
Setting up Crosswork for Secure Zero Touch Provisioning (SZTP)
Introduction
The Crosswork ZTP application provides operators with the ability to provision networking devices remotely.
Using Crosswork ZTP, operators can ship factory-fresh devices to remote locations and connect them to the network without prior configuration. Crosswork ZTP can help upgrade the software image on these devices to a certified version and ensure that the desired Day0 configurations are applied.
Once configured, ZTP onboards the new device to the Cisco Crosswork device inventory. You can then use other Cisco Crosswork applications to monitor and manage the device.
Crosswork ZTP starting from release 2.0 supports Secure ZTP (SZTP) as per RFC 8572. Secure ZTP combines seamless automated devices bring up with security. Network devices can securely establish a connection with the ZTP server and authenticate the onboarding information that it receives. This process helps mitigate security risks that may be present during the provisioning of remote devices.
This tutorial provides a quick guide to get Secure ZTP up and running on Crosswork.
Secure ZTP Lifecycle
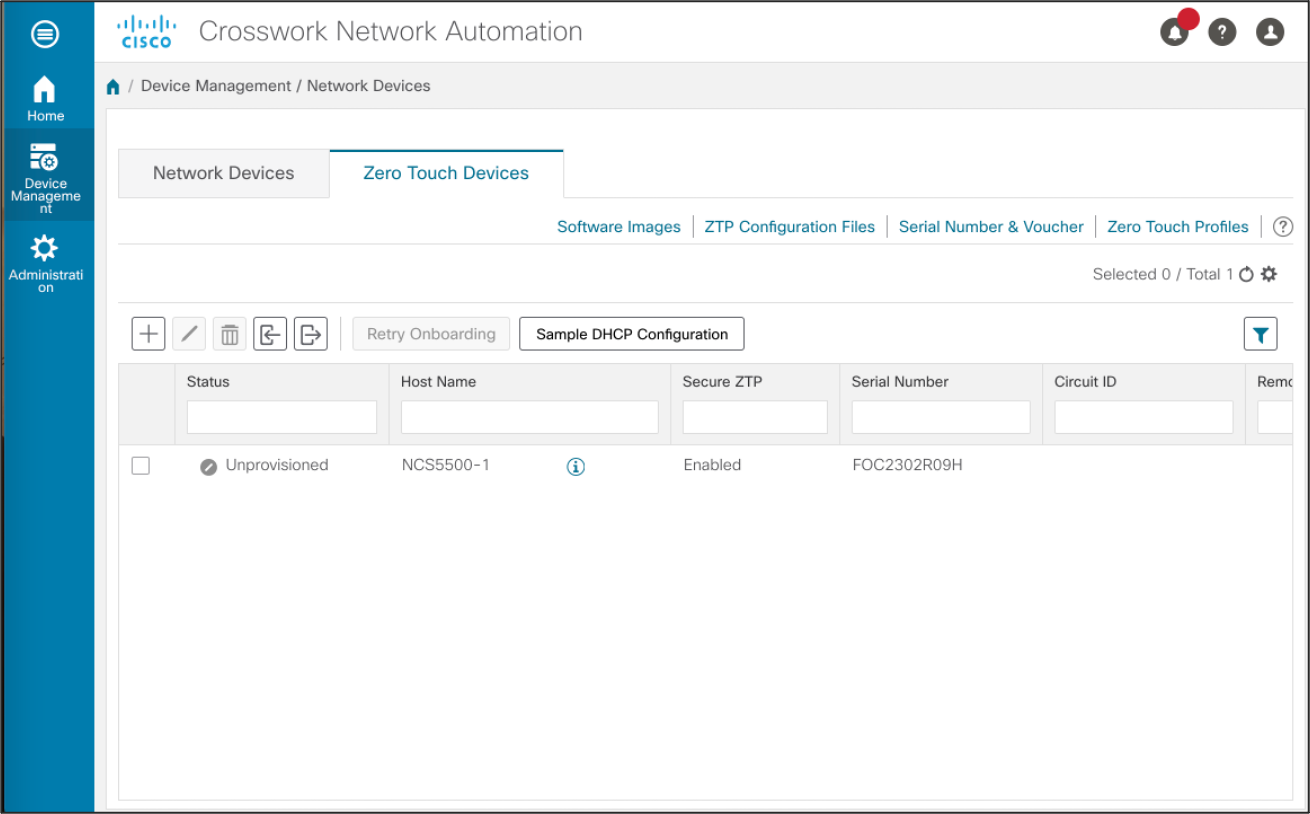
The Secure ZTP device lifecycle begins in the Unprovisioned state. Once the ZTP process initiates, the device and the bootstrap server validate each other and the payload.
The two use the device SUDI, ownership vouchers, and device owner certificates for validation over a HTTP/TLS connection. If this is successful, the device entry transitions to the InProgress state. It connects to the network and starts downloading image and configuration files. The device remains in the InProgress state until it posts a Provisioning Error, ZTP Error, or Provisioned status to Cisco Crosswork.
Once the provisioning process completes successfully, the device will transition to the Provisioned state. Once provisioned, Cisco Crosswork onboards the device. If Cisco NSO is a Cisco Crosswork provider, Cisco NSO will onboard the device. Next, the device state changes to Onboarded. The device is now visible in inventory, and you can monitor and manage it like any other Cisco Crosswork network device.
If any of the validation steps fail, Secure ZTP posts a Provisioning Error. If the image or configuration code fails verification or installation, Secure ZTP posts a ZTP Error instead. Like Classic ZTP, Secure ZTP is successful when the device loads its image and/or configuration successfully, connects with Cisco Crosswork, and posts a Provisioned status. License consumption is the same as in Classic ZTP.
Configuring Crosswork for Secure ZTP (SZTP)
Install ZTP application
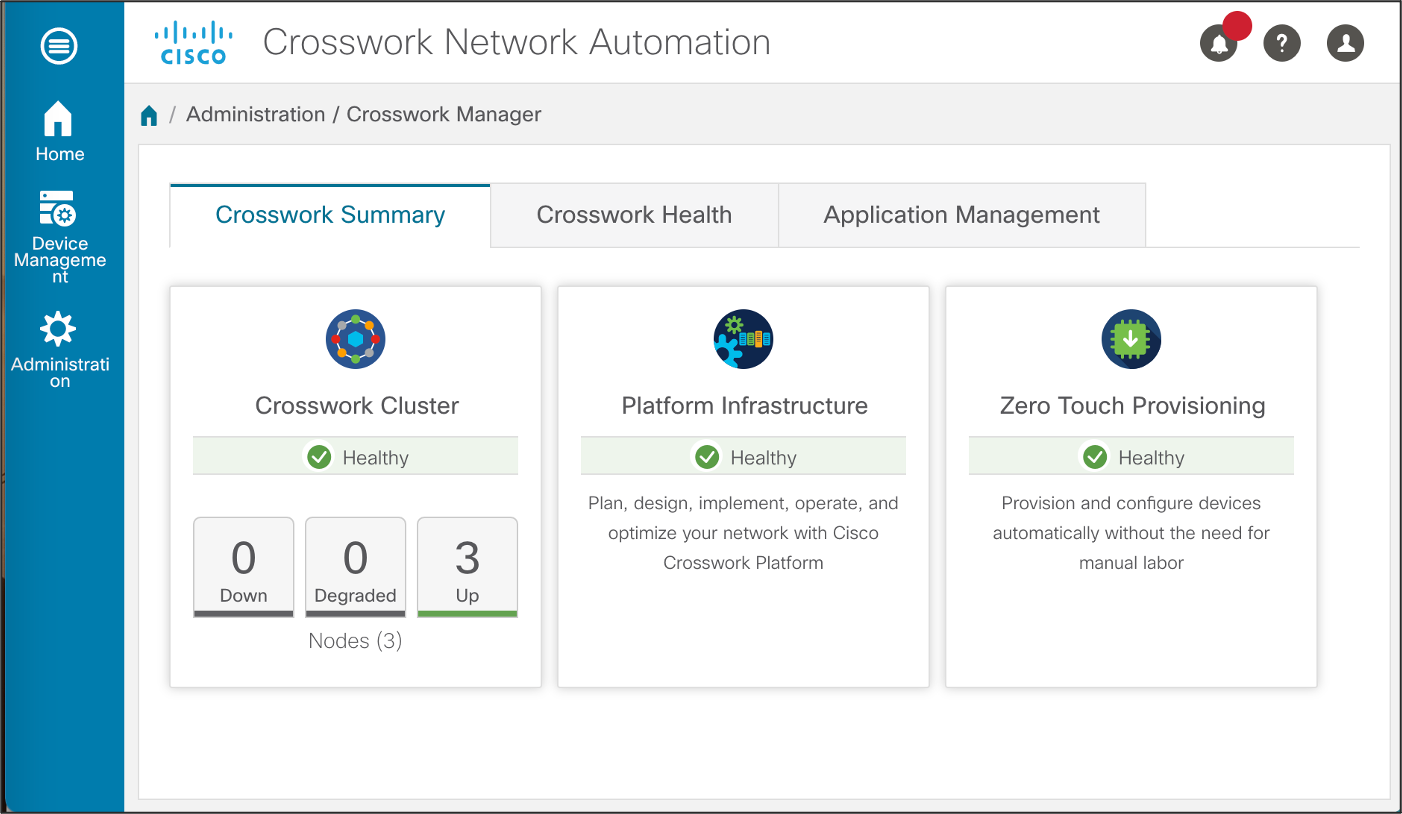
First, ensure that the ZTP application is installed and fully functional. You may verify the status of Crosswork applications by going to Administration > Crosswork Manager > Zero Touch Provisioning. The status indicator under the Zero Touch Provisioning should be in green and this indicates that the application is Healthy.
Upload ZTP certificates
The next step involves uploading the ZTP certificates onto Crosswork. To do so, navigate to Administration > Crosswork Management. The certificates under Crosswork-ZTP-Device-SUDI and Crosswork-ZTP-Owner are the ones which are required to be updated.
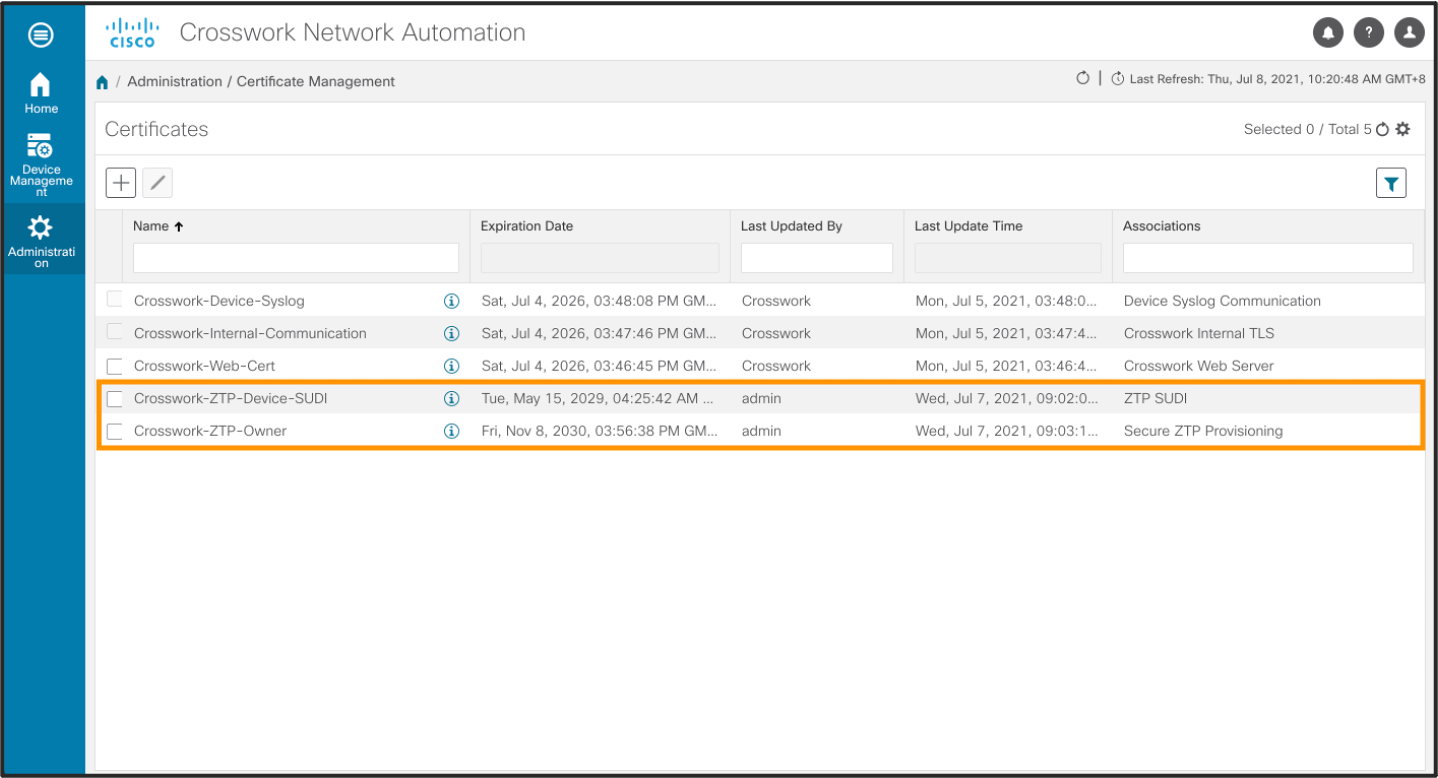
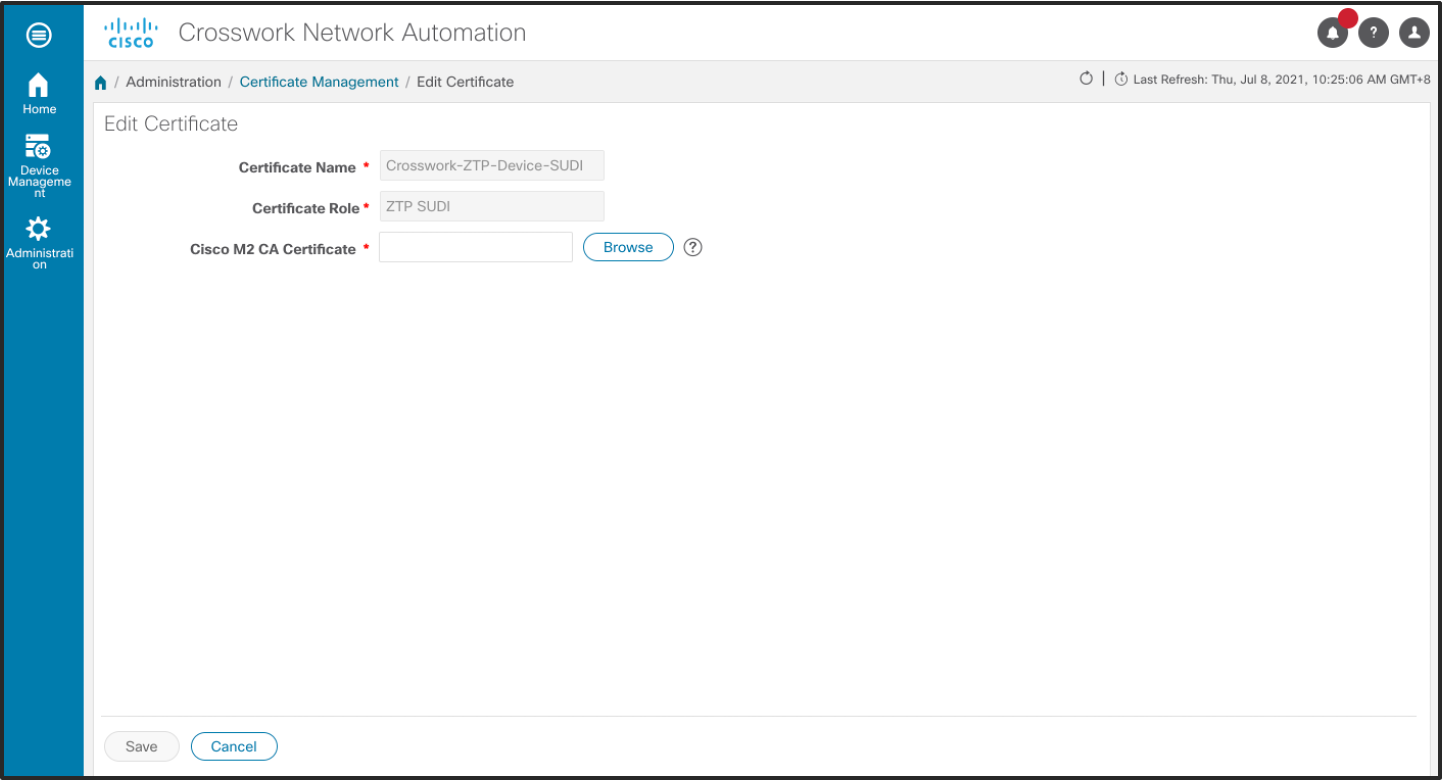
Select Crosswork-ZTP-Device-SUDI and select edit. Use the Browse button to upload the Cisco M2 CA Certificate from your local filestore to Crosswork.
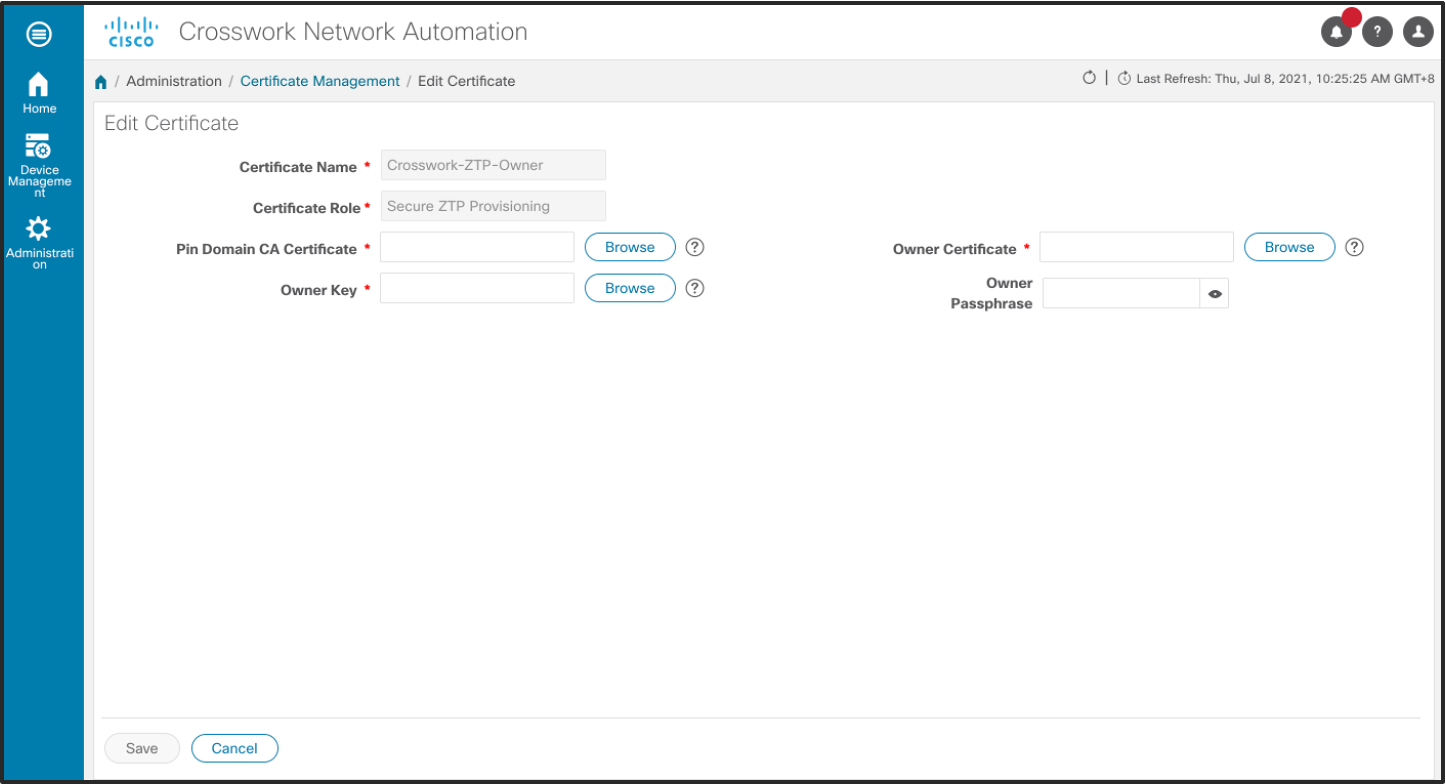
Next, select Crosswork-ZTP-Owner certificate and select edit. Use the Browse button to upload the Pinned-Domain CA Certificate (PDC), Owner Certificate and Owner Key to Crosswork. It is not mandatory to enter a Owner Passphrase.
Note: The following shows how we may generate a Pinned-Domain Certificate (PDC) and Owner Certificate on Crosswork:
# Create Root Key
openssl genrsa -aes256 -out pdc.key 2048
# Create and self sign the Root Certificate
openssl req -config pdc.cnf -key root.key -new -x509 -days 7300 -sha256 -extensions v3_ca -out pdc.crt

[ req_distinguished_name ]
# See <https://en.wikipedia.org/wiki/Certificate_signing_request>.
countryName                     = US
stateOrProvinceName             = CA
localityName                    = SJ
0.organizationName              = Customer
organizationalUnitName          = Network
commonName                      = Network.Customer.PDC.ROOT

[ v3_ca ]
# Extensions for a typical CA (`man x509v3_config`).
subjectKeyIdentifier = hash
authorityKeyIdentifier = keyid:always,issuer
basicConstraints = critical, CA:true
keyUsage = critical, digitalSignature, cRLSign, keyCertSign

# owner keys and certs
openssl genrsa -out owner.key 2048
openssl req -key owner.key -new -sha256 -out owner.csr
openssl x509 -req -in owner.csr -CA pdc.crt -CAkey pdc.key -CAcreateserial -out owner.crt -days 1825
Once the PDC is generated, we may pass along the PDC (in DER format) and device serial number to Cisco or the MASA Server in order to generate the Ownership Voucher for each device which will be used at a later stage. The following command may be used to convert the PDC from PEM to DER format.
openssl x509 -in pdc.pem -inform pem -outform DER -out pdc.der
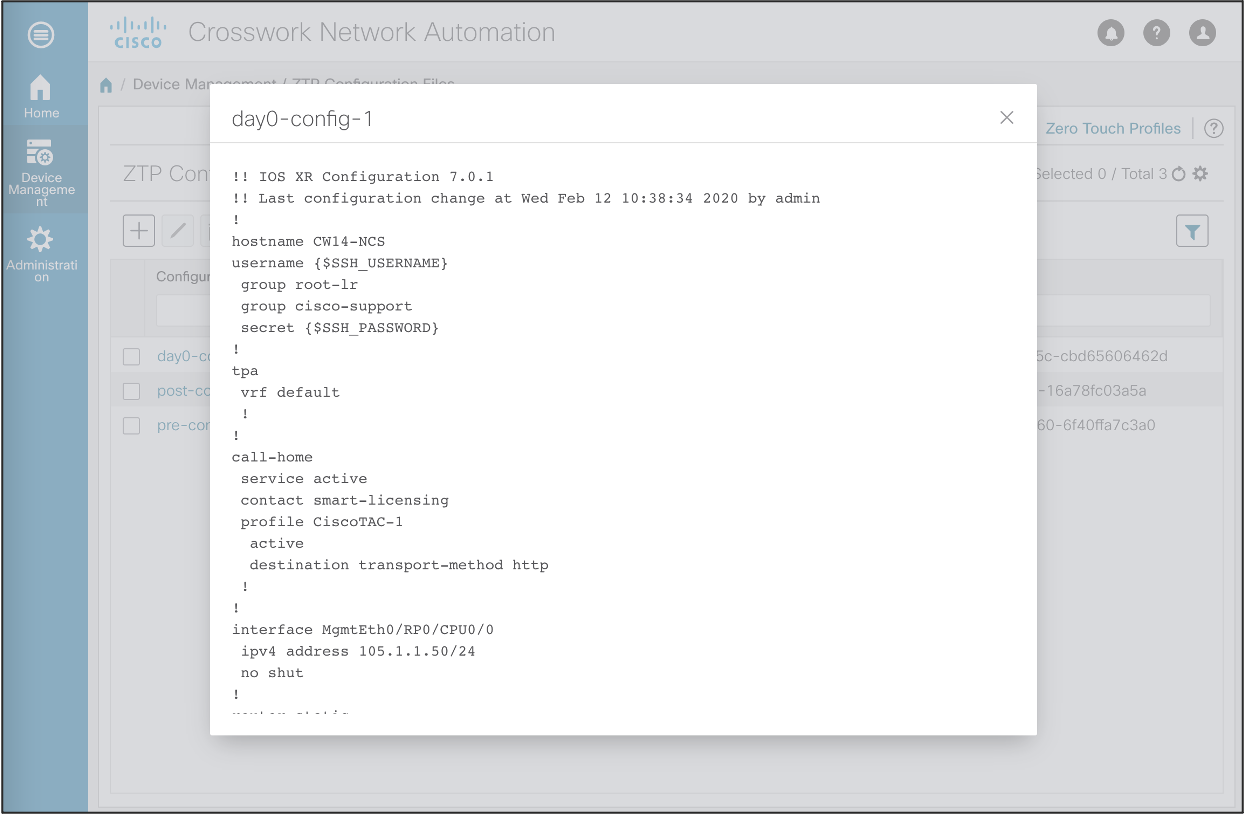
Upload device configuration files
The next step of the ZTP process involves uploading the device Day0 configuration files. These configuration files will be downloaded to the device during the ZTP process. Note that these configuration files may be device configuration files, or scripts which are executed on the devices as part of the ZTP process. Scripts can provide additional functionality which is not possible with a configuration files, such as posting the device status to Crosswork when it has been successfully onboarded.
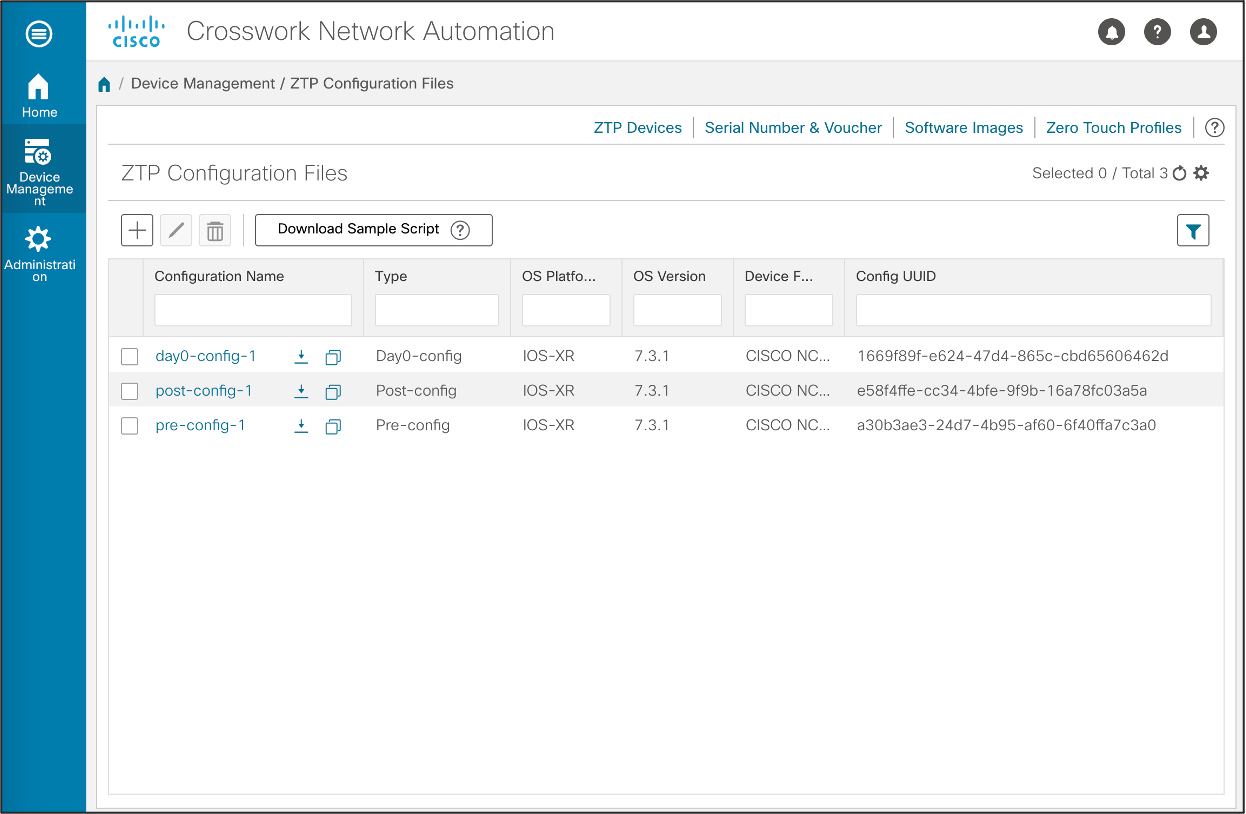
Crosswork supports the use of variable substitution in the configuration files. The variables will be substituted at run-time when a request is made from the ZTP device.
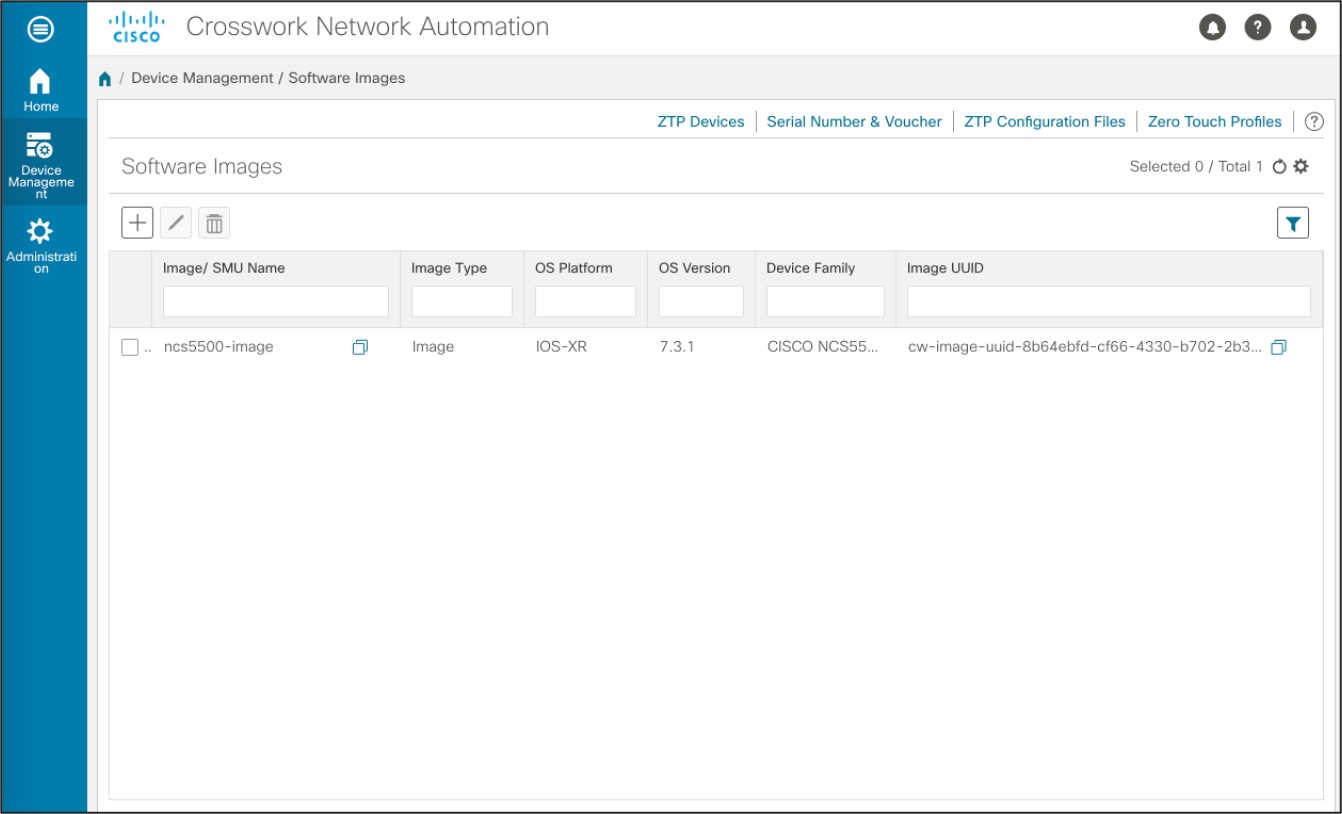
Upload device software images
Upload the desired Software images for use by ZTP.
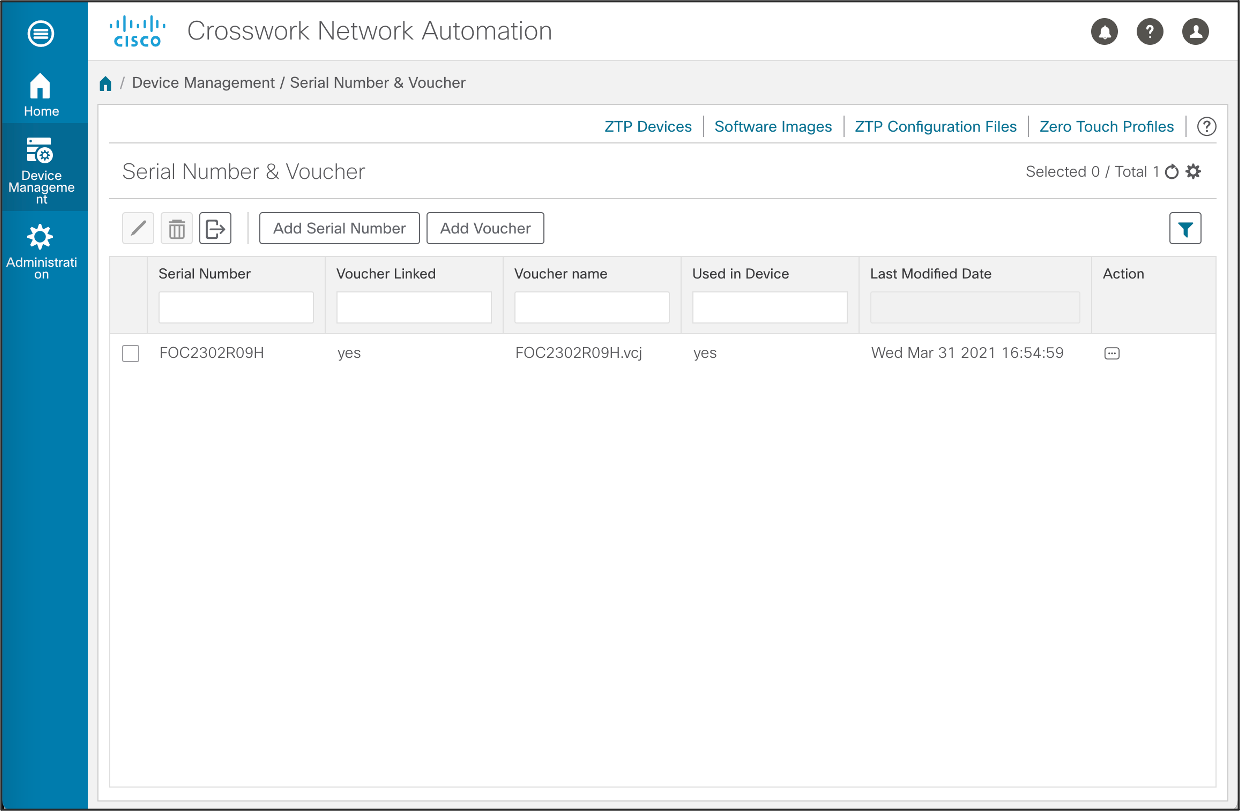
Add device Serial Number and Ownership Voucher
We will need to upload the Serial Number and Ownership Voucher (obtained from Cisco or MASA server) to the ZTP server. This selecion allows us to specify the device serial number, and associate it with a ownership voucher which provides a tamper proof evidence of device ownership for the secure ZTP process.
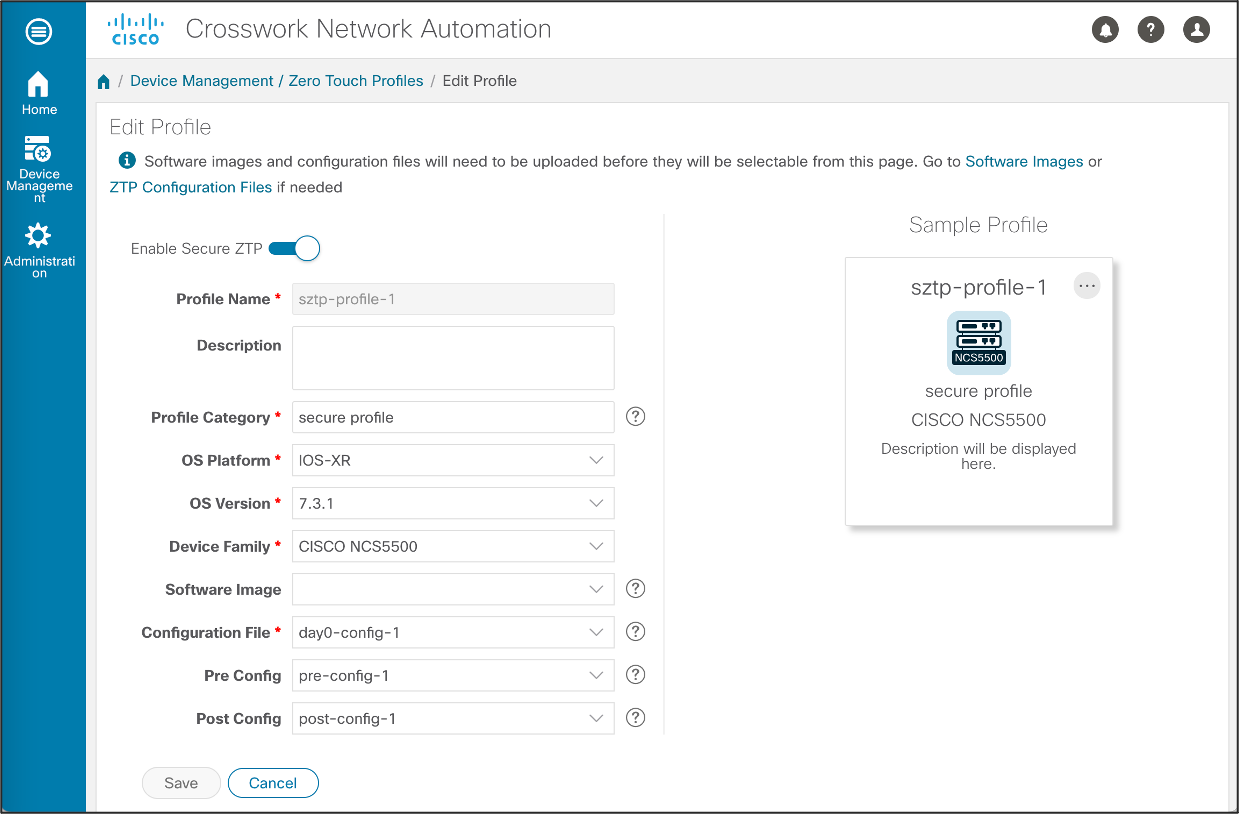
Create Zero Touch Profile
The last part involves the configuration of a Zero Touch Profile.

Add device entry on DHCP server
The following example provides the DHCP server configuration for use in the ZTP/SZTP process:
authoritative;
option sztp-redirect code 143 = text;

default-lease-time 7200;
max-lease-time 7200;

subnet 105.1.1.0 netmask 255.255.255.0 {
  option routers 105.1.1.254;
  option domain-name "cisco.com";
  option domain-name-servers 171.70.168.183;
  option subnet-mask 255.255.255.0;
  range 105.1.1.40 105.1.1.140;
  if exists user-class and option user-class = "iPXE" {
         filename = "http://105.1.2.100:30604/crosswork/imagesvc/v1/device/files/CW-IMG-UUID";
      } else {
option sztp-redirect "https://105.1.2.100:30617/restconf/operations/ietf-sztp-bootstrap-server:get-bootstrap-data";
  }

}
We are now ready to process with the Secure ZTP process on the device.
Leave a Comment