
Using Service Layer APIs with Vagrant IOS-XR
Introduction
If you’ve haven’t played around with the vagrant IOS-XR box yet, now might be a good time to take a look at the following tutorials and get your environment set up:
Generate API Key: Generate an API Key using your CCO (cisco.com) ID to download the Vagrant box for IOS-XR with SL-API support.
Vagrant IOS-XR Quick Start: Use the downloaded box and learn how to boot it on your laptop and play with a couple of sample topologies.
Bootstrap XR Configuration with Vagrant (optional): Learn how a simple shell provisioner can be used to apply a configuration on boot with a Vagrant IOS-XR box.
Once you have everything set up, you should be able to see the IOS-XRv vagrant box in the vagrant box list command:
  AKSHSHAR-M-K0DS:~ akshshar$ vagrant box list
  IOS-XRv (virtualbox, 0)
  AKSHSHAR-M-K0DS:~ akshshar$
This tutorial is meant to get you up and running with an environment to play with the Service Layer APIs on IOS-XR. An introduction to these APIs can be found here:
https://xrdocs.io/cisco-service-layer/blogs/2017-09-25-service-layer-intro/
To get more details on the APIs, check out the API-Docs section:
In this tutorial we set up a GRPC/python environment that may be used to build your own python client to interact with the SL APIs.
A couple c++ clients can be found here:
https://github.com/cisco-service-layer/service-layer-objmodel/tree/master/grpc/cpp
Run the build_tutorials.sh script in a suitable environment (Ubuntu 16.04 for example) to install dependencies, build the library and subsequently build the tutorials. One tutorial is the quickstart client located here:
https://github.com/Cisco-Service-Layer/service-layer-objmodel/tree/master/grpc/cpp/src/tutorial
that pushes a few routes into the IOS-XR RIB using service-layer APIs. A similar more exhaustive client can be found here:
that pushes a 100000 routes into the IOS-XR RIB by default and calculates the programming rate.
A go client binary is also included as part of the “service-layer-objmodel” code itself at the following link: (You will also find a quick-start go client code located there)
https://github.com/cisco-service-layer/service-layer-objmodel/tree/master/grpc/go/src/tutorial
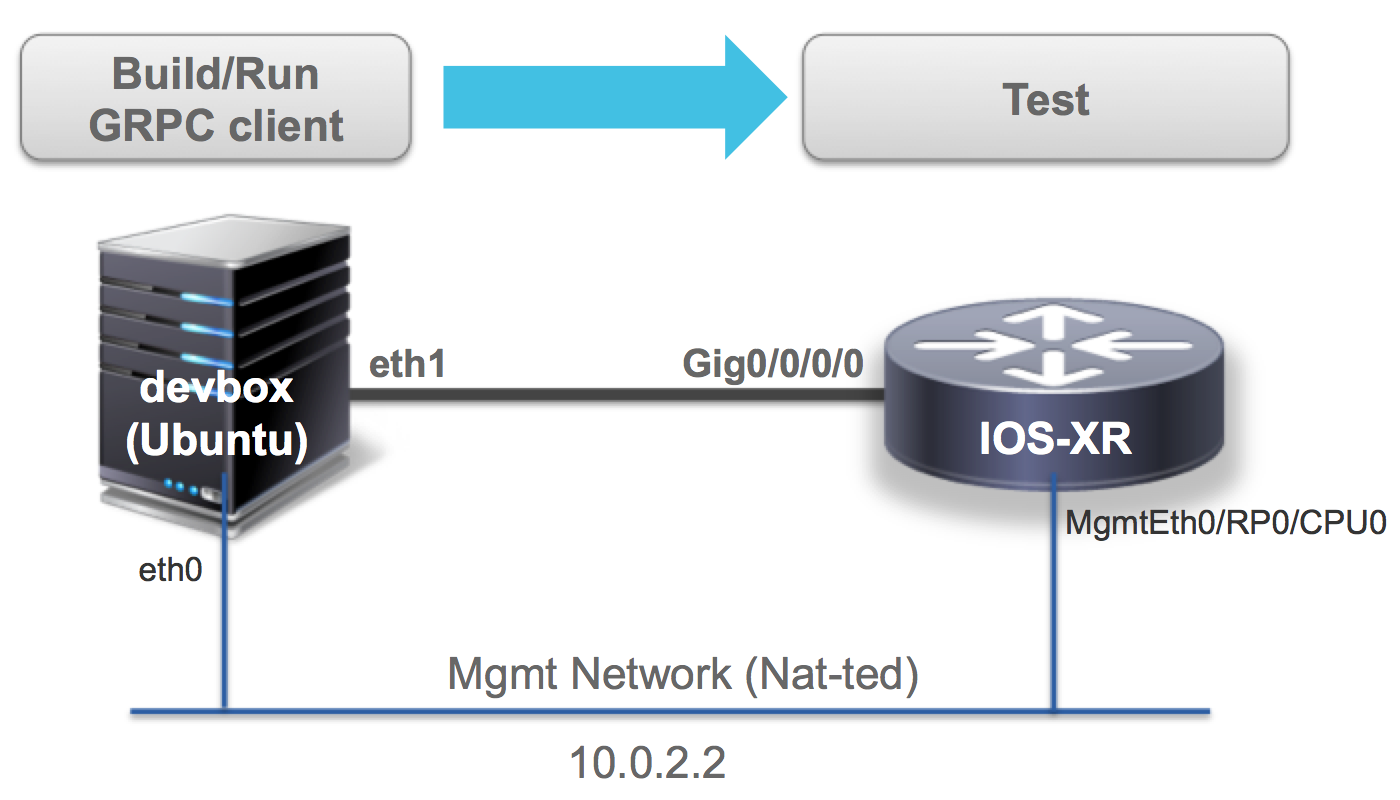
Clone the development topology
We’ll use a simple Vagrant topology as shown below:
Clone the vagrant-examples repo to get started:
AKSHSHAR-M-K0DS:~ akshshar$ git clone https://github.com/cisco-service-layer/vagrant-examples.git
Cloning into 'vagrant-examples'...
remote: Counting objects: 78, done.
remote: Compressing objects: 100% (42/42), done.
remote: Total 78 (delta 13), reused 78 (delta 13), pack-reused 0
Unpacking objects: 100% (78/78), done.
Checking connectivity... done.
AKSHSHAR-M-K0DS:~ akshshar$
AKSHSHAR-M-K0DS:~ akshshar$cd vagrant-examples/iosxr-grpc-setup/
AKSHSHAR-M-K0DS:iosxr-grpc-setup akshshar$
AKSHSHAR-M-K0DS:iosxr-grpc-setup akshshar$ ls
Vagrantfile	configs		scripts
AKSHSHAR-M-K0DS:iosxr-grpc-setup akshshar$
Understand the Vagrantfile
The Vagrantfile located under vagrant-examples/iosxr-grpc-setup/ is shown in its entirety below:
Notice the port forwarding enabled for the rtr node (IOS-XR) which corresponds to the grpc server port (57344) configured as part of the bootstrap script. This makes the port accessible on the management port (nat network for Vagrant).
Further, eth1 of the devbox is connected to GigabitEthernet0/0/0/0 of the IOS-XR vagrant node,making the grpc server available on this path as well.
Vagrant.configure(2) do |config|


   config.vm.define "rtr" do |node|
      node.vm.box =  "thinxr-aug3"

      node.vm.network "forwarded_port", guest: 57344, host: 57344
      # gig0/0/0 connected to "link1"
      # auto_config is not supported for XR, set to false

      node.vm.network :private_network, virtualbox__intnet: "link1", auto_config: false


      #Source a config file and apply it to XR

      node.vm.provision "file", source: "configs/rtr_config", destination: "/home/vagrant/rtr_config"

      node.vm.provision "shell" do |s|
          s.path =  "scripts/apply_config.sh"
          s.args = ["/home/vagrant/rtr_config"]
      end

    end


    config.vm.define "devbox" do |node|
      node.vm.box =  "ciscoxr/grpc-ubuntu-16.04"

      # eth1 connected to link1
      # auto_config is supported for an ubuntu instance

      node.vm.network :private_network, virtualbox__intnet: "link1", ip: "11.1.1.20"

    end

end
The following configuration is applied to the IOS-XR instance on boot:
(located @ vagrant-examples/iosxr-grpc-setup/configs/rtr_config)
!! XR configuration
!
interface GigabitEthernet0/0/0/0
ip address 11.1.1.10/24
no shutdown
!
grpc
  port 57344
  address-family ipv4
  service-layer
!
!
end
This configuration is in addition to a dhcp client configured on the MgmtEth0/RP0/CPU0/0 port and a user with credentials: username/password = vagrant/vagrant. These are set up in the vagrant box by default.
GRPC/Python environment (devbox)
Use our Vagrant box
You’ll need a few dependencies installed to construct your own grpc python client. To make things easier we’ve already created an ubuntu-16.04 vagrant box with everything installed. If you notice in the above Vagrantfile, we specify a name for a special Vagrant box:
 config.vm.define "devbox" do |node|
      node.vm.box =  "ciscoxr/grpc-ubuntu-16.04"

      # eth1 connected to link1
ciscoxr/grpc-ubuntu-16.04 is up on Atlas for your convenience and you can include it in your Vagrantfiles as shown above.
To bring up the devbox, simply issue a “vagrant up devbox” inside the cloned directory:
AKSHSHAR-M-K0DS:iosxr-grpc-setup akshshar$ pwd
/Users/akshshar/vagrant-examples/iosxr-grpc-setup
AKSHSHAR-M-K0DS:iosxr-grpc-setup akshshar$
AKSHSHAR-M-K0DS:iosxr-grpc-setup akshshar$ ls
Vagrantfile	configs		scripts
AKSHSHAR-M-K0DS:iosxr-grpc-setup akshshar$ vagrant up devbox
Bringing machine 'devbox' up with 'virtualbox' provider...
==> devbox: Importing base box 'ciscoxr/grpc-ubuntu-16.04'...

----------------------- snip output --------------------------
Hop into the devbox once up:
vagrant ssh devbox
All dependencies should be installed already:
vagrant@vagrant:~$ protoc --version
libprotoc 3.0.0
vagrant@vagrant:~$
vagrant@vagrant:~$ pip show grpcio
---
Name: grpcio
Version: 0.13.1
Location: /usr/local/lib/python2.7/dist-packages
Requires: six, enum34, futures, protobuf
vagrant@vagrant:~$
Build your own?
If you’d much rather build your own devbox environment, then let’s use a pristine Ubuntu 16.04 box. Make the following change in the Vagrantfile:
 config.vm.define "devbox" do |node|
      node.vm.box =  "bento/ubuntu-16.04"

      # eth1 connected to link1
You will need the following steps:
Bring up the devbox first:
AKSHSHAR-M-K0DS:iosxr-grpc-setup akshshar$ pwd
/Users/akshshar/vagrant-examples/iosxr-grpc-setup
AKSHSHAR-M-K0DS:iosxr-grpc-setup akshshar$
AKSHSHAR-M-K0DS:iosxr-grpc-setup akshshar$ ls
Vagrantfile	configs		scripts
AKSHSHAR-M-K0DS:iosxr-grpc-setup akshshar$ vagrant up devbox
Bringing machine 'devbox' up with 'virtualbox' provider...
==> devbox: Importing base box 'bento/ubuntu-16.04'...

----------------------- snip output --------------------------
Hop into the devbox
vagrant ssh devboxBuild the c++ dependencies (using build_libiosxrsl.sh from the service-layer-objmodel git repo):
vagrant@vagrant:~$ git clone https://github.com/Cisco-Service-Layer/service-layer-objmodel.git
Cloning into 'service-layer-objmodel'...
remote: Counting objects: 332, done.
remote: Compressing objects: 100% (17/17), done.
remote: Total 332 (delta 5), reused 0 (delta 0), pack-reused 315
Receiving objects: 100% (332/332), 7.58 MiB | 3.20 MiB/s, done.
Resolving deltas: 100% (165/165), done.
Checking connectivity... done.
vagrant@vagrant:~$
vagrant@vagrant:~$
vagrant@vagrant:~$
vagrant@vagrant:~$ cd service-layer-objmodel/
vagrant@vagrant:~/service-layer-objmodel$ cd grpc/cpp/
vagrant@vagrant:~/service-layer-objmodel/grpc/cpp$
vagrant@vagrant:~/service-layer-objmodel/grpc/cpp$
vagrant@vagrant:~/service-layer-objmodel/grpc/cpp$ sudo ./build_libiosxrsl.sh
+ apt-get update
Get:1 http://security.ubuntu.com/ubuntu xenial-security InRelease [107 kB]
Ign:2 http://security.ubuntu.com/ubuntu xenial-security/main amd64 Packages
Hit:3 http://archive.ubuntu.com/ubuntu xenial InRelease
Get:4 http://security.ubuntu.com/ubuntu xenial-security/main i386 Packages [472 kB]
Ign:5 http://security.ubuntu.com/ubuntu xenial-security/main Translation-en
Get:6 http://security.ubuntu.com/ubuntu xenial-security/restricted amd64 Packages [7,204 B]
Ign:7 http://security.ubuntu.com/ubuntu xenial-security/restricted i386 Packages
Install basic dependencies for the required python packages:
sudo apt-get update
sudo apt-get -y install python-pip
Now install the python grpc and py2-ipaddress packages:
sudo pip install six grpcio=='0.13.1' py2-ipaddress=='3.4'
That’s it! You’re now ready to launch the router and test things out.
Clone the Object Model Code into Devbox
By now, you should have your devbox up and running with the dependencies installed.
Clone the Object Model code:
The following command must be run inside the devbox
git clone https://github.com/cisco-service-layer/service-layer-objmodel.git ~/service-layer-objmodel
Bring up the Router
On your laptop, bring up the router connected to the devbox:
AKSHSHAR-M-K0DS:iosxr-grpc-setup akshshar$ pwd
/Users/akshshar/vagrant-examples/iosxr-grpc-setup
AKSHSHAR-M-K0DS:iosxr-grpc-setup akshshar$ ls
Vagrantfile	configs		scripts
AKSHSHAR-M-K0DS:iosxr-grpc-setup akshshar$ vagrant up rtr
Bringing machine 'rtr' up with 'virtualbox' provider...
==> rtr: Importing base box 'IOS-XRv'...

----------------------- snip output --------------------------
Check connectivity from the devbox
Once the router is up, you should be able to issue vagrant status to see both nodes running on your laptop:
AKSHSHAR-M-K0DS:iosxr-grpc-setup akshshar$ pwd
/Users/akshshar/vagrant-examples/iosxr-grpc-setup
AKSHSHAR-M-K0DS:iosxr-grpc-setup akshshar$
AKSHSHAR-M-K0DS:iosxr-grpc-setup akshshar$ vagrant status
Current machine states:

rtr                       running (virtualbox)
devbox                    running (virtualbox)

This environment represents multiple VMs. The VMs are all listed
above with their current state. For more information about a specific
VM, run `vagrant status NAME`.
AKSHSHAR-M-K0DS:iosxr-grpc-setup akshshar$
Jump into the devbox to see that:
vagrant ssh devbox
You’re able to ping the directly connected interface of the router (Gig0/0/0/0 at 11.1.1.10):
vagrant@vagrant:~$ ping 11.1.1.10
PING 11.1.1.10 (11.1.1.10) 56(84) bytes of data.
64 bytes from 11.1.1.10: icmp_seq=1 ttl=255 time=1.48 ms
64 bytes from 11.1.1.10: icmp_seq=2 ttl=255 time=2.12 ms
64 bytes from 11.1.1.10: icmp_seq=3 ttl=255 time=2.49 ms
You’re able to connect to port 57344 (opened up by the grpc server) on the router:
- Via Gig0/0/0/0
vagrant@vagrant:~$ telnet 11.1.1.10 57344 Trying 11.1.1.10... Connected to 11.1.1.10. Escape character is '^]'.- Via MgmtEth0/RP0/CPU0/0
vagrant@vagrant:~$ telnet 10.0.2.2 57344
Trying 10.0.2.2...
Connected to 10.0.2.2.
Escape character is '^]'.
Perfect! You’re now all set to try out the python grpc client code.
Run the python unit-tests
Still inside the devbox, set the SERVER_IP and SERVER_PORT variables:
You have two options:
- If you wish to use the Management Network, then
SERVER_IP=10.0.2.2 - If you wish to use the Gig0/0/0/0 Network, then
SERVER_IP=11.1.1.10
For example, if we use the Management Network:
vagrant@vagrant:~$
vagrant@vagrant:~$ export SERVER_IP=10.0.2.2
vagrant@vagrant:~$ export SERVER_PORT=57344
vagrant@vagrant:~$
Now, run the python unit-tests to verify that everything is fine:
cd ~/service-layer-objmodel/grpc/python/src/
python -m unittest -v tests.test_lindt
You will see a slew of messages pass by on the screen, as the unit-tests program routes into the router using the Service Layer APIs:
 D0808 12:23:28.989076624    1983 ev_posix.c:101]             Using polling engine: poll
test_000_global_init (tests.test_lindt.TestSuite_000_Global) ... Waiting to hear from Global event...
Server Version 0.0.0
Global Event Notification Received! Waiting for events...
ok
test_001_get_globals (tests.test_lindt.TestSuite_000_Global) ... Max VRF Name Len     : 33
Max Iface Name Len   : 64
Max Paths per Entry  : 128
Max Prim per Entry   : 64
Max Bckup per Entry  : 64
Max Labels per Entry : 3
Min Prim Path-id     : 1
Max Prim Path-id     : 64
Min Bckup Path-id    : 65
Max Bckup Path-id    : 128
Max Remote Bckup Addr: 2
ok
test_000_get_globals (tests.test_lindt.TestSuite_001_Route_IPv4) ... Max v4 VRF Reg Per VRF Msg : 512
Max v4 Routes per Route Msg: 1024
ok
test_001_vrf_registration_add (tests.test_lindt.TestSuite_001_Route_IPv4) ... ok
test_002_route_add (tests.test_lindt.TestSuite_001_Route_IPv4) ... ok
test_003_00_route_update (tests.test_lindt.TestSuite_001_Route_IPv4) ... ok
test_003_01_route_update_nhlfe_connected (tests.test_lindt.TestSuite_001_Route_IPv4) ... ok
test_003_02_route_update_nhlfe_ecmp (tests.test_lindt.TestSuite_001_Route_IPv4) ... ok
test_003_03_route_update_nhlfe_non_connected (tests.test_lindt.TestSuite_001_Route_IPv4) ... ok
test_003_04_route_update_route_connected (tests.test_lindt.TestSuite_001_Route_IPv4) ... ok
test_003_05_route_update_route_ecmp (tests.test_lindt.TestSuite_001_Route_IPv4) ... ok

------------------------- snip output ----------------------------


----------------------------------------------------------------------
Ran 139 tests in 22.700s

OK
Writing your own Python-GRPC client
You now have a development environment up and running on your laptop.
To understand how to build your own python-grpc client to interact with Service Layer APIs, head over to API-Docs section where you can find more in-depth information on the available Services, Messsages and Error codes:
Onbox SL-API Clients
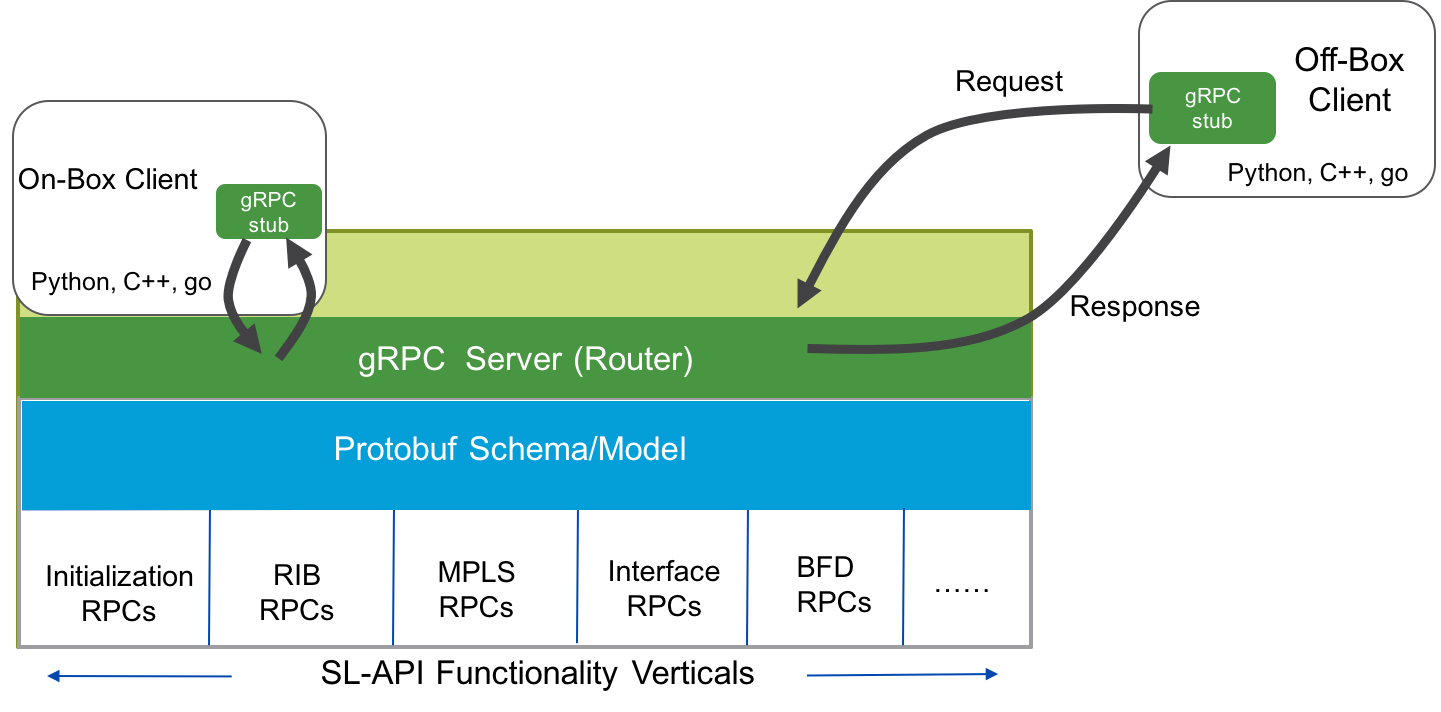
Service Layer API in IOS-XR is designed with an RPC mechanism (gRPC) so that clients can be hosted either onbox or offbox without any changes to the code.
To demonstrate this, let’s pull in a pre-built docker image on the running vagrant IOS-XRv instance before running the tutorials from the objmodel git repo locally on the router inside the docker instance.
Configure Default route through management port
Set up the configuration to use the management port as the default route on the vagrant XR instance. The changes needed are shown below. You will notice that the ip route output now points to fwd_ew interface enabling packets to exit the management port directly for downloading the docker image.
RP/0/RP0/CPU0:ios#show  configuration commit changes last 1
Tue Jul 17 09:40:24.452 UTC
Building configuration...
!! IOS XR Configuration version = 6.2.2.25I
tpa
 vrf default
  address-family ipv4
   default-route east-west
  !
 !
!
end

RP/0/RP0/CPU0:ios#
RP/0/RP0/CPU0:ios#
RP/0/RP0/CPU0:ios#bash
Tue Jul 17 09:41:55.477 UTC
[host:~]$
[host:~]$ ip route
default dev fwd_ew  scope link  src 10.0.2.15
10.0.2.0/24 dev Mg0_RP0_CPU0_0  proto kernel  scope link  src 10.0.2.15
[host:~]$
[host:~]$
[host:~]$
Further, set up the domain name server. This could be your corporate DNS or a more general purpose DNS like 8.8.8.8:
[host:~]$ cat /etc/resolv.conf
nameserver 8.8.8.8
[host:~]$
Pull Docker image with gRPC client dependencies
Now pull the required docker image:
[host:~]$ docker pull akshshar/grpc-gopycpp
Using default tag: latest
latest: Pulling from akshshar/grpc-gopycpp
297061f60c36: Pull complete
e9ccef17b516: Pull complete
dbc33716854d: Pull complete
8fe36b178d25: Pull complete
686596545a94: Pull complete
c6a0dd213130: Pull complete
83b91b2d9b70: Pull complete
367064675a13: Pull complete
726e11d920f9: Pull complete
Digest: sha256:b04db96e6f12a9940af45bd504d809d0d7c7e5df7458a2dcf2d9e7e49a3fe90e
Status: Downloaded newer image for akshshar/grpc-gopycpp:latest
Launch the docker instance
To keep things simple, we launch the docker instance using --net=host to inherit the global-vrf (or default vrf) network namespace as the default namespace of the docker container instance:
[host:~]$ docker run -itd --name grpc-client --net=host  akshshar/grpc-gopycpp bash
f4d76b0166f4d70c7c36801429b9c7443d0ad3f472b9b3762aa979c369e2e526
You can exec into the docker instance using docker exec from the XR bash shell:
[host:~]$ docker exec -it grpc-client bash
root@host:/#
root@host:/#
Clone the service-layer-objmodel code
Clone the service-layer-objmodel git repo inside the running docker instance (post docker exec):
root@host:~#
root@host:~#
root@host:~#git clone  https://github.com/cisco-service-layer/service-layer-objmodel.git ~/service-layer-objmodel

Cloning into 'service-layer-objmodel'...
remote: Counting objects: 320, done.
remote: Compressing objects: 100% (5/5), done.
remote: Total 320 (delta 0), reused 0 (delta 0), pack-reused 315
Receiving objects: 100% (320/320), 7.58 MiB | 1.63 MiB/s, done.
Resolving deltas: 100% (160/160), done.
Checking connectivity... done.
root@host:~#
Running a c++ onbox client
Build the c++ tutorials
cd into the ~/service-layer-objmodel/grpc/cpp/ directory and run the ./build_tutorials.sh script which will build the c++ tutorials (quickstart and rshuttle):
root@host:~# cd ~/service-layer-objmodel/grpc/cpp/
root@host:~/service-layer-objmodel/grpc/cpp# ls
build_libiosxrsl.sh  build_tutorials.sh  clean.sh  gen-bindings.sh  src
root@host:~/service-layer-objmodel/grpc/cpp# ./build_tutorials.sh
+++ dirname ./build_tutorials.sh
++ cd .
+++ pwd
++ echo /root/service-layer-objmodel/grpc/cpp
+ SCRIPT_DIR=/root/service-layer-objmodel/grpc/cpp
+ ./build_libiosxrsl.sh
++ pkg-config --exists protobuf
++ pkg-config --modversion protobuf
+ PROTOBUF_INSTALLED_VERSION=3.5.0
++ pkg-config --exists grpc


............


g++ -g -std=c++11 -I/usr/local/include -pthread -c -o quickstart.o quickstart.cc
g++ quickstart.o -L/usr/local/lib  -I/usr/local/include -lgrpc++_unsecure -lgrpc -lprotobuf -lpthread -ldl -liosxrsl -o quickstart
+ cd /root/service-layer-objmodel/grpc/cpp/src/tutorial/rshuttle
+ make
g++  -g -std=c++11 -I/usr/local/include -pthread  -c -o ServiceLayerMain.o ServiceLayerMain.cpp
g++  -g -std=c++11 -I/usr/local/include -pthread  -c -o ServiceLayerRoute.o ServiceLayerRoute.cpp
g++  -g -std=c++11 -I/usr/local/include -pthread  -c -o ServiceLayerAsyncInit.o ServiceLayerAsyncInit.cpp
g++ ServiceLayerMain.o ServiceLayerRoute.o ServiceLayerAsyncInit.o -L/usr/local/lib -I/usr/local/include -lgrpc++_unsecure -lgrpc -lprotobuf -lpthread -ldl -liosxrsl -lglog  -o servicelayermain
root@host:~/service-layer-objmodel/grpc/cpp#
Run c++ quickstart tutorial
Now export SERVER_IP and SERVER_PORT environment variables to indicate the connection parameters for the gRPC server running inside the XR stack. Since we’ll be running the clients locally on the router inside the docker instance (with the shared global-vrf network namespace) we simply need to connect to localhost (127.0.0.1) on the gRPC port configured in the XR config (57344 in this case):
root@host:~/service-layer-objmodel/grpc/cpp# cd src/tutorial/
root@host:~/service-layer-objmodel/grpc/cpp/src/tutorial# export SERVER_IP=127.0.0.1
root@host:~/service-layer-objmodel/grpc/cpp/src/tutorial# export SERVER_PORT=57344
root@host:~/service-layer-objmodel/grpc/cpp/src/tutorial# ./quickstart


Connecting to grpc server at 127.0.0.1:57344


###########################
Transmitted message: IOSXR-SL INIT SubVer: 1
###########################


Server returned
Successfully Initialized, connection Established!


###########################
Transmitted message: IOSXR-SL VRF Oper: SL_REGOP_REGISTER
VrfRegMsgs {
  VrfName: "default"
  AdminDistance: 10
  VrfPurgeIntervalSeconds: 500
}
###########################


RPC call was successful, checking response...
IPv4 Vrf Operation:1 Successful


###########################
Transmitted message: IOSXR-SL VRF Oper: SL_REGOP_EOF
VrfRegMsgs {
  VrfName: "default"
  AdminDistance: 10
  VrfPurgeIntervalSeconds: 500
}
###########################


RPC call was successful, checking response...
IPv4 Vrf Operation:3 Successful


###########################
Transmitted message: IOSXR-SL VRF Oper: SL_REGOP_REGISTER
VrfRegMsgs {
  VrfName: "default"
  AdminDistance: 10
  VrfPurgeIntervalSeconds: 500
}
###########################


RPC call was successful, checking response...
IPv6 Vrf Operation: 1 successful


###########################
Transmitted message: IOSXR-SL VRF Oper: SL_REGOP_EOF
VrfRegMsgs {
  VrfName: "default"
  AdminDistance: 10
  VrfPurgeIntervalSeconds: 500
}
###########################


RPC call was successful, checking response...
IPv6 Vrf Operation: 3 successful


###########################
Transmitted message: IOSXR-SL RouteV4 Oper: SL_OBJOP_UPDATE
VrfName: "default"
Routes {
  Prefix: 335544576
  PrefixLen: 24
  RouteCommon {
    AdminDistance: 120
  }
  PathList {
    NexthopAddress {
      V4Address: 234946826
    }
    NexthopInterface {
      Name: "GigabitEthernet0/0/0/0"
    }
  }
}
Routes {
  Prefix: 385876224
  PrefixLen: 24
  RouteCommon {
    AdminDistance: 120
  }
  PathList {
    NexthopAddress {
      V4Address: 234946826
    }
    NexthopInterface {
      Name: "GigabitEthernet0/0/0/0"
    }
  }
}
###########################


RPC call was successful, checking response...
IPv4 Route Operation:2 Successful


###########################
Transmitted message: IOSXR-SL RouteV6 Oper: SL_OBJOP_UPDATE
VrfName: "default"
Routes {
  Prefix: " \002\000\252\000\000\000\000\000\000\000\000\000\000\000\000"
  PrefixLen: 64
  RouteCommon {
    AdminDistance: 120
  }
  PathList {
    NexthopAddress {
      V6Address: " \002\000\256\000\000\000\000\000\000\000\000\000\000\000\003"
    }
    NexthopInterface {
      Name: "GigabitEthernet0/0/0/0"
    }
  }
}
###########################


RPC call was successful, checking response...
IPv6 Route Operation:2 Successful
Press control-c to quit

Received Heartbeat
Open another ssh session into the XR vagrant box and view the effect on the route table while this client is running:
RP/0/RP0/CPU0:ios#show route
Tue Jul 17 10:11:54.628 UTC

Codes: C - connected, S - static, R - RIP, B - BGP, (>) - Diversion path
       D - EIGRP, EX - EIGRP external, O - OSPF, IA - OSPF inter area
       N1 - OSPF NSSA external type 1, N2 - OSPF NSSA external type 2
       E1 - OSPF external type 1, E2 - OSPF external type 2, E - EGP
       i - ISIS, L1 - IS-IS level-1, L2 - IS-IS level-2
       ia - IS-IS inter area, su - IS-IS summary null, * - candidate default
       U - per-user static route, o - ODR, L - local, G  - DAGR, l - LISP
       A - access/subscriber, a - Application route
       M - mobile route, r - RPL, (!) - FRR Backup path

Gateway of last resort is 10.0.2.2 to network 0.0.0.0

S*   0.0.0.0/0 [1/0] via 10.0.2.2, 04:37:28, MgmtEth0/RP0/CPU0/0
C    10.0.2.0/24 is directly connected, 04:37:28, MgmtEth0/RP0/CPU0/0
L    10.0.2.15/32 is directly connected, 04:37:28, MgmtEth0/RP0/CPU0/0
C    11.1.1.0/24 is directly connected, 04:37:06, GigabitEthernet0/0/0/0
L    11.1.1.10/32 is directly connected, 04:37:06, GigabitEthernet0/0/0/0
a    20.0.1.0/24 [120/0] via 14.1.1.10, 00:00:18, GigabitEthernet0/0/0/0
a    23.0.1.0/24 [120/0] via 14.1.1.10, 00:00:18, GigabitEthernet0/0/0/0
RP/0/RP0/CPU0:ios#   show route ipv6
Tue Jul 17 10:12:02.168 UTC

Codes: C - connected, S - static, R - RIP, B - BGP, (>) - Diversion path
       D - EIGRP, EX - EIGRP external, O - OSPF, IA - OSPF inter area
       N1 - OSPF NSSA external type 1, N2 - OSPF NSSA external type 2
       E1 - OSPF external type 1, E2 - OSPF external type 2, E - EGP
       i - ISIS, L1 - IS-IS level-1, L2 - IS-IS level-2
       ia - IS-IS inter area, su - IS-IS summary null, * - candidate default
       U - per-user static route, o - ODR, L - local, G  - DAGR, l - LISP
       A - access/subscriber, a - Application route
       M - mobile route, r - RPL, (!) - FRR Backup path

Gateway of last resort is not set

a    2002:aa::/64
      [120/0] via 2002:ae::3, 00:00:26, GigabitEthernet0/0/0/0
RP/0/RP0/CPU0:ios#
Run c++ rshuttle tutorial
Rshuttle is a sample application that is used to push (shuttle) large number of routes in batches into the XR RIB using a c++ gRPC client for the Service-Layer API.f By default, it is set to push 100352 routes in 98 batches of 1024 routes each (max routes allowed per batch is 1024) and calculates the effective rate of programming of all the routes:
root@host:~/service-layer-objmodel/grpc/cpp/src/tutorial/rshuttle# ./servicelayermain
WARNING: Logging before InitGoogleLogging() is written to STDERR
I0717 10:19:11.854602  6001 ServiceLayerMain.cpp:139] Connecting IOS-XR to gRPC server at 127.0.0.1:57344
I0717 10:19:11.875661  6001 ServiceLayerMain.cpp:89] Starting Route batch
I0717 10:19:13.986866  6001 ServiceLayerMain.cpp:110]
Time taken to program 100352 routes
 2.11111
Route programming rate
47535.2 routes/sec
I0717 10:19:13.986927  6001 ServiceLayerMain.cpp:185] Press control-c to quit
Great! You can see that running an onbox c++ gRPC client achieves the highest possible rate of route programming using the Service-Layer API - a whopping 47535.2 routes/sec!
Again, to see the effect of this client, check out the routing table from a separate ssh session into the XR vagrant box:
RP/0/RP0/CPU0:ios#show  route summary
Tue Jul 17 10:23:41.202 UTC
Route Source                     Routes     Backup     Deleted     Memory(bytes)
connected                        2          0          0           480
local                            2          0          0           480
static                           1          0          0           240
dagr                             0          0          0           0
application Service-layer        100352     0          0           24084480
Total                            100357     0          0           24085680

RP/0/RP0/CPU0:ios#
RP/0/RP0/CPU0:ios#
Running a golang onbox client
Build the golang tutorial
The methodology is similar to the c++ client except we use golang specific commands to build the tutorial.
cd into the ~/service-layer-objmodel/grpc/go/ directory and set the GOPATH variable:
root@host:~# cd ~/service-layer-objmodel/grpc/go
root@host:~/service-layer-objmodel/grpc/go# export GOPATH=/root/service-layer-objmodel/grpc/go
root@host:~/service-layer-objmodel/grpc/go#
Fetch the protoc-gen-go binary to build the proto files:
root@host:~/service-layer-objmodel/grpc/go# go get -u github.com/golang/protobuf/protoc-gen-go
root@host:~/service-layer-objmodel/grpc/go#
root@host:~/service-layer-objmodel/grpc/go# ./gen-bindings.sh
Generating GO bindings...Done
root@host:~/service-layer-objmodel/grpc/go#
Drop into the src/tutorial directory to build the tutorial called quickstart.go:
root@host:~/service-layer-objmodel/grpc/go#  cd src/tutorial/
root@host:~/service-layer-objmodel/grpc/go/src/tutorial# ls
README.md  quickstart.go  tutorial
root@host:~/service-layer-objmodel/grpc/go/src/tutorial#
First fetch all the dependencies (grpc-go etc.) by running the go get command
root@host:~/service-layer-objmodel/grpc/go/src/tutorial# go get
root@host:~/service-layer-objmodel/grpc/go/src/tutorial#
root@host:~/service-layer-objmodel/grpc/go/src/tutorial#
Finally, build the binary out of quickstart.go:
root@host:~/service-layer-objmodel/grpc/go/src/tutorial#  go build -o quickstart quickstart.go
root@host:~/service-layer-objmodel/grpc/go/src/tutorial#  export SERVER_IP=127.0.0.1
root@host:~/service-layer-objmodel/grpc/go/src/tutorial# export SERVER_PORT=57344
root@host:~/service-layer-objmodel/grpc/go/src/tutorial#
root@host:~/service-layer-objmodel/grpc/go/src/tutorial#
root@host:~/service-layer-objmodel/grpc/go/src/tutorial# ./quickstart
Using SERVER IP PORT: 127.0.0.1:57344
Server Returned SL_INIT_STATE_READY, Version: 0.0.0
Client INIT Server response:  SL_SUCCESS
Max VRF Name Len     :  33
Max Iface Name Len   :  64
Max Paths per Entry  :  128
Max Prim per Entry   :  64
Max Bckup per Entry  :  64
Max Labels per Entry :  3
Min Prim Path-id     :  1
Max Prim Path-id     :  64
Min Bckup Path-id    :  65
Max Bckup Path-id    :  128
Max Remote Bckup Addr:  2
VRF SL_REGOP_REGISTER status: SL_SUCCESS
VRF SL_REGOP_EOF status: SL_SUCCESS
SL_OBJOP_ADD Total Batches: 100, Routes: 100000, ElapsedTime: 2.440451665s
Rate: 40976.021543
root@host:~/service-layer-objmodel/grpc/go/src/tutorial#
root@host:~/service-layer-objmodel/grpc/go/src/tutorial#
Excellent! This golang tutorial programs 100000 in 100 batches of 1000 routes each with rate of 40976 routes/sec!
Leave a Comment