
Inception Server (SMI Deployer) Deployment Guide
Introduction
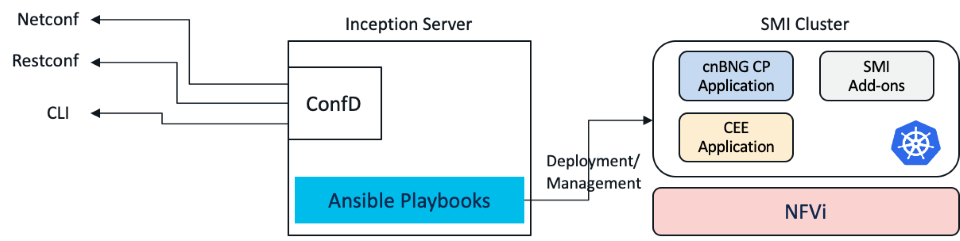
Inception Server is used to deploy the SMI cluster. It packages Ansible Playbooks which makes the deployment of SMI with all addons as a one click operation. The server also has a confD, which offers a user and machine friendly interfaces for SMI deployment. The main interfaces offered are Netconf, Restconf and CLI. In this tutorial we will deploy Inception Server in VMWare ESXi environment. The VMware vSphere Hypervisor (ESXi) >=6.5 has been fully tested and meets performance benchmarks.
We need following softwares for deployment of Inception Server:
- Customized Base Ubuntu ISO Image File (provided by SMI) e.g. smi-install-disk.iso
- Cluster Deployer Tarball e.g. cluster-deployer-2024.02.1.14.tar
Summary Steps for Installation of Inception Server
Inception Server is deployed in two steps in VMWare ESXi environment:
- Installation of Inception VM: In this step Customized Ubuntu VM is deployed using SMI provided Base ISO file
- Installation of SMI Cluster Deployer using the tarball in Inception Ubuntu VM
Inception VM Dimensioning
The following are the minimum hardware requirements for deploying Inception VM using the SMI Base Image ISO on VMware:
- CPU: 8 vCPU
- Memory: 24 G
- Storage: 200 GB
- NIC interfaces: The number of NIC interfaces required is based on the K8s network and VMware host network reachability. Refer to cnBNG Concepts Part-1 document for more details on networking.
The hardware requirements for Inception VM canbe reduced for non-production deployment:
- CPU: 4 vCPU
- Memory: 16 G
- Storage: 100 GB
- NIC interfaces: The number of NIC interfaces required is based on the K8s network and VMware host network reachability. Refer to cnBNG Concepts Part-1 document for more details on networking
Prerequisite (optional, if DC already exists)
- Make sure vCenter is installed (ver 6.7 is tested)
- In the vCenter, right click and select New Data Center
- Provide name of the data-center and click ok
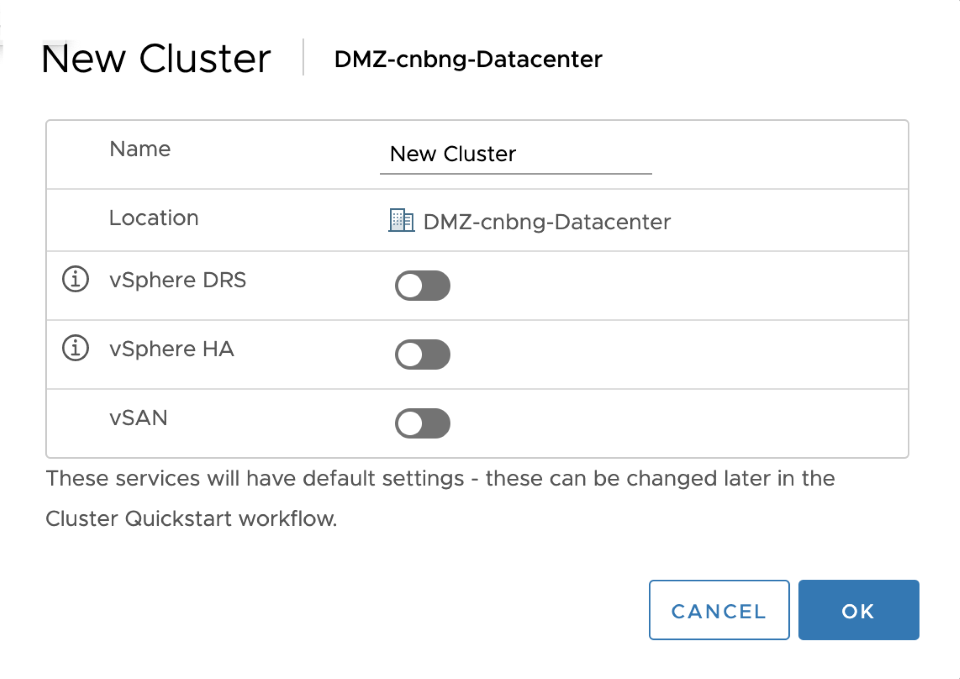
- Right click on the newly created datacenter and select New Cluster.
- Provide name of the cluster and click ok (all other options remain default)
- Provide name of the cluster and click ok (all other options remain default)
- Now add a host to the cluster. By selecting add host from right click menu on newly created cluster. Follow on screen instructions to add the host.
Step 1: Inception VM deployment using Base ISO Image provided by SMI
Download the SMI base ISO image. This is the image which will be used for Ubuntu VM deployment. This is customized Ubuntu for SMI. Now, follow below steps to deploy Ubuntu VM using the downloaded ISO file:
- Download the SMI Base ISO file and copy the file to the VM Datastore
- In the vCenter, select Create a New Virtual Machine
- Specify name of the VM and select the Datacenter
- Next select the host for the VM
- Select the datastore
- Select compatibility (ESXi 6.7 or later)
- Select guest OS: Guest Family- Linux, Guest OS Version- Ubuntu Linux (64-bit)
- Customize Hardware:
- vCPU: 8, Memory: 16GB, New Hard disk: 100Gb (this will depend on the dimensioning selected)
- Under Network: select management network (“VM Network” in most cases
- Click New CD/DVD Drive and do the following:
- Select Datastore ISO file option to boot from the SMI Base .iso file. Browse to the location of the .iso file on the datastore set in Step 1.
- In the Device Status field, select Connect at power on checkbox.
- After the VM boots up: login to the VM (user: cloud-user, password: Cisco_123). You will be prompted to change the password immediately. New password must be 14 characters.
- Now setup Networking by editing “/etc/netplan/50-cloud-init.yaml” file. Here is a sample file config:
network:
    ethernets:
        eno1:
            dhcp4: true
        enp0s3:
            dhcp4: true
        ens160:
            dhcp4: false
            addresses:
               - {inception-VM-IP}/{your-subnet}
            gateway4: {your-gateway-IP}
            nameservers:
                search: [{your-domain}]
                addresses: [{your-dns-server}]
        ens3:
            dhcp4: true
        eth0:
            dhcp4: true
    version: 2
Note1: Sometimes interface is not shown as ens160, in that case it is a good idea to search for the interface using ifconfig -a command. Generally lower ens number is the first NIC attached to the VM, and higher number is the last.
Note2: We can also use cloud-init for os changes.
- If you are not using cloud-init and editing netplan configuration manually, then it must be applied using “sudo netplan apply” after succefully editing the file.
Inception Ubuntu VM OS customisation
- SSH login to Inception VM using login password setup earlier
- Now change the hostname of the VM to:
, using:
sudo hostnamectl set-hostname {your-inception-vm-name}
E.g.
sudo hostnamectl set-hostname inception
- Logout of the VM and login again to see hostname changes are reflected
- Make the hostname persistent even after reload by adding “preserve_hostname: true” to /etc/cloud/cloud.cfg file if not added already or change the setting to true from false if already present.
- Replace default hostname for VM with the one you set (in above step) inside /etc/hosts file. This will avoid hostname resolv error.
Step 2: Installation of SMI Cluster Deployer using Tarball
- Make a temporary folder and copy the offline SMI cluster deployer products tarball
cloud-user@inception:/var/tmp/offline-cm$ ls -altr
total 2984112
drwxrwxrwt 6 root          root                4096 Apr 12 20:57 ..
-rw-rw-r-- 1 cloud-user cloud-user 3055718400 Apr 12 21:08 cluster-deployer-2020-04-12.tar
drwxrwxr-x 2 cloud-user cloud-user       4096 Apr 12 21:50 .
Note: Sometimes there could a disk space problem if files are kept in /var/tmp folder. In that case temporary folder, to keep install files, can be created in user directory itself i.e. /home/cloud-user/
- Untar the tarball using tar xvf
cloud-user@inception:/var/tmp/offline-cm$ tar xvf cluster-deployer-2020-04-12.tar
data/
data/docker/
data/docker/registry/
data/docker/registry/v2/
data/docker/registry/v2/blobs/
data/docker/registry/v2/blobs/sha256/
data/docker/registry/v2/blobs/sha256/ea/
data/docker/registry/v2/blobs/sha256/ea/ea8e1c3b8f60bb8087e7cd84123b530e981c523628bc092c50b9b71137a0e63c/
data/docker/registry/v2/blobs/sha256/ea/ea8e1c3b8f60bb8087e7cd84123b530e981c523628bc092c50b9b71137a0e63c/data
data/docker/registry/v2/blobs/sha256/ea/eacc344652f0577c92c95ee8d2fbd2fd3033b117f2a01769763e16a08d469b18/
data/docker/registry/v2/blobs/sha256/ea/eacc344652f0577c92c95ee8d2fbd2fd3033b117f2a01769763e16a08d469b18/data
data/docker/registry/v2/blobs/sha256/ea/eaf6fc4fd0a4a287d07e8d430ff1dc6725ce9cc555d15a43ba7d3f393b122ed3/
data/docker/registry/v2/blobs/sha256/ea/eaf6fc4fd0a4a287d07e8d430ff1dc6725ce9cc555d15a43ba7d3f393b122ed3/data
data/docker/registry/v2/blobs/sha256/7a/
data/docker/registry/v2/blobs/sha256/7a/7a9829eb5aa4e01093d7906e357247a12d0466cea90055d2d71a83b3f81313b5/
data/docker/registry/v2/blobs/sha256/7a/7a9829eb5aa4e01093d7906e357247a12d0466cea90055d2d71a83b3f81313b5/data
data/docker/registry/v2/blobs/sha256/7a/7a4174f2f7811341b93a64f86f3228c63a924f2c0332531f7d02b09dedf423e6/
data/docker/registry/v2/blobs/sha256/7a/7a4174f2f7811341b93a64f86f3228c63a924f2c0332531f7d02b09dedf423e6/data
data/docker/registry/v2/blobs/sha256/4f/
data/docker/registry/v2/blobs/sha256/4f/4faf3e475ac4f0df9de360e9845e1c3de73e04cb0
. . .
. . .
- After tar xvf finishes: cluster Deployer files will be copied to “data” folder in the same temporary folder where tarball was copied
cloud-user@inception:/var/tmp/offline-cm/data$ ls -altr
total 20
drwxr-xr-x 3 cloud-user cloud-user 4096 Apr 12 21:04 docker
drwxrwxr-x 2 cloud-user cloud-user 4096 Apr 12 21:07 charts
drwxrwxr-x 3 cloud-user cloud-user 4096 Apr 12 21:07 deployer-inception
drwxr-xr-x 5 cloud-user cloud-user 4096 Apr 12 21:07 .
drwxrwxr-x 3 cloud-user cloud-user 4096 Apr 12 22:00 ..
- Deploy utility which deploys the SMI Cluster Deployer can be located inside data/deployer-inception folder. We will be using this utility to deploy SMI Cluster Deployer
cloud-user@inception:/var/tmp/offline-cm/data$ cd deployer-inception/
cloud-user@inception:/var/tmp/offline-cm/data/deployer-inception$ ls -altr
total 36
-rwxrwxr-x 1 cloud-user cloud-user  102 Apr 12 21:07 stop
-rwxrwxr-x 1 cloud-user cloud-user 5636 Apr 12 21:07 start
-rwxrwxr-x 1 cloud-user cloud-user 6297 Apr 12 21:07 deploy
drwxrwxr-x 3 cloud-user cloud-user 4096 Apr 12 21:07 compose-offline
-rw-rw-r-- 1 cloud-user cloud-user   60 Apr 12 21:07 README.md
drwxr-xr-x 5 cloud-user cloud-user 4096 Apr 12 21:07 ..
drwxrwxr-x 3 cloud-user cloud-user 4096 Apr 12 21:07 .
- Run the deploy command as shown below. External-ip is the IP address from K8s Network configured on Inception VM. It will be used to host your ISO and your offline file tars to be downloaded to the remote hosts
cloud-user@inception:/var/tmp/offline-cm/data/deployer-inception$ ./deploy --external-ip 172.22.18.55 --first-boot-password "your-password"
2020-04-13 19:49:16.261 INFO deploy: Directory Path /var/tmp/offline-cm/data/deployer-inception
2020-04-13 19:49:16.261 INFO deploy: Directory is /var/tmp/offline-cm/data/deployer-inception/../
2020-04-13 19:49:16.261 INFO deploy: Default info: external_ip: 172.22.18.55 and tar_name: cluster-deployer-2020-04-12
2020-04-13 19:49:16.261 INFO deploy: Prep charts and docker images for registries .....
2020-04-13 19:49:19.726 INFO deploy: Set up the smi-cluster-deployer release: cluster-deployer-2020-04-12
2020-04-13 19:49:19.739 INFO deploy: Prep override yaml .....
2020-04-13 19:49:19.748 INFO deploy: Copy the start and stop scripts .....
2020-04-13 19:49:19.769 INFO deploy: Triggering deployer inception .........
. . .
. . .
Connection Information
----------------------
SSH (cli): ssh admin@localhost -p 2022
SSH (browser): https://cli.172.22.18.55.nip.io
Files: https://files-offline.172.22.18.55.nip.io
UI: https://deployer-ui.172.22.18.55.nip.io
API: https://restconf.172.22.18.55.nip.io
Note: Rerun of deploy utility doesnot work/ fix issues with previous deployment. It’s always a good idea to clean up containers manually and before attemting to rerun ./deploy
Verifications
- We can login to the SMI Cluster Deployer CLI, using “ssh admin@localhost -p 2022” on Inception VM
cloud-user@inception:~$ ssh admin@localhost -p 2022
admin@localhost's password:

      Welcome to the Cisco SMI Cluster Deployer on inception
      Copyright © 2016-2020, Cisco Systems, Inc.
      All rights reserved.

admin connected from 172.18.0.1 using ssh on 79bd273aeec7
[inception] SMI Cluster Deployer#
[inception] SMI Cluster Deployer#
- We can also connect to netconf interface of the SMI Deployer through ssh at default port 830
cloud-user@inception:~$ ssh admin@localhost -p 830 -s netconf
admin@localhost's password:
<?xml version="1.0" encoding="UTF-8"?>
<hello xmlns="urn:ietf:params:xml:ns:netconf:base:1.0">
<capabilities>
<capability>urn:ietf:params:netconf:base:1.0</capability>
<capability>urn:ietf:params:netconf:base:1.1</capability>
<capability>urn:ietf:params:netconf:capability:confirmed-commit:1.1</capability>
<capability>urn:ietf:params:netconf:capability:confirmed-commit:1.0</capability>
<capability>urn:ietf:params:netconf:capability:candidate:1.0</capability>
<capability>urn:ietf:params:netconf:capability:rollback-on-error:1.0</capability>
<capability>urn:ietf:params:netconf:capability:url:1.0?scheme=ftp,sftp,file</capability>
<capability>urn:ietf:params:netconf:capability:validate:1.0</capability>
<capability>urn:ietf:params:netconf:capability:validate:1.1</capability>
<capability>urn:ietf:params:netconf:capability:xpath:1.0</capability>
<capability>urn:ietf:params:netconf:capability:notification:1.0</capability>
<capability>urn:ietf:params:netconf:capability:interleave:1.0</capability>
<capability>urn:ietf:params:netconf:capability:partial-lock:1.0</capability>
<capability>urn:ietf:params:netconf:capability:with-defaults:1.0?basic-mode=explicit&also-supported=report-all-tagged,report-all</capability>
<capability>urn:ietf:params:netconf:capability:yang-library:1.0?revision=2019-01-04&module-set-id=4677c22a6aa6a53bff239d24639f5f31</capability>
<capability>urn:ietf:params:netconf:capability:yang-library:1.1?revision=2019-01-04&content-id=4677c22a6aa6a53bff239d24639f5f31</capability>
<capability>http://tail-f.com/ns/netconf/actions/1.0</capability>
<capability>http://tail-f.com/ns/aaa/1.1?module=tailf-aaa&revision=2018-09-12</capability>
<capability>http://tail-f.com/ns/common/query?module=tailf-common-query&revision=2017-12-15</capability>
<capability>http://tail-f.com/ns/confd-progress?module=tailf-confd-progress&revision=2020-06-29</capability>
<capability>http://tail-f.com/ns/kicker?module=tailf-kicker&revision=2020-11-26</capability>
<capability>http://tail-f.com/ns/netconf/query?module=tailf-netconf-query&revision=2017-01-06</capability>
<capability>http://tail-f.com/ns/webui?module=tailf-webui&revision=2013-03-07</capability>
<capability>http://tail-f.com/yang/acm?module=tailf-acm&revision=2013-03-07</capability>
<capability>http://tail-f.com/yang/common?module=tailf-common&revision=2020-11-26</capability>
<capability>http://tail-f.com/yang/common-monitoring?module=tailf-common-monitoring&revision=2019-04-09</capability>
<capability>http://tail-f.com/yang/confd-monitoring?module=tailf-confd-monitoring&revision=2019-10-30</capability>
<capability>http://tail-f.com/yang/netconf-monitoring?module=tailf-netconf-monitoring&revision=2019-03-28</capability>
<capability>http://tail-f.com/yang/xsd-types?module=tailf-xsd-types&revision=2017-11-20</capability>
<capability>urn:ietf:params:xml:ns:netconf:base:1.0?module=ietf-netconf&revision=2011-06-01&features=confirmed-commit,candidate,rollback-on-error,validate,xpath,url</capability>
<capability>urn:ietf:params:xml:ns:netconf:partial-lock:1.0?module=ietf-netconf-partial-lock&revision=2009-10-19</capability>
<capability>urn:ietf:params:xml:ns:yang:iana-crypt-hash?module=iana-crypt-hash&revision=2014-08-06&features=crypt-hash-sha-512,crypt-hash-sha-256,crypt-hash-md5</capability>
<capability>urn:ietf:params:xml:ns:yang:ietf-inet-types?module=ietf-inet-types&revision=2013-07-15</capability>
<capability>urn:ietf:params:xml:ns:yang:ietf-netconf-acm?module=ietf-netconf-acm&revision=2018-02-14</capability>
<capability>urn:ietf:params:xml:ns:yang:ietf-netconf-monitoring?module=ietf-netconf-monitoring&revision=2010-10-04</capability>
<capability>urn:ietf:params:xml:ns:yang:ietf-netconf-notifications?module=ietf-netconf-notifications&revision=2012-02-06</capability>
<capability>urn:ietf:params:xml:ns:yang:ietf-netconf-with-defaults?module=ietf-netconf-with-defaults&revision=2011-06-01</capability>
<capability>urn:ietf:params:xml:ns:yang:ietf-restconf-monitoring?module=ietf-restconf-monitoring&revision=2017-01-26</capability>
<capability>urn:ietf:params:xml:ns:yang:ietf-x509-cert-to-name?module=ietf-x509-cert-to-name&revision=2014-12-10</capability>
<capability>urn:ietf:params:xml:ns:yang:ietf-yang-metadata?module=ietf-yang-metadata&revision=2016-08-05</capability>
<capability>urn:ietf:params:xml:ns:yang:ietf-yang-types?module=ietf-yang-types&revision=2013-07-15</capability>
</capabilities>
<session-id>278399</session-id></hello>]]>]]>
Note: You can exit from netconf prompt using ctrl+C
Leave a Comment