
XRd with docker: Control-Plane and vRouter
- This is Part-5 of the XRd tutorials Series.
- Skip to Part-6 here: XRd with Docker-compose: Control-Plane.
- Re-read Part-4 here: User Interface and knobs for XRd
Introduction
In Part-1 of the XRd tutorials Series, we learnt how to fetch the XRd images from software.cisco.com (CCO) and verified their signatures.
Then in Part-3, we set up the host environment required to run XRd (both variants - Control-Plane and vRouter) and also installed docker and docker-compose as part of the Host machine setup.
XRd-Tools launch-xrd Script
In this tutorial, we will focus on the launch-xrd script that we introduced as part of the xrd-tools repository in Part-2 of the XRd tutorials Series.
While XRd images can be launched using docker natively - launch-xrd acts as a great abstraction to simplify the launching process for XRd images. It is essentially a wrapper around docker run with all the required options to boot XRd.
Note: A general guidance on the use of any xrd-tools script is to utilize the --help option to first dump the list of options available for use with each script. In these tutorials, we will attempt to try the most important/common options but the reader is encouraged to follow the help blurbs and try each option for each of the scripts.
Dumping the available options with launch-xrd:
cisco@xrdcisco:~/xrd-tools/scripts$ ./launch-xrd --help
Usage: launch-xrd [-h|--help] [-n|--dry-run] IMG [<opts>]


Launch a single XRd container.

Use '--dry-run' to see the command that would be run without running it.

Required arguments:
  IMG                           Specify loaded container image to boot

Optional arguments:
  -f, --first-boot-config FILE  Path to startup config file for first boot
  -e, --every-boot-config FILE  Path to startup config file for every boot
  -v, --xrd-volume VOL          Name of volume used for persistency (created if
                                doesn't already exist)
  -p, --platform PLATFORM       XR platform to launch (defaults to checking the
                                image label)
  -k, --keep                    Keep the container around after it has stopped
  -c, --ctr-client EXE          Container client executable (defaults to
                                'docker'), the name is used to determine
                                whether using docker or podman
  --name NAME                   Specify container name
  --privileged                  Run the container with extended privileges
  --interfaces IF_TYPE:IF_NAME[,IF_FLAG[,...]][;IF_TYPE:IF_NAME[...]...]
                                XR interfaces to create and their mapping to
                                underlying linux/pci interfaces
  --mgmt-interfaces linux:IF_NAME[,MG_FLAG[,...]][;linux:IF_NAME[...]...]
                                XR management interfaces to create and their
                                mapping to underlying linux interfaces (defaults
                                to a single interface mapped to eth0, pass ""
                                to prevent this)
  --first-boot-script FILE      Path to script to be run after all config has
                                been applied on the first boot
  --every-boot-script FILE      Path to script to be run after all config has
                                been applied on every boot
  --disk-limit LIMIT            Disk usage limit to impose (defaults to '6G')
  --ztp-enable                  Enable Zero Touch Provisioning (ZTP) to start
                                up after boot, by default ZTP is disabled
                                (cannot be used with IP snooping)
  --ztp-config FILE             Enable ZTP with custom ZTP ini configuration
  --args '<arg1> <arg2> ...'    Extra arguments to pass to '<ctr_mgr> run'

XRd Control Plane arguments:
  IF_TYPE := { linux }          Interface type
  IF_NAME := { * }              A linux interface name
  IF_FLAG := { xr_name | chksum | snoop_v[4|6] | snoop_v[4|6]_default_route }
                                Flags for interface configuration
  MG_FLAG := IF_FLAG            Flags for management interface configuration

XRd vRouter arguments:
  IF_TYPE := { pci | pci-range }
                                Interface type
  IF_NAME := { (IF_TYPE=pci)       BUS:SLOT.FUNC |
               (IF_TYPE=pci-range) lastN | firstN }
                                Either PCI address e.g. pci:00:09.0, or
                                selection of addresses e.g. pci-range:last4
  IF_FLAG := {}                 Flags for interface configuration
  MG_FLAG := { chksum | snoop_v[4|6] | snoop_v[4|6]_default_route }
                                Flags for management interface configuration
cisco@xrdcisco:~/xrd-tools/scripts$
Launching XRd using docker
Load docker images downloaded from CCO
Before we begin, let’s load the XRd images we downloaded from CCO into the local docker daemon.
The image tarballs we expanded in Part-1 are dumped below.
cisco@xrdcisco:~/images$ tree .
.
├── xrd-control-plane
│   ├── IOS-XR-SW-XRd.crt
│   ├── cisco_x509_verify_release.py3
│   ├── cisco_x509_verify_release.py3.README
│   ├── cisco_x509_verify_release.py3.signature
│   ├── xrd-control-plane-container-x64.7.7.1.tgz
│   ├── xrd-control-plane-container-x64.dockerv1.tgz
│   └── xrd-control-plane-container-x64.dockerv1.tgz.signature
└── xrd-vrouter
    ├── IOS-XR-SW-XRd.crt
    ├── cisco_x509_verify_release.py3
    ├── cisco_x509_verify_release.py3.README
    ├── cisco_x509_verify_release.py3.signature
    ├── xrd-vrouter-container-x64.7.7.1.tgz
    ├── xrd-vrouter-container-x64.dockerv1.tgz
    └── xrd-vrouter-container-x64.dockerv1.tgz.signature

2 directories, 14 files
cisco@xrdcisco:~/images$
Loading the xrd-control-plane docker image first (we rename it explicitly to localhost/xrd-control-plane to easily differentiate the image from the xrd-vrouter image that we will load subsequently):
cisco@xrdcisco:~/images/xrd-vrouter$
cisco@xrdcisco:~/images/xrd-vrouter$ cd ../xrd-control-plane/
cisco@xrdcisco:~/images/xrd-control-plane$ docker load -i xrd-control-plane-container-x64.dockerv1.tgz
a42828b8fe58: Loading layer [==================================================>]  1.179GB/1.179GB
Loaded image: localhost/ios-xr:7.7.1
cisco@xrdcisco:~/images/xrd-control-plane$
cisco@xrdcisco:~/images/xrd-control-plane$ docker tag localhost/ios-xr:7.7.1 localhost/xrd-control-plane
cisco@xrdcisco:~/images/xrd-control-plane$
cisco@xrdcisco:~/images/xrd-control-plane$ docker rmi localhost/ios-xr:7.7.1
Untagged: localhost/ios-xr:7.7.1
cisco@xrdcisco:~/images/xrd-control-plane$
cisco@xrdcisco:~/images/xrd-control-plane$
cisco@xrdcisco:~/images/xrd-control-plane$ docker images
REPOSITORY                    TAG       IMAGE ID       CREATED       SIZE
localhost/xrd-control-plane   latest    dd8d741e50b2   4 weeks ago   1.15GB
cisco@xrdcisco:~/images/xrd-control-plane$
Similarly, let’s load the xrd-vrouter docker image and rename it to localhost/xrd-vrouter
cisco@xrdcisco:~/images/xrd-control-plane$
cisco@xrdcisco:~/images/xrd-control-plane$ cd ../xrd-vrouter/
cisco@xrdcisco:~/images/xrd-vrouter$
cisco@xrdcisco:~/images/xrd-vrouter$ docker load -i xrd-vrouter-container-x64.dockerv1.tgz
e97a8613578a: Loading layer [==================================================>]  1.225GB/1.225GB
Loaded image: localhost/ios-xr:7.7.1
cisco@xrdcisco:~/images/xrd-vrouter$
cisco@xrdcisco:~/images/xrd-vrouter$ docker tag localhost/ios-xr:7.7.1 localhost/xrd-vrouter
cisco@xrdcisco:~/images/xrd-vrouter$ docker rmi localhost/ios-xr:7.7.1
Untagged: localhost/ios-xr:7.7.1
cisco@xrdcisco:~/images/xrd-control-plane$ docker images
REPOSITORY                    TAG       IMAGE ID       CREATED       SIZE
localhost/xrd-vrouter         latest    78632a9bbb1d   4 weeks ago   1.2GB
localhost/xrd-control-plane   latest    dd8d741e50b2   4 weeks ago   1.15GB
cisco@xrdcisco:~/images/xrd-vrouter$
cisco@xrdcisco:~/images/xrd-vrouter$
Boot XRd control-plane image using launch-xrd
Before we try booting the image, let’s use the --dry-run option in launch-xrd to dump the actual docker run command that would have been used in the background by the script:
cisco@xrdcisco:~/xrd-tools/scripts$ ./launch-xrd --dry-run localhost/xrd-control-plane
docker run -it --rm --cap-drop all --cap-add AUDIT_WRITE --cap-add CHOWN --cap-add DAC_OVERRIDE --cap-add FOWNER --cap-add FSETID --cap-add KILL --cap-add MKNOD --cap-add NET_BIND_SERVICE --cap-add NET_RAW --cap-add SETFCAP --cap-add SETGID --cap-add SETUID --cap-add SETPCAP --cap-add SYS_CHROOT --cap-add IPC_LOCK --cap-add NET_ADMIN --cap-add SYS_ADMIN --cap-add SYS_NICE --cap-add SYS_PTRACE --cap-add SYS_RESOURCE --device /dev/fuse --device /dev/net/tun --security-opt apparmor=unconfined --security-opt label=disable -v /sys/fs/cgroup:/sys/fs/cgroup:ro --env XR_MGMT_INTERFACES=linux:eth0,chksum localhost/xrd-control-plane
Structuring the output to better understand it:
docker run -it --rm \
--cap-drop all \
--cap-add AUDIT_WRITE --cap-add CHOWN \
--cap-add DAC_OVERRIDE --cap-add FOWNER \
--cap-add FSETID --cap-add KILL \
--cap-add MKNOD --cap-add NET_BIND_SERVICE \
--cap-add NET_RAW --cap-add SETFCAP \
--cap-add SETGID --cap-add SETUID \
--cap-add SETPCAP --cap-add SYS_CHROOT \
--cap-add IPC_LOCK --cap-add NET_ADMIN \
--cap-add SYS_ADMIN --cap-add SYS_NICE \
--cap-add SYS_PTRACE --cap-add SYS_RESOURCE \
--device /dev/fuse \
--device /dev/net/tun \
--security-opt apparmor=unconfined \
--security-opt label=disable \
-v /sys/fs/cgroup:/sys/fs/cgroup:ro \
--env XR_MGMT_INTERFACES=linux:eth0,chksum \
localhost/xrd-control-plane
We can use either launch-xrd or the native docker command as shown above to boot the XRd container. Note the --env option passed to the native docker command - this is where we specify the XRd specific environment variables. These environment variables have been discussed in detail in Part-4 of the XRd tutorial series here: User Interface and knobs for XRd. In the above --dry-run output, the only XRd environment variable being passed in is XR_MGMT_INTERFACES which connects the eth0 interface passed by the docker daemon to the container into XRd.
Let’s do a simple boot using launch-xrd first:
cisco@xrdcisco:~/xrd-tools/scripts$ ./launch-xrd localhost/xrd-control-plane
systemd 230 running in system mode. (+PAM +AUDIT +SELINUX +IMA -APPARMOR +SMACK +SYSVINIT +UTMP -LIBCRYPTSETUP -GCRYPT -GNUTLS +ACL +XZ -LZ4 -SECCOMP +BLKID -ELFUTILS +KMOD -IDN)
Detected virtualization docker.
Detected architecture x86-64.

Welcome to Cisco XR (Base Distro SELinux and CGL) 9.0.0.26!

Set hostname to <2b4a359239e7>.
Initializing machine ID from random generator.
[  OK  ] Reached target Remote File Systems.
[  OK  ] Listening on Journal Socket (/dev/log).
[  OK  ] Reached target Swap.
[  OK  ] Listening on Journal Socket.
[  OK  ] Created slice User and Session Slice.
[  OK  ] Reached target Paths.
[  OK  ] Listening on Syslog Socket.
[  OK  ] Created slice System Slice.
         Mounting Temporary Directory...
         Mounting FUSE Control File System...
         Mounting Huge Pages File System...
[  OK  ] Reached target Slices.
         Starting Journal Service...
         Starting Remount Root and Kernel File Systems...
[  OK  ] Mounted FUSE Control File System.
[  OK  ] Mounted Huge Pages File System.
[  OK  ] Mounted Temporary Directory.
[  OK  ] Started Remount Root and Kernel File Systems.
         Starting Copy selected logs to var/log/old directories...
         Starting Create System Users...
         Starting Rebuild Hardware Database...
         Starting Load/Save Random Seed...
         Starting Monitoring of LVM2 mirrors, snapshots etc. using dmeventd or progress polling...
[  OK  ] Started Journal Service.
[  OK  ] Started Create System Users.
         Starting Flush Journal to Persistent Storage...
[  OK  ] Started Load/Save Random Seed.
[  OK  ] Started Flush Journal to Persistent Storage.
[  OK  ] Started Monitoring of LVM2 mirrors, snapshots etc. using dmeventd or progress polling.
[  OK  ] Reached target Local File Systems (Pre).
         Mounting /mnt...
         Mounting /var/volatile...
[  OK  ] Mounted /var/volatile.
[  OK  ] Mounted /mnt.
[  OK  ] Started Copy selected logs to var/log/old directories.
[  OK  ] Reached target Local File Systems.
         Starting Create Volatile Files and Directories...
         Starting Rebuild Dynamic Linker Cache...
         Starting Rebuild Journal Catalog...
[  OK  ] Started Create Volatile Files and Directories.
         Starting Update UTMP about System Boot/Shutdown...
[  OK  ] Started Rebuild Journal Catalog.
[  OK  ] Started Update UTMP about System Boot/Shutdown.
[  OK  ] Started Rebuild Dynamic Linker Cache.
[  OK  ] Started Rebuild Hardware Database.
         Starting Update is Completed...
[  OK  ] Started Update is Completed.
[  OK  ] Reached target System Initialization.
[  OK  ] Started Daily Cleanup of Temporary Directories.
[  OK  ] Reached target Timers.
[  OK  ] Listening on D-Bus System Message Bus Socket.
[  OK  ] Reached target Sockets.
[  OK  ] Reached target Basic System.
         Starting System Logging Service...
[  OK  ] Started Periodic Command Scheduler.
         Starting OpenSSH Key Generation...
         Starting sysklogd Kernel Logging Service...
         Starting IOS-XR Setup Non-Root related tasks...
[  OK  ] Started Job spooling tools.
         Starting Resets System Activity Logs...
[  OK  ] Started D-Bus System Message Bus.
[  OK  ] Started IOS-XR XRd Core Watcher.
[  OK  ] Reached target Network.
         Starting Permit User Sessions...
         Starting /etc/rc.local Compatibility...
         Starting Xinetd A Powerful Replacement For Inetd...
[  OK  ] Started Service for factory reset.
[  OK  ] Started Resets System Activity Logs.
[  OK  ] Started Permit User Sessions.
[  OK  ] Started /etc/rc.local Compatibility.
[  OK  ] Reached target Login Prompts.
[  OK  ] Started Xinetd A Powerful Replacement For Inetd.
[  OK  ] Reached target Multi-User System.
         Starting Update UTMP about System Runlevel Changes...
[  OK  ] Started Update UTMP about System Runlevel Changes.
[  OK  ] Started IOS-XR Setup Non-Root related tasks.
[  OK  ] Started OpenSSH Key Generation.
         Starting IOS-XR ISO Installation...
[  OK  ] Started System Logging Service.
[  OK  ] Started sysklogd Kernel Logging Service.
[12351.229709] xrnginstall[358]: 2022 Aug 25 09:16:58.807 UTC: Setting up dumper and build info files
[12351.309618] xrnginstall[358]: 2022 Aug 25 09:16:58.886 UTC: XR Lineup:  r77x.lu%EFR-00000436820
[12351.314251] xrnginstall[358]: 2022 Aug 25 09:16:58.891 UTC: XR Version: 7.7.1
[12351.323159] xrnginstall[358]: 2022 Aug 25 09:16:58.900 UTC: Completed set up of dumper and build info files
[12351.329081] xrnginstall[358]: 2022 Aug 25 09:16:58.906 UTC: Preparing IOS-XR (first boot)
[12351.555529] xrnginstall[358]: 2022 Aug 25 09:16:59.132 UTC: Checking if rollback cleanup is required
[12351.559938] xrnginstall[358]: 2022 Aug 25 09:16:59.137 UTC: Finished rollback cleanup stage
[12351.563992] xrnginstall[358]: 2022 Aug 25 09:16:59.141 UTC: Single node: starting XR
[12351.573417] xrnginstall[358]: 2022 Aug 25 09:16:59.150 UTC: xrnginstall completed successfully
[  OK  ] Started IOS-XR ISO Installation.
[  OK  ] Started Cisco Directory Services.
         Starting IOS-XR XRd...
[  OK  ] Started IOS-XR XRd.
         Starting IOS-XR Reaperd and Process Manager...
[  OK  ] Started IOS-XR Reaperd and Process Manager.
[  OK  ] Reached target XR installation and startup.


ios con0/RP0/CPU0 is now available


Press RETURN to get started.


This product contains cryptographic features and is subject to United
States and local country laws governing import, export, transfer and
use. Delivery of Cisco cryptographic products does not imply third-party
authority to import, export, distribute or use encryption. Importers,
exporters, distributors and users are responsible for compliance with
U.S. and local country laws. By using this product you agree to comply
with applicable laws and regulations. If you are unable to comply with
U.S. and local laws, return this product immediately.

A summary of U.S. laws governing Cisco cryptographic products may be
found at:
http://www.cisco.com/wwl/export/crypto/tool/stqrg.html

If you require further assistance please contact us by sending email to
export@cisco.com.


RP/0/RP0/CPU0:Aug 25 09:17:10.363 UTC: pyztp2[168]: %INFRA-ZTP-4-EXITED : ZTP exited

!!!!!!!!!!!!!!!!!!!! NO root-system username is configured. Need to configure root-system username. !!!!!!!!!!!!!!!!!!!!

         --- Administrative User Dialog ---


  Enter root-system username: cisco
  Enter secret:
  Enter secret again:
Use the 'configure' command to modify this configuration.
User Access Verification

Username: cisco
Password:


RP/0/RP0/CPU0:ios#
RP/0/RP0/CPU0:ios#
RP/0/RP0/CPU0:ios#show  version
Thu Aug 25 09:17:37.487 UTC
Cisco IOS XR Software, Version 7.7.1 LNT
Copyright (c) 2013-2022 by Cisco Systems, Inc.

Build Information:
 Built By     : ingunawa
 Built On     : Mon Jul 25 06:07:25 UTC 2022
 Build Host   : iox-lnx-121
 Workspace    : /auto/srcarchive12/prod/7.7.1/xrd-control-plane/ws
 Version      : 7.7.1
 Label        : 7.7.1

cisco XRd Control Plane
cisco XRd-CP-C-01 processor with 30GB of memory
ios uptime is 0 minutes
XRd Control Plane Container

RP/0/RP0/CPU0:ios#
RP/0/RP0/CPU0:ios#
RP/0/RP0/CPU0:ios#show  running-config
Thu Aug 25 09:17:42.875 UTC
Building configuration...
!! IOS XR Configuration 7.7.1
!! Last configuration change at Thu Aug 25 09:17:30 2022 by SYSTEM
!
username cisco
 group root-lr
 group cisco-support
 secret 10 $6$00ByfEXz8sj0f...$q4Y1blEefLrM6pQz4.ZRGSSnLYqnYNbJC3Q4tH/68PcFv2AxOumseCQ/5hM2VnIbRyRZ3tunpQpqoK29jXhYV1
!
call-home
 service active
 contact smart-licensing
 profile CiscoTAC-1
  active
  destination transport-method email disable
  destination transport-method http
 !
!
interface MgmtEth0/RP0/CPU0/0
 shutdown
!
end

RP/0/RP0/CPU0:ios#
The boot above is very similar to IOS-XR boot on physical network hardware such as the Cisco8000 or NCS540.
It can be seen in the show run output above that a default Management interface is added due to the XR_MGMT_INTERFACES=linux:eth0,chksum options passed as environment variables during launch.
Open up a new shell into the host machine and dump the running docker containers on the system:
cisco@xrdcisco:~$ docker ps
CONTAINER ID   IMAGE                         COMMAND                  CREATED         STATUS         PORTS     NAMES
2b4a359239e7   localhost/xrd-control-plane   "/bin/sh -c /sbin/xr…"   4 minutes ago   Up 4 minutes             blissful_germain
cisco@xrdcisco:~$
Let’s inspect the IP address assigned to the docker container:
cisco@xrdcisco:~$ docker inspect -f '{{range.NetworkSettings.Networks}}{{.IPAddress}}{{end}}' blissful_germain
172.17.0.2
cisco@xrdcisco:~$
Let’s try configuring this IP address on the router’s Mgmt IP to see if we can establish connectivity:
RP/0/RP0/CPU0:ios#conf t
Thu Aug 25 09:21:55.229 UTC
RP/0/RP0/CPU0:ios(config)#int MgmtEth 0/RP0/CPU0/0
RP/0/RP0/CPU0:ios(config-if)#no shut
RP/0/RP0/CPU0:ios(config-if)#ipv4 add 172.17.0.2/24
RP/0/RP0/CPU0:ios(config-if)#commit
Thu Aug 25 09:22:11.945 UTC
RP/0/RP0/CPU0:Aug 25 09:20:49.877 UTC: ifmgr[250]: %PKT_INFRA-LINK-3-UPDOWN : Interface MgmtEth0/RP0/CPU0/0, changed state to Down
RP/0/RP0/CPU0:Aug 25 09:20:49.889 UTC: ifmgr[250]: %PKT_INFRA-LINK-3-UPDOWN : Interface MgmtEth0/RP0/CPU0/0, changed state to Up
RP/0/RP0/CPU0:ios(config-if)#
RP/0/RP0/CPU0:ios#

RP/0/RP0/CPU0:ios#show ip int brief
Thu Aug 25 09:30:49.235 UTC

Interface                      IP-Address      Status          Protocol Vrf-Name
MgmtEth0/RP0/CPU0/0            172.17.0.2      Up              Up       default
RP/0/RP0/CPU0:ios#
RP/0/RP0/CPU0:ios#ping 172.17.0.1
Thu Aug 25 09:22:17.764 UTC
Type escape sequence to abort.
Sending 5, 100-byte ICMP Echos to 172.17.0.1, timeout is 2 seconds:
!!!!!
Success rate is 100 percent (5/5), round-trip min/avg/max = 1/5/17 ms
RP/0/RP0/CPU0:ios#
Great, we’re able to docker daemon default gateway from the router. If we enable SSH in the router, we should also be able to SSH to the running docker container from the host machine:
RP/0/RP0/CPU0:ios#conf t
Thu Aug 25 09:32:06.031 UTC
RP/0/RP0/CPU0:ios(config)#
RP/0/RP0/CPU0:ios(config)#ssh server v2
RP/0/RP0/CPU0:ios(config)#commit
Thu Aug 25 09:32:13.356 UTC
RP/0/RP0/CPU0:ios(config)#
SSH from the host machine using the root username we created post boot:
cisco@xrdcisco:~$ ssh [email protected]
The authenticity of host '172.17.0.2 (172.17.0.2)' can't be established.
ECDSA key fingerprint is SHA256:kO8b9uTc+ITEA4EfR4gDwHwl74iZhxZNglX1VsP3EZY.
Are you sure you want to continue connecting (yes/no/[fingerprint])? yes
Warning: Permanently added '172.17.0.2' (ECDSA) to the list of known hosts.
Password:


RP/0/RP0/CPU0:ios#
RP/0/RP0/CPU0:ios#
RP/0/RP0/CPU0:ios#
Awesome! we have established basic connectivity over the Mgmt port into the XRd control-plane router.
Bring down the XRd Control-Plane docker container
Standard docker interactions can be used for this purpose.
To stop the XRd docker container, use docker stop or docker rm -f:
cisco@xrdcisco:~$ docker stop blissful_germain
blissful_germain
cisco@xrdcisco:~$
cisco@xrdcisco:~$ docker ps
CONTAINER ID   IMAGE     COMMAND   CREATED   STATUS    PORTS     NAMES
cisco@xrdcisco:~$
Passing an initial configuration during boot
Using the launch-xrd script
To pass an initial configuration, we can use the --every-boot-config option for the launch-xrd script. Using a simple configuration as shown below:
cisco@xrdcisco:~/xrd-tools/scripts$ cat xr.config
!! IOS XR Configuration 7.7.1
!! No configuration change since last restart
!
username cisco
 group root-lr
 secret 10 $6$MaGnn0dowgBD9n0.$3hEo4Tm.I9mNF0tjXybAn6dhbQx7SxLT0NahSsOJmqfKcOvqLwEEB2jJtytwtTdWOZ32knC03/cGjcIGZHltC1
!
call-home
 service active
 contact smart-licensing
 profile CiscoTAC-1
  active
  destination transport-method email disable
  destination transport-method http
 !
!
interface MgmtEth0/RP0/CPU0/0
 shutdown
!
end
we pass it into the launch-xrd script:
cisco@xrdcisco:~/xrd-tools/scripts$ ./launch-xrd localhost/xrd-control-plane --every-boot-config xr.config
systemd 230 running in system mode. (+PAM +AUDIT +SELINUX +IMA -APPARMOR +SMACK +SYSVINIT +UTMP -LIBCRYPTSETUP -GCRYPT -GNUTLS +ACL +XZ -LZ4 -SECCOMP +BLKID -ELFUTILS +KMOD -IDN)
Detected virtualization docker.
Detected architecture x86-64.

Welcome to Cisco XR (Base Distro SELinux and CGL) 9.0.0.26!

Set hostname to <6ba2d89c79a7>.
Initializing machine ID from random generator.
[  OK  ] Reached target Remote File Systems.


################################ truncated O/P #############################


If you require further assistance please contact us by sending email to
[email protected].


RP/0/RP0/CPU0:Aug 28 11:33:57.618 UTC: pyztp2[168]: %INFRA-ZTP-4-EXITED : ZTP exited

User Access Verification

Username: cisco
Password:


RP/0/RP0/CPU0:ios#
RP/0/RP0/CPU0:ios#
RP/0/RP0/CPU0:ios#show running-config
Sun Aug 28 11:34:13.451 UTC
Building configuration...
!! IOS XR Configuration 7.7.1
!! No configuration change since last restart
!
username cisco
 group root-lr
 secret 10 $6$MaGnn0dowgBD9n0.$3hEo4Tm.I9mNF0tjXybAn6dhbQx7SxLT0NahSsOJmqfKcOvqLwEEB2jJtytwtTdWOZ32knC03/cGjcIGZHltC1
!
call-home
 service active
 contact smart-licensing
 profile CiscoTAC-1
  active
  destination transport-method email disable
  destination transport-method http
 !
!
interface MgmtEth0/RP0/CPU0/0
 shutdown
!
end

RP/0/RP0/CPU0:ios#
As highlighted above, note how during this boot, we didn’t have to create a root username and were able to login using the credentials (cisco/cisco123 in this example) set in the configuration file passed to launch-xrd.
Using the native docker run command
It’s easy to determine the native docker run command to use by utilizing the --dry-run option to launch-xrd as we discussed above:
cisco@xrdcisco:~/xrd-tools/scripts$ ./launch-xrd localhost/xrd-control-plane --every-boot-config xr.config --dry-run
docker run -it --rm --cap-drop all --cap-add AUDIT_WRITE --cap-add CHOWN --cap-add DAC_OVERRIDE --cap-add FOWNER --cap-add FSETID --cap-add KILL --cap-add MKNOD --cap-add NET_BIND_SERVICE --cap-add NET_RAW --cap-add SETFCAP --cap-add SETGID --cap-add SETUID --cap-add SETPCAP --cap-add SYS_CHROOT --cap-add IPC_LOCK --cap-add NET_ADMIN --cap-add SYS_ADMIN --cap-add SYS_NICE --cap-add SYS_PTRACE --cap-add SYS_RESOURCE --device /dev/fuse --device /dev/net/tun --security-opt apparmor=unconfined --security-opt label=disable -v /sys/fs/cgroup:/sys/fs/cgroup:ro --mount type=bind,source=/home/cisco/xrd-tools/scripts/xr.config,target=/etc/xrd/every-boot.cfg --env XR_EVERY_BOOT_CONFIG=/etc/xrd/every-boot.cfg --env XR_MGMT_INTERFACES=linux:eth0,chksum localhost/xrd-control-plane
cisco@xrdcisco:~/xrd-tools/scripts$
Let’s add another twist here though - we’ll use the native -d or --daemon option supported by docker run to run XRd in the background, so the command becomes:
docker run -it --rm --cap-drop all --cap-add AUDIT_WRITE --cap-add CHOWN --cap-add DAC_OVERRIDE --cap-add FOWNER --cap-add FSETID --cap-add KILL --cap-add MKNOD --cap-add NET_BIND_SERVICE --cap-add NET_RAW --cap-add SETFCAP --cap-add SETGID --cap-add SETUID --cap-add SETPCAP --cap-add SYS_CHROOT --cap-add IPC_LOCK --cap-add NET_ADMIN --cap-add SYS_ADMIN --cap-add SYS_NICE --cap-add SYS_PTRACE --cap-add SYS_RESOURCE --device /dev/fuse --device /dev/net/tun --security-opt apparmor=unconfined --security-opt label=disable -v /sys/fs/cgroup:/sys/fs/cgroup:ro --mount type=bind,source=/home/cisco/xrd-tools/scripts/xr.config,target=/etc/xrd/every-boot.cfg --env XR_EVERY_BOOT_CONFIG=/etc/xrd/every-boot.cfg --env XR_MGMT_INTERFACES=linux:eth0,chksum -d localhost/xrd-control-plane
Running the command as is:
cisco@xrdcisco:~/xrd-tools/scripts$ docker run -it --rm --cap-drop all --cap-add AUDIT_WRITE --cap-add CHOWN --cap-add DAC_OVERRIDE --cap-add FOWNER --cap-add FSETID --cap-add KILL --cap-add MKNOD --cap-add NET_BIND_SERVICE --cap-add NET_RAW --cap-add SETFCAP --cap-add SETGID --cap-add SETUID --cap-add SETPCAP --cap-add SYS_CHROOT --cap-add IPC_LOCK --cap-add NET_ADMIN --cap-add SYS_ADMIN --cap-add SYS_NICE --cap-add SYS_PTRACE --cap-add SYS_RESOURCE --device /dev/fuse --device /dev/net/tun --security-opt apparmor=unconfined --security-opt label=disable -v /sys/fs/cgroup:/sys/fs/cgroup:ro --mount type=bind,source=/home/cisco/xrd-tools/scripts/xr.config,target=/etc/xrd/every-boot.cfg --env XR_EVERY_BOOT_CONFIG=/etc/xrd/every-boot.cfg --env XR_MGMT_INTERFACES=linux:eth0,chksum -d  localhost/xrd-control-plane
ef0dabe120fb3a9d5254fae26fc68644392e94203a235e72fd8a37afde4571fa
cisco@xrdcisco:~/xrd-tools/scripts$
A docker container was launched in the background, we can the containers running using docker ps to view the container that was launched:
cisco@xrdcisco:~/xrd-tools/scripts$ docker ps
CONTAINER ID   IMAGE                         COMMAND                  CREATED         STATUS         PORTS     NAMES
ef0dabe120fb   localhost/xrd-control-plane   "/bin/sh -c /sbin/xr…"   3 seconds ago   Up 2 seconds             hopeful_goldberg
cisco@xrdcisco:~/xrd-tools/scripts$
Accessing and Managing XRd running in the background
The steps we used above provide a good segue to understand how to access XRd containers running in the background:
- Use the
docker exec -it <container hash or name> <command>to drop into the container - There are two possible commands that we can run:
/pkg/bin/xr_cli.sh: Running this command as part ofdocker execwill directly drop us into XR CLI shellbash: Runningbashwill drop us into XRd bash shell directly. From here you have access to the XR ZTP bash and python libraries for automation or you can launch/pkg/bin/xr_cli.shas well to drop into XR CLI subsequently.
- Dealing with XRd containers running in the background is quite useful, because this is the typical way in which we will interact with XRd containers especially when they are launched as part of a larger topology using docker-compose or Kubernetes.
Dropping directly into XR CLI
Dropping into the XRd instance running in the background (using the container hash from docker ps output earlier:
cisco@xrdcisco:~$ docker exec -it ef0dabe120fb /pkg/bin/xr_cli.sh

User Access Verification

Username: cisco
Password:


RP/0/RP0/CPU0:ios#
RP/0/RP0/CPU0:ios#
RP/0/RP0/CPU0:ios#show  run
Sun Aug 28 12:51:40.317 UTC
Building configuration...
!! IOS XR Configuration 7.7.1
!! No configuration change since last restart
!
username cisco
 group root-lr
 secret 10 $6$MaGnn0dowgBD9n0.$3hEo4Tm.I9mNF0tjXybAn6dhbQx7SxLT0NahSsOJmqfKcOvqLwEEB2jJtytwtTdWOZ32knC03/cGjcIGZHltC1
!
call-home
 service active
 contact smart-licensing
 profile CiscoTAC-1
  active
  destination transport-method email disable
  destination transport-method http
 !
!
interface MgmtEth0/RP0/CPU0/0
 shutdown
!
end

RP/0/RP0/CPU0:ios#
We were able to login directly using the credentials provided via the config file earlier.
Dropping into XR bash and using ZTP commands
Let’s try dropping into XRd bash and running a few ZTP bash commands (notice we use the docker container name this time from the same docker ps output earlier):
cisco@xrdcisco:~$ docker exec -it hopeful_goldberg bash
bash-4.3#
bash-4.3# source /pkg/bin/ztp_helper.sh
bash-4.3#
bash-4.3# xrcmd "show run"
Building configuration...
!! IOS XR Configuration 7.7.1
!! Last configuration change at Sun Aug 28 12:55:34 2022 by ZTP
!
username cisco
 group root-lr
 secret 10 $6$MaGnn0dowgBD9n0.$3hEo4Tm.I9mNF0tjXybAn6dhbQx7SxLT0NahSsOJmqfKcOvqLwEEB2jJtytwtTdWOZ32knC03/cGjcIGZHltC1
!
call-home
 service active
 contact smart-licensing
 profile CiscoTAC-1
  active
  destination transport-method email disable
  destination transport-method http
 !
!
interface MgmtEth0/RP0/CPU0/0
 shutdown
!
end

bash-4.3#
bash-4.3#
bash-4.3# xrapply_string "hostname xrd_docker"
bash-4.3#
bash-4.3# xrcmd "show running-config hostname"
hostname xrd_docker

bash-4.3#
bash-4.3#
bash-4.3# /pkg/bin/xr_cli.sh

User Access Verification

Username: cisco
Password:


RP/0/RP0/CPU0:xrd_docker#
RP/0/RP0/CPU0:xrd_docker#
It was also possible to jump to XR CLI shell by running the /pkg/bin/xr_cli.sh script from the XRd bash shell that we dropped into.
Set Up Network for External Connections: XRd Control Plane
- In general, it is possible for XRd to use any interface that is moved into the XRd container network namespace. However, this renders that interface inacessible by any other application running on the container host.
- It’s assumed that this is undesirable for the majority of use cases and so the recommended workflow to enable XRd to communicate externally is to use macvlan interfaces.
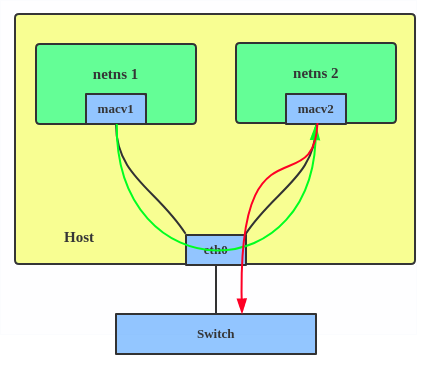
- A macvlan interface is a standard Linux interface type that is created on top of another interface, which could be a physical interface with an external connection. Multiple macvlan interfaces can be created on top of one standard interface. This allows multiple applications, including XRd, to ‘share’ the physical interfaces on a particular host server, via these macvlan interfaces.
- Each macvlan interface is assigned its own MAC address (hence the name) and data is directed to the correct interface based on this MAC address. This is illustrated in the image below:
We’ll work with 3 physical interfaces available on the current host machine and transform the setup to provide 3 macvlan interfaces corresponding to each of these physical interfaces that we can then pass into the XRd Control-Plane container.
On the host-machine in use in this tutorial series, the available interfaces are highlighted below (ens33 here is the main gateway interface for the host machine and we’ll ignore that):
cisco@xrdcisco:~$ ip link show
1: lo: <LOOPBACK,UP,LOWER_UP> mtu 65536 qdisc noqueue state UNKNOWN mode DEFAULT group default qlen 1000
    link/loopback 00:00:00:00:00:00 brd 00:00:00:00:00:00
2: ens160: <BROADCAST,MULTICAST,UP,LOWER_UP> mtu 1500 qdisc mq state UP mode DEFAULT group default qlen 1000
    link/ether 00:0c:29:0d:60:cc brd ff:ff:ff:ff:ff:ff
3: ens192: <BROADCAST,MULTICAST,UP,LOWER_UP> mtu 1500 qdisc mq state UP mode DEFAULT group default qlen 1000
    link/ether 00:0c:29:0d:60:d6 brd ff:ff:ff:ff:ff:ff
4: ens224: <BROADCAST,MULTICAST,UP,LOWER_UP> mtu 1500 qdisc mq state UP mode DEFAULT group default qlen 1000
    link/ether 00:0c:29:0d:60:e0 brd ff:ff:ff:ff:ff:ff
5: ens256: <BROADCAST,MULTICAST,UP,LOWER_UP> mtu 1500 qdisc mq state UP mode DEFAULT group default qlen 1000
    link/ether 00:0c:29:0d:60:ea brd ff:ff:ff:ff:ff:ff
6: ens33: <BROADCAST,MULTICAST,UP,LOWER_UP>> mtu 1500 qdisc fq_codel state UP mode DEFAULT group default qlen 1000
    link/ether 00:50:56:00:00:04 brd ff:ff:ff:ff:ff:ff
7: docker0: <BROADCAST,MULTICAST,UP,LOWER_UP>> mtu 1500 qdisc noqueue state UP mode DEFAULT group default
    link/ether 02:42:4a:d3:09:25 brd ff:ff:ff:ff:ff:ff
21: vethb026b12@if20: <BROADCAST,MULTICAST,UP,LOWER_UP> mtu 1500 qdisc noqueue master docker0 state UP mode DEFAULT group default
    link/ether 2e:c5:7e:66:50:35 brd ff:ff:ff:ff:ff:ff link-netnsid 0
cisco@xrdcisco
Step 1 - Create data port macvlan interfaces
Create macvlan interfaces to use as data ports. This produces new interfaces with their own MAC address that ‘share’ the physical interface specified e.g. ens160 or ens192.
sudo ip link add ens160-mac link ens160 type macvlan mode bridge
sudo ip link add ens192-mac link ens192 type macvlan mode bridge
The 2 new mavlan interfaces show up in ip link show as follows:
cisco@xrdcisco:~$ ip link show | grep \\-mac
22: ens160-mac@ens160: <BROADCAST,MULTICAST> mtu 1500 qdisc noop state DOWN mode DEFAULT group default qlen 1000
23: ens192-mac@ens192: <BROADCAST,MULTICAST> mtu 1500 qdisc noop state DOWN mode DEFAULT group default qlen 1000
cisco@xrdcisco:~$
Step 2 - Create manageability port macvlan interfaces
Create macvlan interface to use for manageability, as well as a locally terminating maclvan interface on the same network to enable manageability access from the host. This locally terminating interface will be given an IP address that routes to the XRd manageability port (e.g. on the same subnet).
We’ll use the interface ens224 as the “physical” anchor for the mangeability network:
sudo ip link add ens224-mg link ens224 type macvlan mode bridge
# Terminate locally on the container host
sudo ip link add ens224-mg-local link ens224 type macvlan mode bridge
sudo ip address add 172.50.1.4/24 dev ens224-mg-local
sudo ip link set ens224-mg-local up
Note: The macvlan interfaces created link directly from XRd to the external connection with no interface exposed on the container host. Creating the extra macvlan interface (ens224-mg-local) that isn’t moved into the XRd container exposes an interface on the container host for manageability access e.g. SSH, GPRC.
Warning: When creating any new interfaces in Linux, there is a default restriction of 15 characters for the interface name (due to IFNAMSIZ length= 16 bytes used in the Linux kernel code. If you exceed that, you will see an error similar to: Error: Attribute failed policy validation. Try and keep the macvlan interface names you select as part of these steps, below 15 visible characters.
Step 3 - Create the Container
Create the container:
- The
XR_INTERFACESandXR_MGMT_INTERFACESenvironment variables map the created macvlan interfaces to XR data and management interfaces respectively. These are semicolon (and optional whitespace) separated entries, each of the form<underlying interface type>:<underlying interface identifier>,<comma separated optional flags>where: - underlying interface type:
linux(for the XRd control-plane image) orpci(for the XRd vRouter image) - underlying interface identifier: Linux interface name or PCI address, as applicable optional flags include:
xr_name=<XR name>: If unspecified, an XR name is automatically assigned- chksum: For simulations using virtual interfaces, checksum offload counteract may be required
snoop_v[4|6]: Snoop the IPv4/6 address of the interface, and add corresponding XR configurationsnoop_v[4|6]_default_route: Snoop the IPv4/6 default route(s) of the interface, and add corresponding XR configuration. May be specified for a maximum of one interface, and only for interfaces with the correspondingsnoop_v[4|6]flag specified.--net noneis specified so that the container is not added to the default Docker bridge network (this would add an extra unnecessary interface to the container).- Startup config is specified here using the
XR_EVERY_BOOT_CONFIGenvironment variable. This is optional. - The image used is the XRd control-plane image:
docker create \
--name xrd --cap-drop all \
--cap-add AUDIT_WRITE --cap-add CHOWN --cap-add DAC_OVERRIDE \
--cap-add FOWNER --cap-add FSETID --cap-add KILL \
--cap-add MKNOD --cap-add NET_BIND_SERVICE --cap-add NET_RAW \
--cap-add SETFCAP --cap-add SETGID --cap-add SETUID \
--cap-add SETPCAP --cap-add SYS_CHROOT --cap-add SYS_ADMIN \
--cap-add SYS_NICE --cap-add SYS_PTRACE --cap-add SYS_RESOURCE \
--cap-add NET_ADMIN --cap-add IPC_LOCK \
--device /dev/fuse --device /dev/net/tun \
--security-opt apparmor=unconfined \
--env XR_INTERFACES='linux:ens160-mac,xr_name=Gi0/0/0/0;linux:ens192-mac,xr_name=Gi0/0/0/1' \
--env XR_MGMT_INTERFACES='linux:ens224-mg,xr_name=MgmtEth0/RP0/CPU0/0,chksum' \
--env XR_EVERY_BOOT_CONFIG=/startup.cfg \
--mount type=bind,source=/home/cisco/xrd-tools/scripts/xr.config,target=/startup.cfg \
--net none \
-it localhost/xrd-control-plane
Note: The docker create command is used to set up the container with all the required options without actually starting it. Also notice the name xrd that we apply to the container during creation making it easier to reference the container in subsequent steps.
Start the xrd container:
cisco@xrdcisco:~$ docker start xrd
xrd
cisco@xrdcisco:~$
Determine the pid of the launched container and add the macvlan interfaces created earlier to the network namespace (netns) associated with the container pid (effectively we pass the macvlan interfaces into the newly launched container):
cisco@xrdcisco:~$ pid=$(docker inspect xrd -f '{{.State.Pid}}')
cisco@xrdcisco:~$ sudo ip link set ens160-mac netns $pid
cisco@xrdcisco:~$ sudo ip link set ens192-mac netns $pid
cisco@xrdcisco:~$ sudo ip link set ens224-mg netns $pid
Finally, drop into the container to see that interfaces have been picked up by XRd:
cisco@xrdcisco:~$ docker exec -it xrd /pkg/bin/xr_cli.sh

User Access Verification

Username: cisco
Password:


RP/0/RP0/CPU0:ios#show  ip int br
Sun Aug 28 14:34:30.361 UTC

Interface                      IP-Address      Status          Protocol Vrf-Name
MgmtEth0/RP0/CPU0/0            unassigned      Shutdown        Down     default
GigabitEthernet0/0/0/0         unassigned      Shutdown        Down     default
GigabitEthernet0/0/0/1         unassigned      Shutdown        Down     default
RP/0/RP0/CPU0:ios#
Great, the interfaces have been created! Now, let’s bring them up and configure the MgmtEth interface in the subnet 172.50.1.0/24 so that it’s reachable from the host-based mac-vlan interface (ens224-mg-local) that we created earlier.
RP/0/RP0/CPU0:ios(config)#int GigabitEthernet 0/0/0/0
RP/0/RP0/CPU0:ios(config-if)#no shutdown
RP/0/RP0/CPU0:ios(config-if)#int GigabitEthernet 0/0/0/1
RP/0/RP0/CPU0:ios(config-if)#no shutdown
RP/0/RP0/CPU0:ios(config-if)#exit
RP/0/RP0/CPU0:ios(config)#int MgmtEth 0/RP0/CPU0/0
RP/0/RP0/CPU0:ios(config-if)#no shutdown
RP/0/RP0/CPU0:ios(config-if)#commit
Sun Aug 28 14:54:47.290 UTC
RP/0/RP0/CPU0:ios(config-if)#
RP/0/RP0/CPU0:ios#
RP/0/RP0/CPU0:ios#
RP/0/RP0/CPU0:ios#show  ip int br
Sun Aug 28 14:54:53.384 UTC

Interface                      IP-Address      Status          Protocol Vrf-Name
MgmtEth0/RP0/CPU0/0            unassigned      Up              Up       default
GigabitEthernet0/0/0/0         unassigned      Up              Up       default
GigabitEthernet0/0/0/1         unassigned      Up              Up       default
RP/0/RP0/CPU0:ios#conf t
Sun Aug 28 14:55:03.625 UTC
RP/0/RP0/CPU0:ios(config)#int MgmtEth 0/RP0/CPU0/0
RP/0/RP0/CPU0:ios(config-if)#ipv4 address 172.50.1.3/24
RP/0/RP0/CPU0:ios(config-if)#commit
Sun Aug 28 14:55:36.302 UTC
RP/0/RP0/CPU0:ios(config-if)#
RP/0/RP0/CPU0:ios#
RP/0/RP0/CPU0:ios#
RP/0/RP0/CPU0:ios#ping 172.50.1.4
Sun Aug 28 14:55:46.551 UTC
Type escape sequence to abort.
Sending 5, 100-byte ICMP Echos to 172.50.1.4, timeout is 2 seconds:
!!!!!
Success rate is 100 percent (5/5), round-trip min/avg/max = 1/4/13 ms
RP/0/RP0/CPU0:ios#
Awesome, we’re able to ping out from the XRd instance to ens224-mg-local. Finally, configure ssh server on XRd and connect to the instance over SSH using the local connectivity provided by ens224-mg-local:
Sun Aug 28 14:56:05.183 UTC
RP/0/RP0/CPU0:ios(config)#ssh server v2
RP/0/RP0/CPU0:ios(config)#commit
Sun Aug 28 14:56:10.263 UTC
RP/0/RP0/CPU0:ios(config)#exit
RP/0/RP0/CPU0:ios#
RP/0/RP0/CPU0:ios#exit
cisco@xrdcisco:~$
cisco@xrdcisco:~$
cisco@xrdcisco:~$ ssh [email protected]
The authenticity of host '172.50.1.3 (172.50.1.3)' can't be established.
ECDSA key fingerprint is SHA256:sPt+YMSYjJmntBA2G5hfPMfUgVUVyKx7Z8zx+3NKOL8.
Are you sure you want to continue connecting (yes/no/[fingerprint])? yes
Warning: Permanently added '172.50.1.3' (ECDSA) to the list of known hosts.
Password:


RP/0/RP0/CPU0:ios#
RP/0/RP0/CPU0:ios#
Perfect! The external connectivity that we established via maclvan interfaces for the XRd control-plane instance was successful.
Boot XRd vRouter image using launch-xrd
Once you have the hang of the XRd Control-Plane image and its launch process using either launch-xrd or standalone docker, XRd vRouter is not much different. A few additional points however must be taken care of when trying to launch XRd vRouter in a standalone fashion with docker:
- The following capabilities are required, in addition to the default XRd Control Plane set:
SYS_RAWIO
- The following devices must be mounted, in addition to the default XRd Control Plane set:
/dev/vfio
- The following device cgroup rules are required, to allow the use of PCI driver character devices:
c *:* rwmorc <major>:* rwmif the major device number is known - The format of XR_INTERFACES is either: a semi-colon separated list of “pci:
: . " or a range of unspecified addresses via "pci-range:{first,last} " selecting a of interfaces (linux macvlan interfaces are not supported for XR_INTERFACES variable for XRd vRouter).
The good news is that #1, #2 and #3 are handled by launch-xrd automatically, so you only need to be aware of #4.
Let’s begin by dumping the available pci network devices on the host machine:
cisco@xrdcisco:~$ sudo lshw -businfo -c network
Bus info          Device           Class      Description
=========================================================
pci@0000:02:01.0  ens33            network    82545EM Gigabit Ethernet Controller (Copper)
pci@0000:03:00.0  ens160           network    VMXNET3 Ethernet Controller
pci@0000:0b:00.0  ens192           network    VMXNET3 Ethernet Controller
pci@0000:13:00.0  ens224           network    VMXNET3 Ethernet Controller
pci@0000:1b:00.0  ens256           network    VMXNET3 Ethernet Controller
                  ens224-mg-local  network    Ethernet interface
cisco@xrdcisco:~$
cisco@xrdcisco:~$
Now, use the --interfaces option to specify the list of interfaces as options to launch-xrd along with the --dry-run option to dump the underlying docker command being used:
cisco@xrdcisco:~/xrd-tools/scripts$ ./launch-xrd localhost/xrd-vrouter --interfaces "pci:1b:00.0;pci:03:00.0" --dry-run
docker run -it --rm --cap-drop all --cap-add AUDIT_WRITE --cap-add CHOWN --cap-add DAC_OVERRIDE --cap-add FOWNER --cap-add FSETID --cap-add KILL --cap-add MKNOD --cap-add NET_BIND_SERVICE --cap-add NET_RAW --cap-add SETFCAP --cap-add SETGID --cap-add SETUID --cap-add SETPCAP --cap-add SYS_CHROOT --cap-add IPC_LOCK --cap-add NET_ADMIN --cap-add SYS_ADMIN --cap-add SYS_NICE --cap-add SYS_PTRACE --cap-add SYS_RESOURCE --cap-add SYS_RAWIO --device /dev/fuse --device /dev/net/tun --security-opt apparmor=unconfined --security-opt label=disable -v /sys/fs/cgroup:/sys/fs/cgroup:ro --device /dev/vfio --device-cgroup-rule 'c *:* rwm' --env 'XR_INTERFACES=pci:1b:00.0;pci:03:00.0' --env XR_MGMT_INTERFACES=linux:eth0,chksum localhost/xrd-vrouter
cisco@xrdcisco:~/xrd-tools/scripts$
Doing pretty-dump of the docker command for better discernment:
docker run -it --rm \
--cap-drop all --cap-add AUDIT_WRITE \
--cap-add CHOWN --cap-add DAC_OVERRIDE \
--cap-add FOWNER --cap-add FSETID \
--cap-add KILL --cap-add MKNOD \
--cap-add NET_BIND_SERVICE --cap-add NET_RAW \
--cap-add SETFCAP --cap-add SETGID \
--cap-add SETUID --cap-add SETPCAP \
--cap-add SYS_CHROOT --cap-add IPC_LOCK \
--cap-add NET_ADMIN --cap-add SYS_ADMIN \
--cap-add SYS_NICE --cap-add SYS_PTRACE \
--cap-add SYS_RESOURCE --cap-add SYS_RAWIO \
--device /dev/fuse --device /dev/net/tun \
--security-opt apparmor=unconfined \
--security-opt label=disable -v /sys/fs/cgroup:/sys/fs/cgroup:ro \
--device /dev/vfio --device-cgroup-rule 'c *:* rwm' \
--env 'XR_INTERFACES=pci:1b:00.0;pci:03:00.0' \
--env XR_MGMT_INTERFACES=linux:eth0,chksum \
localhost/xrd-vrouter
Finally, launching the xrd-vrouter instance:
cisco@xrdcisco:~/xrd-tools/scripts$ ./launch-xrd localhost/xrd-vrouter --interfaces "pci:1b:00.0;pci:03:00.0"
CPU assignment: control-plane 0-6, dataplane packet threads 7, dataplane main core 6
Hugepage assignment: 3072M
Using interfaces: pci:1b:00.0 pci:03:00.0
Using management interface: eth0
systemd 230 running in system mode. (+PAM +AUDIT +SELINUX +IMA -APPARMOR +SMACK +SYSVINIT +UTMP -LIBCRYPTSETUP -GCRYPT -GNUTLS +ACL +XZ -LZ4 -SECCOMP +BLKID -ELFUTILS +KMOD -IDN)
Detected virtualization docker.
Detected architecture x86-64.

Welcome to Cisco XR (Base Distro SELinux and CGL) 9.0.0.26!

Set hostname to <931cb555b3b7>.
Initializing machine ID from random generator.
[  OK  ] Created slice System Slice.
[  OK  ] Reached target Swap.
[  OK  ] Listening on Journal Socket (/dev/log).
[  OK  ] Listening on Journal Socket.
         Starting Remount Root and Kernel File Systems...
[  OK  ] Reached target Remote File Systems.
         Mounting Debug File System...
         Mounting Configuration File System...
[  OK  ] Reached target Paths.
         Mounting Temporary Directory...
         Mounting Huge Pages File System...
[  OK  ] Listening on Syslog Socket.
         Starting Journal Service...
         Mounting FUSE Control File System...
[  OK  ] Created slice User and Session Slice.
[  OK  ] Reached target Slices.
[  OK  ] Mounted Debug File System.
[  OK  ] Mounted Configuration File System.
[  OK  ] Mounted FUSE Control File System.
[  OK  ] Mounted Huge Pages File System.
[  OK  ] Mounted Temporary Directory.
[  OK  ] Started Remount Root and Kernel File Systems.
         Starting Load/Save Random Seed...
         Starting Rebuild Hardware Database...
         Starting Copy selected logs to var/log/old directories...
         Starting Create System Users...
         Starting Monitoring of LVM2 mirrors, snapshots etc. using dmeventd or progress polling...
[  OK  ] Started Load/Save Random Seed.
[  OK  ] Started Journal Service.
         Starting Flush Journal to Persistent Storage...
[  OK  ] Started Create System Users.
[  OK  ] Started Flush Journal to Persistent Storage.
[  OK  ] Started Copy selected logs to var/log/old directories.
[  OK  ] Started Monitoring of LVM2 mirrors, snapshots etc. using dmeventd or progress polling.
[  OK  ] Reached target Local File Systems (Pre).
         Mounting /var/volatile...
         Mounting /mnt...
[  OK  ] Mounted /var/volatile.
[  OK  ] Mounted /mnt.
[  OK  ] Reached target Local File Systems.
         Starting Rebuild Dynamic Linker Cache...
         Starting Rebuild Journal Catalog...
         Starting Create Volatile Files and Directories...
[  OK  ] Started Rebuild Journal Catalog.
[  OK  ] Started Create Volatile Files and Directories.
         Starting Update UTMP about System Boot/Shutdown...
[  OK  ] Started Rebuild Dynamic Linker Cache.
[  OK  ] Started Update UTMP about System Boot/Shutdown.
[  OK  ] Started Rebuild Hardware Database.
         Starting Update is Completed...
[  OK  ] Started Update is Completed.
[  OK  ] Reached target System Initialization.
[  OK  ] Started Daily Cleanup of Temporary Directories.
[  OK  ] Reached target Timers.
[  OK  ] Listening on D-Bus System Message Bus Socket.
[  OK  ] Reached target Sockets.
[  OK  ] Reached target Basic System.
         Starting IOS-XR Setup Non-Root related tasks...
[  OK  ] Started IOS-XR XRd Core Watcher.
[  OK  ] Started Periodic Command Scheduler.
[  OK  ] Started Job spooling tools.
         Starting OpenSSH Key Generation...
[  OK  ] Started D-Bus System Message Bus.
[  OK  ] Reached target Network.
         Starting Permit User Sessions...
         Starting Xinetd A Powerful Replacement For Inetd...
         Starting /etc/rc.local Compatibility...
         Starting Resets System Activity Logs...
[  OK  ] Started Service for factory reset.
         Starting sysklogd Kernel Logging Service...
         Starting System Logging Service...
[  OK  ] Started Permit User Sessions.
[  OK  ] Started /etc/rc.local Compatibility.
[  OK  ] Reached target Login Prompts.
[  OK  ] Started Xinetd A Powerful Replacement For Inetd.
[  OK  ] Started Resets System Activity Logs.
[  OK  ] Reached target Multi-User System.
         Starting Update UTMP about System Runlevel Changes...
[  OK  ] Started Update UTMP about System Runlevel Changes.
[  OK  ] Started IOS-XR Setup Non-Root related tasks.
[  OK  ] Started OpenSSH Key Generation.
         Starting IOS-XR ISO Installation...
[  OK  ] Started System Logging Service.
[  OK  ] Started sysklogd Kernel Logging Service.
[294072.879365] xrnginstall[410]: 2022 Aug 28 15:32:20.456 UTC: Setting up dumper and build info files
[294072.961666] xrnginstall[410]: 2022 Aug 28 15:32:20.539 UTC: XR Lineup:  r77x.lu%EFR-00000436820
[294072.965596] xrnginstall[410]: 2022 Aug 28 15:32:20.542 UTC: XR Version: 7.7.1
[294072.973965] xrnginstall[410]: 2022 Aug 28 15:32:20.551 UTC: Completed set up of dumper and build info files
[294072.979433] xrnginstall[410]: 2022 Aug 28 15:32:20.556 UTC: Preparing IOS-XR (first boot)
[294073.103570] xrnginstall[410]: 2022 Aug 28 15:32:20.680 UTC: Checking if rollback cleanup is required
[294073.110342] xrnginstall[410]: 2022 Aug 28 15:32:20.687 UTC: Finished rollback cleanup stage
[294073.115788] xrnginstall[410]: 2022 Aug 28 15:32:20.692 UTC: Single node: starting XR
[294073.127630] xrnginstall[410]: 2022 Aug 28 15:32:20.704 UTC: xrnginstall completed successfully
[  OK  ] Started IOS-XR ISO Installation.
         Starting IOS-XR XRd...
[  OK  ] Started Cisco Directory Services.
[  OK  ] Started IOS-XR XRd.
         Starting IOS-XR Reaperd and Process Manager...
[  OK  ] Started IOS-XR Reaperd and Process Manager.
[  OK  ] Reached target XR installation and startup.


ios con0/RP0/CPU0 is now available


Press RETURN to get started.


This product contains cryptographic features and is subject to United
States and local country laws governing import, export, transfer and
use. Delivery of Cisco cryptographic products does not imply third-party
authority to import, export, distribute or use encryption. Importers,
exporters, distributors and users are responsible for compliance with
U.S. and local country laws. By using this product you agree to comply
with applicable laws and regulations. If you are unable to comply with
U.S. and local laws, return this product immediately.

A summary of U.S. laws governing Cisco cryptographic products may be
found at:
http://www.cisco.com/wwl/export/crypto/tool/stqrg.html

If you require further assistance please contact us by sending email to
[email protected].


RP/0/RP0/CPU0:Aug 28 15:32:58.435 UTC: pyztp2[179]: %INFRA-ZTP-4-EXITED : ZTP exited

!!!!!!!!!!!!!!!!!!!! NO root-system username is configured. Need to configure root-system username. !!!!!!!!!!!!!!!!!!!!

         --- Administrative User Dialog ---


  Enter root-system username: cisco
  Enter secret:
  Enter secret again:
Use the 'configure' command to modify this configuration.
User Access Verification

Username: cisco
Password:


RP/0/RP0/CPU0:ios#
RP/0/RP0/CPU0:ios#
RP/0/RP0/CPU0:ios#show  ip int br
Sun Aug 28 15:33:42.391 UTC

Interface                      IP-Address      Status          Protocol Vrf-Name
MgmtEth0/RP0/CPU0/0            unassigned      Shutdown        Down     default
TenGigE0/0/0/0                 unassigned      Shutdown        Down     default
TenGigE0/0/0/1                 unassigned      Shutdown        Down     default
RP/0/RP0/CPU0:ios#
RP/0/RP0/CPU0:ios#
The TenGig interfaces showing up in the “show ip interface brief” output are the two pci interfaces we just passed in as input to the launch-xrd script.
And there you have it! We learnt how to use the launch-xrd script which is part of the xrd-tools repository to launch both the XRd control-plane and the XRd vRouter images, taking care of their respective requirements, successfully. We further looked at using the standalone docker commands and the different ways to interact with the XRd instances -configuration, SSH access, ZTP automation and more. Next up - we’ll look at bringing up XRd topologies using docker-compose.
Part-6 of the XRd tutorials Series here: XRd with Docker-compose: Control-Plane.
Leave a Comment