
Getting Started with XRd on AWS
Disclaimer The CloudFormation templates used in this tutorial are now deprecated. Please refer to the XRd with Terraform tutorial instead.
Introduction
With the release of IOS XR 7.8.1, XRd is supported as a Cloud Router and SR-PCE. In this tutorial we will explore how to deploy a topology of XRd cloud routers on Amazon Elastic Kubernetes Service (EKS).
Prerequisites
We will need the a XRd vRouter image release 7.8.1 or later. The steps to do this was outlined in a previous tutorial. In addition, we will need an AWS account and the aws cli installed and configured on our local machine. Although these following tools aren’t strictly required to launch XRd on EKS, we will use them in our tutorial:
kubectldockerskopeohelm
Clone the XRd on AWS EKS repository for access to cloudformation templates and sample scripts that we will use in this deployment.
tadeshpa@TADESHPA-M-F92B ~> git clone --recurse-submodules https://github.com/ios-xr/xrd-eks.git
Cloning into 'xrd-eks'...
remote: Enumerating objects: 177, done.
remote: Counting objects: 100% (177/177), done.
remote: Compressing objects: 100% (115/115), done.
remote: Total 177 (delta 73), reused 135 (delta 48), pack-reused 0
Receiving objects: 100% (177/177), 105.08 KiB | 2.39 MiB/s, done.
Resolving deltas: 100% (73/73), done.
Submodule 'submodules/quickstart-amazon-eks' (https://github.com/aws-quickstart/quickstart-amazon-eks.git) registered for path 'submodules/quickstart-amazon-eks'
Submodule 'submodules/quickstart-aws-vpc' (https://github.com/aws-quickstart/quickstart-aws-vpc.git) registered for path 'submodules/quickstart-aws-vpc'
Cloning into '/Users/matgreen/test/xrd-eks/submodules/quickstart-amazon-eks'...
remote: Enumerating objects: 6870, done.
remote: Counting objects: 100% (6870/6870), done.
remote: Compressing objects: 100% (2240/2240), done.
remote: Total 6870 (delta 4288), reused 6748 (delta 4196), pack-reused 0
Receiving objects: 100% (6870/6870), 430.56 MiB | 8.02 MiB/s, done.
Resolving deltas: 100% (4288/4288), done.
Cloning into '/Users/matgreen/test/xrd-eks/submodules/quickstart-aws-vpc'...
remote: Enumerating objects: 1118, done.
remote: Counting objects: 100% (432/432), done.
remote: Compressing objects: 100% (195/195), done.
remote: Total 1118 (delta 233), reused 406 (delta 223), pack-reused 686
Receiving objects: 100% (1118/1118), 1.26 MiB | 6.80 MiB/s, done.
Resolving deltas: 100% (654/654), done.
Submodule path 'submodules/quickstart-amazon-eks': checked out 'cfa2cfa3bfd218195230cb1fc1ad488055563ef2'
<snip>
Submodule path 'submodules/quickstart-aws-vpc': checked out '9dc47510f71f1fb6baf8c4e96b5330a6f51f540e'
From this repository, we will directly use three scripts for the tutorial:
publish-ecr- Places XRd container images in a container registry on AWSpublish-s3-bucket- Uploads example cloudformation templates and AMI assets from the github repository to an S3 bucket on AWScreate-stack- Automates the deployment of an example topology using cloudformation templates
Publish XRd Images on Elastic Container Registry
EKS needs to pull the XRd image from a container image repository which is accessible to AWS. For this, we will create a repository using AWS’s ECR (Elastic Container Registry) service and host the XRd images there.
tadeshpa@TADESHPA-M-F92B ~/xrd-eks (main) [1]> ./publish-ecr xrd-vrouter-container-x64.dockerv1.tgz
Login Succeeded!
{
    "repository": {
        "repositoryArn": "arn:aws:ecr:us-east-2:655415053484:repository/xrd/xrd-vrouter",
        "registryId": "655415053484",
        "repositoryName": "xrd/xrd-vrouter",
        "repositoryUri": "655415053484.dkr.ecr.us-east-2.amazonaws.com/xrd/xrd-vrouter",
        "createdAt": "2022-12-02T14:06:36-08:00",
        "imageTagMutability": "MUTABLE",
        "imageScanningConfiguration": {
            "scanOnPush": false
        },
        "encryptionConfiguration": {
            "encryptionType": "AES256"
        }
    }
}
Getting image source signatures
Copying blob 4952cb498877 done
Copying config c795cd1683 done
Writing manifest to image destination
Storing signatures
Image is now available at 655415053484.dkr.ecr.us-east-2.amazonaws.com/xrd/xrd-vrouter:latest
Now if we check our ECR Repositories list on the AWS console, we can see that an xrd-vrouter repository has been created 
Cloudformation Templates and AMI Assets
In the XRd on AWS EKS github repository, a number of Cloudformation templates are provided as building blocks for bringing up and experimenting with XRd (these templates are provided as open-source artifacts without cisco support).
There are three types of templates included in the github repository:
- Atomic Building Block - elements used to build a full deployment stack.
xrd-vpc - Create VPC suitable for running XRd. Augments aws-vpc with additional subnets to build network topologies with. These subnets are tagged so that topologies can be built referring to the tag rather than the SubnetId which varies every time a new VPC is created.
- xrd-eks-existing-vpc - Create EKS control plane suitable for running XRd using an existing VPC. Augments amazon-eks-entrypoint-existing-vpc with XRd K8S settings and installs Multus. Includes provisioning a Bastion for access to worker nodes
- xrd-eks-ami - Creates an AMI for the EKS worker node which is able to run XRd vRouter. Builds and installs a patched version of the igb_uio driver to add write-combine supported which in turn is needed to achieve high volume and low latency on AWS ENA interfaces. Installs a tuned profile to isolate cores and prevent interrupts from running on data processing cores etc.
- xrd-eks-node-launch-template - Create a node launch template suitable for running XRd.
- xrd-ec2-network-interface Create a network interface on a subnet and attach it to an EC2 instance. The subnet is identified by tag rather than SubnetId. The tag is constant across VPCs, whereas the SubnetId varies.
- Composite Building Block - convenient combinations of the atomic building block templates.
xrd-eks-new-vpc - Create EKS control plane and VPC. Composite of xrd-vpc and xrd-eks-existing-vpc.
xrd-eks-node - Create an EKS worker node suitable for hosting an XRd instance. Brings together xrd-eks-node-launch-template and xrd-ec2-network-interface to create a worker node with interfaces attached to the desired subnets. The EC2 instance is labelled to provide a target for the associated XRd instance.
Application - example XRd deployments.
- xrd-overlay-example-existing-eks - Two routers connected via an overlay constructed using GRE, IS-IS and L3VPN. Each router is connected to a simple container workload emulating a NF in an isolated VRF.
- xrd-singleton-existing-eks - Single XRd instance of desired platform type. This template can also be a useful building block.
- xrd-example - Creates a complete stack, including a parameter to choose either ‘overlay’ or ‘singleton’
The application templates that we deploy create nested stacks, since they may reference multiple atomic or composite building blocks. Due to this, all necessary templates should be placed in an S3 Bucket so that Cloudformation can easily access them.
In addition to the cloudformation templates, we will also place the ami assets, in the same S3 bucket. These AMI Assets are required so an AMI suitable for running XRd vRouter can be created as part of the CloudFormation stack. This AMI is an Amazon Linux 2 instance with modifications made to several OS-level settings so that the XRd vRouter can maximize performance. This is accomplished by using the tool TuneD to:
- Turn off kernel timer ticks
- Offload kernel RCU callbacks
- Prevent process scheduling
- Offload IRQ interrupts
The XRd vRouter also requires an interface driver to be loaded in the underlying OS’s kernel. When running on AWS EKS, this interface driver must support write combining as described in the DPDK documentation. XRd has been validated using the igb_uio interface driver from DPDK 19.11.12 LTS, and building and loading this module is done as a part of a script included in the AMI assets.
Publishing S3 Bucket
The script publish-s3-bucket automates the process of creating the bucket and uploading the relevant resources.
tadeshpa@TADESHPA-M-F92B ~/xrd-eks (main) [254]> ./publish-s3-bucket
Creating bucket 655415053484-xrd-quickstart...
{
    "Location": "http://655415053484-xrd-quickstart.s3.amazonaws.com/"
}
Syncing CF templates to bucket...
upload: cf-templates/xrd-ec2-network-interface-cf.yaml to s3://655415053484-xrd-quickstart/xrd-eks/cf-templates/xrd-ec2-network-interface-cf.yaml
upload: cf-templates/xrd-eks-new-vpc-cf.yaml to s3://655415053484-xrd-quickstart/xrd-eks/cf-templates/xrd-eks-new-vpc-cf.yaml
upload: cf-templates/xrd-vpc-cf.yaml to s3://655415053484-xrd-quickstart/xrd-eks/cf-templates/xrd-vpc-cf.yaml
upload: cf-templates/xrd-eks-ami-cf.yaml to s3://655415053484-xrd-quickstart/xrd-eks/cf-templates/xrd-eks-ami-cf.yaml
upload: cf-templates/xrd-overlay-example-existing-eks-cf.yaml to s3://655415053484-xrd-quickstart/xrd-eks/cf-templates/xrd-overlay-example-existing-eks-cf.yaml
upload: cf-templates/xrd-eks-existing-vpc-cf.yaml to s3://655415053484-xrd-quickstart/xrd-eks/cf-templates/xrd-eks-existing-vpc-cf.yaml
upload: cf-templates/xrd-example-cf.yaml to s3://655415053484-xrd-quickstart/xrd-eks/cf-templates/xrd-example-cf.yaml
upload: cf-templates/xrd-eks-node-cf.yaml to s3://655415053484-xrd-quickstart/xrd-eks/cf-templates/xrd-eks-node-cf.yaml
upload: cf-templates/xrd-eks-node-launch-template-cf.yaml to s3://655415053484-xrd-quickstart/xrd-eks/cf-templates/xrd-eks-node-launch-template-cf.yaml
upload: cf-templates/xrd-singleton-existing-eks-cf.yaml to s3://655415053484-xrd-quickstart/xrd-eks/cf-templates/xrd-singleton-existing-eks-cf.yaml
Syncing AMI assets to bucket...
upload: ami_assets/etc/modprobe.d/igb_uio.conf to s3://655415053484-xrd-quickstart/xrd-eks/ami_assets/etc/modprobe.d/igb_uio.conf
upload: ami_assets/etc/modprobe.d/vfio.conf to s3://655415053484-xrd-quickstart/xrd-eks/ami_assets/etc/modprobe.d/vfio.conf
upload: ami_assets/etc/tuned/xrd-eks-node-variables.conf to s3://655415053484-xrd-quickstart/xrd-eks/ami_assets/etc/tuned/xrd-eks-node-variables.conf
upload: ami_assets/etc/tuned/xrd-eks-node/tuned.conf to s3://655415053484-xrd-quickstart/xrd-eks/ami_assets/etc/tuned/xrd-eks-node/tuned.conf
upload: ami_assets/etc/modules-load.d/uio.conf to s3://655415053484-xrd-quickstart/xrd-eks/ami_assets/etc/modules-load.d/uio.conf
upload: ami_assets/etc/modules-load.d/vfio-pci.conf to s3://655415053484-xrd-quickstart/xrd-eks/ami_assets/etc/modules-load.d/vfio-pci.conf
upload: ami_assets/etc/xrd/bootstrap.sh to s3://655415053484-xrd-quickstart/xrd-eks/ami_assets/etc/xrd/bootstrap.sh
upload: ami_assets/etc/modules-load.d/igb_uio.conf to s3://655415053484-xrd-quickstart/xrd-eks/ami_assets/etc/modules-load.d/igb_uio.conf
upload: ami_assets/etc/tuned/xrd-eks-node/defirqaffinity.py to s3://655415053484-xrd-quickstart/xrd-eks/ami_assets/etc/tuned/xrd-eks-node/defirqaffinity.py
upload: ami_assets/etc/xrd/xrd-vrouter-build-ami.sh to s3://655415053484-xrd-quickstart/xrd-eks/ami_assets/etc/xrd/xrd-vrouter-build-ami.sh

Successfully populated S3 bucket
Use the following values in your XRd CloudFormation stack:
  XRd resource S3 bucket name: 655415053484-xrd-quickstart
  XRd resource S3 bucket region: us-east-2
  XRd resource S3 bucket key prefix: xrd-eks/
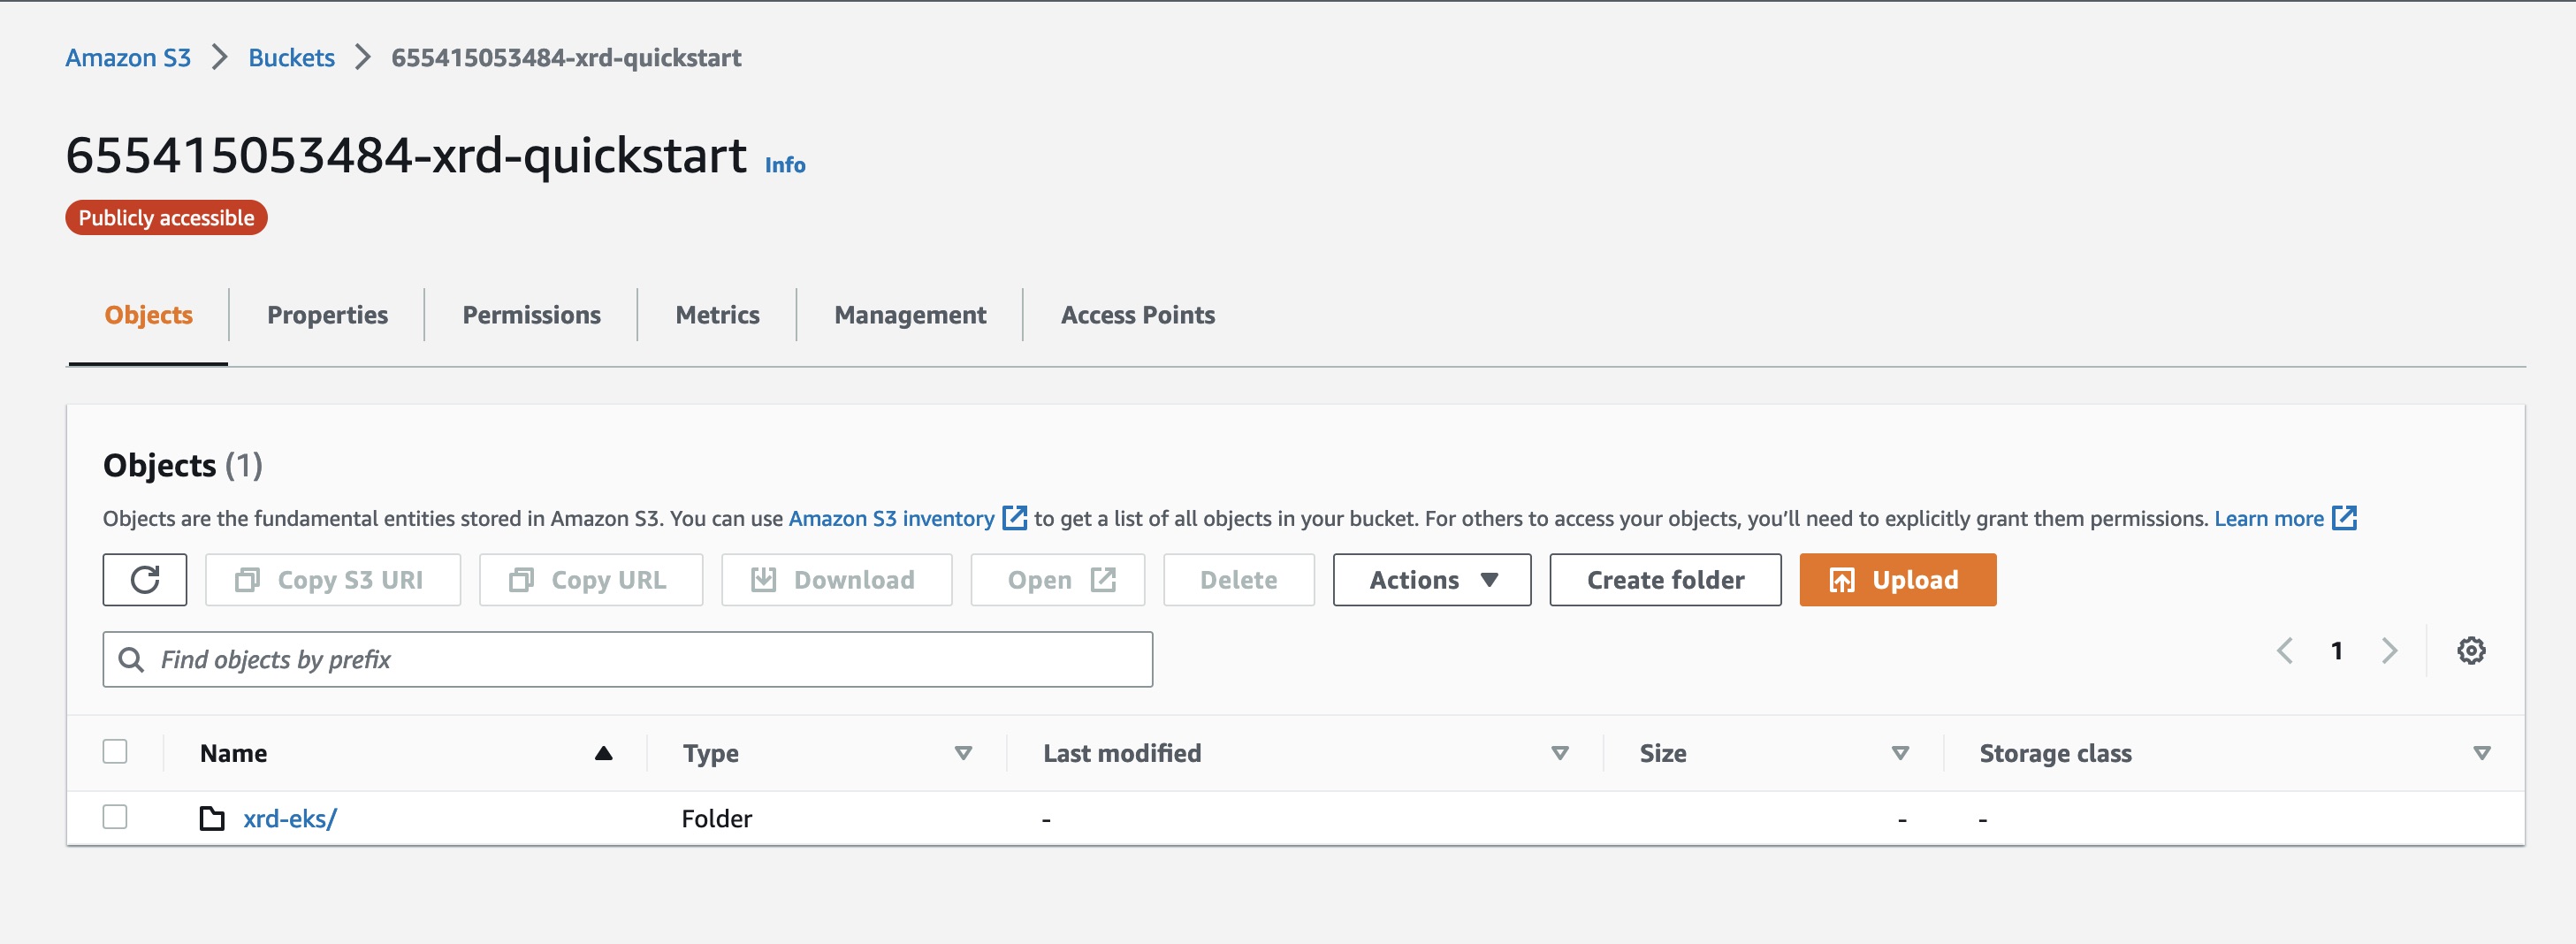
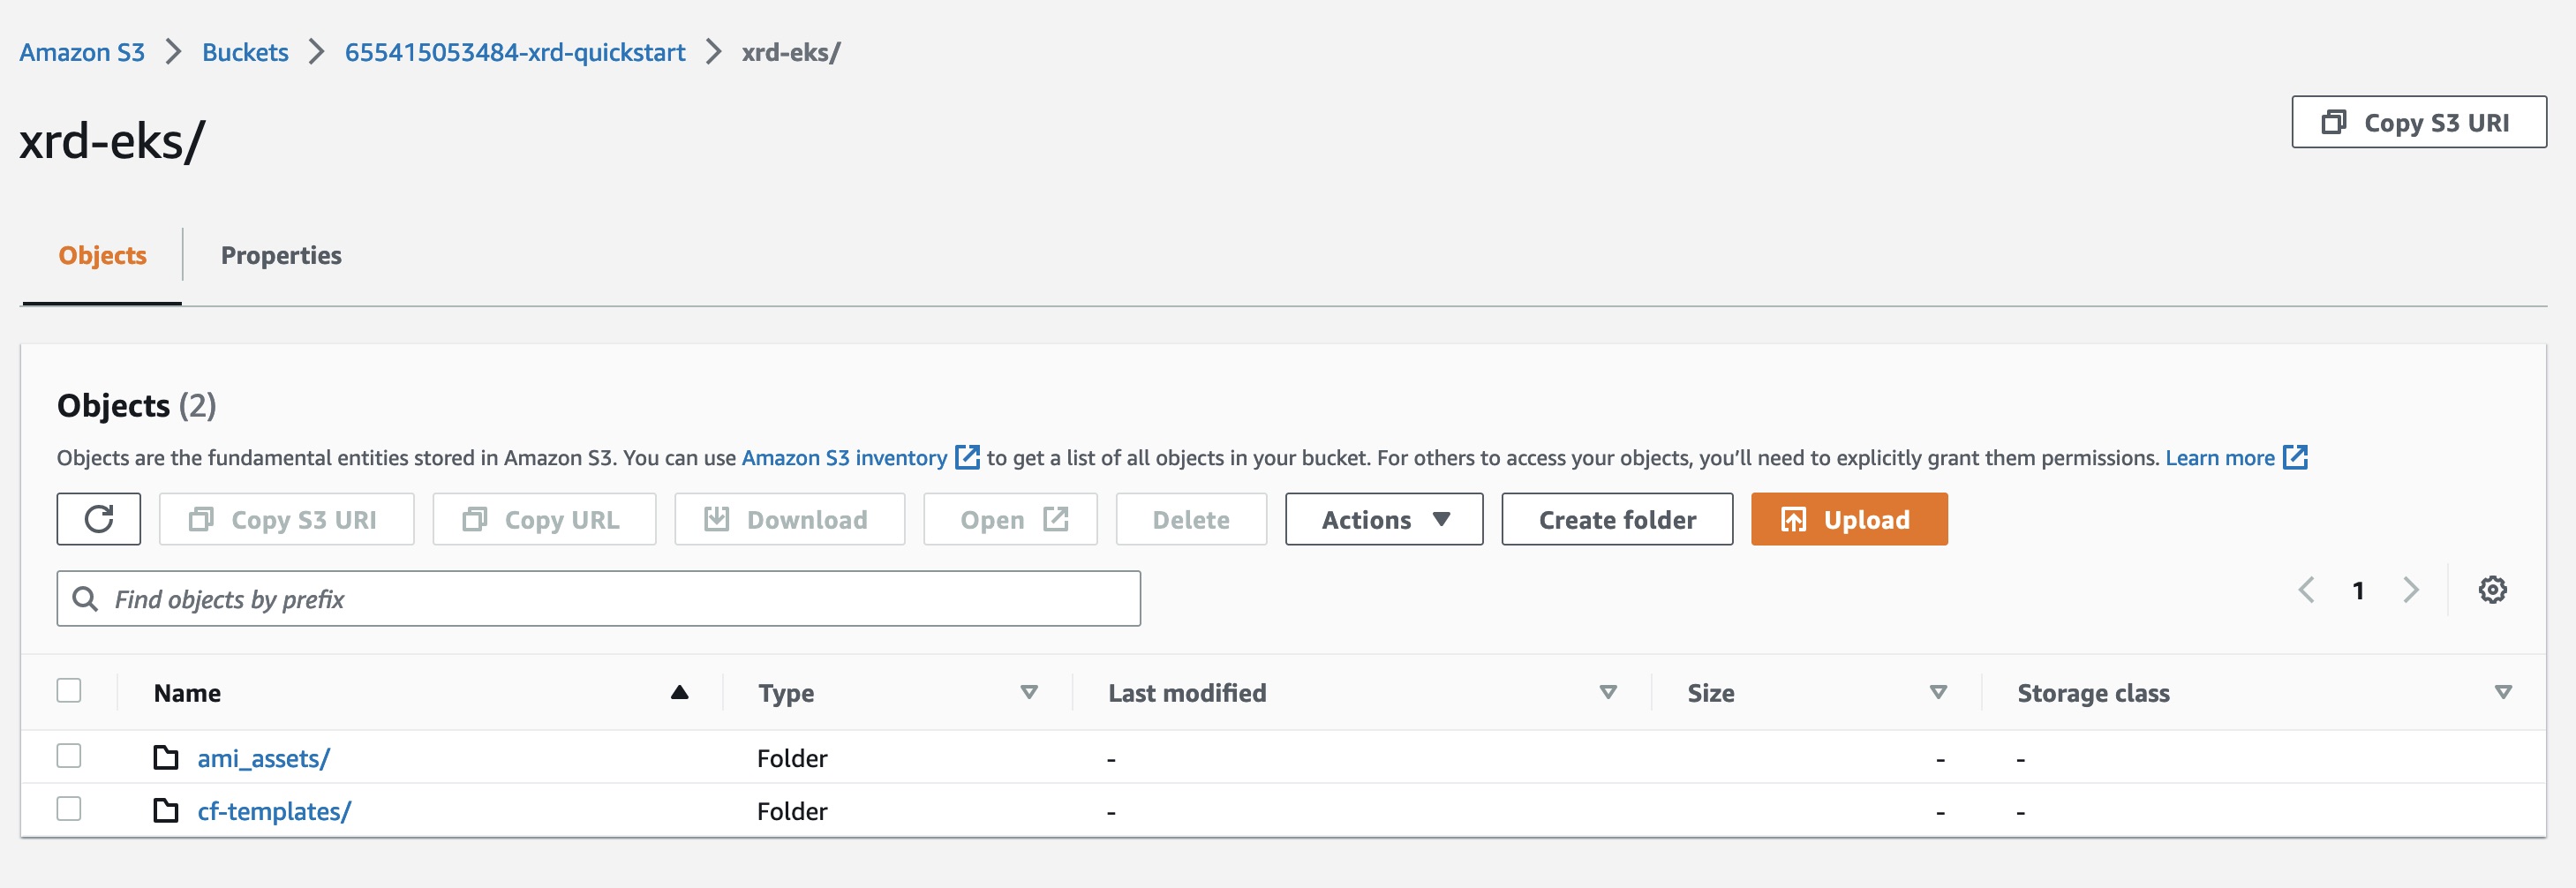
Now when we navigate to the AWS Console and view S3 buckets, we can see that one has been created with the relevant resources uploaded:
Launching the Application
We need an AWS key-pair to access the Bastion and Worker nodes created by stack. If you have not already created one in the region that you are deploying the cluster in, follow this guide.
Launch from AWS Console
Navigate to ‘Create Stack’ within the AWS console 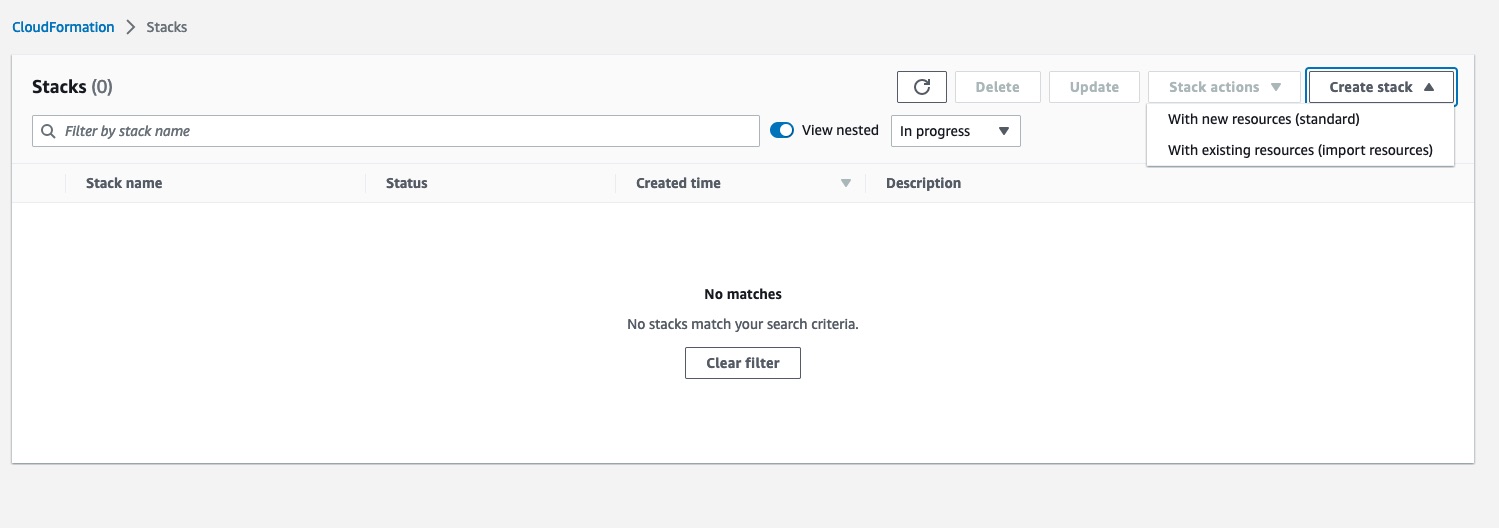 Next, we will copy the url of the Cloudformation Template that we want to deploy. In this case, we will select
 xrd-example-cf.yaml 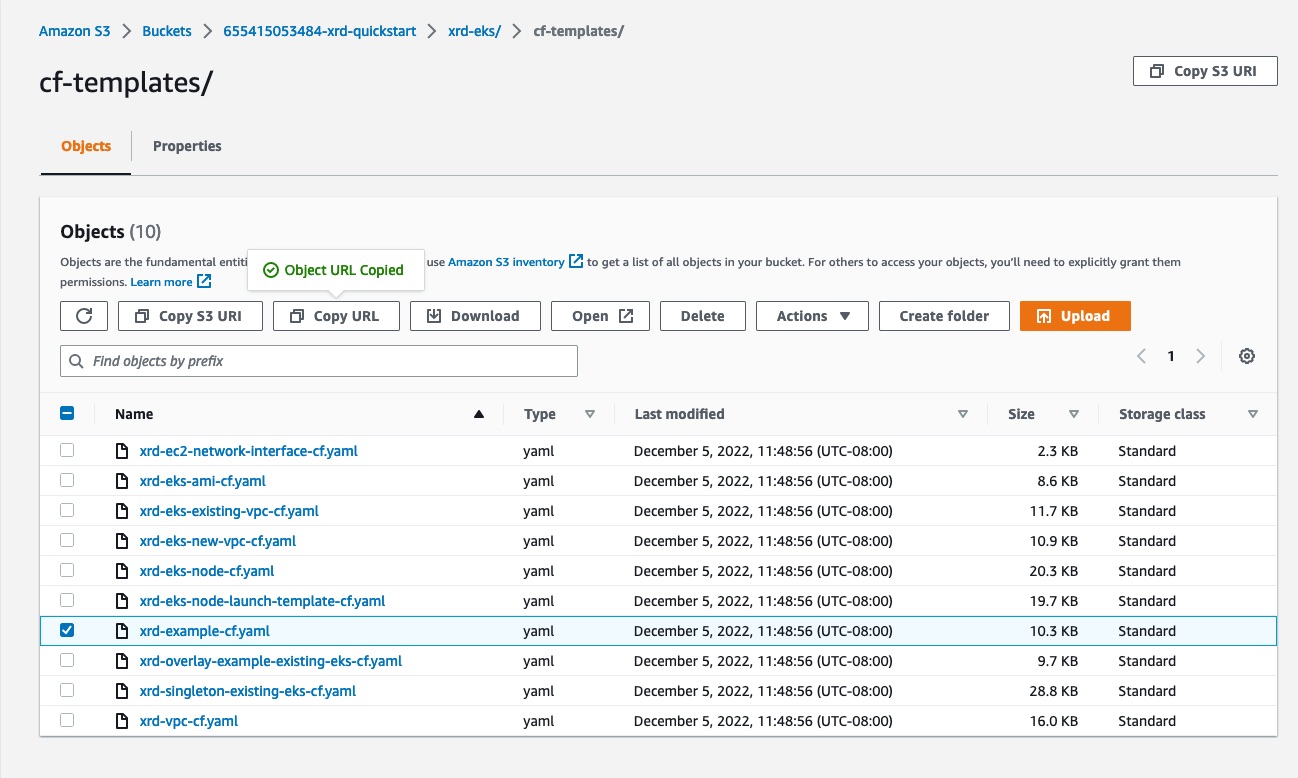
Create Stack

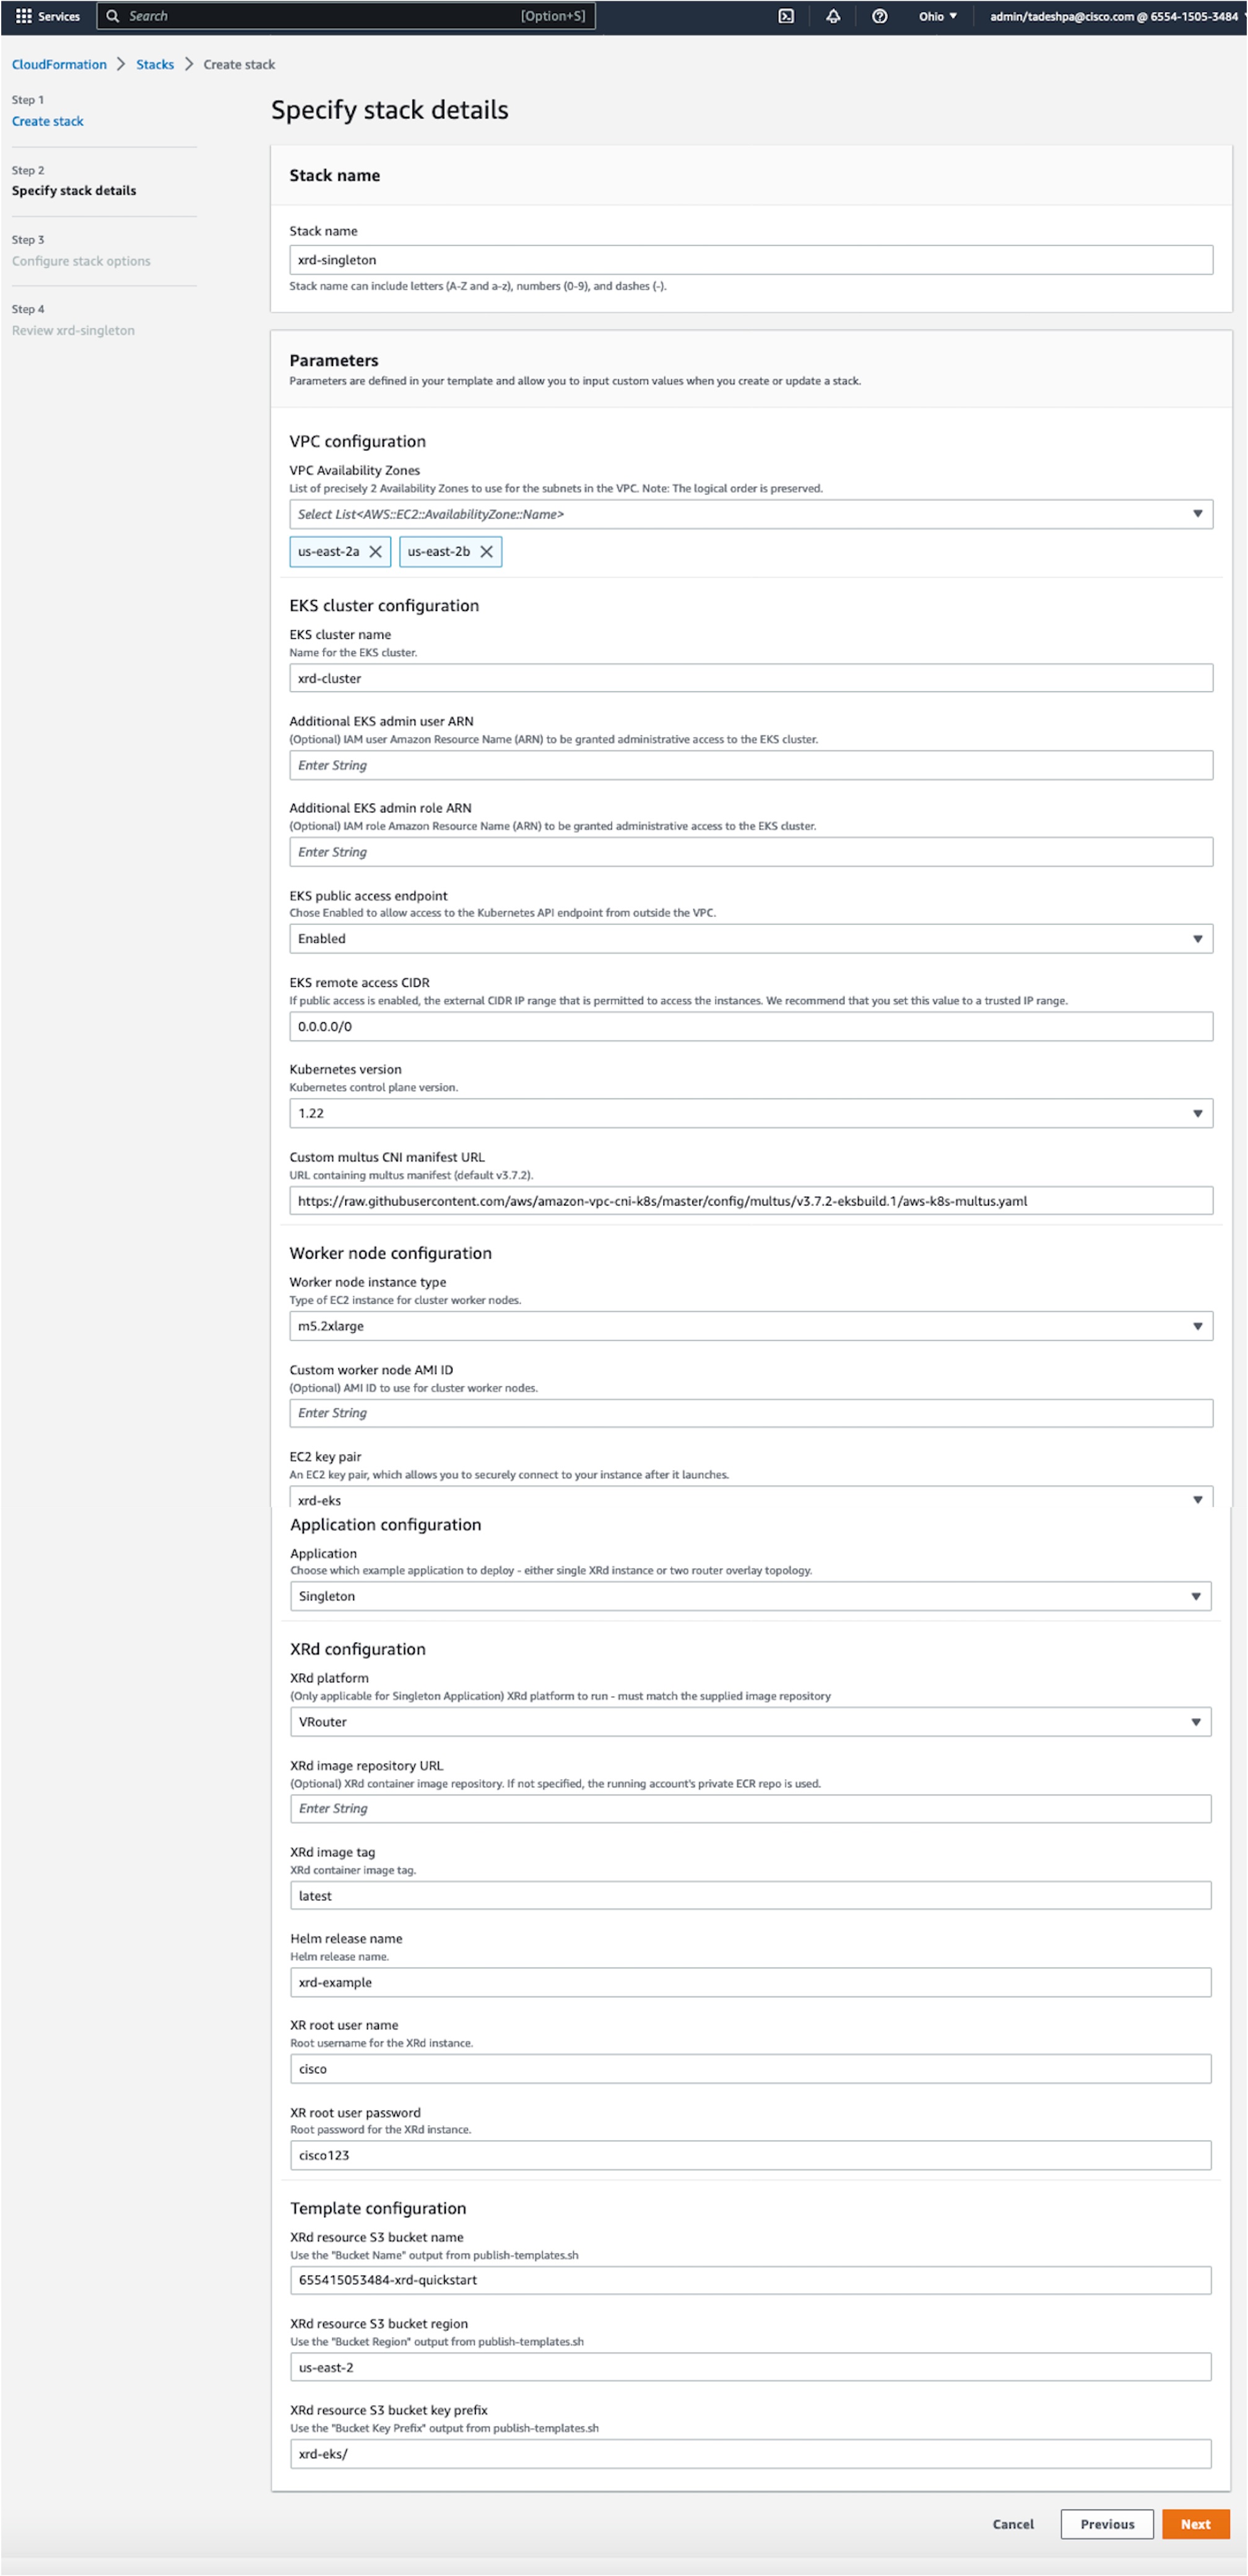
Specify Stack Details
We will fill in these following parameters:
- VPC Availability Zones - Choose any two offered AZs.
- EKS public access endpoint - Chose ‘Enabled’ to allow external access to the cluster API.
- EKS remote access CIDR - Choose an IP subnet to allow external access from (or 0.0.0.0/0 to allow access from everywhere).
- EC2 key pair - Choose the EC2 key pair to install to the bastion and worker nodes (per above).
- Application - Choose ‘Singleton’
- XR root user name - Specify the root user name for XRd instances.
- XR root user password - Specify the root user password for XRd instances.
- XRd resource S3 bucket name - from the
publish-s3-bucketscript output. - XRd resource S3 bucket region - as previous.
- XRd resource S3 bucket key prefix - as previous.
Launch Stack
We can skip Step 3 (Configure stack options), and proceed to step 4, where we will acknowledge the capabilities and click submit. 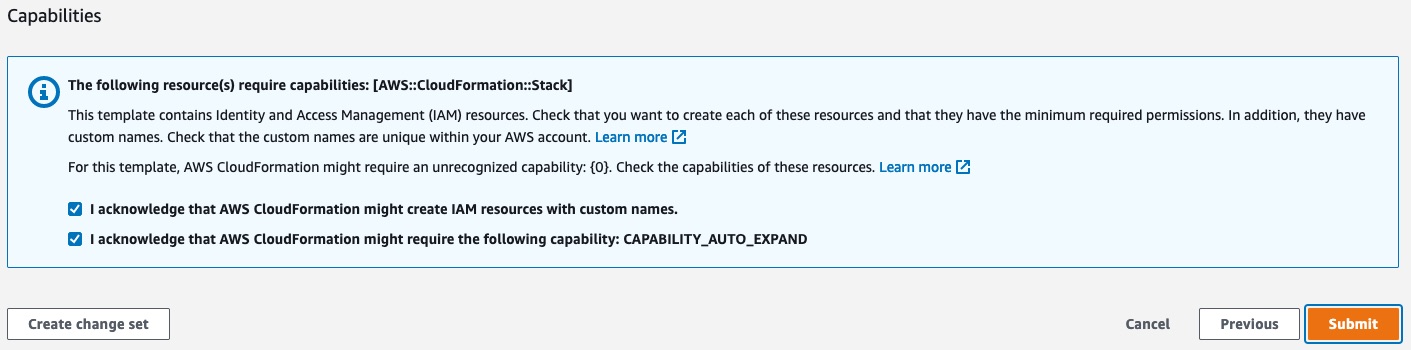
The process of launching the stack can take over an hour. We can follow the progress in the events tab of our stack in the AWS Console. 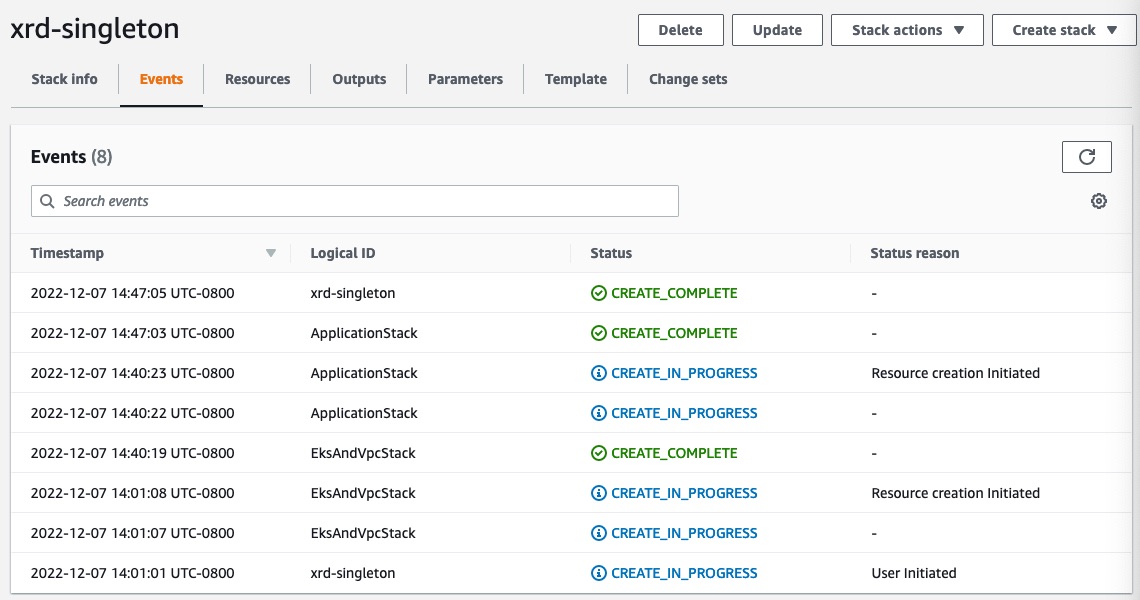
Connect to XRd
Navigate to the instances view in the AWS Console.  We have two instances running - EKSBastion and one worker node. The Bastion host is the point of entry to our network of XRds. The worker node is the host machine of the XRd container.
Connect using Kubernetes command line
Update the kubeconfig
bash-5.2$ aws eks update-kubeconfig --name xrd-cluster --profile xrdocs
Updated context arn:aws:eks:us-east-2:655415053484:cluster/xrd-cluster in /Users/tadeshpa/.kube/config
Check the current deployed pods
bash-5.2$ kubectl get pods
NAME                        READY   STATUS    RESTARTS   AGE
xrd-example-xrd-vrouter-0   1/1     Running   0          19m
Connect the container using the credentials we supplied during the Cloudformation Stack Launch
bash-5.2$ kubectl get pods
NAME                        READY   STATUS    RESTARTS   AGE
xrd-example-xrd-vrouter-0   1/1     Running   0          19m
bash-5.2$ kubectl exec xrd-example-xrd-vrouter-0 -it -- xr

User Access Verification

Username: cisco
Password:


RP/0/RP0/CPU0:xrd#show ip interface brief
Thu Dec  8 19:32:22.603 UTC

Interface                      IP-Address      Status          Protocol Vrf-Name
HundredGigE0/0/0/0             10.0.1.11       Up              Up       default
HundredGigE0/0/0/1             10.0.2.11       Up              Up       default
HundredGigE0/0/0/2             10.0.3.11       Up              Up       default
Launch from Command Line
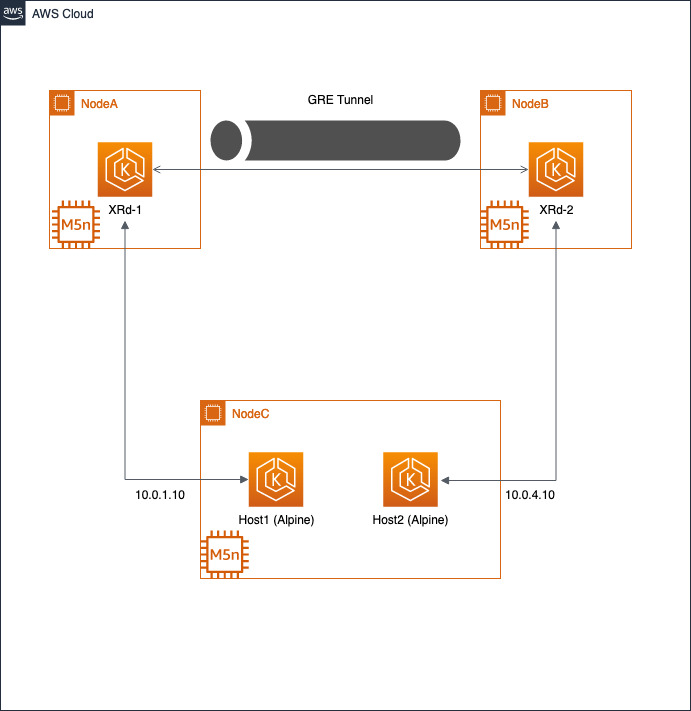
The create-stack script will create a more complex application: xrd-overlay. This topology includes two routers connected via an overlay constructed using GRE, IS-IS and L3VPN. Each router is also connected to an alpine linux container workload emulating a NF in an isolated VRF.
tadeshpa@TADESHPA-M-F92B ~/xrd-eks (main)> ./create-stack -h
Usage: create-stack -u XR_USERNAME -p XR_PASSWORD -k EC2_KEY_PAIR [-a CUSTOM_AMI_ID]

Create an example XRd CF stack
tadeshpa@TADESHPA-M-F92B ~/xrd-eks (main)> ./create-stack -u cisco -p cisco123 -k xrd-eks
+ aws cloudformation delete-stack --stack-name xrd-Overlay
+ aws cloudformation wait stack-delete-complete --stack-name xrd-Overlay
+ aws cloudformation create-stack --stack-name xrd-Overlay --template-url https://655415053484-xrd-quickstart.s3.us-east-2.amazonaws.com/xrd-eks/cf-templates/xrd-example-cf.yaml --disable-rollback --capabilities CAPABILITY_IAM CAPABILITY_NAMED_IAM CAPABILITY_AUTO_EXPAND --parameters ParameterKey=XrdS3BucketName,ParameterValue=655415053484-xrd-quickstart ParameterKey=XrdS3BucketRegion,ParameterValue=us-east-2 ParameterKey=XrdS3KeyPrefix,ParameterValue=xrd-eks/ ParameterKey=EKSClusterName,ParameterValue=xrd-cluster 'ParameterKey=AvailabilityZones,ParameterValue="us-east-2a,us-east-2b"' ParameterKey=RemoteAccessCIDR,ParameterValue=0.0.0.0/0 ParameterKey=EKSPublicAccessEndpoint,ParameterValue=Enabled ParameterKey=KeyPairName,ParameterValue=xrd-eks ParameterKey=NodeInstanceType,ParameterValue=m5.2xlarge ParameterKey=Application,ParameterValue=Overlay ParameterKey=Platform,ParameterValue=VRouter ParameterKey=XrdRootUserName,ParameterValue=cisco ParameterKey=XrdRootPassword,ParameterValue=cisco123
{
    "StackId": "arn:aws:cloudformation:us-east-2:655415053484:stack/xrd-Overlay/7f843610-7a65-11ed-90a2-02cf6e66352a"
}
+ aws cloudformation wait stack-create-complete --stack-name xrd-Overlay
+ aws cloudformation list-stacks --query 'StackSummaries[?StackName==`xrd-Overlay` && StackStatus!=`DELETE_COMPLETE`].{Name: StackName, Status: StackStatus, Id: StackId}'
[
    {
        "Name": "xrd-Overlay",
        "Status": "CREATE_COMPLETE",
        "Id": "arn:aws:cloudformation:us-east-2:655415053484:stack/xrd-Overlay/7f843610-7a65-11ed-90a2-02cf6e66352a"
    }
]
+ aws eks update-kubeconfig --name xrd-cluster
Updated context arn:aws:eks:us-east-2:655415053484:cluster/xrd-cluster in /Users/tadeshpa/.kube/config
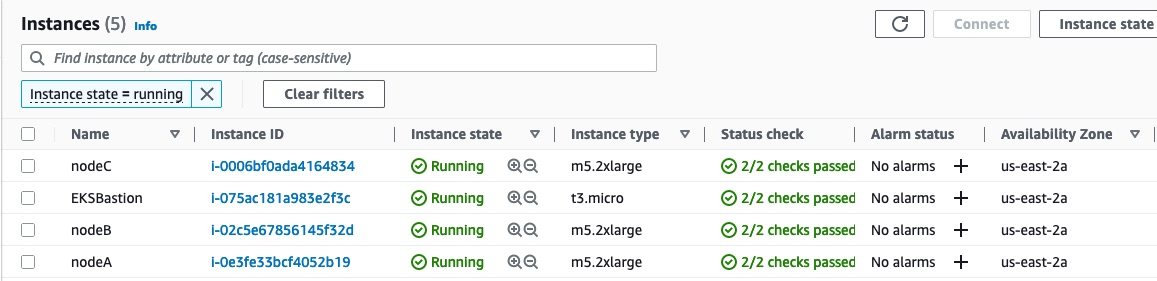
If we navigate to the AWS console, we still see the EKSBastion, but now there are three worker nodes: nodaA, nodeB, and nodeC.
The script will automatically update the kubconfig, so we can see that the four pods are deployed.
tadeshpa@TADESHPA-M-F92B ~/xrd-eks (main) [255]> kubectl get pods
NAME                                 READY   STATUS    RESTARTS   AGE
xrd-example-host1-78b766f567-jk5kl   1/1     Running   0          99m
xrd-example-host2-6f948b8c5b-gkdj8   1/1     Running   0          99m
xrd-example-xrd1-0                   1/1     Running   0          99m
xrd-example-xrd2-0                   1/1     Running   0          99m
Just like the singleton example, we can use kubectl to attach to the containers.
Host1:
tadeshpa@TADESHPA-M-F92B ~/xrd-eks (main) [1]> kubectl exec -it xrd-example-host1-78b766f567-jk5kl -- /bin/sh
/ # ip route
default via 169.254.1.1 dev eth0
10.0.1.0/24 dev net1 scope link  src 10.0.1.10
10.0.4.0/24 via 10.0.1.11 dev net1
169.254.1.1 dev eth0 scope link
XRd1:
tadeshpa@TADESHPA-M-F92B ~/xrd-eks (main)> kubectl exec -it xrd-example-xrd1-0 -- xr

User Access Verification

Username: cisco
Password:


RP/0/RP0/CPU0:xrd1#show ip interface brief
Tue Dec 13 00:22:49.751 UTC

Interface                      IP-Address      Status          Protocol Vrf-Name
Loopback0                      1.0.0.11        Up              Up       default
tunnel-ip1                     10.1.2.11       Up              Up       default
tunnel-ip2                     10.1.3.11       Up              Up       default
HundredGigE0/0/0/0             10.0.1.11       Up              Up       nfs
HundredGigE0/0/0/1             10.0.2.11       Up              Up       default
HundredGigE0/0/0/2             10.0.3.11       Up              Up       default
RP/0/RP0/CPU0:xrd1#
Modify Deployment using Helm
Helm is a package manager for kubernetes, and we will use it to modify the current deployment. There is a general helm repo for XRd, with sample value files, that document all possible settings that can be configured when deploying XRd on K8s. There is also an xrd-eks helm repo, with EKS-specific charts derived from the xrd-helm repo.
To modify the deployment, let’s start by adding the xrd-eks helm repository to our current namespace.
tadeshpa@TADESHPA-M-F92B ~/xrd-eks (main) [1]> helm repo add xrd-eks https://ios-xr.github.io/xrd-eks
"xrd-eks" has been added to your repositories
Next, we can view which helm charts are available in this helm repository. These charts are essentially sample XRd deployments.
tadeshpa@TADESHPA-M-F92B ~/xrd-eks (main)> helm search repo xrd-eks
NAME                       	CHART VERSION	APP VERSION	DESCRIPTION
xrd-eks/aws-overlay-example	0.1.0        	latest     	Two XRd instances providing overlay with contai...
xrd-eks/simple-host        	0.1.0        	latest     	Deployment of a specified image (default alpine...
Then we can view details of our current deployment.
tadeshpa@TADESHPA-M-F92B ~/xrd-eks (main)> helm list
NAME       	NAMESPACE	REVISION	UPDATED                                	STATUS  	CHART                    	APP VERSION
xrd-example	default  	1       	2023-01-18 03:56:43.307742177 +0000 UTC	deployed	aws-overlay-example-0.1.0	latest
Our current deployment is xrd-example which is a modification of the chart aws-overlay-example-0.1.0. We can use helm to check the configuration settings of this chart.
tadeshpa@TADESHPA-M-F92B ~/xrd-eks (main)> helm show values xrd-eks/aws-overlay-example
# Default values for aws-overlay-example.
# This is a YAML-formatted file.
# Declare variables to be passed into your templates.

xrd1:
  # Image configuration
  image:
    # repository:
    pullPolicy: Always
    #tag: ""
  resources:
    limits:
      memory: 8Gi
      hugepages-1Gi: 3Gi
  securityContext:
    privileged: true
  nodeSelector:
      xrd.node: nodeA
  persistence:
    enabled: true
    size: "6Gi"
    accessModes:
    - ReadWriteOnce
    storageClass: "gp2"
  config:
    # ASCII XR configuration to be applied on XR boot.
    ascii: |
      hostname xrd1
      logging console debugging
      logging monitor debugging
      vrf nfs
       address-family ipv4 unicast
        import route-target
         100:100
        !
        export route-target
         100:100
        !
       !
      !
      line default
       exec-timeout 0 0
       width 0
       length 0
      !
      bfd
       multipath include location 0/RP0/CPU0
       echo disable
      !
      call-home
       service active
       contact smart-licensing
       profile CiscoTAC-1
        active
        destination transport-method email disable
        destination transport-method http
       !
      !
      interface Loopback0
       ipv4 address 1.0.0.11 255.255.255.255
      !
      interface tunnel-ip1
       mtu 1450
       ipv4 address 10.1.2.11 255.255.255.0
       tunnel source 10.0.2.11
       tunnel destination 10.0.2.12
       logging events link-status
      !
      interface tunnel-ip2
       mtu 1450
       ipv4 address 10.1.3.11 255.255.255.0
       tunnel source 10.0.3.11
       tunnel destination 10.0.3.12
       logging events link-status

      ...

      segment-routing
      !
    asciiEveryBoot: True
  interfaces:
    - type: pci
      config:
        last: 3
  pciDriver: "igb_uio"
  cpu:
    cpuset: 2-3
xrd2:
  # Image configuration
  image:
    # repository:
    pullPolicy: Always
    #tag: ""
  resources:
    limits:
      memory: 8Gi
      hugepages-1Gi: 3Gi
  securityContext:
    privileged: true
  nodeSelector:
      xrd.node: nodeB
  persistence:
    enabled: true
    size: "6Gi"
    accessModes:
    - ReadWriteOnce
    storageClass: "gp2"
  config:
    # ASCII XR configuration to be applied on XR boot.
    ascii: |
      hostname xrd2
      logging console debugging
      logging monitor debugging
      vrf nfs
       address-family ipv4 unicast
        import route-target
         100:100
        !
        export route-target
         100:100
        !
       !
      !
      line default
       exec-timeout 0 0
       width 0
       length 0
      !
      bfd
       multipath include location 0/RP0/CPU0
       echo disable
      !
      call-home
       service active
       contact smart-licensing
       profile CiscoTAC-1
        active
        destination transport-method email disable
        destination transport-method http
       !
      !
      interface Loopback0
       ipv4 address 1.0.0.12 255.255.255.255
      !
      interface tunnel-ip1
       mtu 1450
       ipv4 address 10.1.2.12 255.255.255.0
       tunnel source 10.0.2.12
       tunnel destination 10.0.2.11
       logging events link-status
      !
      interface tunnel-ip2
       mtu 1450
       ipv4 address 10.1.3.12 255.255.255.0
       tunnel source 10.0.3.12
       tunnel destination 10.0.3.11
       logging events link-status
      !

      ...

      segment-routing
      !
    asciiEveryBoot: True
  interfaces:
  - type: pci
    config:
      last: 3
  pciDriver: "igb_uio"
  cpu:
    cpuset: 2-3

host1:
  image:
    repository: alpine
    pullPolicy: IfNotPresent
    # Overrides the image tag whose default is the chart appVersion.
    tag: ""
  networkAttachment:
    config: '{
        "cniVersion": "0.3.1",
        "type": "host-device",
        "device": "eth1",
        "ipam": {
          "type": "static",
          "addresses" : [
              {
                  "address": "10.0.1.10/24",
                  "gateway": "10.0.1.11"
              }
          ],
          "routes" : [
              {
                  "dst": "10.0.4.0/24"
              }
          ]
        }
      }'

  nodeSelector:
    xrd.node: nodeC

host2:
  image:
    repository: alpine
    pullPolicy: IfNotPresent
    # Overrides the image tag whose default is the chart appVersion.
    tag: ""
  networkAttachment:
    config: '{
        "cniVersion": "0.3.1",
        "type": "host-device",
        "device": "eth2",
        "ipam": {
          "type": "static",
          "addresses" : [
              {
                  "address": "10.0.4.10/24",
                  "gateway": "10.0.4.12"
              }
          ],
          "routes" : [
              {
                  "dst": "10.0.1.0/24"
              }
          ]
        }
      }'

  nodeSelector:
    xrd.node: nodeC
This chart specifies most of the configuration settings in our current deployment (for a detailed view of what settings can be configured here, view: xrd-vrouter/values.yaml). However, the image repository and tag are commented out. In our current deployment, we used ECR as our image repository. These values were specified in our xrd-example deployment.
tadeshpa@TADESHPA-M-F92B ~/xrd-eks (main)> helm get values xrd-example
USER-SUPPLIED VALUES:
xrd1:
  config:
    password: cisco123
    username: cisco
  image:
    repository: 655415053484.dkr.ecr.us-east-2.amazonaws.com/xrd/xrd-vrouter
    tag: latest
xrd2:
  config:
    password: cisco123
    username: cisco
  image:
    repository: 655415053484.dkr.ecr.us-east-2.amazonaws.com/xrd/xrd-vrouter
    tag: latest
The values that were specified in xrd-example overwrite the default values in aws-overlay-example. To make a modification to the current depoyment, we simply need to make a YAML file the contains the configuration values we wish to modify. Let’s modify our current deployment by changing the credentials for xrd1.
tadeshpa@TADESHPA-M-F92B ~/xrd-eks (main)> cat example.yaml
USER-SUPPLIED VALUES:
xrd1:
  config:
    password: xrd-password
    username: xrd1
  image:
    repository: 655415053484.dkr.ecr.us-east-2.amazonaws.com/xrd/xrd-vrouter
    tag: latest
xrd2:
  config:
    password: cisco123
    username: cisco
  image:
    repository: 655415053484.dkr.ecr.us-east-2.amazonaws.com/xrd/xrd-vrouter
    tag: latest
Now, we can use helm to stop our current installment using helm uninstall,re-deploy with our updated config, and login with our updated credentials.
tadeshpa@TADESHPA-M-F92B ~/xrd-eks (main) [SIGTERM]> helm uninstall xrd-example
release "xrd-example" uninstalled
tadeshpa@TADESHPA-M-F92B ~/xrd-eks (main)> helm install -f example.yaml xrd-example xrd-eks/aws-overlay-example
NAME: xrd-example
LAST DEPLOYED: Mon Jan 23 13:14:51 2023
NAMESPACE: default
STATUS: deployed
REVISION: 1
TEST SUITE: None
tadeshpa@TADESHPA-M-F92B ~/xrd-eks (main)> kubectl exec -it xrd-example-xrd1-0 -- xr

User Access Verification

Username: xrd1
Password:


RP/0/RP0/CPU0:xrd1#
Stay tuned for a full tutorial on using helm with XRd.
Deleting the Application
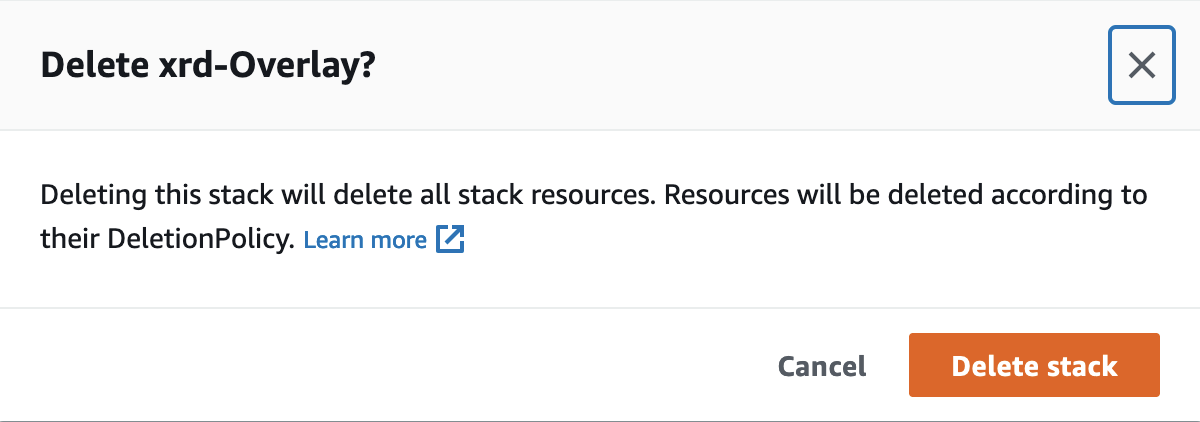
First, navigate to the Stacks page in the AWS Console. Next, we will select the stack that we created in this example, and click delete.

It will ask us form confirmation, and then begin to delete all of the AWS resources we created in order to launch the example application.
There you have it! In this tutorial, we learned how to deploy an XRd topology on EKS. You can continue to play around with XRd on AWS by using atomic and composite building blocks to create a new application cloudformation template, and you can create new helm charts based on the existing charts in the xrd-eks helm repo.
Leave a Comment