
Using ZTP to integrate IOS-XR with NSO
Introduction
Network Services Orchestrator is a Cisco tool that provides end-to-end orchestration that spans multiple domains in your network. Using strict, standardized YANG models for both services and devices and a highly efficient abstraction layer between your network services and the underlying infrastructure, the orchestrator lets you automate Cisco and other vendor’s devices.
NSO
To automate configuration of physical devices, NSO relies on add-ons packages called Network Element Driver (NED) NSO provides 2 different ways to interact with IOS-XR:
- The IOS-XR CLI NED for CLI configuration
- The Netconf NED for Netconf/Yang configuration
The IOS-XR CLI NED must be purchased for your version of NSO. Once acquired, it should be installed inside NSO as a package. For the Netconf NED, there are 2 ways to create the package
Download all the models supported by XR on github: Yang models for Cisco IOS-XR and use the ncs-make-package command to create the package, once created you can install the package inside NSO.
Use the NSO pioneer tool available on github: Your Swiss army knife for NETCONF, YANG and NSO NEDs to retrieve all the models from a device and create the package.
The advantage of the second method is that you are certain that the device effectively supports all the models but the retrieve operation can take some time.
NSO has a set of REST/RESTCONF northbound API that can be used to provision a devices using simple HTTP GET/PUT/POST request. In short, only three operations are required:
- Creating the device and associate it with the correct NED (Netconf/IOS-XR CLI)
- Exchange the RSA keys between the device and NSO
- synchronize the configuration with NSO
The example in this blog uses REST, if you plan to use RESTCONF, small modifications in the URIs are required.
To allow full configuration of device, NSO requires configuring the username and password (encrypted) in an authorization group, devices that belong to a specified authgroup shares the same username and password. In the example below the authgroup ios-xr-default has been created in advance on the NSO server.
devices authgroups group ios-xr-default
 default-map remote-name cisco
 default-map remote-password <encrypted password>
IOS-XR
To allow IOS-XR to communicate with NSO using the CLI NED, it is required to install the K9 (Crypto support) package. If you decide to use the Netconf NED, you will have to also install the MGBL (SNMP/Netconf/telemetry, etc.) in addition to the K9 package. A base configuration that enables these features should also be placed onto the device. The example described in this blog use the management interface to communicate with the NSO server, it is imperative to keep the ip address and device name constant after registering the device with NSO.
ZTP
ZTP has support for both shell and python scripts, IOS-XR comes with an rich environment of shell tools and python libraries. In this example we will use a python based ZTP script and will leverage the python-netclient, python-json and the embedded ztp_helper libraries to provision the device in NSO. The python-netclient package provides us access to the urllib, urllib2 and base64 libraries, the python-json package allows us to manipulate json data efficiently.
Flow of Operation
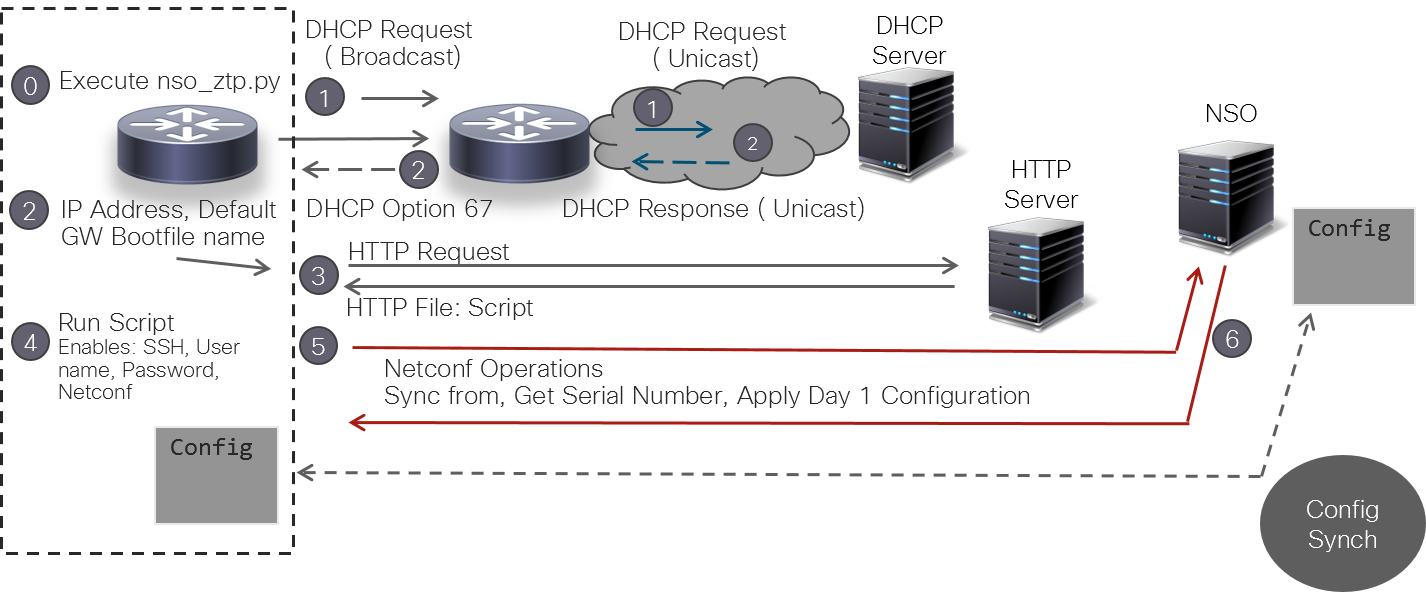
DHCP Configuration
For ZTP to operate a valid IPv4/IPv6 address is required and the DHCP server must send a pointer to the configuration script via option 67. Here is an example of configuration
#
# DHCP Server Configuration file.
#
allow bootp;
allow booting;
ddns-update-style interim;
option time-offset -8;
ignore client-updates;
default-lease-time 300;
log-facility local7;
authoritative;

subnet 192.168.1.0 netmask 255.255.255.0 {
  option subnet-mask                  255.255.255.0;
  option broadcast-address            192.168.1.255;
  option routers                      192.168.1.1;
  option domain-name-servers          192.168.1.10;
  option domain-name                  "cisco.local";
}
host ncs-5001-1 {
  option dhcp-client-identifier    "FOC2018R1QU";
  fixed-address                    192.168.1.16;
  if exists user-class and option user-class = "iPXE" {
    filename = "http://192.168.2.10/ipxe/ncs5k.ipxe";
  } elsif exists user-class and option user-class = "exr-config" {
    filename = "http://192.168.2.10/scripts/ncs-5001_nso_ztp.py";
  }
}
ZTP Script
The ZTP script will do the following operations:
- Install the K9SEC and MGBL packages.
- Create a general-purpose key.
- Apply a basic configuration that allow the netconf agent to communicate with the NSO server.
- Push the Device profile to NSO
- Push the RSA key to NSO
- Synchronize the basic configuration with NSO
Device Profile
The device profile is described in a JSON template with the name and ip address of the device filled during the ZTP execution, the IOS-XR CLI based template looks like this:
myDevice = {
    "device": {
        "name": "XXXX",
        "address": "XXXX",
        "port": 22,
        "state": {
            "admin-state": "unlocked"
        },
        "authgroup": "ios-xr-default",
        "device-type": {
            "cli": {
              "ned-id": "tailf-ned-cisco-ios-xr-id:cisco-ios-xr"
            }
        }
    }
}
If you plan to use Netconf, the profile template will have to be modified:
myDevice = {
    "device": {
        "name": "XXXX",
        "address": "XXXX",
        "port": 22,
        "state": {
            "admin-state": "unlocked"
        },
        "authgroup": "ios-xr-default",
        "device-type": {
            "netconf": {
              "ned-id": "tailf-ncs-ned:netconf"
            }
        }
    }
}
A simple function has been created that can handle all REST operation with NSO
def nso_rest(self, ressource=None, operation=None, data=None):
   """
   """
   if data is not None:
      request = urllib2.Request(ressource, data)
   else:
      request = urllib2.Request(ressource)

   request.add_header("Authorization", "Basic %s" % base64.encodestring('%s:%s' % (NSO_USER, NSO_PASSWD)).replace('\n', ''))
   request.add_header('Content-Type', 'application/vnd.yang.data+json')
   request.get_method = lambda: operation
   try:
      response = urllib2.urlopen(request)
   except urllib2.HTTPError,error:
      self.syslogger.info("REST operation error code: " + str(error.code()))
      self.syslogger.info("REST response: " + error.read())
   except URLError, error:
      self.syslogger.info("URL error: " + str(error.code()))
   else:
      self.syslogger.info("REST operation status: " + str(response.code))
      self.syslogger.info("REST return data: "  + response.read())
   return {"status": response.code, "output" : response.read()}
This function will be called like this
ztp_script.syslogger.info("###### Pushing Device Profile ######")
ztp_script.nso_rest(BASE_URI + '/devices/device/' + hostname, 'PUT', json.dumps(myDevice))
ztp_script.syslogger.info("###### Pushing RSA key ######")
ztp_script.nso_rest(BASE_URI + '/devices/device/' + hostname + '/ssh/_operations/fetch-host-keys/', 'POST')
ztp_script.syslogger.info("###### Syncing configuration ######")
ztp_script.nso_rest(BASE_URI + '/devices/device/' + hostname + '/_operations/sync-from', 'POST')
The complete detail of the ZTP script is available on github integrating IOS-XR with NSO
Leave a Comment