
pyATS series - Install and use pyATS
Introduction
Ever dreamed of a test framework that could be used across multiple platforms, OS and vendors, which could do regression, sanity and feature testing; already used by thousands of engineers and developers worldwide? Guess what, it exists, it’s free, and you can start using it right now!
pyATS (Python Automated Test Systems, to be pronounced “py A. T. S.”) was first created as an internal project, to ease the validation of two OS versions. It has been made public in 2017 through Cisco Devnet.
This blog post will be the first one of a series on pyATS. Today, we will explain what’s pyATS, install pyATS and cover a basic use case (getting a CLI output from a XR device). More use cases are going to be covered in the next posts.
The code used for each blog post can be found here. This link will include the code for all posts.
Today’s part will refer to the 0_get_cli_show folder of the repo.
Other pyATS episodes
You’ve missed an episode? You would like to read more? Below the list of published episodes:
pyATS overview
Building blocks
pyATS is made of three main building blocks:
- pyATS, the core block of this ecosystem. It’s a Python framework which leverages multiple Python libraries such as Unicon, providing a simplified connection experience to network devices. It supports CLI, NETCONF, RESTCONF and gRPC. It enables network engineers and developers to start with small and simple test cases.
- pyATS libraries (also known as Genie) which provides everything you need for network testing such as parsers, triggers and APIs.
- XPRESSO, the pyATS Web UI Dashboard.
You can read more about pyATS ecosystem in the official documentation.
Supported OS
This solution is built and thought from the ground up to be an agnostic ecosystem. As of January 2021, it comes out of the box with libraries for the below OS:
- IOS XR,
- IOS XE,
- IOS,
- NXOS,
- ASA,
- Linux,
- JUNOS,
- SROS,
- BIGIP,
- Viptela OS,
- DNA Center.
Getting your hands dirty
Enough talking, do YOU want to start using pyATS? Yes
pyATS requirements
Full requirements can be found in the official documentation.
Hardware
pyATS is lightweight and scalable. As per the documentation, you need:
- 1GB of RAM,
- 1 vCPU.
Operating System
It runs in a Linux and Linux-like environments, such as Ubuntu, CentOS, Fedora and macOS.
The pyATS ecosystem does not support Windows.
Python version
As of January 2021, it requires Python version between 3.5 and 3.8.
Python version 3.9 is not yet supported.

pyATS installation
pyATS ecosystem can be installed in two ways: in a docker container or in a virtual environment. Today, we will focus on the second option. Remember, you need a Python version between 3.5 and 3.8 to use pyATS.
Full installation documentation for Docker and Virtual Environment can be found here.
You don’t have a supported system, but still want to run the code? Reserve the Devnet DevBox, here, and start coding now!
Let’s start! Open a bash terminal and run the below three commands. It will:
- Create a virtual environment.
- Activate the virtual environment.
- Install pyATS and its dependencies.
From your bash terminal
python -m venv venv
source venv/bin/activate
pip install pyats
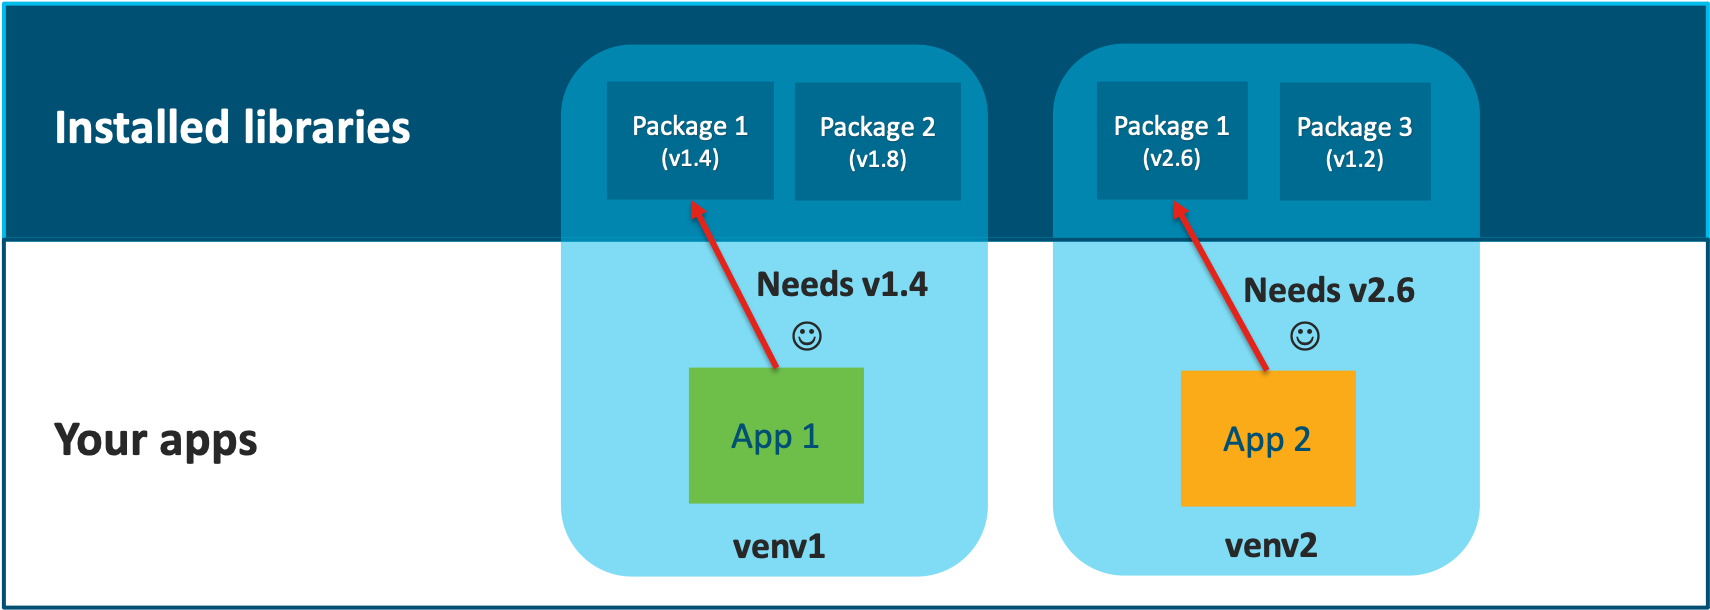
A Python Virtual Environment is a best pratice when you have different projects with different python module requirements. A Python Virtual Environment creates a folder (here, named venv) containing all the necessary executables and libraries for a project.
Your first pyATS use case: getting a CLI output from a device
In this first use case, we are going to see step by step how we can get a simple CLI output (show ip interface brief) from an IOS XR device.
This first use case does not demonstrate the full power of pyATS but should be a good example to cover the basics.
In order for everyone to be able to run the code, we will use the IOS XR always-on sandbox on Cisco Devnet. Feel free to adapt the code to use your own device(s). Below the sandbox information.
| Key | Value |
|---|---|
| IOS XRv 9000 host | sbx-iosxr-mgmt.cisco.com |
| SSH Port | 8181 |
| Username | admin |
| Password | C1sco12345 |
Building a testbed
The simplest way to connect to a device is through a pyATS testbed file, written in YAML. This information will be used by Unicon to connect to the device and send the requested commands.
You can find the complete documentation on how to build a testbed here.
testbed.yaml
# Step 0: list of devices
devices:
  iosxr1:
    # Step 1: OS and Type
    type: iosxr-devnet
    os: iosxr
    # Step 2: credentials
    credentials:
      default:
        username: admin
        password: C1sco12345
    # Step 3: connection parameters
    connections:
      vty:
        protocol: ssh
        ip: sbx-iosxr-mgmt.cisco.com
        port: 8181
The testbed.yaml file is available here.
Let’s now explain the building blocks of the testbed. The parts below will refer to each inline comment of the code block above.
Step 0: list of devices
This line starts a list of devices. Here, I have one device: iosxr1. I could have many devices.
By default (i.e. if you does not change pyATS default settings), this name (iosxr1) will need to exactly match the hostname of your device. It is case sensitive.
If you do not want the device in your testbed to match the hostname, please refer to the documentation here, in the learn_hostname section.
Step 1: OS and type
type is mandatory, and is used for clarity (i.e. its value doesn’t matter). os is the OS type of the device, as per the Unicon documentation.
Step 2: credentials
credentials starts a list of credentials for this device. username and password are the credentials of your device.
default will be checked first, if not specified otherwise in your script.
Step 3: connection parameters
connections starts a list of possible connections for the device. If not specified otherwise, pyATS will try to use the vty connection. You need to specify a protocol, the ip of the device, and the port.
You could add many more connections, such as NETCONF or RESTCONF.
Now that our testbed is ready, let’s make our first pyATS python script.
Getting your first CLI output with pyATS
Let’s take a simple use case: we are going to connect to the device and collect a CLI output of the show ip interface brief command. This first example will not demonstrate the full power of pyAST but will be useful to understand its core functions. More to come in the next posts.
0_execute_cli_show.py
from pyats.topology import loader

# Step 0: load the testbed
testbed = loader.load(f'./testbed.yaml')

# Step 1: testbed is a dictionary. Extract the device iosxr1
iosxr1 = testbed.devices["iosxr1"]

# Step 2: Connect to the device
iosxr1.connect(init_exec_commands=[], init_config_commands=[], log_stdout=False)

# Step 3: saving the `show ip interface brief` output in a variable
show_interface = iosxr1.execute('show ip interface brief')

# Step 4: pritting the `show interface brief` output
print(show_interface)

# Step 5: disconnect from the device
iosxr1.disconnect()
The 0_execute_cli_show.py file is available here.
Executing the script
From your bash terminal
python 0_execute_cli_show.py
In this example, the testbed.yaml file need to be in the same folder as the 0_get_cli_show.py file. Also, you need to execute the Python script in the folder where you have these two files.
Let’s now explain the building blocks of the Python script. The parts below will refer to each inline comment of the code block above.
Output example
Here is an output example of the above script. It might slightly vary according to the configuration of the device.
Python console
Interface                      IP-Address      Status          Protocol Vrf-Name
Loopback100                    1.1.1.100       Up              Up       default
Loopback200                    1.1.1.200       Up              Up       default
Loopback999                    unassigned      Up              Up       default
MgmtEth0/RP0/CPU0/0            10.10.20.175    Up              Up       default
GigabitEthernet0/0/0/0         unassigned      Shutdown        Down     default
GigabitEthernet0/0/0/1         unassigned      Shutdown        Down     default
GigabitEthernet0/0/0/2         unassigned      Shutdown        Down     default
GigabitEthernet0/0/0/3         unassigned      Shutdown        Down     default
GigabitEthernet0/0/0/4         unassigned      Shutdown        Down     default
GigabitEthernet0/0/0/5         unassigned      Shutdown        Down     default
GigabitEthernet0/0/0/6         unassigned      Shutdown        Down     default
Step 0: load the testbed
From the pyats.topology module, we import the loader() function. This function will be used to load the testbed file we have created.
We load the testbed information, stored in our testbed.yaml file. We assign it to an object: testbed.
Step 1: extract device information
testbed is a Python dictionary. We are extracting the device iosxr1 information. We assign it to an object: iosxr1.
You can name the object with the name you want. The object name does not need to match the hostname of you device.
Step 2: connect to the device
We use the connect() method on the iosxr1 object to connect to the device.
By default, pyATS will send exec and configuration commands to the device (such as terminal length 0 and show version). To avoid such behavior, we are passing arguments to the conect() method. We are also disabling the logging to standard output. More information in the [documentation].(https://pubhub.devnetcloud.com/media/unicon/docs/user_guide/connection.html)
Step 3: saving the CLI output
We send the command to the device with the execute() method. We save the output (a string) in a variable: show_interface.
Instead of show ip interface brief, you could send any command supported by your device.
Step 4: print the output
We print the output to the console.
Step 5: disconnect from the device
We use the disconnect() method to properly disconnect from the device.
It’s important to properly disconnect from the device, otherwise the vty connection will remain open on the device, until it times out.
Conclusion
In this first post of the pyATS series, we learnt how to build a testbed and how to collect our first CLI output from the device. In the next post, we will see how to parse the output to transform this big string into a dictionary.
The code used for each blog post can be found here. This link will include the code for all posts.
Resources
Below a few useful pyATS resources.
Leave a Comment