
High Availability with XRv9000 on AWS: Using AppHosting + SL-API
Need for Router HA in the public cloud
The Telco 5G on Public Cloud space has been heating up off-late. With the public announcement of the Dish 5G deployment on AWS:
it is becoming increasingly clear that 5G Networks lend themselves well to the public cloud model- especially with greater focus on virtualized and containerized network functions (VNFs and CNFs) in the core deployment and technology strategy of 5G as opposed to traditional mobile network deployments like 4G.

The focus of this architecture is to leverage 5G components for services in multiple target environments (Dev/Test/Production/Enterprise) with full automation on the public cloud - so a good mix of native cloud services and telco protocols and technologies.
Challenges with network deployments on Public Cloud
There are however limitations to network deployments on the public cloud:
Lack of transport Features in the Cloud (AWS) underlay: The public-cloud underlay does a great job for traditional application services, however, it is quite limited when it comes to traditional Telco networking requirements such as IGPs, SR-MPLS, EVPN, SRv6 and more. This means traditional networking vendors can augment the underlay capabilities by providing virtualized versions of their Network OS to bring in the missing features. This is where Cisco virtual platforms such as XRv9000 and XRd play an important role - serving as edge and transport nodes in the 5G core on public cloud while also dabbling as gateways and route-reflectors in other parts of the network.
Restrictions in Cloud environments (no multicast, broadcast packets): With primary focus on server application workloads, Public Cloud underlays are restrictive in nature - multicast and broadcast packets are blocked - which implies traditional IGPs (OSPF, ISIS) or redundancy protocols like HSRP/VRRP just won’t work. Thus, even with virtual platforms from networking vendors, operators need to be innovative in their design. For example, a typical 5G deployment that intends to use SR-MPLS+ IGPs for transport will need to create an initial overlay of p2p tunnels (like GRE).
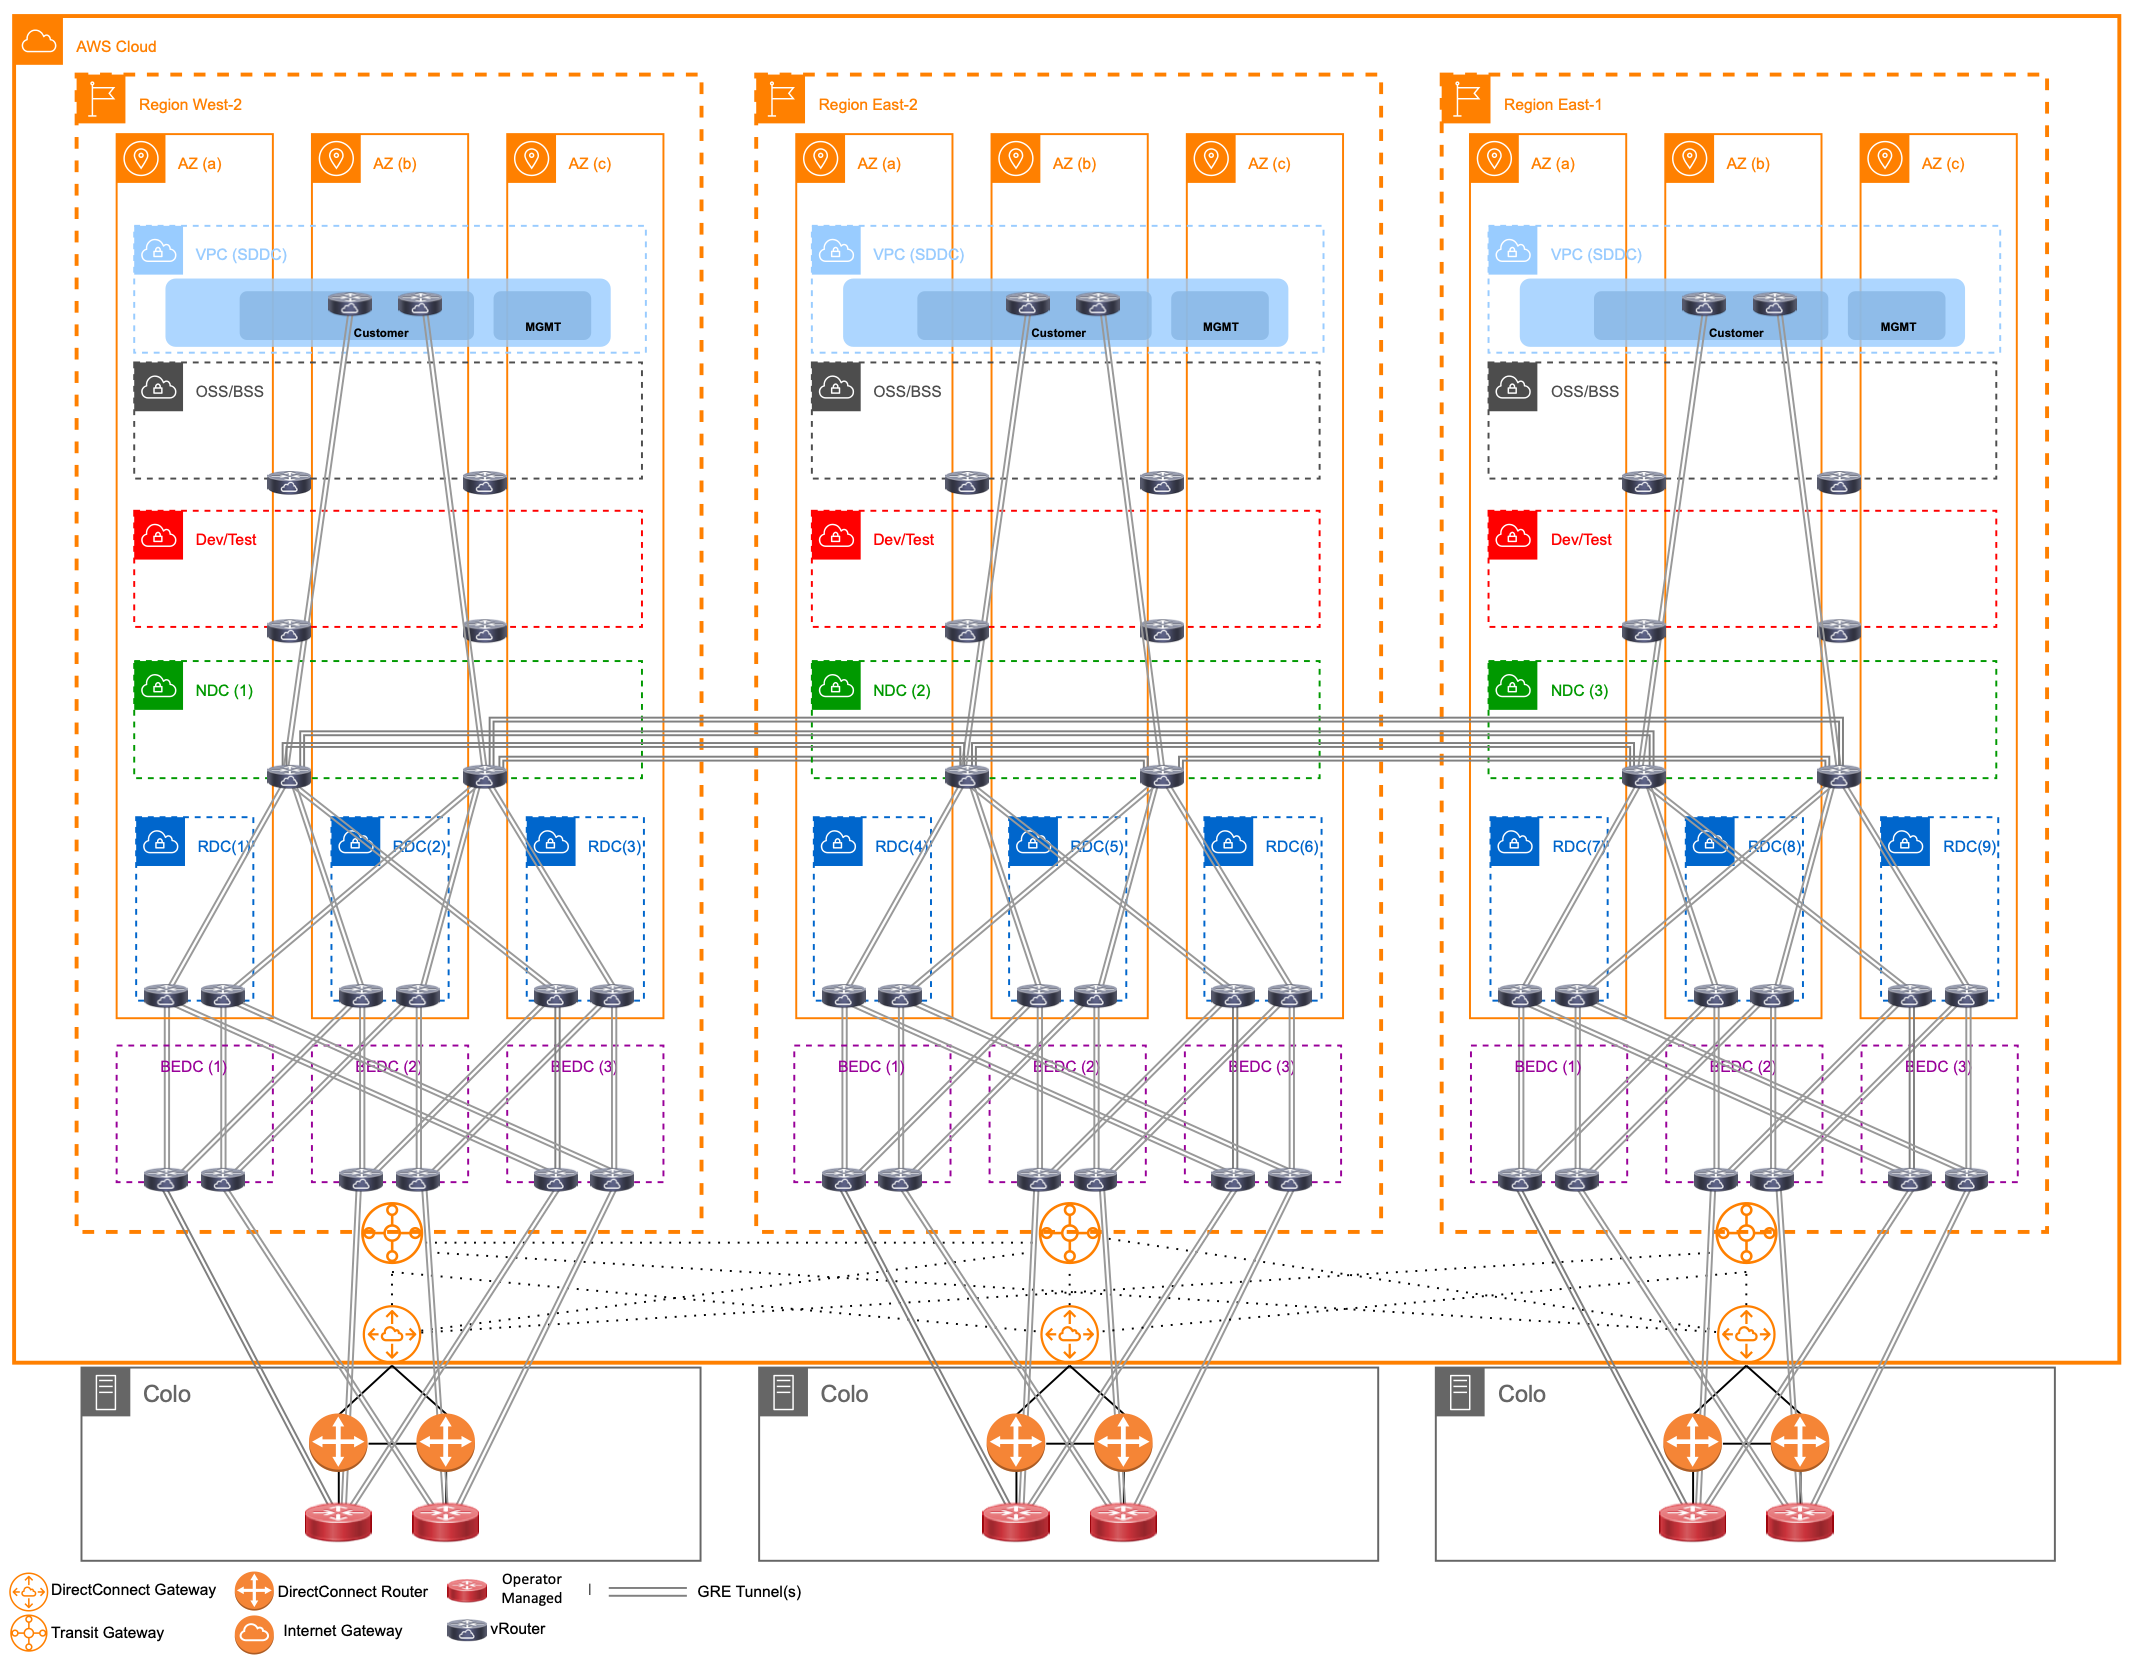
The network in reality becomes a three-layered architecture, with AWS underlay at the bottom for basic connectivity, P2P tunnels between virtual routers as the second layer to help carry the third-layer of traditional network protocols and traffic like IGPs, BGP, SR-MPLS etc. This is shown below:
The HA problem
Let’s keep a detailed deep dive on this emerging 5G deployment strategy for another day and focus on a more specific problem that arises when traditional network roles like Provider-Edge (PE) that may have been served by modular network devices with multiple Route-Processors are replaced by standalone virtual network hardware like XRv9000:
Modular Network Hardware such as the ASR9000, Cisco8000, NCS5XX come with (the option of) Active and Standby Route-Processors that provide a great degree of reliability and high-availability (HA) in their network positions/roles.
Virtual Network hardware however does not come with High-Availability features built in - reliance instead is on Network Redundancy features such as HSRP/VRRP combined with BFD for quick failovers. It is far easier and cheaper to spin up separate Active/Standby Virtual Routers with network-level redundancy than to complicate their design with in-built HA capabilities.
However, deployment on public cloud poses a new challenge: HSRP/VRRP won’t work. Since public cloud (AWS) blocks multicast traffic - HSRP/VRRP hellos that are sent to multicast addresses are blocked. Further HSRP state machine depends on the use of gratuitous ARP packets that are dropped on the public cloud as well.
A simple HA deployment with vRouters (XRv9000) on AWS would look like the following:
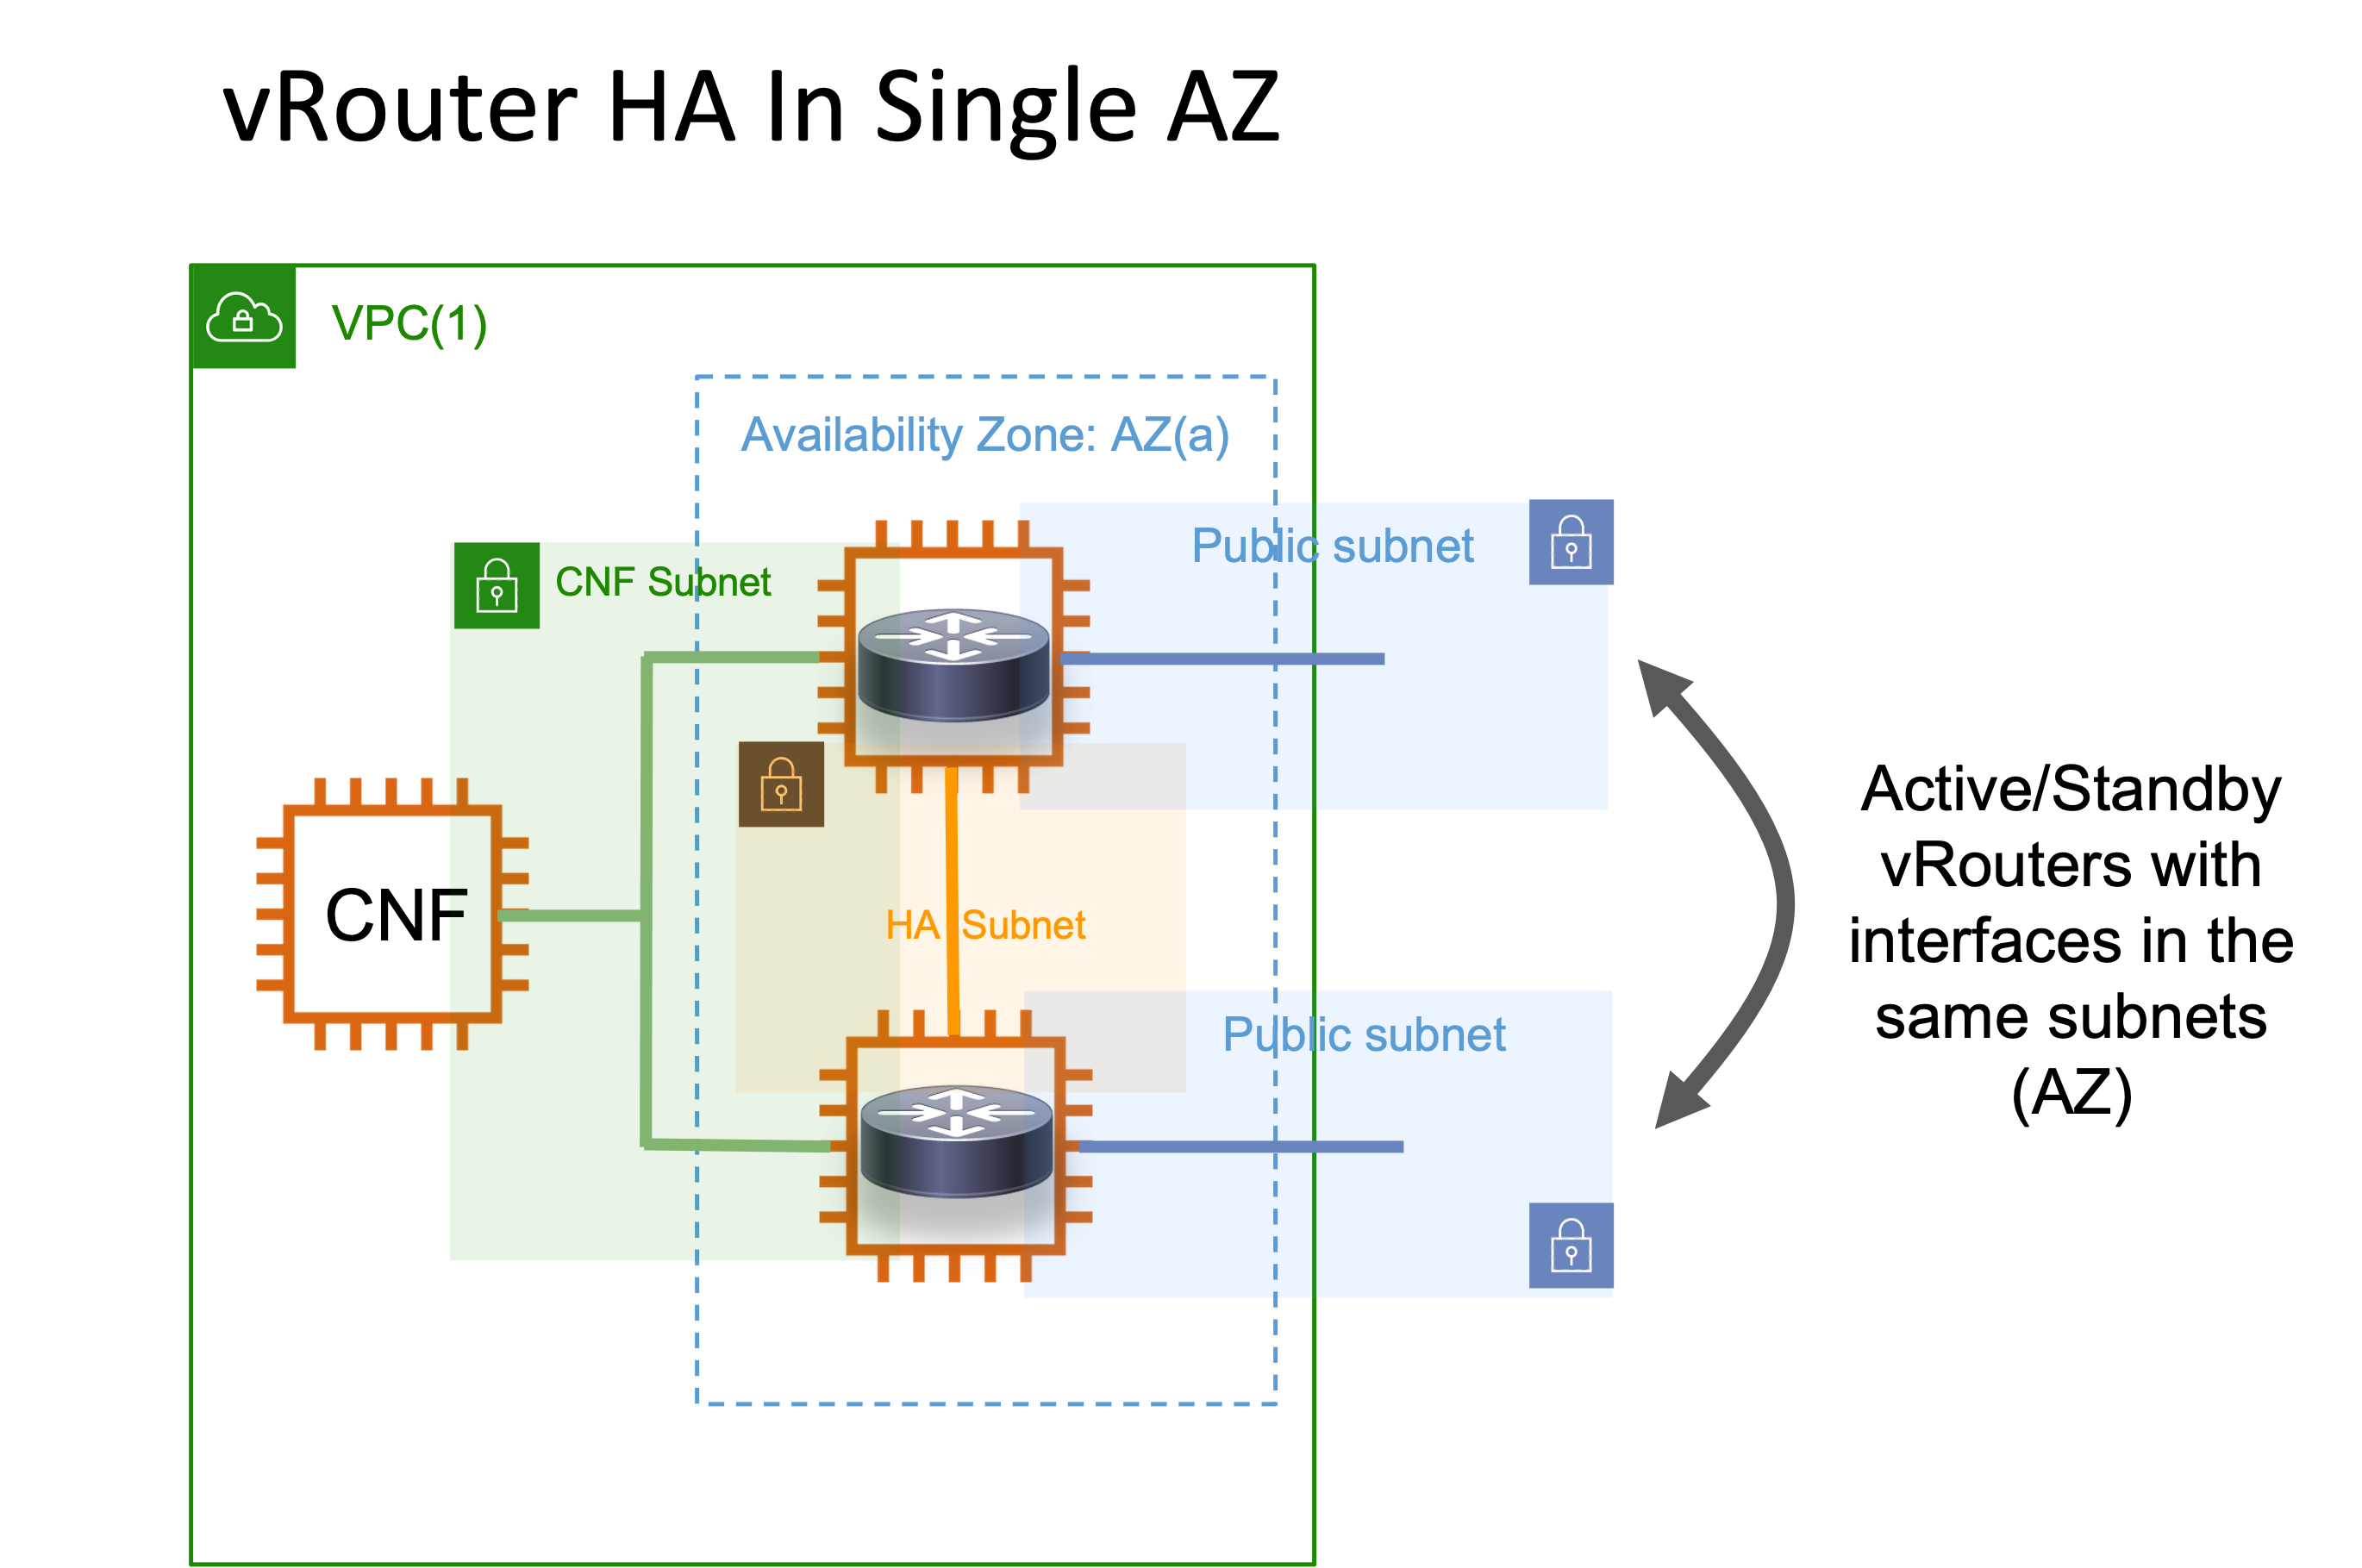
In this example the two vRouters are in the same availability zone (hence interfaces are in the same subnets). This requires no routing to achieve reachability between the Active/Standby routers and hence solutions that mimic HSRP (with the limitations described above) can solve the HA problem.
Besides the challenges, there is also scope to expand High-availability capabilities by leveraging some concepts from the Public-Cloud. AWS for example structures its infrastructure offerings into regions, availability-zones and more:
https://docs.aws.amazon.com/AWSEC2/latest/UserGuide/using-regions-availability-zones.html
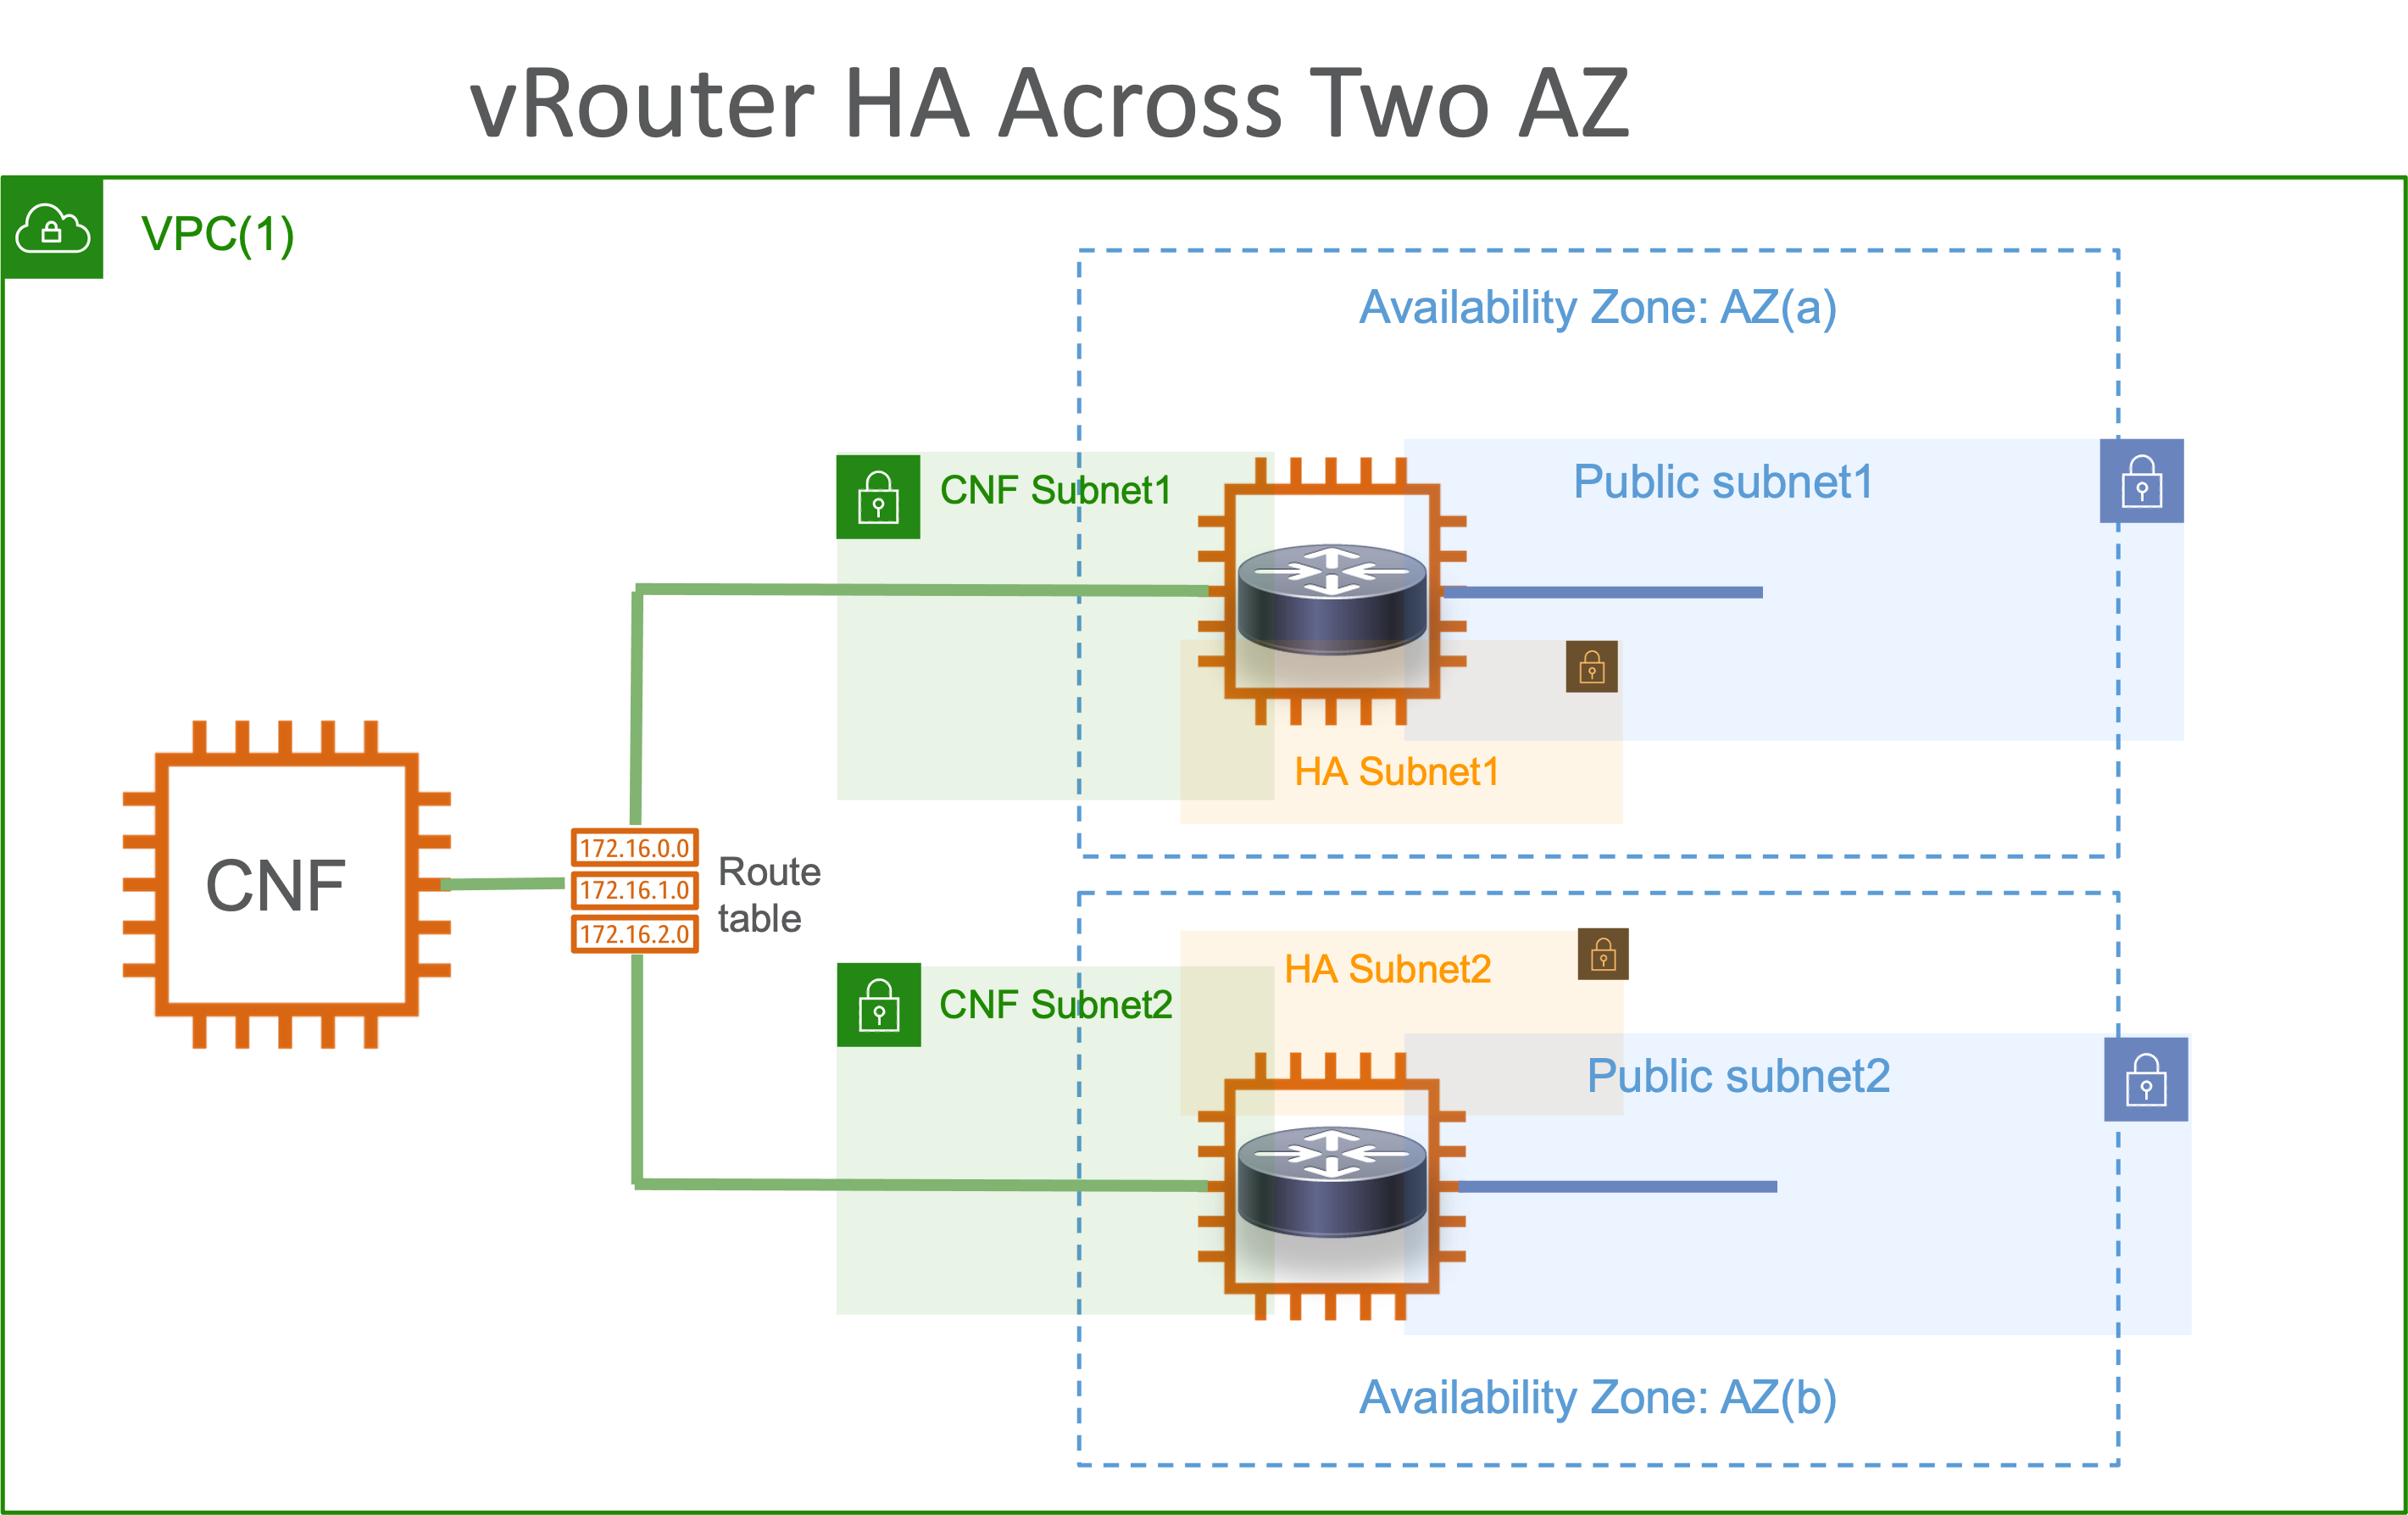
This implies we can also target HA deployments where Active/Standby vRouters are in altogether different availability zones with AWS VPC routing-tables to help route between them.
Onbox Apphosting solution for XRv9000 AWS HA
The solution described here can be extended in the future to cover the different use cases discussed above. However, for now, we focus on the active-standby vRouters in the same Availability zone only. The solution is an Onbox docker App to enable High-Availability for XRv9k on AWS using IOS-XR Service-Layer API and AWS APIs:
How does it work?
Check out the solution guide: HA_redundancy_xrv9k_soln.pdf for details on how the application works. The third-party app utilizes two key pieces of infrastructure in the IOS-XR stack:
Application-Hosting capabilities: this allows third-party (non-XR) code to run on the router as a docker container, further enhanced by the AppMgr code released in IOS-XR release 7.3.1 to manage onbox docker app lifecycle. Learn more about IOS-XR apphosting here: https://xrdocs.io/application-hosting/
Service-Layer APIs: The service-layer API infrastructure in IOS-XR enables high-performance, model-driven access to the service/instructure layer of the IOS-XR stack so that third-party onbox or offbox applications can manipulate IOS-XR RIB, Label-Switch Database (create/delete ILM paths) or create and listen to BFD session events along with interface events. Learn more about IOS-XR Service-Layer API capabilities here: https://xrdocs.io/cisco-service-layer/
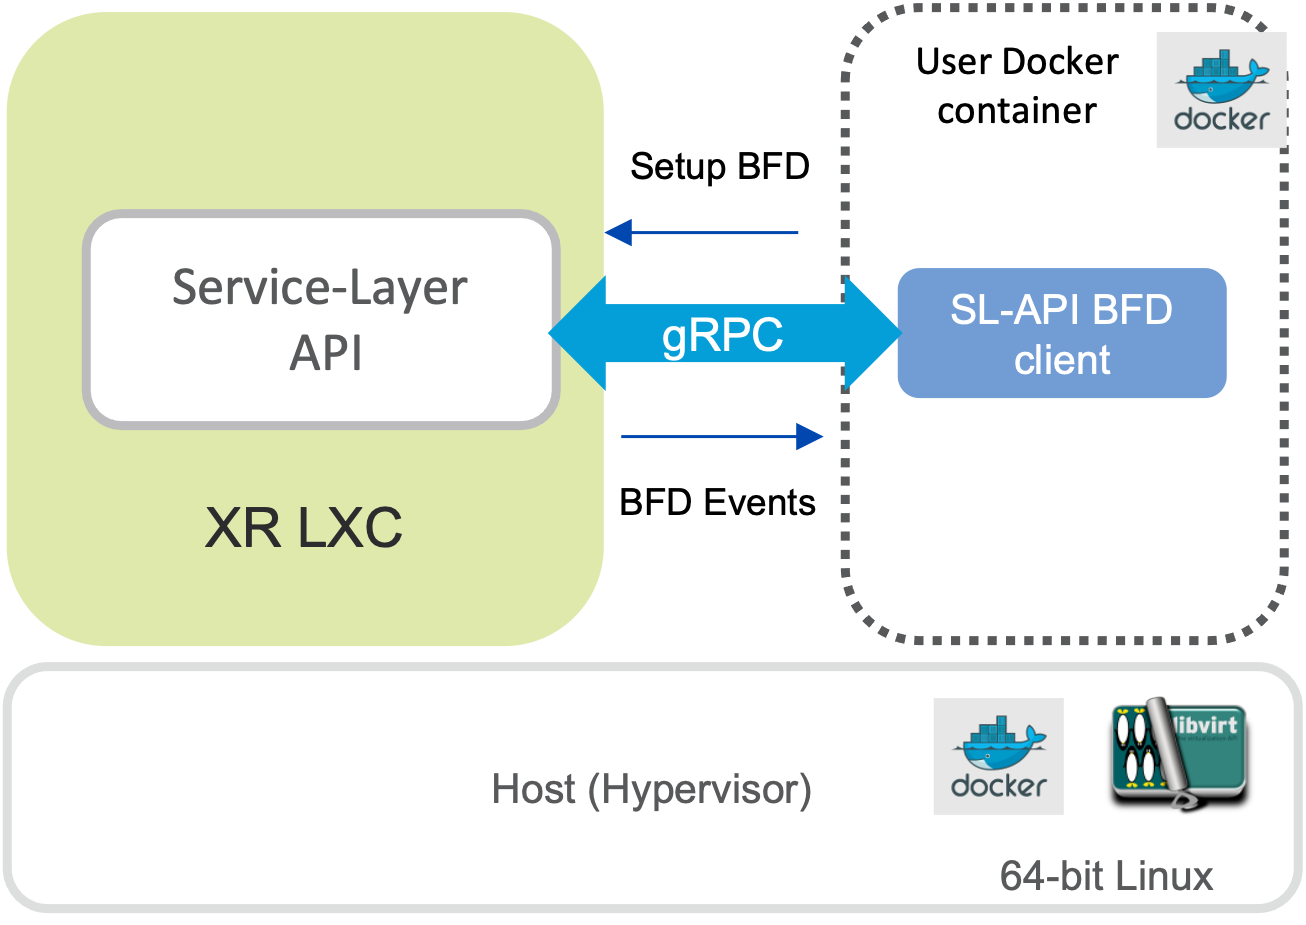
HA App Interaction with IOS-XR
 .
.
Using Xrv9000 Application-hosting capabilities, an SL-API BFD client will be spun up in a Docker container on the vRouter itself.
BFD sessions are normally associated with a Routing Protocol “Client” like BGP, OSPF, ISIS etc.
With Service-layer API– “Service-Layer” acts as client for BFD allowing us to add/modify BFD sessions directly WITHOUT ANY IOS-XR CONFIG. BFD session state is transient/ephemeral – tied to the client.
Real-time BFD events are then received over gRPC, allowing the SLAPI client to react to Peer-router unreachable/down events
Design Tenets for the HA App
The figure below captures the design tenets of the HA application:
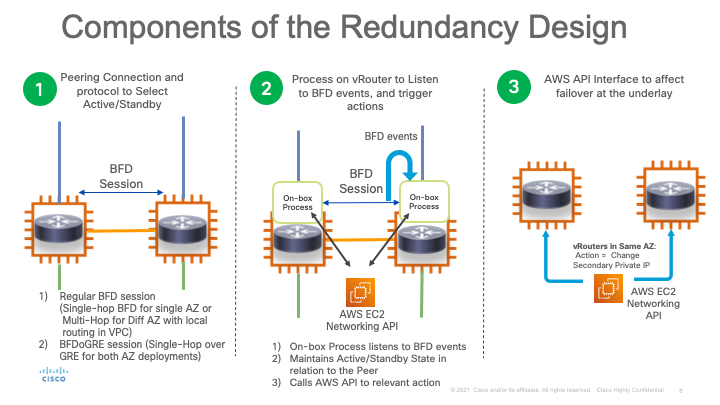
The redundancy design is composed of 3 parts:
1) Trigger: One or more BFD sessions are initiated between the active and standby routers by the onbox container app using IOS-XR’s service-layer API. 2) Detection: When either the active router or the neighboring BFD interface goes down, the BFD event is detected within a few hundred milliseconds based on the BFD settings selected. This BFD event is detected by the application using service-layer API as well. 3) Action: The application then invokes AWS APIs to trigger a failover. If both routers are in the same Availability zone, this is done by shifting the unique secondary IP configured on the active router to the standby router, thereby redirecting traffic destined for the secondary IP. If the routers are in different Availability zones, then the failover happens by shifting the gateway configured in the VPC routing table from the active Router’s primary IP to the standby router’s primary IP.
HA App: Same Availability Zone Deployment Model
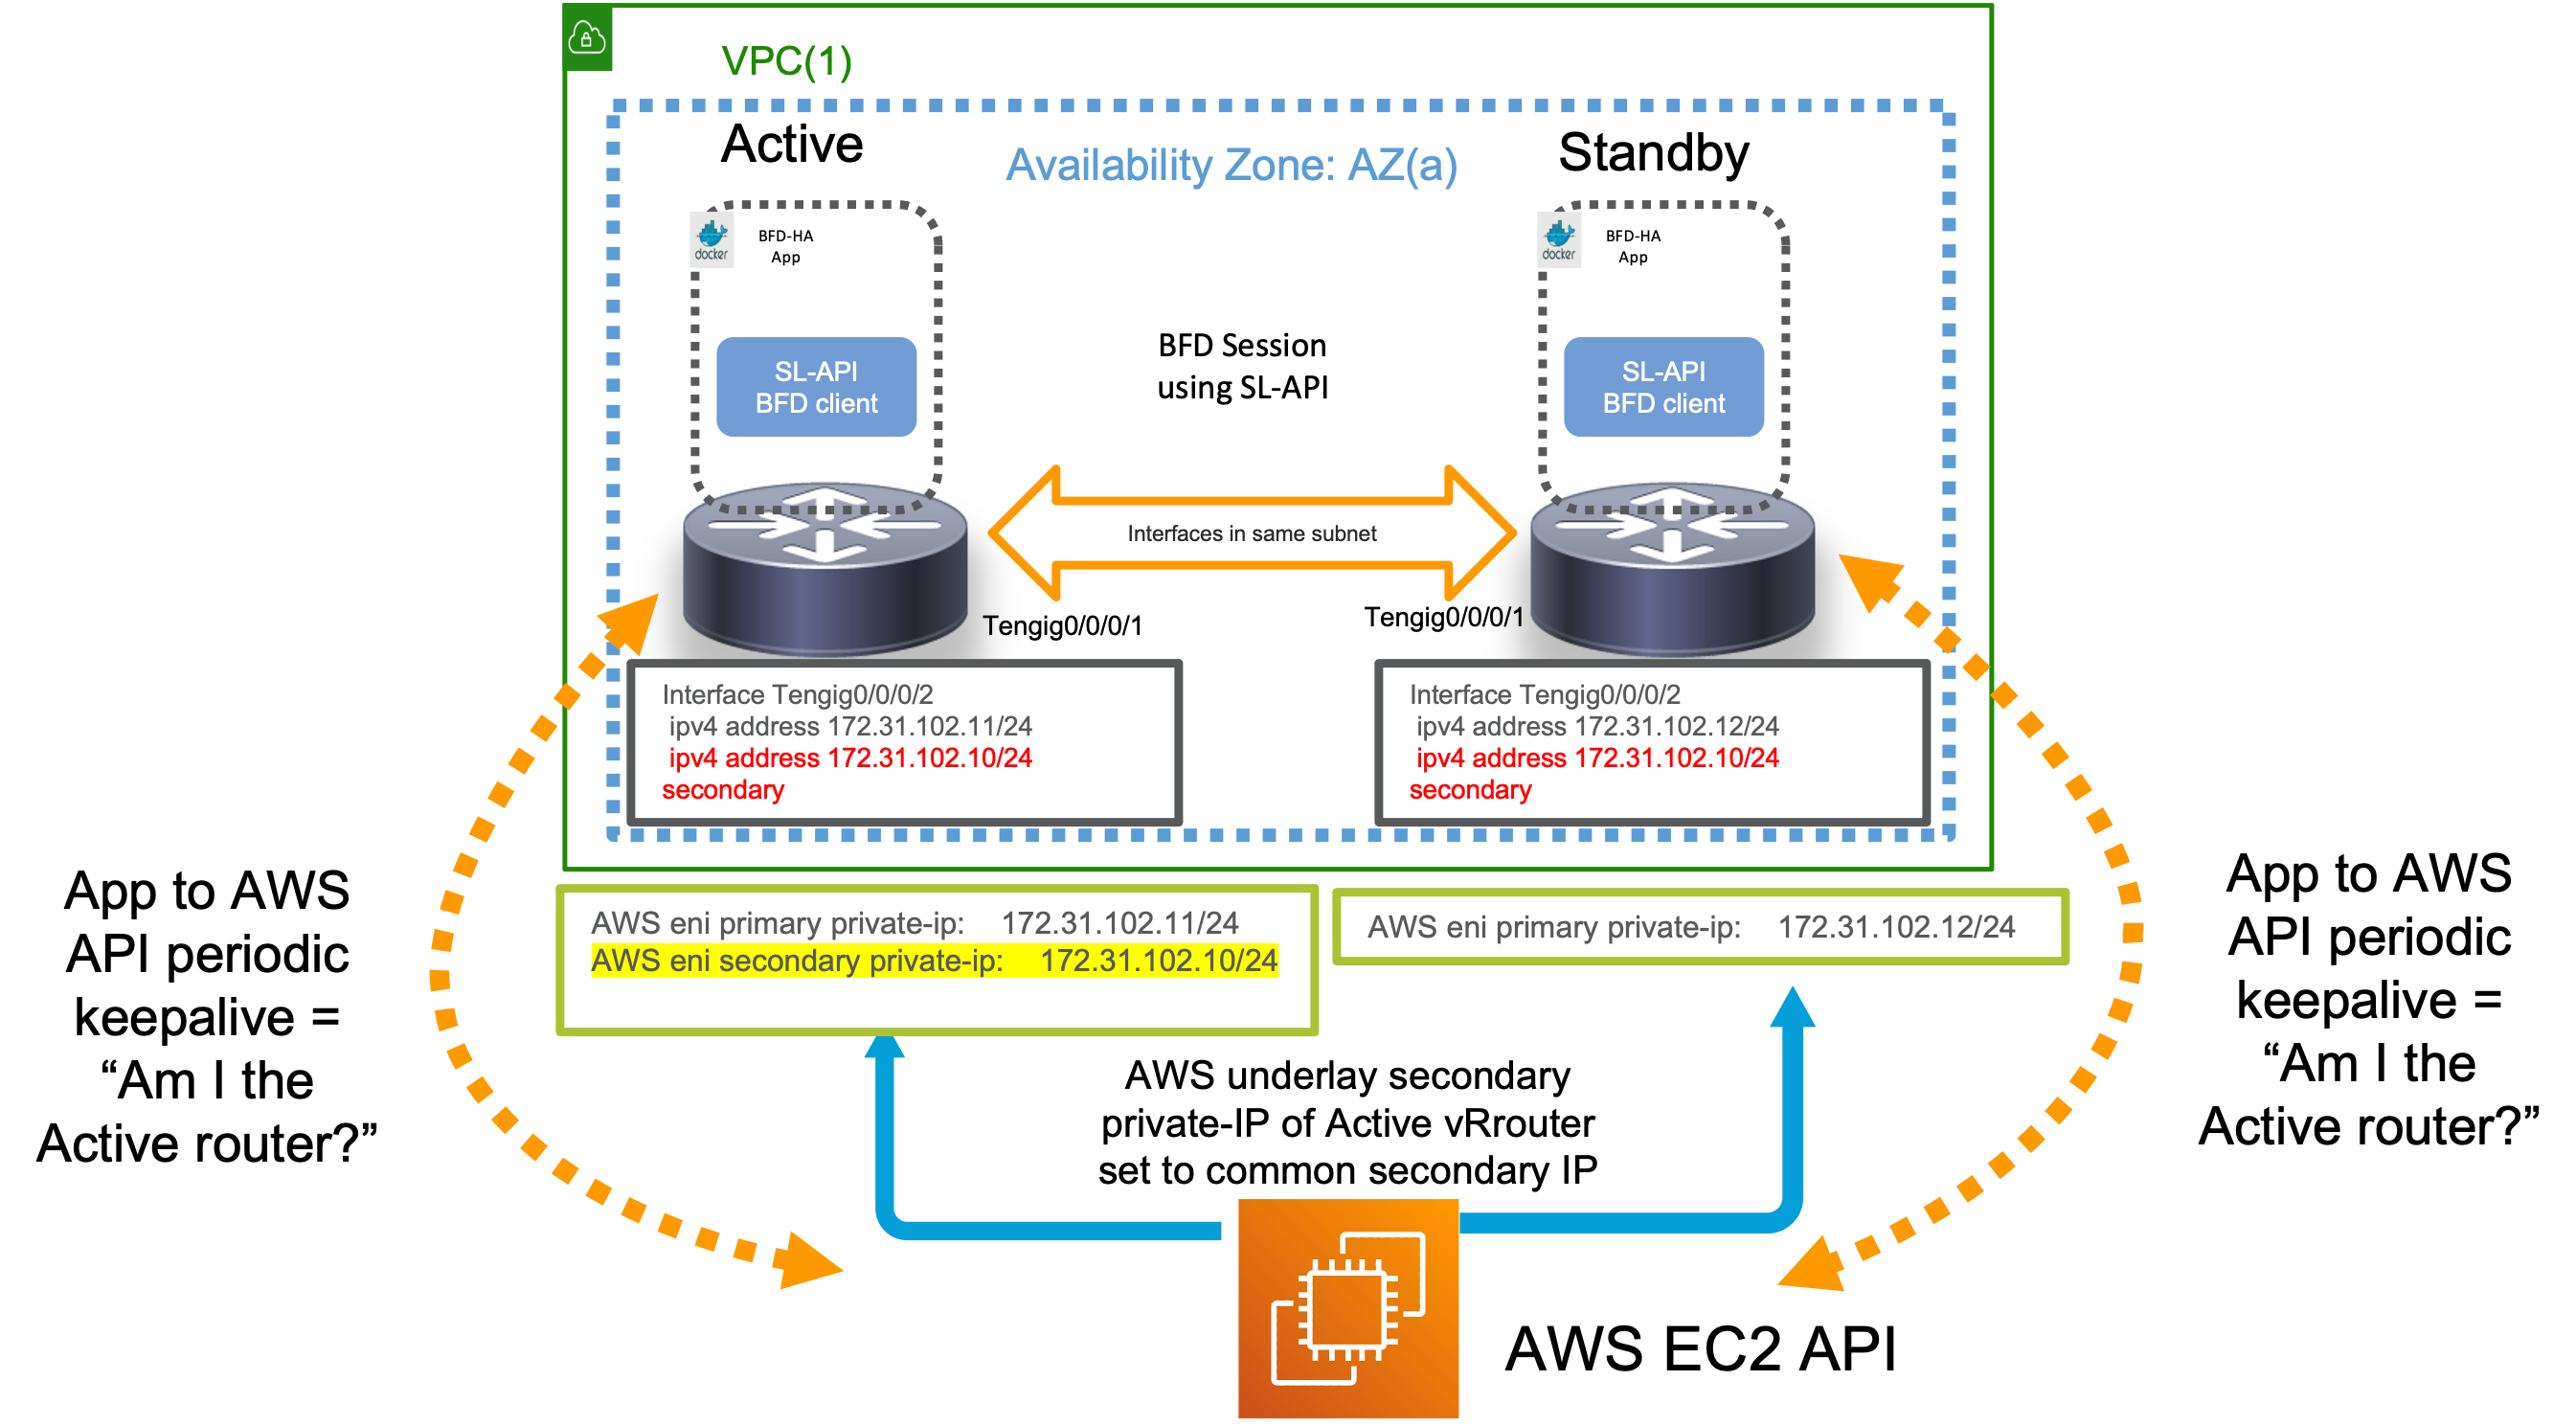
As shown below, the HA app is orchestrated on each router (Active and Standby) as an onbox docker app. Each onbox app instance connects to the local router’s Service-layer API over gRPC to orchestrate and monitor BFD sessions with the neighboring router
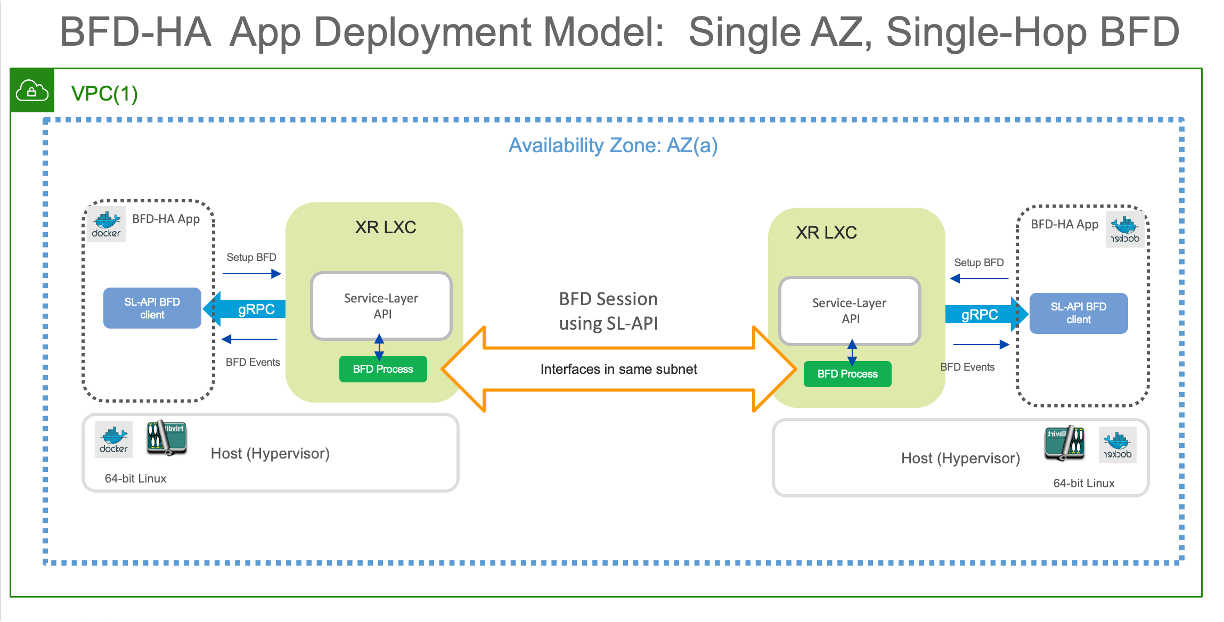
Understanding the HA App operation:
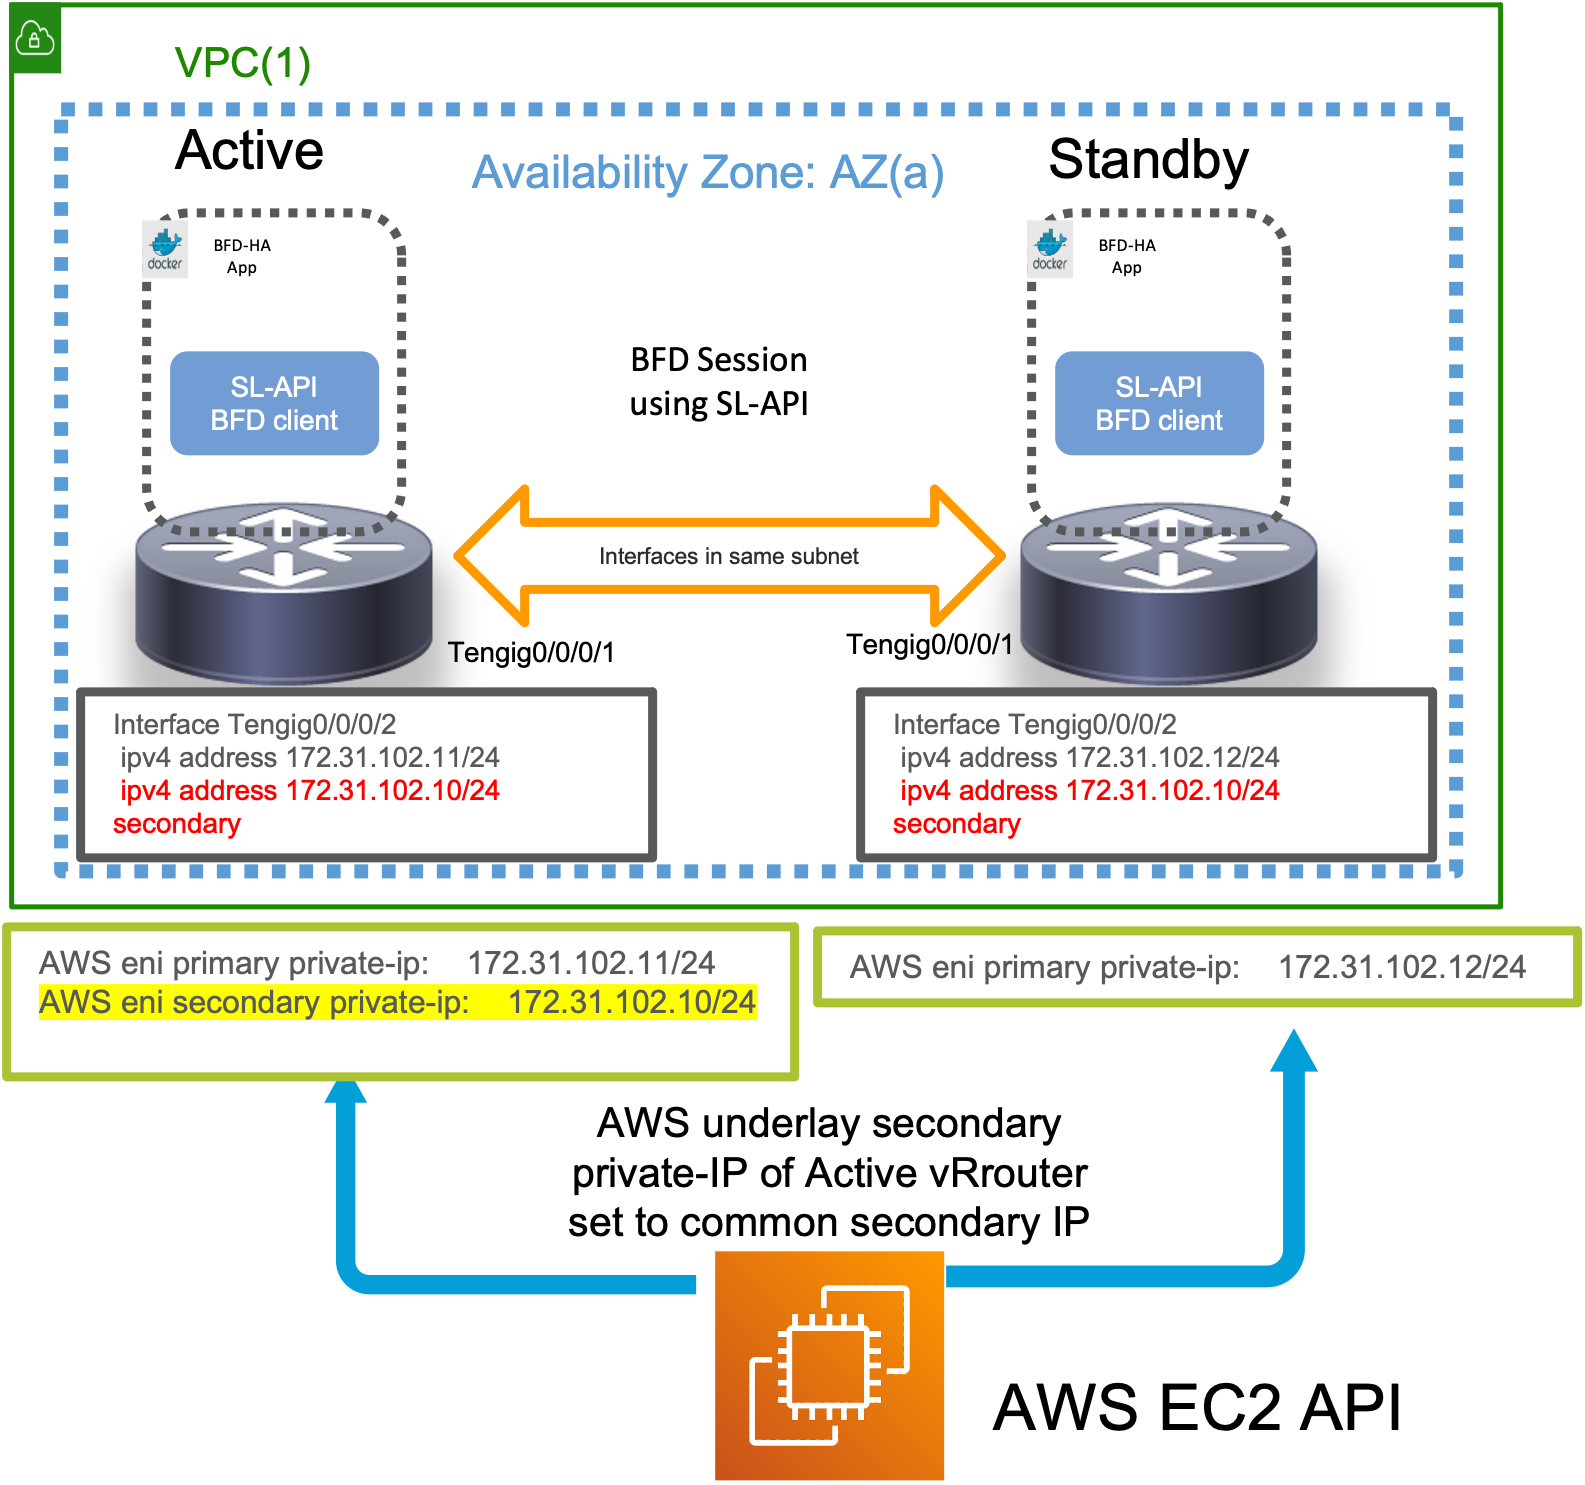
With both routers in the same Availability zone (AZ) on AWS, each router has a unique primary IP address on the incoming interface (for traffic). However, secondary IP is the same (common) across the two routers. The Application orchestrated as a docker app on each router, initiates a BFD session for each interface pair specified in an App specific configuration (discussed later). The App then monitors all the BFD sessions and waits for any failure to occur causing the BFD neighbor to go down.
Note: The XRv9000 routers are running as EC2 instances. On AWS EC2, ARP traffic and convergence is handled by the AWS underlay. Since the XR instance does not directly process the ARP traffic, nor does it do duplicate IP detection, we can easily configure the same secondary IP address on each router in the IOS-XR configuration. Of course, on the AWS underlay, an instance can only have a unique primary or secondary IP. This is why, only the Active router has the common secondary IP configured on the AWS underlay for the EC2 instance. In other words, the presence of the secondary IP on an EC2 instance confers the “Active” router status to that EC2 instance, and all traffic destined to the common secondary IP address, will be directed to the Active Router.
When a failure occurs (The current “Active” router goes down or the neighboring BFD interface goes down, causing one or more of the monitored BFD sessions to go down), then the App on the current Standby router will reach out to the AWS API to shift the “common Secondary IP” on the AWS underlay from the current “Active” router to the “Standby” router, making it the new “Active”. ARP recovergence will then happen on the AWS underlay for any incoming traffic causing the traffic to failover to the new “Active” router.
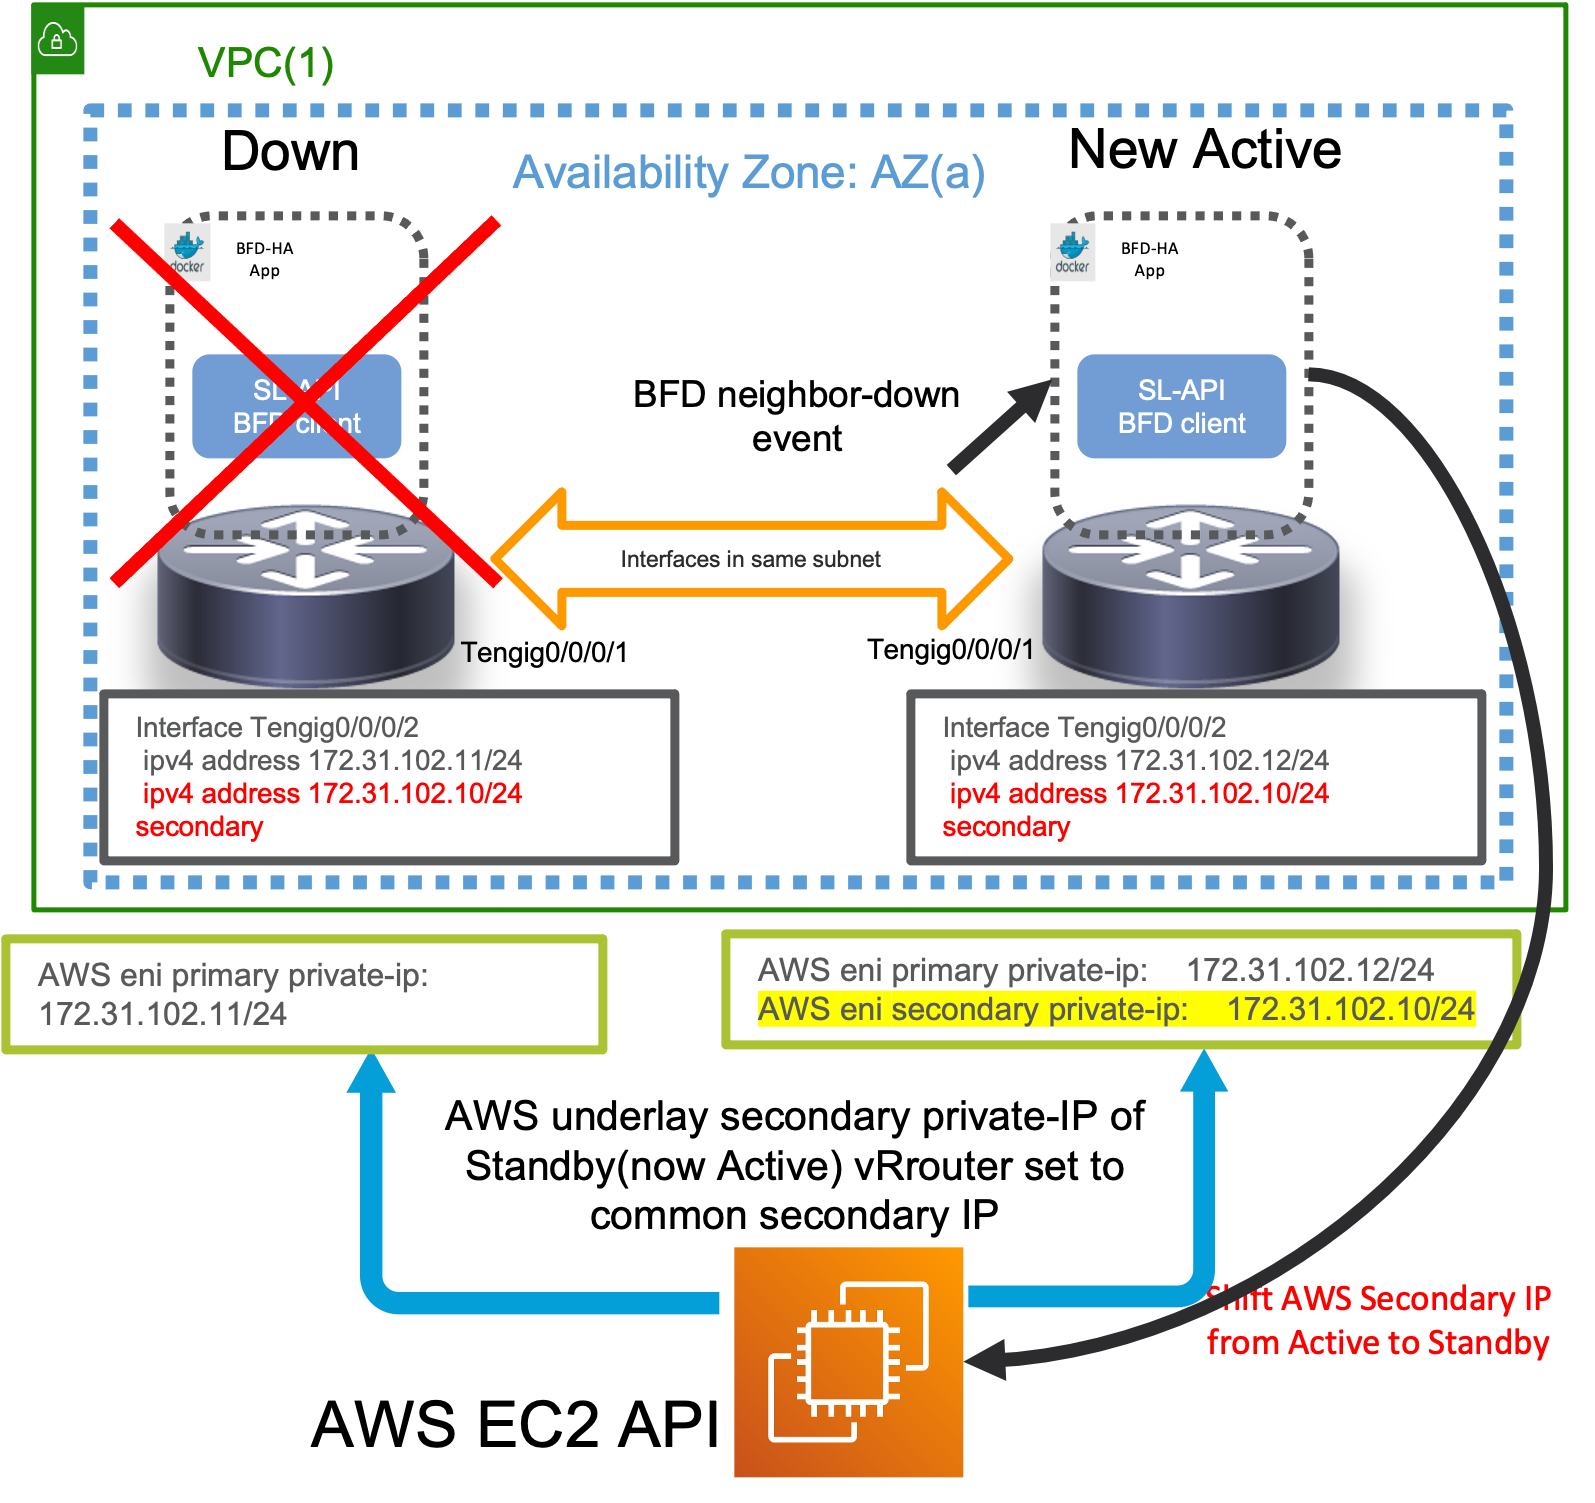
Important: It goes without saying that only a router that is currently “Standby” will react to neighbor down events and trigger a failover through the secondary-ip shift mechanism. A router that is currently “Active” will ignore these events to prevent any unecessary failovers and consequent traffic loss.
The HA App State Machine, Split-Brain/Active-Active scenarios…
While the detection and failover mechanisms have been explained above, an obvious scenario to handle is the split-brain/Active-Active scenario, described thus:
- Current “Active” router (rtr1) goes down
- “Standby” router (rtr2) detects the event and triggers failover.
- rtr2 now becomes the “Active” router.
- rtr1 comes back up - how does it know it needs to be standby ? Does it assume it is Active again and try to re-instate the secondary-IP on its own EC2 instance ?
To help address the question above, it is important to understand how the routers become Active/Standby and how their state is managed during the lifecycle of the app.
In most redundancy solutions such as HSRP, this problem is solved by enabling a communication channel between the Active and Standby routers and implementing a keep-alive and/or election mechanism to elect the current Active router.
In this HA app, we implement a keepalive between each router and the AWS API instead. This is shown below:
In short, the state machine works as follows:
- Each HA app runs a parallel thread whose sole purpose is to query the AWS API to know whether the common secondary IP is currently configured on its own incoming interface or not.
- If yes, then the router assumes it is “Active” - which means it starts ignoring any incoming BFD “down” events
- If no, then the router assumes it is the “Standby” router - and starts monitoring any incoming BFD “down” events to know when to trigger a failover.
- If the “Active” router (rtr1) goes down, then upon coming back up, it restarts the keepalive with the AWS API. Since post failover, the secondary IP would have shifted to the original “Standby” router (rtr2), rtr1 then realizes that it no longer holds the secondary IP on its instance and promptly assumes the “Standby” state. Thus, the dreaded Active-Active scenario is avoided.
HA App Pre-requisites
Using an AWS private-link (Interface Endpoint Service):
Since the HA App has to interact with the AWS EC2 APIs for state maintenance and to trigger failovers, it is important to reduce the round-trip-time from the HA App (router) to the AWS API endpoint.
Further, there cannot be any compulsion to have a public IP associated with the routers, just so that the HA App can communicate with the public AWS EC2 API. For these reasons, it is necessary to deploy an AWS private-link in the form of a private interface endpoint with an attached IP and domain name that is reachable for the HA router pair.
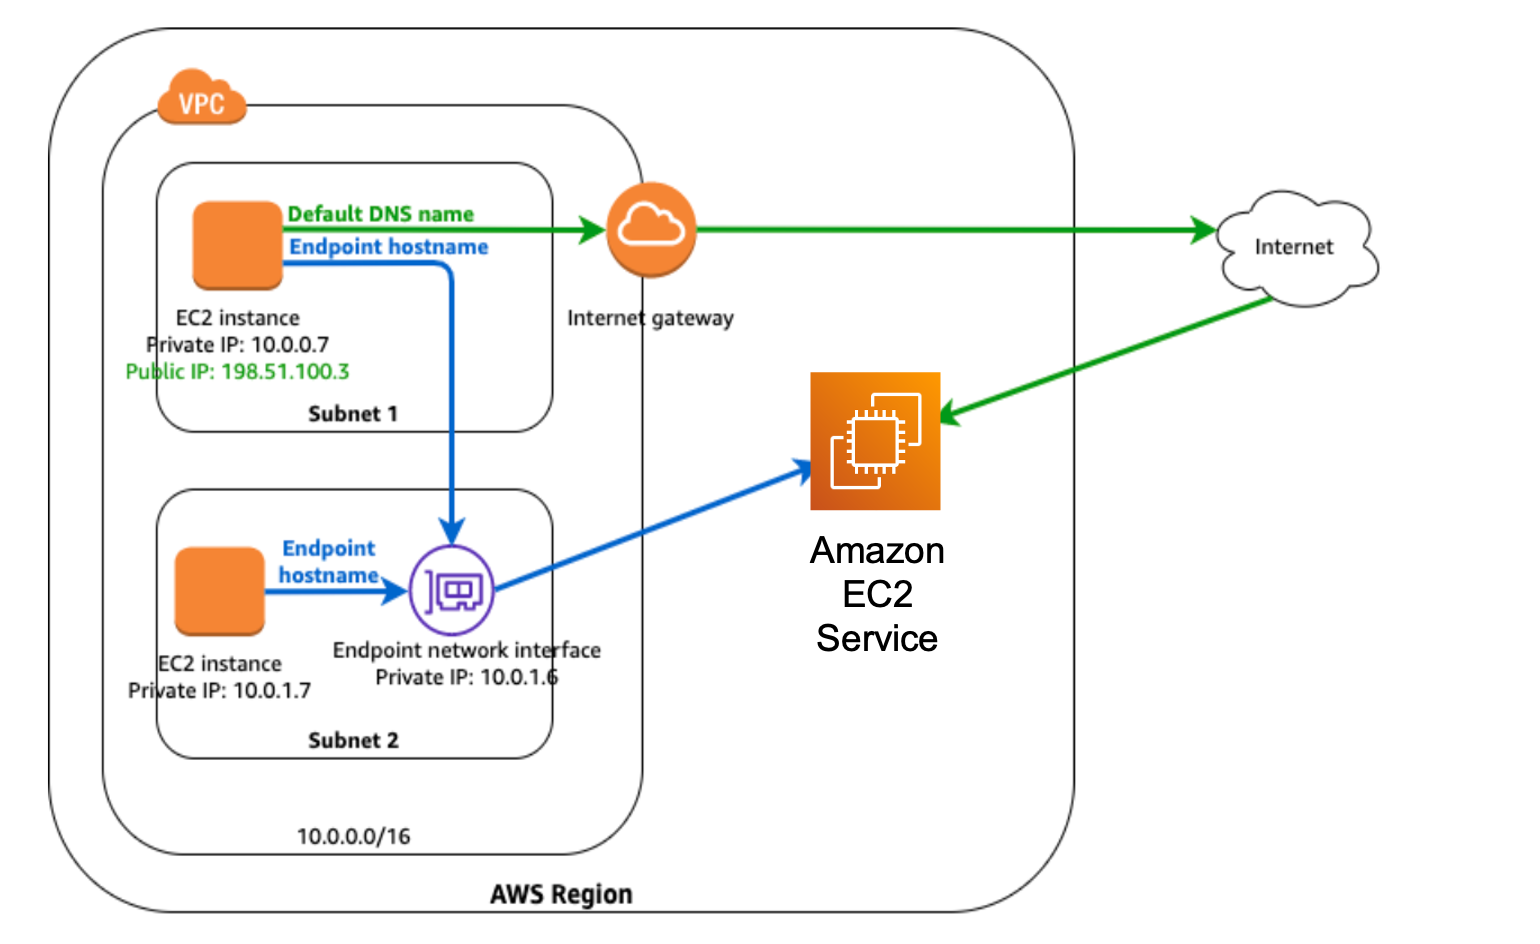
Private Interface Endpoint Service is created so that routers can access EC2 API without internet access
The endpoint URL utilized by the router HA App is obtained from the interface endpoint Service configuration
Sample boto3 resource creation for interface endpoint service in python is shown below. Using this the interface endpoint can be interacted with in the HA App.
  resource = boto3.resource(
        service_name='ec2',
        endpoint_url='https://vpce-0786bfdf8aad8840c-vacmlroq-us-west-2a.ec2.us-west-2.vpce.amazonaws.com',
        aws_access_key_id=ACCESS_KEY,
        aws_secret_access_key=SECRET_KEY,
        aws_session_token=SESSION_TOKEN,
        region_name=REGION_NAME
        )
The AWS private interface endpoint must be deployed either manually or using AWS CLI or AWS Cloudformation before the HA App is deployed so that the endpoint_url that the HA App needs to interact with is known before App deployment. More details on it can be found here:
Configuring IAM roles
The second pre-requisite for the HA app is to have the ability to create temporary credentials during its lifecycle without having to package user AWS credentials in each onbox container.
To do this, make sure an IAM role with EC2 access is assigned to each router on which the HA App is going to run.
First create a file named ec2-role-trust-policy.json with the following contents:
{
  "Version": "2012-10-17",
  "Statement": [
    {
      "Effect": "Allow",
      "Principal": { "Service": "ec2.amazonaws.com"},
      "Action": "sts:AssumeRole"
    }
  ]
}
Next, create an access policy with a file named ec2-role-access-policy.json with the following contents:
{
  "Version": "2012-10-17",
  "Statement": [
    {
      "Effect": "Allow",
      "Action": ["ec2:*"],
      "Resource": ["*"]
    }
  ]
}
Finally, a simple bash script (setup_iam_role.sh) that uses the AWS CLI on your client machine is given below which can be used to apply the required IAM role to each of the routers in the HA router pair:
Note: Before running this script, make sure the latest AWS CLI v2 is installed on your client machine: https://docs.aws.amazon.com/cli/latest/userguide/getting-started-install.html.
#!/bin/bash
set -x

rtr1_instance_id="i-092b5318d504748cd"
rtr2_instance_id="i-0440aeae55f8166f1"


aws iam create-role --role-name ec2access --assume-role-policy-document file://ec2-role-trust-policy.json
aws iam put-role-policy --role-name ec2access --policy-name EC2-Permissions --policy-document file://ec2-role-access-policy.json
aws iam create-instance-profile --instance-profile-name ec2access-profile
aws iam add-role-to-instance-profile --instance-profile-name ec2access-profile --role-name ec2access
aws ec2 associate-iam-instance-profile --instance-id $rtr1_instance_id --iam-instance-profile Name=ec2access-profile
aws ec2 associate-iam-instance-profile --instance-id $rtr2_instance_id --iam-instance-profile Name=ec2access-profile
aws ec2 describe-iam-instance-profile-associations
These files can be found at the following location in the xrv9k-aws-ha git repository:
Learn more about associating IAM roles with EC2 instances for EC2 API access, here:
https://docs.aws.amazon.com/AWSEC2/latest/UserGuide/iam-roles-for-amazon-ec2.html
Once the IAM role is assigned to each router, the onbox HA Apps can easily fetch their temporary security credentials for EC2 API access using the metadata URL:
http://169.254.169.254/latest/meta-data/iam/security-credentials/ec2access where ec2access is the name of the IAM role assigned to the routers.
Try out the HA App!
Launch an Automated Test Environment (CloudFormation):
If you’d like to try and test the onbox HA application quickly- the best technique is to drop into the ansible folder of the xrv9k-aws-ha git repository and launch a test topology on AWS using the ansible playbook documented below:
The Ansible playbook is set up to launch a cloudformation topology in AWS with hardcoded private IPs so that the stack is reproducible. View the cloudformation template: /ansible/cloudformation/xrv9k_aws_ha_topo_basic.yml from the root of the git repository
Cloudformation Topology
The topology launched by the Ansible playbook + Cloudformation template is shown below:
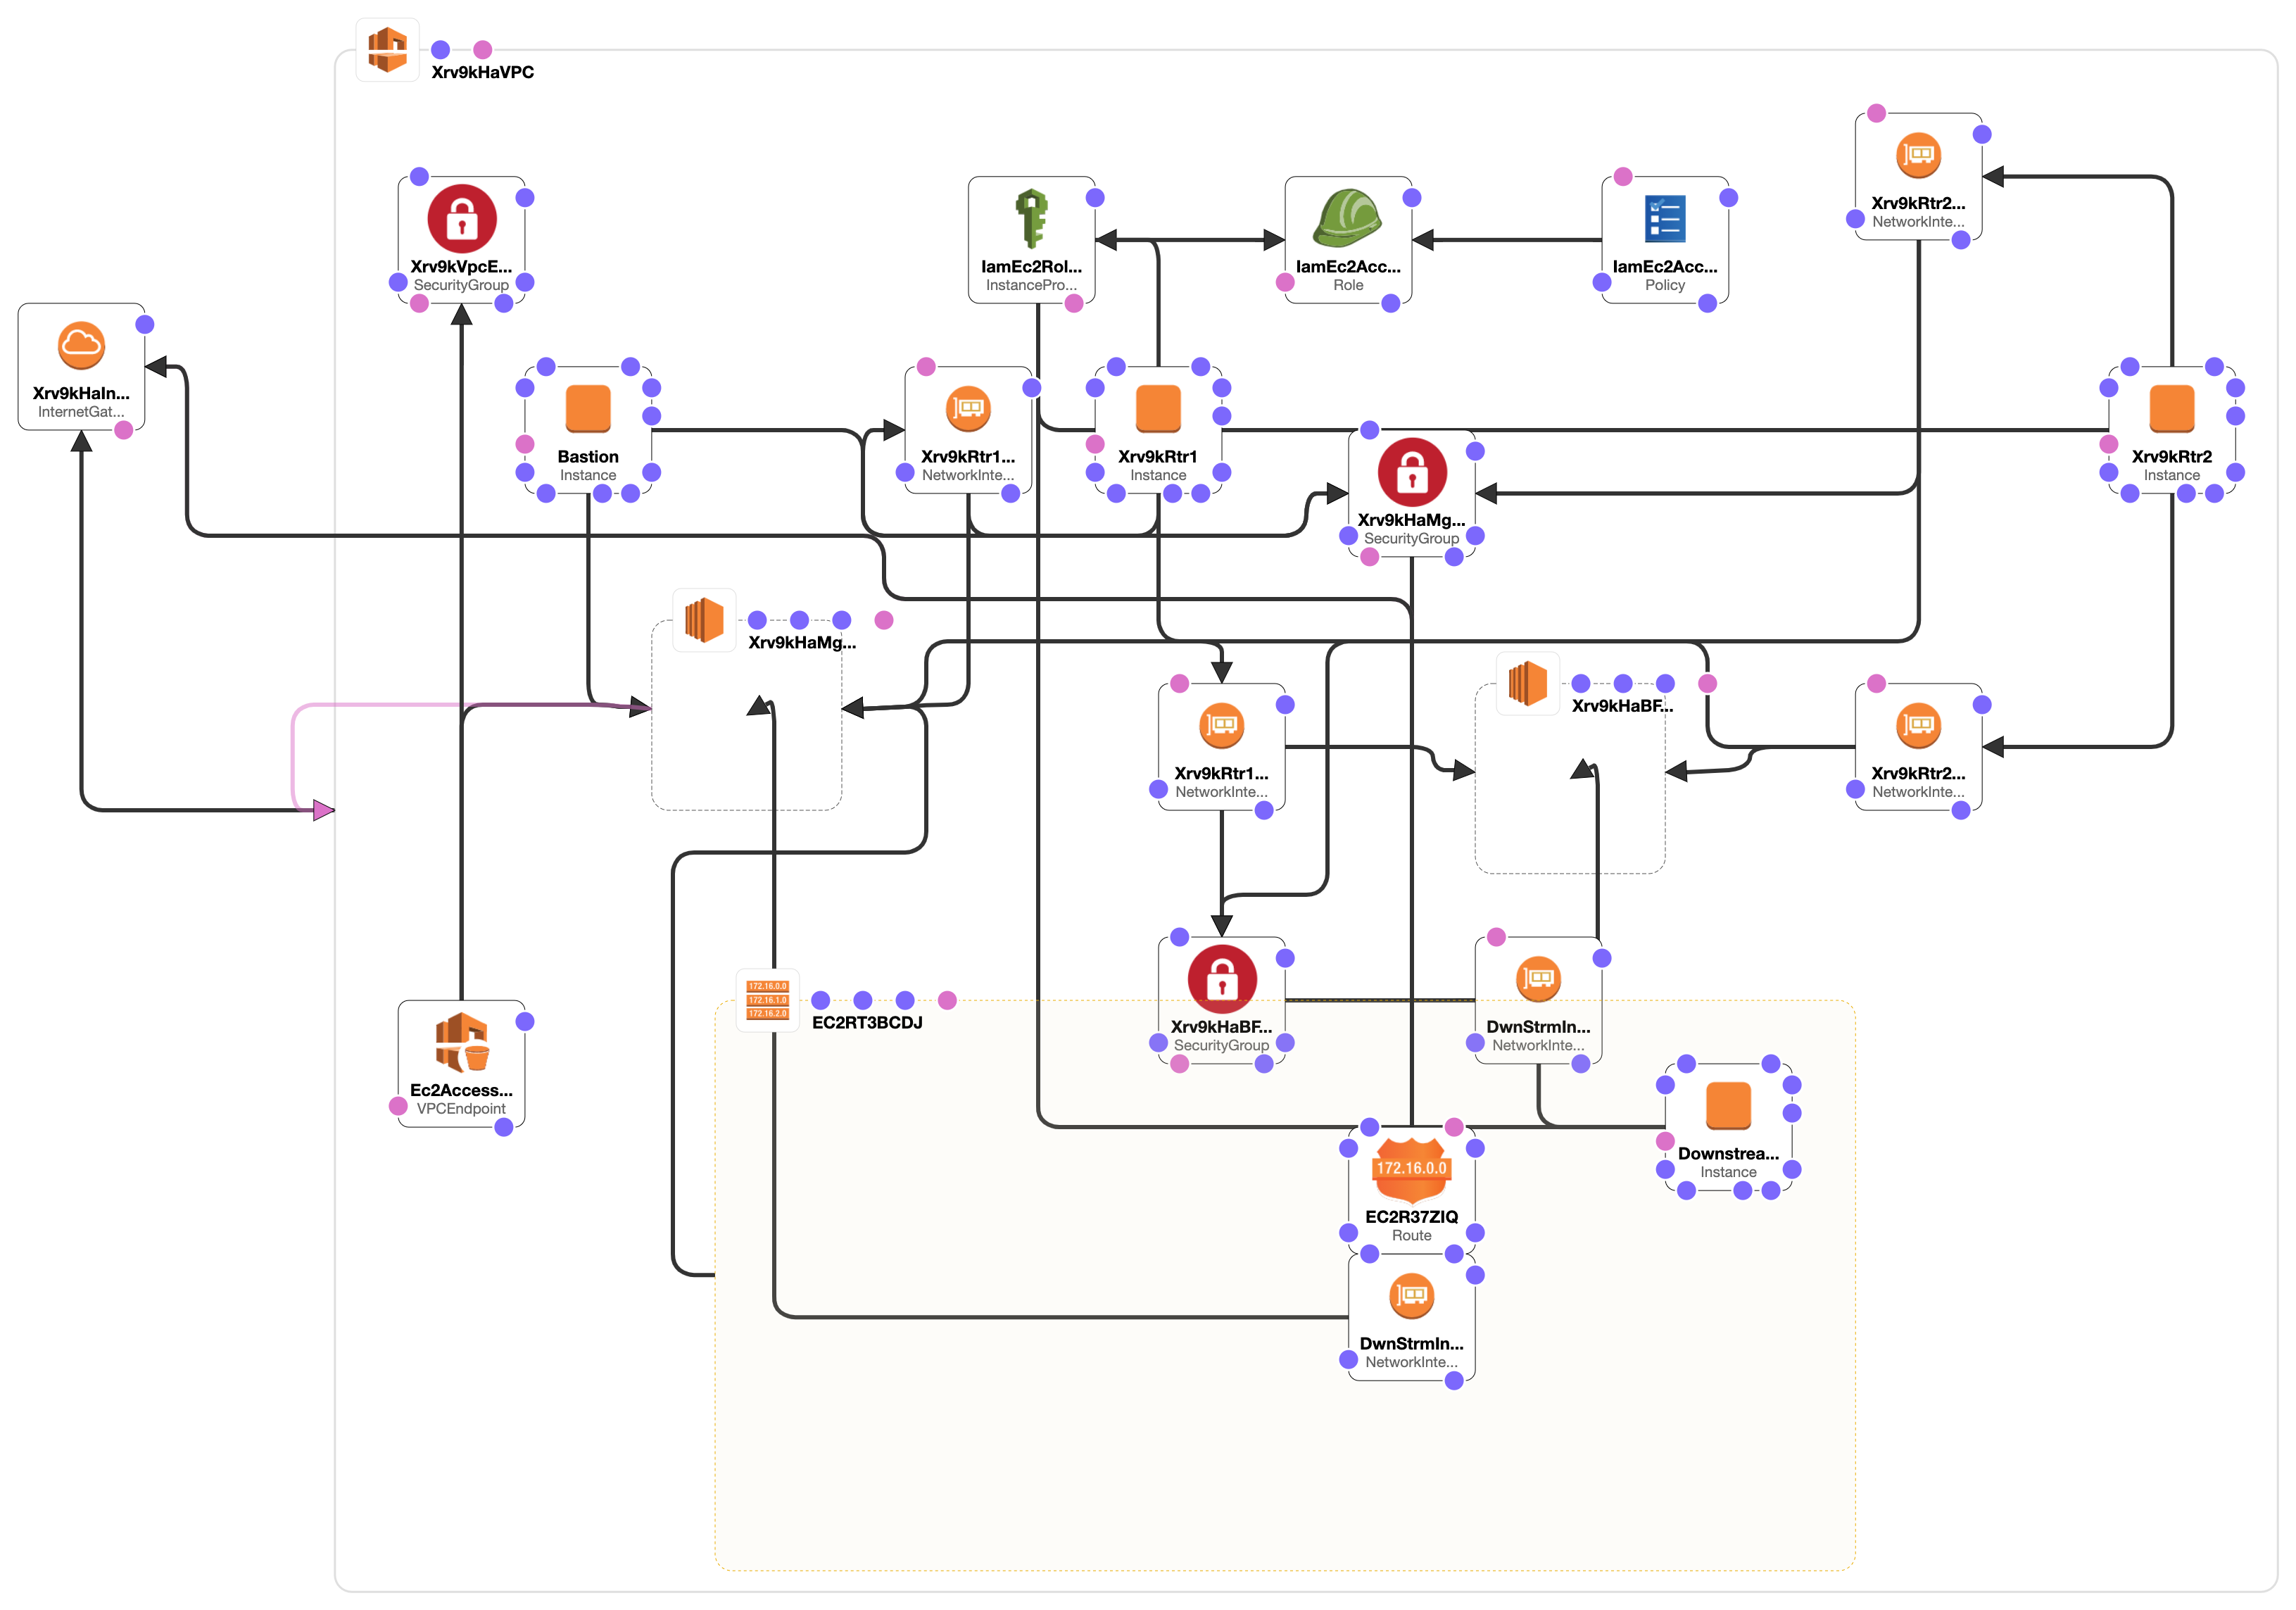
This topology includes a VPC endpoint to enable private access to EC2 API services. Further, the IAM role and policy to allow access to the EC2 API (via temporary security credentials) is automatically set up in the cloudformation template as well.
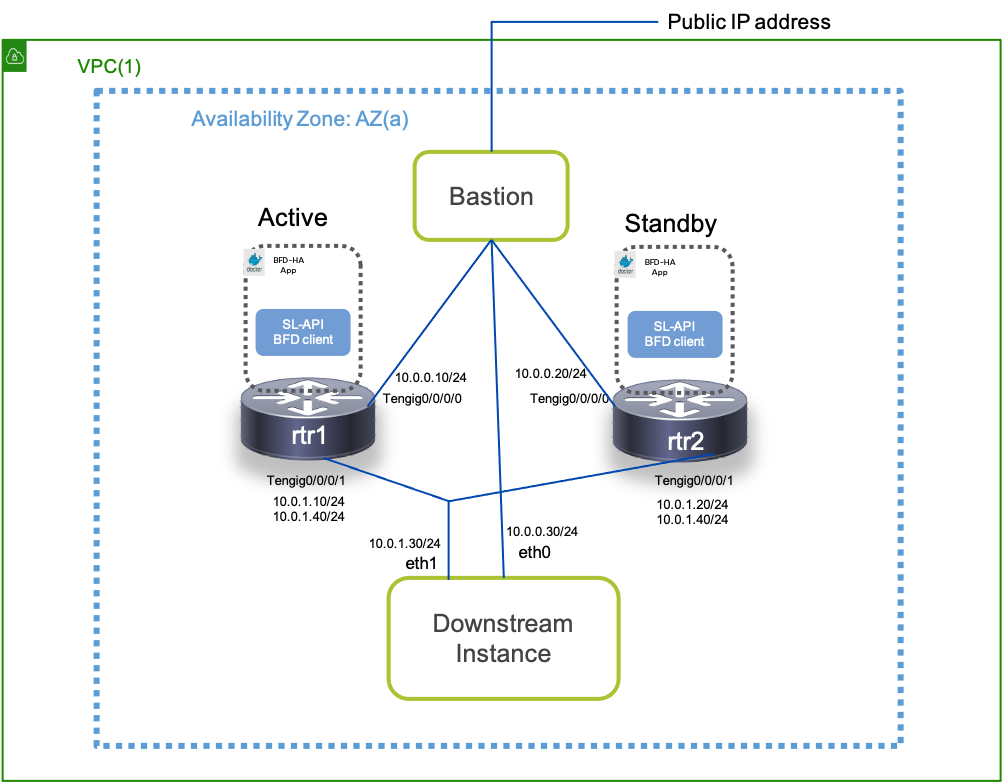
Effectively, this topology can be simplified to:
Requirements: Setting up the Client Machine (Laptop/Server)
Set up Routing to AWS
The client machine may be your laptop or any server/machine thas has internet access capable of reaching AWS public ip addresses. You can view the block of public IP addresses that AWS uses by navigating here: https://ip-ranges.amazonaws.com/ip-ranges.json and setting up routing appropriately.
Compatible OS
Technically the entire spin-up process runs using docker containers and nothing needs to be installed on the client machine except for docker itself. Since docker is supported on Linux, MacOSX and Windows, you should be able to run the build code on any of these operating systems once docker is up and running.
Install Docker Engine
Navigate here: https://docs.docker.com/engine/install/ to install Docker Engine for the OS running on your selected Client Machine. The instructions below capture the build flow from MacOSX.
Fetch your AWS Credentials
You will need to set up your AWS credentials before running the code. So fetch your Access Key and Secret Key as described here for programmatic access to AWS APIs: https://docs.aws.amazon.com/general/latest/gr/aws-sec-cred-types.html#access-keys-and-secret-access-keys
and keep them ready.
Working with xrv9k-aws-ha Ansible+CloudFormation
Clone the git repo
aks::~$git clone https://github.com/akshshar/xrv9k-aws-ha
Cloning into 'xrv9k-aws-ha'...
Set up the AWS credentials
As explained in the requirements section, once you have the Access Key and Secret Key associated with your account ready, fill out /ansible/aws/credentials file in the git repo:
aks::~/xrv9k-aws-ha$  cat ansible/aws/credentials
[default]
aws_access_key_id =
aws_secret_access_key =
Copy rsa key pair of your Client Machine to ssh/
Generate an RSA key pair: private-key filename: id_rsa public-key filename: id_rsa.pub
Follow the instructions relevant to the OS of your client machine to do so. Then copy the key files over to the /ansible/ssh/ directory of the cloned git repo:
aks::~/xrv9k-aws-ha$ cd ansible/
aks::~/xrv9k-aws-ha/ansible$cp ~/.ssh/id_rsa* ssh/
aks::~/xrv9k-aws-ha/ansible$
aks::~/xrv9k-aws-ha/ansible$tree ./ssh
./ssh
├── PlaceSSHKeysHere.md
├── id_rsa
└── id_rsa.pub

0 directories, 3 files
aks::~/xrv9k-aws-ha/ansible$
Build the Ansible Docker image
aks::~/xrv9k-aws-ha/ansible$ docker build -t ansible_client .
[+] Building 226.2s (8/8) FINISHED
 => [internal] load build definition from Dockerfile                                                                                                                                             0.0s
 => => transferring dockerfile: 451B                                                                                                                                                             0.0s
 => [internal] load .dockerignore                                                                                                                                                                0.0s
 => => transferring context: 2B                                                                                                                                                                  0.0s
 => [internal] load metadata for docker.io/library/python:3.8-slim                                                                                                                               5.5s
 => [internal] load build context                                                                                                                                                                0.0s
 => => transferring context: 128B                                                                                                                                                                0.0s
 => [1/3] FROM docker.io/library/python:3.8-slim@sha256:47bcfecfc8b486a6cbd86cf2c67d74a18519ed29d43b5d4ee20692433e81d0a1                                                                        84.5s
 => => resolve docker.io/library/python:3.8-slim@sha256:47bcfecfc8b486a6cbd86cf2c67d74a18519ed29d43b5d4ee20692433e81d0a1                                                                         0.0s
 => => sha256:6d9f6b5c1e712fa60caf3b1b4644b47abe0bec3fd2b6389bc1f8114f3269b9a9 10.76MB / 10.76MB                                                                                                42.2s
 => => sha256:47bcfecfc8b486a6cbd86cf2c67d74a18519ed29d43b5d4ee20692433e81d0a1 1.86kB / 1.86kB                                                                                                   0.0s
 => => sha256:00d7c12a2ae7d176a855da66e81184eaa63aedc96083547a80a219f681f4c228 1.37kB / 1.37kB                                                                                                   0.0s
 => => sha256:2e56f6b0af6977ccaf1680c9e464aa85d83925e06130ede28a6f755fde312282 7.92kB / 7.92kB                                                                                                   0.0s
 => => sha256:bd897bb914af2ec64f1cff5856aefa1ae99b072e38db0b7d801f9679b04aad74 31.37MB / 31.37MB                                                                                                81.8s
 => => sha256:aee78d8222132bc168ae0d97914077508c31763bb168955723883c59593868ae 1.08MB / 1.08MB                                                                                                   3.3s
 => => sha256:cf9f290bd6be1670494fceedbf07a21958f8e99ef25ca48f1291410c7544a6b5 233B / 233B                                                                                                       4.4s
 => => sha256:5e4b501cbda59bcec36db68e2b95f750a8499c7d0d8cc274e12c858379570ecb 2.64MB / 2.64MB                                                                                                   9.1s
 => => extracting sha256:bd897bb914af2ec64f1cff5856aefa1ae99b072e38db0b7d801f9679b04aad74                                                                                                        1.4s
 => => extracting sha256:aee78d8222132bc168ae0d97914077508c31763bb168955723883c59593868ae                                                                                                        0.1s
 => => extracting sha256:6d9f6b5c1e712fa60caf3b1b4644b47abe0bec3fd2b6389bc1f8114f3269b9a9                                                                                                        0.5s
 => => extracting sha256:cf9f290bd6be1670494fceedbf07a21958f8e99ef25ca48f1291410c7544a6b5                                                                                                        0.0s
 => => extracting sha256:5e4b501cbda59bcec36db68e2b95f750a8499c7d0d8cc274e12c858379570ecb                                                                                                        0.2s
 => [2/3] COPY requirements.yml /root/requirements.yml                                                                                                                                           0.0s
 => [3/3] RUN python3 -m pip install --upgrade ansible-core boto3 scp &&     apt-get update &&     apt-get install -y openssh-client &&     apt-get clean &&     rm -rf /var/lib/apt/lists/*   134.6s
 => exporting to image                                                                                                                                                                           1.5s
 => => exporting layers                                                                                                                                                                          1.5s
 => => writing image sha256:b639e1250482aa72ea1b41a9e1a67201c9c165c3c462005cdf5ca66fcf788340                                                                                                     0.0s
 => => naming to docker.io/library/ansible_client                                                                                                                                                0.0s

Use 'docker scan' to run Snyk tests against images to find vulnerabilities and learn how to fix them
aks::~/xrv9k-aws-ha/ansible$
Bring up the 2 node-topology
The Ansible playbook will launch the AWS topology, build the xrv9k HA App RPM and deploy the app with the required config file on the two routers.
To bring up the topo and deploy the app:
aks::~/xrv9k-aws-ha/ansible$ ./bringup_stack.sh
Bring down the topology
aks::~/xrv9k-aws-ha/ansible$ ./bringdown_stack.sh
Manual App Build and Deployment
In case you already have a running AWS router setup, the HA App can be built manually and deployed on the routers. The build and deployment process for the App is described below:
Build the Docker image (or Download pre-built latest version)
Note: Make sure Docker is installed on your build server/laptop - instructions here.
aks::~/ha_app_xrv9k$
aks::~/ha_app_xrv9k$cd core/python/
aks::~/ha_app_xrv9k/core/python$
aks::~/ha_app_xrv9k/core/python$docker build -t akshshar/xrv9k_aws_ha .
Sending build context to Docker daemon  1.477MB
Step 1/17 : FROM python:3.8-slim as builder
 ---> b298bacb2734
Step 2/17 : RUN apt-get update &&     apt-get install -y gcc &&     apt-get clean
 ---> Using cache
 ---> 66c9e6285ad9
Step 3/17 : COPY src/app /app
 ---> ca311a236235
Step 4/17 : WORKDIR app
 ---> Running in a455c337f656
Removing intermediate container a455c337f656
 ---> 3b1663658191
Step 5/17 : RUN python3 -m pip install --user -r requirements.txt
 ---> Running in c12edaaca0a7
Collecting rdbtools
  Downloading rdbtools-0.1.15.tar.gz (31 kB)
Collecting python-lzf
  Downloading python-lzf-0.2.4.tar.gz (9.3 kB)
Collecting grpcio
  Downloading grpcio-1.38.1-cp38-cp38-manylinux2014_x86_64.whl (4.2 MB)
Collecting grpcio-tools
  Downloading grpcio_tools-1.38.1-cp38-cp38-manylinux2014_x86_64.whl (2.5 MB)
Collecting boto3
  Downloading boto3-1.17.105-py2


  ..........


  Removing intermediate container d2f69f2f2d5d
 ---> 91195bbe9542
Step 17/17 : CMD ["/usr/local/bin/python3", "/root/.local/bin/supervisord", "-c", "/etc/supervisord.conf", "-n"]
 ---> Running in 8459c24eceb9
Removing intermediate container 8459c24eceb9
 ---> c23601535cd8
Successfully built c23601535cd8
Successfully tagged akshshar/xrv9k_aws_ha:latest
aks::~/ha_app_xrv9k/core/python$
aks::~/ha_app_xrv9k/core/python$
The Docker image should appear in the local docker registry:
aks::~/ha_app_xrv9k/core/python$docker images akshshar/xrv9k_aws_ha
REPOSITORY              TAG                 IMAGE ID            CREATED              SIZE
akshshar/xrv9k_aws_ha   latest              c23601535cd8        About a minute ago   309MB
aks::~/ha_app_xrv9k/core/python$
Note: If you’d like to download a pre-built docker image from dockerhub, just issue a docker pull:
aks::~$
aks::~$docker pull akshshar/xrv9k-aws-ha:latest
latest: Pulling from akshshar/xrv9k-aws-ha
000eee12ec04: Already exists
ddc2d83f8229: Already exists
3ae1660fa0d9: Already exists
ef709117d3d3: Already exists
487a0421e8fa: Already exists
199045e43db5: Downloading [===========================>                       ]  10.27MB/18.37MB
5f1db3d1ff14: Download complete
8ee41ff6fca0: Downloading [===========================>                       ]  8.932MB/16.32MB
d7376ff144fe: Download complete
1a2a1997dd86: Downloading [>
Build the Application RPM from docker image for deployment
Drop into the app specific folder under /xr-appmgr/ in the root of the cloned git repository and create a tarball from the Docker image.
aks::~/ha_app_xrv9k$
aks::~/ha_app_xrv9k$
aks::~/ha_app_xrv9k$cd xr-appmgr/src/apps/xrv9k_aws_ha/
aks::~/ha_app_xrv9k/xr-appmgr/src/apps/xrv9k_aws_ha$
aks::~/ha_app_xrv9k/xr-appmgr/src/apps/xrv9k_aws_ha$ docker save akshshar/xrv9k-aws-ha:latest > xrv9k_aws_ha.tar
aks::~/ha_app_xrv9k/xr-appmgr/src/apps/xrv9k_aws_ha$
aks::~/ha_app_xrv9k/xr-appmgr/src/apps/xrv9k_aws_ha$
From the /xr-appmgr/ folder, issue a build for xr-appmgr compatible RPM build:
aks::~/ha_app_xrv9k$cd xr-appmgr/
aks::~/ha_app_xrv9k/xr-appmgr$
aks::~/ha_app_xrv9k/xr-appmgr$
aks::~/ha_app_xrv9k/xr-appmgr$  ./appmgr_build -b build.yaml
Starting to build package: xrv9k-aws-ha
Building docker image arhashem/xr-wrl7...
docker build docker -f docker/WRL7.Dockerfile -t arhashem/xr-wrl7
Sending build context to Docker daemon  6.656kB
Step 1/2 : FROM akshshar/xr-wrl7
 ---> a25bec9d92f6
Step 2/2 : COPY build_rpm.sh /usr/sbin/
 ---> Using cache
 ---> 04f3d0717d48
Successfully built 04f3d0717d48
Successfully tagged arhashem/xr-wrl7:latest
Adding sources...
 ---> xrv9k_aws_ha
Adding configs...
 ---> xrv9k_aws_ha
Adding data...
Creating source archive...
Generating spec file: xrv9k-aws-ha-0.1.0-eXR.spec
Building RPM...
/usr/sbin/build_rpm.sh --spec-file /usr/src/rpm/SPECS/xrv9k-aws-ha-0.1.0-eXR.spec --source-dir /usr/src/rpm/SOURCES --rpm-dir /usr/src/rpm/RPMS --output-dir /root/RPMS --verbose
+ [[ '' == '' ]]
+ log_file=/tmp/rpmbuild.log
+ [[ /usr/src/rpm/SPECS/xrv9k-aws-ha-0.1.0-eXR.spec == '' ]]
+ [[ /usr/src/rpm/SOURCES == '' ]]
+ [[ /usr/src/rpm/RPMS == '' ]]
+ [[ /root/RPMS == '' ]]
+ mkdir -p /root/RPMS
+ chown -Rf root:root /root/RPMS
+ chown -Rf root:root /usr/src/rpm/SOURCES/xrv9k-aws-ha-0.1.0-eXR.tar.gz
++ dirname /usr/src/rpm/SPECS/xrv9k-aws-ha-0.1.0-eXR.spec
+ chown -Rf root:root /usr/src/rpm/SPECS/xrv9k-aws-ha-0.1.0-eXR.spec
+ [[ '' != '' ]]
+ /usr/bin/rpmbuild --verbose -bb /usr/src/rpm/SPECS/xrv9k-aws-ha-0.1.0-eXR.spec
+ rpm_build_ec=0
+ [[ 0 -eq 0 ]]
+ echo 'RPM built successfully, copying over the RPMs directory to /root/RPMS'
RPM built successfully, copying over the RPMs directory to /root/RPMS
+ [[ '' != '' ]]
+ cp -r /usr/src/rpm/RPMS/noarch /usr/src/rpm/RPMS/x86_64 /root/RPMS
+ sync
+ ls -R /root/RPMS
/root/RPMS:
noarch	x86_64

/root/RPMS/noarch:

/root/RPMS/x86_64:
xrv9k-aws-ha-0.1.0-eXR.x86_64.rpm

Done building package xrv9k-aws-ha

aks::~/ha_app_xrv9k/xr-appmgr$
aks::~/ha_app_xrv9k/xr-appmgr$
aks::~/ha_app_xrv9k/xr-appmgr$ ls -l RPMS/x86_64/
total 202112
-rw-r--r--  1 akshshar  staff  95900546 Jul  6 18:07 xrv9k-aws-ha-0.1.0-eXR.x86_64.rpm
aks::~/ha_app_xrv9k/xr-appmgr$
Create config.json for each router based on the router configurations
Sample configuration files are present under /core/python/src/app/onbox/ for a two router setup:
{
    "config": {
    	"global_retry_interval": 30,
    	"global_retry_count": 5,
    	"ec2_private_endpoint_url": "https://vpce-01c286018e0fad113-vwje496n.ec2.us-west-2.vpce.amazonaws.com",
    	"grpc_server": "127.0.0.1",
    	"grpc_port": 57777,
        "action": {
            "method": "secondary_ip_shift",
            "method_params": {
            	"intf_list": [
            		{
            			"secondary_ip": "172.31.105.10",
			            "instance_intf_number": 2
            		},
            		            		{
            			"secondary_ip": "172.31.101.10",
			            "instance_intf_number": 1
            		}
            	]
            }
        },
    	"bfd_sessions": [
    		{
    			"session_type": "SINGLE_HOP",
	    		"intf_name": "TenGigE0/0/0/2",
	    		"neigh_ip": "172.31.105.206",
	    		"bfd_desired_tx_int_usec": 50000,
		        "detect_multiplier": 3,
		        "vrf_name": "default"
    	    },
            {
            	"session_type": "SINGLE_HOP",
            	"intf_name": "TenGigE0/0/0/1",
    		    "neigh_ip": "172.31.101.101",
	    		"bfd_desired_tx_int_usec": 50000,
		        "detect_multiplier": 3,
		        "vrf_name": "default"
            }
    	]

    }

}
The fields are pretty self explanatory. The Mandatory fields are:
1) "bfd_sessions"
2) "ec2_private_endpoint_url" 3) "action"
For the "action" field only the "secondary_ip_shift" method is currently supported.
Create hosts file for the router pair
The host files is set up to eliminate the AWS endpoint-URL DNS lookup which would otherwise increase failover time. Usually a hosts file would be valid for a HA router pair, but it could be common for all HA router pairs within the same availability zone in the deployment. A sample hosts file is present under /core/python/src/app/onbox/ and also shown below.
127.0.0.1	localhost.localdomain		localhost
172.31.100.237 vpce-01c286018e0fad113-vwje496n.ec2.us-west-2.vpce.amazonaws.com
Deploy App
#####################################################################################
STEP 1: COPY Artifacts to router harddisk
#####################################################################################
—> Before doing an SCP, enable SCP at higher rates into the routers using the following rate-limit policy for SSH in lpts
!
lpts pifib hardware police
 flow ssh known rate 15000
 flow ssh default rate 15000
 !
SCP App RPM and router specific config.json + hosts file (for predetermined resolution for ec2 endpoint url) to harddisk: (/misc/disk1)
scp xrv9k-slbfdha-aws-0.1.0-eXR.x86_64.rpm root@<xrv9k-ip>:/misc/disk1/
scp config_rtr1.json root@<xrv9k-ip>:/misc/disk1/
scp hosts root@<xrv9k-ip>:/misc/disk1/
#####################################################################################
STEP 2: Install Application RPM and move config files to App Folder
#####################################################################################
XR CLI exec commands:
# Install RPM
appmgr package install rpm /misc/disk1/xrv9k-aws-ha-0.1.0-eXR.x86_64.rpm

# copy config file to config mount of App
copy harddisk:/config.json apphost:/appmgr/config/xrv9k_aws_ha/config.json

# copy hosts file to config mount of App
copy harddisk:/hosts apphost:/appmgr/config/xrv9k_aws_ha/hosts
#####################################################################################
STEP 3: Apply CLI configuration to activate app
#####################################################################################
XR CLI config
# Activate App along with grpc server and routes to metadata and endpoint services


!
bfd
  echo disable
  !
!
appmgr
 application xrv9k_aws_ha
  activate type docker source xrv9k_aws_ha docker-run-opts "-itd --net=host -v {app_install_root}/config/xrv9k_aws_ha/config.json:/app/onbox/config.json -v {app_install_root}/config/xrv9k_aws_ha/hosts:/etc/hosts"
 !
!
!
router static
 address-family ipv4 unicast
  169.254.169.254/32 172.31.100.1
 !
!
tpa
 vrf default
  address-family ipv4
   update-source dataports TenGigE0/0/0/0
  !
 !
 grpc
 port 57777
 no-tls
 service-layer
 !
!
–> The above static route and tpa update-source config are used to enable docker applications on XR to access AWS metadata via the 1st data port.
Monitor Application
Once the application starts running it can be monitored using xr-appmgr commands:
Running Application Info
RP/0/RP0/CPU0:rtr2#show appmgr application name xrv9k_aws_ha info detail
Tue Jul  6 12:53:09.301 UTC
Application: xrv9k_aws_ha
  Type: Docker
  Source: xrv9k_aws_ha
  Config State: Activated
  Docker Information:
    Container ID: ff9508c510d41c46818f09d423a5f8f5c3e97ed3f212e6db3a56c8024f2e3bc5
    Container name: xrv9k_aws_ha
    Labels:
    Image: akshshar/xrv9k-aws-ha:latest
    Command: "/usr/local/bin/python3 /root/.local/bin/supervisord -c /etc/supervisord.conf -n"
    Created at: 2021-07-06 11:46:28 +0000 UTC
    Running for: About an hour ago
    Status: Up About an hour
    Size: 4.98MB (virtual 314MB)
    Ports:
    Mounts: /misc/app_host/appmgr/config/xrv9k_aws_ha/config.json,/misc/app_host/appmgr/config/xrv9k_aws_ha/hosts
    Networks: host
    LocalVolumes: 0
RP/0/RP0/CPU0:rtr2#
RP/0/RP0/CPU0:rtr2#
Running Application Stats
RP/0/RP0/CPU0:rtr2#show appmgr application name xrv9k_aws_ha stats
Tue Jul  6 12:53:27.760 UTC
Application Stats: xrv9k_aws_ha
   CPU Percentage: 1.90%
   Memory Usage: 72.91MiB / 15.05GiB
   Memory Percentage: 0.47%
   Network IO: 0B / 0B
   Block IO: 0B / 0B
   PIDs: 0
RP/0/RP0/CPU0:rtr2#
Running Application logs
Docker Container logs:
RP/0/RP0/CPU0:rtr2#show appmgr application name xrv9k_aws_ha  logs
Tue Jul  6 12:54:02.808 UTC
2021-07-06 11:46:29,227 CRIT Supervisor is running as root.  Privileges were not dropped because no user is specified in the config file.  If you intend to run as root, you can set user=root in the config file to avoid this message.
2021-07-06 11:46:29,231 CRIT Server 'unix_http_server' running without any HTTP authentication checking
2021-07-06 11:46:29,232 INFO supervisord started with pid 1
2021-07-06 11:46:30,234 INFO spawned: 'ha_app' with pid 6
2021-07-06 11:46:30,235 INFO spawned: 'redis' with pid 7
2021-07-06 11:46:31,237 INFO success: ha_app entered RUNNING state, process has stayed up for > than 1 seconds (startsecs)
2021-07-06 11:46:31,237 INFO success: redis entered RUNNING state, process has stayed up for > than 1 seconds (startsecs)
2021-07-06 11:51:28,550 WARN received SIGTERM indicating exit request
2021-07-06 11:51:28,550 INFO waiting for ha_app, redis to die
2021-07-06 11:51:28,633 INFO stopped: redis (exit status 0)
2021-07-06 11:51:28,829 INFO stopped: ha_app (exit status 0)
2021-07-06 11:51:36,599 CRIT Supervisor is running as root.  Privileges were not dropped because no user is specified in the config file.  If you intend to run as root, you can set user=root in the config file to avoid this message.
2021-07-06 11:51:36,604 CRIT Server 'unix_http_server' running without any HTTP authentication checking
2021-07-06 11:51:36,604 INFO supervisord started with pid 1
2021-07-06 11:51:37,606 INFO spawned: 'ha_app' with pid 6
2021-07-06 11:51:37,608 INFO spawned: 'redis' with pid 7
2021-07-06 11:51:38,609 INFO success: ha_app entered RUNNING state, process has stayed up for > than 1 seconds (startsecs)
2021-07-06 11:51:38,609 INFO success: redis entered RUNNING state, process has stayed up for > than 1 seconds (startsecs)
RP/0/RP0/CPU0:rtr2#
Application Specific logs:
Here the command passed to the docker-exec-command can be used to monitor logs in real time using tail -f as shown below or just a dump of the logs using cat.
Note: The Application specific logs are automatically log rotated to 1MB.
RP/0/RP0/CPU0:rtr2#
RP/0/RP0/CPU0:rtr2#appmgr application exec name xrv9k_aws_ha docker-exec-cmd tail -f /var/log/ha_app_bkp.log
Tue Jul  6 12:55:19.545 UTC
Python: { "loggerName":"SL_HA_APP_LOGGER", "asciTime":"2021-07-06 12:54:39,667", "pathName":"/app/onbox/onbox_bfd_ha_app.py", "logRecordCreationTime":"1625576079.667968", "functionName":"check_ha_state", "levelNo":"20", "lineNo":"479", "levelName":"INFO", "message":"Periodic HA state check..."}
Python: { "loggerName":"SL_HA_APP_LOGGER", "asciTime":"2021-07-06 12:54:39,779", "pathName":"/app/onbox/onbox_bfd_ha_app.py", "logRecordCreationTime":"1625576079.779082", "functionName":"check_ha_state", "levelNo":"20", "lineNo":"482", "levelName":"INFO", "message":"HA State: STANDBY"}
Python: { "loggerName":"SL_HA_APP_LOGGER", "asciTime":"2021-07-06 12:54:49,779", "pathName":"/app/onbox/onbox_bfd_ha_app.py", "logRecordCreationTime":"1625576089.779313", "functionName":"check_ha_state", "levelNo":"20", "lineNo":"479", "levelName":"INFO", "message":"Periodic HA state check..."}
Python: { "loggerName":"SL_HA_APP_LOGGER", "asciTime":"2021-07-06 12:54:49,900", "pathName":"/app/onbox/onbox_bfd_ha_app.py", "logRecordCreationTime":"1625576089.900367", "functionName":"check_ha_state", "levelNo":"20", "lineNo":"482", "levelName":"INFO", "message":"HA State: STANDBY"}
Python: { "loggerName":"SL_HA_APP_LOGGER", "asciTime":"2021-07-06 12:54:59,900", "pathName":"/app/onbox/onbox_bfd_ha_app.py", "logRecordCreationTime":"1625576099.900582", "functionName":"check_ha_state", "levelNo":"20", "lineNo":"479", "levelName":"INFO", "message":"Periodic HA state check..."}
Python: { "loggerName":"SL_HA_APP_LOGGER", "asciTime":"2021-07-06 12:55:00,016", "pathName":"/app/onbox/onbox_bfd_ha_app.py", "logRecordCreationTime":"1625576100.016909", "functionName":"check_ha_state", "levelNo":"20", "lineNo":"482", "levelName":"INFO", "message":"HA State: STANDBY"}
Python: { "loggerName":"SL_HA_APP_LOGGER", "asciTime":"2021-07-06 12:55:10,017", "pathName":"/app/onbox/onbox_bfd_ha_app.py", "logRecordCreationTime":"1625576110.017127", "functionName":"check_ha_state", "levelNo":"20", "lineNo":"479", "levelName":"INFO", "message":"Periodic HA state check..."}
Python: { "loggerName":"SL_HA_APP_LOGGER", "asciTime":"2021-07-06 12:55:10,130", "pathName":"/app/onbox/onbox_bfd_ha_app.py", "logRecordCreationTime":"1625576110.130391", "functionName":"check_ha_state", "levelNo":"20", "lineNo":"482", "levelName":"INFO", "message":"HA State: STANDBY"}
Python: { "loggerName":"SL_HA_APP_LOGGER", "asciTime":"2021-07-06 12:55:20,130", "pathName":"/app/onbox/onbox_bfd_ha_app.py", "logRecordCreationTime":"1625576120.130635", "functionName":"check_ha_state", "levelNo":"20", "lineNo":"479", "levelName":"INFO", "message":"Periodic HA state check..."}
Python: { "loggerName":"SL_HA_APP_LOGGER", "asciTime":"2021-07-06 12:55:20,240", "pathName":"/app/onbox/onbox_bfd_ha_app.py", "logRecordCreationTime":"1625576120.240956", "functionName":"check_ha_state", "levelNo":"20", "lineNo":"482", "levelName":"INFO", "message":"HA State: STANDBY"}
Accessing the Application CLI
For convenient state verification and troubleshooting purposes, it is possible to utilize an Application specific json-based CLI that utilizes access to the application’s Redis database. All available cli keys/commands can be checked at any time by running show redundancy as an application docker-exec-command as shown below:
View Available keys/commands
RP/0/RP0/CPU0:rtr2#appmgr application exec name xrv9k_aws_ha docker-exec-cmd show redundancy
Tue Jul  6 12:59:21.789 UTC
[
  "last_bfd_down_event",
  "config",
  "last_intf_event",
  "ha_state",
  "bfd_neighbors",
  "ha_interfaces"
]
RP/0/RP0/CPU0:rtr2#
RP/0/RP0/CPU0:rtr2#
Access Keys/Commands directly using docker-exec “show”
Check HA State of the router
RP/0/RP0/CPU0:rtr2#
RP/0/RP0/CPU0:rtr2#appmgr application exec name xrv9k_aws_ha docker-exec-cmd show ha_state
Tue Jul  6 13:00:26.585 UTC

Last Created: 2021/07/06 13:00:24.442059

STANDBY
RP/0/RP0/CPU0:rtr2#
RP/0/RP0/CPU0:rtr2#
**Check Last discovered BFD neighbors (this is not real time BFD state. Use “show bfd session” in XR instead) **
RP/0/RP0/CPU0:rtr2#
RP/0/RP0/CPU0:rtr2#appmgr application exec name xrv9k_aws_ha docker-exec-cmd show bfd_neighbors
Tue Jul  6 13:00:39.300 UTC

Last Created: 2021/07/06 12:09:41.012098

{
  "172.31.105.154": {
    "EventType": "SL_BFD_EVENT_TYPE_SESSION_STATE",
    "Session": {
      "Key": {
        "Type": "SL_BFD_SINGLE_HOP",
        "NbrAddr": 2887739802,
        "Interface": {
          "Name": "TenGigE0/0/0/2"
        }
      },
      "State": {
        "SeqNum": "45",
        "Status": "SL_BFD_SESSION_UP"
      }
    }
  },
  "172.31.101.241": {
    "EventType": "SL_BFD_EVENT_TYPE_SESSION_STATE",
    "Session": {
      "Key": {
        "Type": "SL_BFD_SINGLE_HOP",
        "NbrAddr": 2887738865,
        "Interface": {
          "Name": "TenGigE0/0/0/1"
        }
      },
      "State": {
        "SeqNum": "52",
        "Status": "SL_BFD_SESSION_UP"
      }
    }
  }
}
RP/0/RP0/CPU0:rtr2#
RP/0/RP0/CPU0:rtr2#
Check Input configuration (config.json) provided to the app
RP/0/RP0/CPU0:rtr2#appmgr application exec name xrv9k_aws_ha docker-exec-cmd show config
Tue Jul  6 13:00:46.610 UTC

Last Created: 2021/07/06 11:51:38.060111

{
  "config": {
    "global_retry_interval": 30,
    "global_retry_count": 5,
    "ec2_private_endpoint_url": "https://vpce-01c286018e0fad113-vwje496n.ec2.us-west-2.vpce.amazonaws.com",
    "grpc_server": "127.0.0.1",
    "grpc_port": 57777,
    "action": {
      "method": "secondary_ip_shift",
      "method_params": {
        "intf_list": [
          {
            "secondary_ip": "172.31.105.20",
            "instance_intf_number": 3
          },
          {
            "secondary_ip": "172.31.101.20",
            "instance_intf_number": 1
          }
        ]
      }
    },
    "bfd_sessions": [
      {
        "session_type": "SINGLE_HOP",
        "intf_name": "TenGigE0/0/0/2",
        "neigh_ip": "172.31.105.154",
        "bfd_desired_tx_int_usec": 50000,
        "detect_multiplier": 3,
        "vrf_name": "default"
      },
      {
        "session_type": "SINGLE_HOP",
        "intf_name": "TenGigE0/0/0/1",
        "neigh_ip": "172.31.101.241",
        "bfd_desired_tx_int_usec": 50000,
        "detect_multiplier": 3,
        "vrf_name": "default"
      }
    ]
  }
}
RP/0/RP0/CPU0:rtr2#
Check Last BFD event and correlate with Applications actions (like failover or ignore)
RP/0/RP0/CPU0:rtr2#
RP/0/RP0/CPU0:rtr2#appmgr application exec name xrv9k_aws_ha docker-exec-cmd show last_bfd_down_event
Tue Jul  6 13:01:04.561 UTC

Last Created: 2021/07/06 12:11:12.123067

{
  "EventType": "SL_BFD_EVENT_TYPE_SESSION_STATE",
  "Session": {
    "Key": {
      "Type": "SL_BFD_SINGLE_HOP",
      "NbrAddr": 2887738865,
      "Interface": {
        "Name": "TenGigE0/0/0/1"
      }
    },
    "State": {
      "SeqNum": "53",
      "Status": "SL_BFD_SESSION_DOWN"
    }
  }
}
RP/0/RP0/CPU0:rtr2#
Leave a Comment