
XRd with Terraform: Topologies on AWS
Disclaimer The topologies deployed in the following scenario are intended to be a lab environment for the user to gain familiarity with XRd’s integration with AWS. This example will not be sufficient for a production use-case.
Introduction
With the release of IOS XR 7.8.1, XRd is supported as a Cloud Router and SR-PCE. In this tutorial we will explore how to deploy a topology of XRd cloud routers on Amazon Elastic Kubernetes Service (EKS). In addition to an automated deployment of XRd on AWS using cloudformation, we now support deployment using Terraform.
Note: The cloudformation github repository is now deprecated and will only support EKS versions up to 1.24.
Prerequisites
We will need the a XRd vRouter image release 7.8.1 or later. The steps to do this was outlined in a previous tutorial. In addition, we will need:
- The
aws cliinstalled and configured on our local machine with account details. terraformhelmdockerpacker- which we will to build an AMI suitable to host XRdkubectlto interact with our deployed cluster
Clone the XRd-Terraform github repository for access to terraform modules and sample scripts that we will use in this deployment.
tadeshpa@TADESHPA-M-F92B ~> git clone https://github.com/ios-xr/xrd-terraform.git
Cloning into 'xrd-terraform'...
remote: Enumerating objects: 625, done.
remote: Counting objects: 100% (625/625), done.
remote: Compressing objects: 100% (354/354), done.
remote: Total 625 (delta 303), reused 548 (delta 229), pack-reused 0
Receiving objects: 100% (625/625), 105.49 KiB | 1.49 MiB/s, done.
Resolving deltas: 100% (303/303), done.
From this repository, we will directly use two scripts for the tutorial:
publish-ecr- Places XRd container images in a container registry on AWSaws-quickstart- Creates a sample topology in an EKS cluster which includes two XRd pods and two Alpine Linux pods
Publish XRd Images on Elastic Container Registry
EKS needs to pull the XRd image from a container image repository which is accessible to AWS. For this, we will create a repository using AWS’s ECR (Elastic Container Registry) service and host the XRd images there.
tadeshpa@TADESHPA-M-F92B ~/xrd-terraform (main)> sudo ./publish-ecr xrd-vrouter-container-x64.dockerv1.tgz
Password:
Login Succeeded!
{
    "repository": {
        "repositoryArn": "arn:aws:ecr:us-west-2:655415053484:repository/xrd/xrd-vrouter",
        "registryId": "655415053484",
        "repositoryName": "xrd/xrd-vrouter",
        "repositoryUri": "655415053484.dkr.ecr.us-west-2.amazonaws.com/xrd/xrd-vrouter",
        "createdAt": "2023-07-27T13:37:19-07:00",
        "imageTagMutability": "MUTABLE",
        "imageScanningConfiguration": {
            "scanOnPush": false
        },
        "encryptionConfiguration": {
            "encryptionType": "AES256"
        }
    }
}
Getting image source signatures
Copying blob 887387959b52 done
Copying config fc8f44da00 done
Writing manifest to image destination
Storing signatures
Image is now available at 655415053484.dkr.ecr.us-west-2.amazonaws.com/xrd/xrd-vrouter:latest
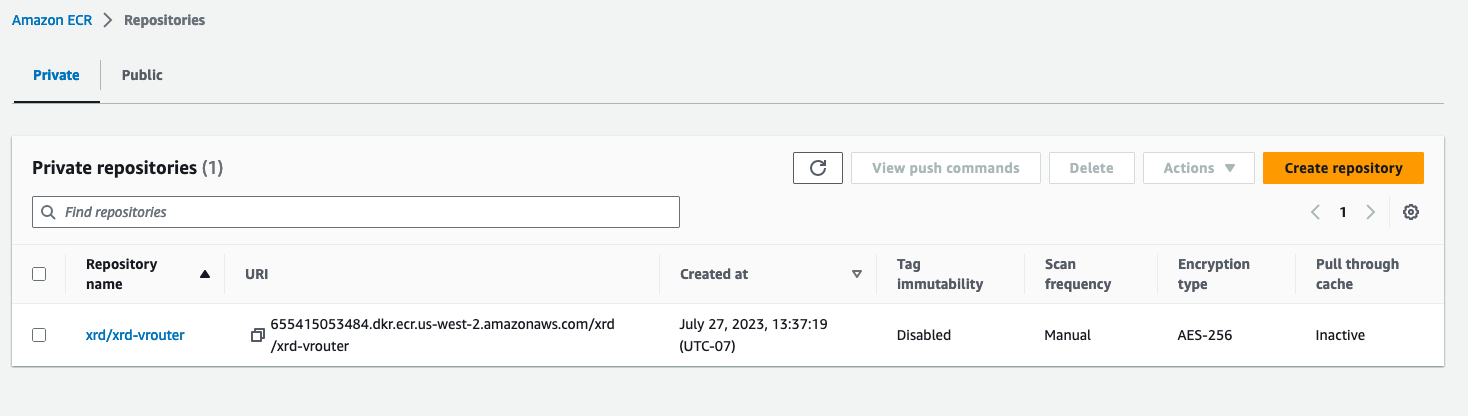
Now if we check our ECR Repositories list on the AWS console, we can see that an xrd-vrouter repository has been created
Quick Start Deployment
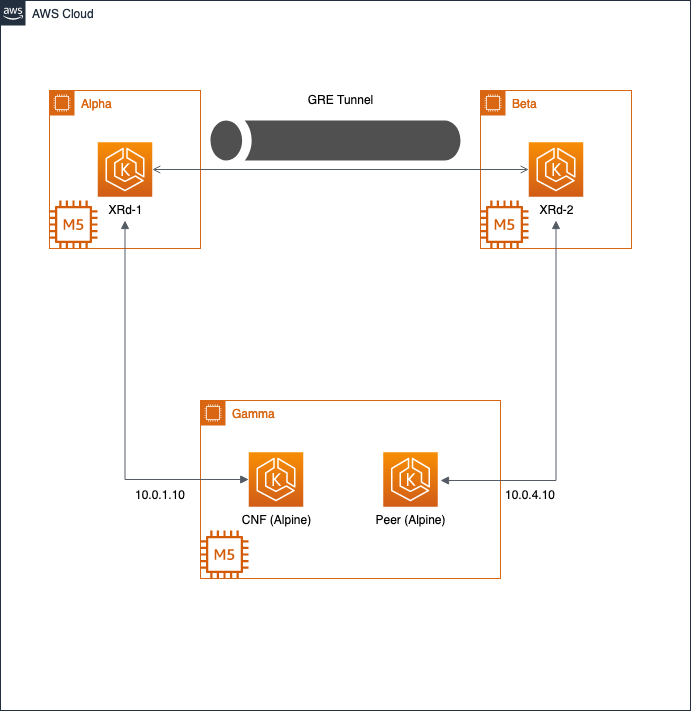
The aws-quickstart script will create all of the required AWS required resources, such as the VPC, EKS Cluster, and EC2 Worker nodes, and then it will deploy an XRd topology. This topology includes two routers connected via an overlay constructed using GRE, IS-IS and L3VPN. Each router is also connected to an alpine linux container workload emulating a NF in an isolated VRF.
Run the script and pass desired XRd login credentials as parameters:
tadeshpa@TADESHPA-M-F92B ~/xrd-terraform (main)> ./aws-quickstart -u cisco -p cisco123
Custom AMI to run XRd
In addition to creating the necessary AWS resources to run XRd in an EKS cluster, the quickstart script will automatically create an AMI that tuned to run XRd with optimal performance. This is done using XRd Packer templates.
This AMI is an Amazon Linux 2 instance with modifications made to several OS-level settings so that the XRd vRouter can maximize performance. This is accomplished by using the tool TuneD to:
- Install an XRd TuneD profile, and run it.
- Build, install, and activate the igb_uio interface driver kernel module.
- Set up recommended core handling behavior.
- Set up hugepage handling for systems with more than one NUMA node.
If we navigate to the EC2 AMIs section in the AWS console, we will see that the quickstart script has created an XRd AMI for EKS 1.27

Access XRd Deployment
If we navigate to the EC2 Instances page of the AWS Console, we can see that four new instances have been created. The bastion host, alpha and beta which are hosting XRd workloads, and gamma which is hosting Alpine Linux workloads.

Let’s update our kubeconfig to view and access our deployed workloads.
tadeshpa@TADESHPA-M-F92B ~/xrd-terraform (main) [1]> aws eks update-kubeconfig --name $(terraform -chdir=examples/overlay/workload output -raw cluster_name)
Added new context arn:aws:eks:us-west-2:655415053484:cluster/xrd-terraform-5b4dcb3f to /Users/tadeshpa/.kube/config
Now we can see our running pods:
tadeshpa@TADESHPA-M-F92B ~/xrd-terraform (main)> kubectl get pods -o wide
NAME                    READY   STATUS    RESTARTS   AGE     IP           NODE                                      NOMINATED NODE   READINESS GATES
cnf-b88f4bdd5-ns8jl     1/1     Running   0          3d22h   10.0.0.49    ip-10-0-0-13.us-west-2.compute.internal   <none>           <none>
peer-76d759b69c-vc5kz   1/1     Running   0          3d22h   10.0.0.72    ip-10-0-0-13.us-west-2.compute.internal   <none>           <none>
xrd1-xrd-vrouter-0      1/1     Running   0          3d22h   10.0.0.135   ip-10-0-0-11.us-west-2.compute.internal   <none>           <none>
xrd2-xrd-vrouter-0      1/1     Running   0          3d22h   10.0.0.126   ip-10-0-0-12.us-west-2.compute.internal   <none>           <none>
And to attach to an XRd pod:
tadeshpa@TADESHPA-M-F92B ~/xrd-terraform (main)> kubectl exec -it xrd1-xrd-vrouter-0 -- xr

User Access Verification

Username: cisco
Password:


RP/0/RP0/CPU0:xrd1#sh ip int brie
Mon Jul 31 23:13:50.549 UTC

Interface                      IP-Address      Status          Protocol Vrf-Name
Loopback0                      1.0.0.11        Up              Up       default
tunnel-ip1                     10.1.2.11       Up              Up       default
tunnel-ip2                     10.1.3.11       Up              Up       default
HundredGigE0/0/0/0             10.0.1.11       Up              Up       nfs
HundredGigE0/0/0/1             10.0.2.11       Up              Up       default
HundredGigE0/0/0/2             10.0.3.11       Up              Up       default
And to access the CNF:
tadeshpa@TADESHPA-M-F92B ~/xrd-terraform (main) [1]> kubectl exec -it cnf-b88f4bdd5-ns8jl -- sh
From here we can check connectivity to Peer:
/ # traceroute 10.0.4.10
traceroute to 10.0.4.10 (10.0.4.10), 30 hops max, 46 byte packets
 1  ip-10-0-1-11.us-west-2.compute.internal (10.0.1.11)  18.668 ms  2.628 ms  2.290 ms
 2  *  *  *
 3  ip-10-0-4-10.us-west-2.compute.internal (10.0.4.10)  0.624 ms  0.565 ms  0.867 ms
Tear Down the Deployment
Finally, we can use the quickstart script to delete all of the AWS resources that we created:
tadeshpa@TADESHPA-M-F92B ~/xrd-terraform (main)> ./aws-quickstart --destroy
Terraform Module Deployment
Let’s walk through an example where we deploy a Singleton XRd workload on an EKS cluster v1.26 using Terraform, and then update our XRd deployment using helm.
Create XRd suitable AMI for Kubernetes v1.26
The quickstart script automatically created an AMI suitable for running XRd, but for version 1.27. If we want to create an AMI for version 1.26, we can use the XRd Packer Modules, as it contains resources that can build XRd AMIs for different EKS versions.
Begin by cloning the repository:
tadeshpa@TADESHPA-M-F92B ~> git clone https://github.com/ios-xr/xrd-packer
Cloning into 'xrd-packer'...
remote: Enumerating objects: 37, done.
remote: Counting objects: 100% (37/37), done.
remote: Compressing objects: 100% (22/22), done.
remote: Total 37 (delta 3), reused 37 (delta 3), pack-reused 0
Receiving objects: 100% (37/37), 11.36 KiB | 775.00 KiB/s, done.
Resolving deltas: 100% (3/3), done.
Now we can build the AMI for 1.26 using Packer:
tadeshpa@TADESHPA-M-F92B ~/xrd-packer (main)> packer init .
tadeshpa@TADESHPA-M-F92B ~/xrd-packer (main)> packer build -var kubernetes_version=1.26 amazon-ebs.pkr.hcl
...
==> Wait completed after 3 minutes 29 seconds

==> Builds finished. The artifacts of successful builds are:
--> amazon-ebs.base: AMIs were created:
us-west-2: ami-0e16ed573841a3d15
And if we navigate to the AMIs page in the AWS console, we can see that this new AMI is present.

Next, we can bootstrap a base EKS v1.26 environment:
terraform -chdir=examples/bootstrap init
terraform -chdir=examples/bootstrap apply -var cluster_version=1.26
...
Apply complete! Resources: 39 added, 0 changed, 0 destroyed.
It was created fairly quickly - in only nine minutes.
Now let’s deploy the infrastructure resources necessary for the Singleton XRd workload:
terraform -chdir=examples/singleton/infra init
terraform -chdir=examples/singleton/infra apply
...
Apply complete! Resources: 21 added, 0 changed, 0 destroyed.
This should take a couple of minutes to complete.
Finally, let’s deploy the Singleton workload itself. We will be prompted to set the XR root username and password.
tadeshpa@TADESHPA-M-F92B ~/xrd-terraform (main)> terraform -chdir=examples/singleton/workload init
tadeshpa@TADESHPA-M-F92B ~/xrd-terraform (main)> terraform -chdir=examples/singleton/workload apply
var.xr_root_password
  Root user password to use on XRd instances.

  Enter a value: cisco123

var.xr_root_user
  Root user name to use on XRd instances.

  Enter a value: cisco
...
Plan: 1 to add, 0 to change, 0 to destroy.

Changes to Outputs:
  + cluster_name = "xrd-terraform-112607da"

Do you want to perform these actions?
  Terraform will perform the actions described above.
  Only 'yes' will be accepted to approve.

  Enter a value: yes
...
Apply complete! Resources: 1 added, 0 changed, 0 destroyed.

Outputs:

cluster_name = "xrd-terraform-112607da"
Once again, we will need to update our kubeconfig to view and attach to our XRd deployment:
tadeshpa@TADESHPA-M-F92B ~/xrd-terraform (main) [1]> aws eks update-kubeconfig --name $(terraform -chdir=examples/singleton/workload output -raw cluster_name)
Updated context arn:aws:eks:us-west-2:655415053484:cluster/xrd-terraform-112607da in /Users/tadeshpa/.kube/config
tadeshpa@TADESHPA-M-F92B ~/xrd-terraform (main)> kubectl get pods -o wide
NAME                 READY   STATUS    RESTARTS   AGE     IP           NODE                                      NOMINATED NODE   READINESS GATES
xrd1-xrd-vrouter-0   1/1     Running   0          2m32s   10.0.0.228   ip-10-0-0-10.us-west-2.compute.internal   <none>           <none>
Modify Deployment using Helm
Helm is a package manager for kubernetes, and we will use it to modify the current deployment. There is a general helm repo for XRd, with sample value files, that document all possible settings that can be configured when deploying XRd on K8s.
To modify the deployment, let’s start by adding the xrd-helm repository to our current namespace.
helm repo add xrd https://ios-xr.github.io/xrd-helm
Next, we can view which helm charts are available in this helm repository.
tadeshpa@TADESHPA-M-F92B ~/xrd-terraform (main)> helm search repo xrd/
NAME                    CHART VERSION   APP VERSION     DESCRIPTION
xrd/xrd-common          1.0.2                           Common helpers for Cisco IOS-XR XRd platforms
xrd/xrd-control-plane   1.0.2                           Cisco IOS-XR XRd Control Plane platform
xrd/xrd-vrouter         1.0.2                           Cisco IOS-XR XRd vRouter platform
We can see that we have one chart to deploy xrd-control-plane and one to deploy xrd-vrouter, as well as chart with helper functions for the charts.
Then we can view details of our current deployment.
tadeshpa@TADESHPA-M-F92B ~/xrd-terraform (main)> helm list
NAME    NAMESPACE       REVISION        UPDATED                                 STATUS          CHART                   APP VERSION
xrd1    default         1               2023-07-31 19:26:32.096599 -0700 PDT    deployed        xrd-vrouter-1.0.2
We can also use the helm command line tool to check the current configuration.
tadeshpa@TADESHPA-M-F92B ~/xrd-terraform (main)> helm get values xrd1
USER-SUPPLIED VALUES:
config:
  ascii: |
    hostname xrd1
    logging console debugging
    logging monitor debugging
    line default
     exec-timeout 0 0
     width 0
     length 0
    !
    call-home
     service active
     contact smart-licensing
     profile CiscoTAC-1
      active
      destination transport-method email disable
      destination transport-method http
     !
    !
    interface Loopback0
     ipv4 address 1.1.1.1 255.255.255.255
    !
    interface HundredGigE0/0/0/0
     ipv4 address 10.0.1.10 255.255.255.0
    !
    interface HundredGigE0/0/0/1
     ipv4 address 10.0.2.10 255.255.255.0
    !
    interface HundredGigE0/0/0/2
     ipv4 address 10.0.3.10 255.255.255.0
    !
  asciiEveryBoot: false
  password: cisco123
  username: cisco
cpu:
  cpuset: 2-3
image:
  repository: 655415053484.dkr.ecr.us-west-2.amazonaws.com/xrd/xrd-vrouter
  tag: latest
interfaces:
- config:
    last: 3
  type: pci
pciDriver: igb_uio
persistence:
  enabled: true
  storageClass: gp2
resources:
  limits:
    hugepages-1Gi: 3Gi
    memory: 8Gi
Here we can see the XR configuration, the host resource allocation, container image, and credentials are defined.
Let’s make a simple change to our current deployment by updating the username and password. To do this, we will create a new YAML file update.yaml. We also set the asciiEveryBoot flag to ensure that our XR config is updated upon the reboot of our XRd workload.
update.yaml
config:
  password: xr-password
  username: xrd1
  asciiEveryBoot: true
Now, using helm, we can upgrade our current deployment.
tadeshpa@TADESHPA-M-F92B ~/xrd-terraform (main) [1]> helm upgrade xrd1 xrd/xrd-vrouter --reuse-values -f update.yaml
Release "xrd1" has been upgraded. Happy Helming!
NAME: xrd1
LAST DEPLOYED: Mon Jul 31 19:42:32 2023
NAMESPACE: default
STATUS: deployed
REVISION: 2
TEST SUITE: None
NOTES:
You have installed XRd vRouter version latest.
The --reuse-values flag keeps all of the settings from our original deployment, and just overwrites the fields specified in update.yaml, as those fields were set in our new file update.yaml.
tadeshpa@TADESHPA-M-F92B ~/xrd-terraform (main)> kubectl get pods -o wide
NAME                 READY   STATUS    RESTARTS   AGE   IP           NODE                                      NOMINATED NODE   READINESS GATES
xrd1-xrd-vrouter-0   1/1     Running   0          16m   10.0.0.228   ip-10-0-0-10.us-west-2.compute.internal   <none>           <none>
If we check on our pods, we see that there has been no restarts. These changes will only take effect as a pod is being brought up. Let’s delete our current pod to force this to happen.
tadeshpa@TADESHPA-M-F92B ~/xrd-terraform (main)> kubectl delete pod xrd1-xrd-vrouter-0
pod "xrd1-xrd-vrouter-0" deleted
Once this new pod boots, we can log in using our newly updated credentials.
tadeshpa@TADESHPA-M-F92B ~/xrd-terraform (main)> kubectl exec -it xrd1-xrd-vrouter-0 -- xr

User Access Verification

Username: xrd1
Password:


RP/0/RP0/CPU0:xrd1#
Teardown Resources Using Terraform
To delete all of the aws resources using terraform we will call the same modules that were used to bring up the topology, but in reverse order.
Note: It is recommended to pass the same configuration to terraform destroy as were passed to terraform apply: this ensures that any mandatory arguments are set (even if their values don’t matter) and means that any automatic inference of values is the same (e.g. automatically picking up XRd Packer AMIs at the correct cluster version, which will fail of no such image is present even in destroy mode)
tadeshpa@TADESHPA-M-F92B ~/xrd-terraform (main) [SIGTERM]> terraform -chdir=examples/singleton/workload destroy
var.xr_root_password
  Root user password to use on XRd instances.

  Enter a value: cisco123

var.xr_root_user
  Root user name to use on XRd instances.

  Enter a value: cisco
...
Destroy complete! Resources: 1 destroyed.
tadeshpa@TADESHPA-M-F92B ~/xrd-terraform (main)> terraform -chdir=examples/singleton/infra destroy
...
Destroy complete! Resources: 21 destroyed.
tadeshpa@TADESHPA-M-F92B ~/xrd-terraform (main)> terraform -chdir=examples/bootstrap destroy
...
Destroy complete! Resources: 39 destroyed.
There you have it! In this tutorial, we learned how to deploy an XRd topology on EKS using terraform using both the quickstart script and the Terraform workload modules.
Leave a Comment