
Solenoid: inject routes into Cisco’s RIB table using gRPC
Introduction
If you haven’t checked out the XR toolbox Series, then you can do so here:
This series is meant to help a beginner get started with application-hosting on IOS-XR.
In this tutorial we intend to utilize almost all the techniques learned in the above series to inject third-party BGP routes into Cisco’s RIB table.
How Solenoid Works
This tutorial focuses on hosting the Solenoid application on IOS-XR, but following is a brief description of how Solenoid works.
For the demos Solenoid uses exaBGP as a third-party BGP software. exaBGP will be running on an Ubuntu vagrant box as well as in a third-party container on the IOS-XR (see Understand the Topology for more information). The two boxes form a BGP neighbor relationship.
When exaBGP in the IOS-XR container hears a neighborhood update (either an announcement of a new route or a withdrawal of an old route), Solenoid works as the glue between exaBGP and the Cisco RIB table. Solenoid hears the exaBGP update, and pulls out the relevant data from the exaBGP udate and models it using the Cisco YANG model for static routes. Then it uses gRPC to send the data to the RIB table.
Pre-requisites
Make sure you have Vagrant and Virtualbox installed on your system.
The system must have 4.5GB of space available. The topology includes an IOS-XRv router (3.5G RAM) and an Ubuntu instance (501MB RAM).
Go through the Vagrant quick-start tutorial, if you haven’t already, to learn how to use Vagrant with IOS-XR: IOS-XR vagrant quick-start
It would be beneficial for the user to go through the XR Toolbox Series. But it is not a hard requirement. Following the steps in this tutorial should work out just fine for this demo.
Once you have everything set up, you should be able to see the IOS-XRv vagrant box in the vagrant box list command:
lisroach@LISROACH-M-J0AY ~/W/X/S/vagrant> vagrant box list
IOS XRv         (virtualbox, 0)
Understand the Topology
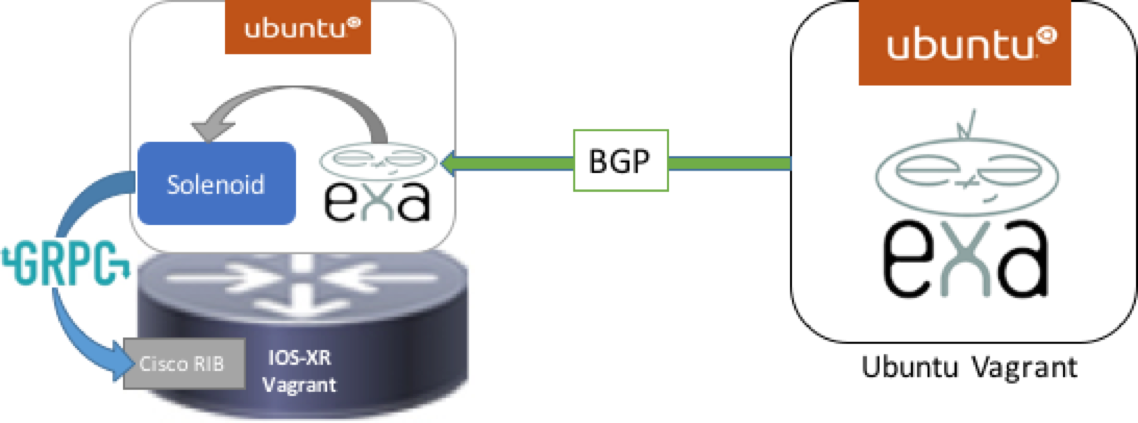
devbox: The Ubuntu Vagrant box on the right. This is running exaBGP and is peered with the xrv router to its left. exaBGP is sending out 3 BGP neighbor announcements and withdrawals about every 2 seconds.
xrv: The router on the left. This router is running a gRPC server, and is not running any version of Cisco’s BGP. It has an Ubuntu LXC as it’s third-party container instead, which is running exaBGP and the Solenoid application.
solenoid container: The Ubuntu LXC that is running on the xrv. exaBGP is peered with the devbox and hears all of its neighbor’s announcements and withdrawals. Upon receiving a neighborhood update, exaBGP runs Solenoid, which uses a gRPC client and YANG models to send the new route (or withdrawn route) to the RIB table in the IOS-XR.
Clone the git repo
The entire environment can be replicated on any environment running vagrant, provided there is at least 4.5GB of space available.
Clone the Solenoid code from here: https://github.com/ios-xr/Solenoid.git
lisroach@LISROACH-M-J0AY ~/Workspace> git clone https://github.com/ios-xr/Solenoid.git
Cloning into 'Solenoid'...
remote: Counting objects: 1539, done.
remote: Compressing objects: 100% (623/623), done.
remote: Total 1539 (delta 884), reused 1508 (delta 866), pack-reused 0
Receiving objects: 100% (1539/1539), 713.76 KiB | 317.00 KiB/s, done.
Resolving deltas: 100% (884/884), done.
Checking connectivity... done.
lisroach@LISROACH-M-J0AY ~/Workspace>
Spin up the Ubuntu devbox
Before we spin up the routers, we can create the container tarball for the Solenoid code. The way the launch scripts are setup for xrv, you can launch the vagrant boxes without creating a new Solenoid tarball (since one with the latest release will be downloaded for you automatically). But if you interested in the absolute latest code, or are interested in the process for your own education, follow the steps below to create your own Solenoid tarball. If you are not interested, skip to Launch router topology.
Move into the vagrant directory and launch only the devbox node:
lisroach@LISROACH-M-J0AY ~/Workspace> cd Solenoid/vagrant
lisroach@LISROACH-M-J0AY ~/W/S/vagrant> vagrant up devbox
exaBGP is already installed and running on your devbox. If you want to see it running, you can jump into the exabgp screen.
vagrant@vagrant-ubuntu-trusty-64:~$ sudo screen -ls
There is a screen on:
       	1762.exabgp    	(09/27/2016 10:43:34 PM)       	(Detached)
1 Socket in /var/run/screen/S-root.
vagrant@vagrant-ubuntu-trusty-64:~$ sudo screen -r exabgp
Tue, 27 Sep 2016 23:43:25 | INFO     | 1764   | processes     | Command from process add-routes : announce route 2.2.2.0/24 next-hop self
Tue, 27 Sep 2016 23:43:25 | INFO     | 1764   | reactor       | Route added to neighbor 11.1.1.10 local-ip 11.1.1.20 local-as 65000 peer-as 65000 router-id 11.1.1.20 family-allowed in-open : 2.2.2.0/24 next-hop 11.1.1.20
To detach from the screen, do the following:
CTRL+a, d
You do not want to kill the process in the screen or destroy the screen, so be sure you detach properly. You will see the following output:
vagrant@vagrant-ubuntu-trusty-64:~$ sudo screen -r exabgp
[detached from 1762.exabgp]
Create Solenoid LXC tarball
Enter the devbox:
lisroach@LISROACH-M-J0AY ~/W/S/vagrant> vagrant ssh devbox
Welcome to Ubuntu 14.04.4 LTS (GNU/Linux 3.13.0-92-generic x86_64)

 * Documentation:  https://help.ubuntu.com/

  System information as of Tue Sep 27 23:20:46 UTC 2016

  System load:  0.06              Users logged in:       0
  Usage of /:   5.4% of 39.34GB   IP address for eth0:   10.0.2.15
  Memory usage: 36%               IP address for eth1:   11.1.1.20
  Swap usage:   0%                IP address for lxcbr0: 10.0.3.1
  Processes:    80

  Graph this data and manage this system at:
    https://landscape.canonical.com/

  Get cloud support with Ubuntu Advantage Cloud Guest:
    http://www.ubuntu.com/business/services/cloud

New release '16.04.1 LTS' available.
Run 'do-release-upgrade' to upgrade to it.


Last login: Tue Sep 27 23:20:46 2016 from 10.0.2.2
vagrant@vagrant-ubuntu-trusty-64:~$
Install LXC:
vagrant@vagrant-ubuntu-trusty-64:~$ sudo apt-get update
vagrant@vagrant-ubuntu-trusty-64:~$ sudo apt -y install lxc
Create the Solenoid LXC template:
vagrant@vagrant-ubuntu-trusty-64:~$ sudo lxc-create -t ubuntu --name solenoid
Start the container. You will be dropped into the console once boot is complete.
vagrant@vagrant-ubuntu-trusty-64:~$ sudo lxc-start --name solenoid
solenoid login: init: setvtrgb main process (428) terminated with status 1
init: plymouth-upstart-bridge main process ended, respawning
ubuntu
Password:
Username: ubuntu
Password: ubuntu
Install Application dependencies inside LXC
Install Solenoid, exaBGP and all of their dependencies inside the container. Initiate the following commands:
ubuntu@solenoid:~$ sudo apt-get -y install git curl screen python-dev python-setuptools
[sudo] password for ubuntu: ubuntu
ubuntu@solenoid:~$ sudo easy_install pip
ubuntu@solenoid:~$ sudo pip install virtualenv exabgp
These dependencies make it possible for us to install the important components of our applications.
Fetch the Application code from github
Now, download Solenoid from github. Using the Solenoid directory, we can install most of the remaining dependencies with the setup.py installation script.
ubuntu@solenoid:~$ git clone https://github.com/ios-xr/Solenoid.git
Let’s install the dependencies in a virtualenv. First, navigate into the Solenoid directory and activate the virtualenv.
ubuntu@solenoid:~$ cd Solenoid
ubuntu@solenoid:~$ virtualenv venv
ubuntu@solenoid:~$ source venv/bin/activate
The (venv) indicates that you have entered your virtualenv. Now you can install the dependencies, and they will only be available in your virtualenv. This means you will have to activate your virtualenv in order to run Solenoid.
(venv) ubuntu@solenoid:~$ pip install grpcio
(venv) ubuntu@solenoid:~$ python setup.py install
Perfect! Now all of our dependencies have been installed.
Configure Solenoid and exaBGP
Solenoid requires a configuration file to indicate some important metadata. Create a file named solenoid.config with the following data (in the Solenoid/ top-level directory):
[default]	# Name you choose for the node
transport: gRPC    # Either gRPC or RESTconf
ip: 11.1.1.10      # IP address of the destination RIB table (the XR device you intend to control)
port: 57777 	   # Depends on what is configured for your gRPC or RESTconf servers
username: vagrant  # Username for the XR device
password: vagrant  # Password for the XR device
That is all we need to configure Solenoid for your system. Now we need to add a configuration file for exaBGP. Navigate to your home directory, and add a file named router.ini:
group demo {
        router-id 11.1.1.10;

        process monitor-neighbors {
            encoder json;
            receive {
                parsed;
                updates;
                neighbor-changes;
            }
            run /usr/bin/env python /home/ubuntu/Solenoid/solenoid/edit_rib.py -f '/home/ubuntu/Solenoid/filter.txt';
        }

        neighbor 11.1.1.20 {
                local-address 11.1.1.10;
                local-as 65000;
                peer-as 65000;
        }
}
The most important part of this code is:
run /usr/bin/env python /home/ubuntu/Solenoid/solenoid/edit_rib.py -f '/home/ubuntu/Solenoid/filter.txt';
This line runs a custom script. The /usr/bin/env python is the path to your python instance. Specifically, it is the path to the first python instance in your PATH, which is important because we are using a virtualenv where the python path might be different than the normal /usr/bin/python.
/home/ubuntu/Solenoid/solenoid/edit_rib.py is the path to the file that launches Solenoid.
The second half of the line, -f '/home/ubuntu/Solenoid/filter.txt' is an optional file argument pointing to the file used for filtering .
For more information about the router.ini file, please consult Solenoid’s Wiki and review exaBGP’s documentation.
Change the SSH port inside the container
When we deploy the container to IOS-XR, we will share XR’s network namespace. Since IOS-XR already uses up port 22 and port 57722 for its own purposes, we need to pick some other port for our container.
P.S. If you check the Vagrantfile, we intend to expose port 58822 to the user’s laptop directly, on IOS-XRv.
Let’s change the SSH port to 58822:
(venv) ubuntu@solenoid:~$ sudo sed -i s/Port\ 22/Port\ 58822/ /etc/ssh/sshd_config
Check that your port was updated successfully:
(venv) ubuntu@solenoid:~$ cat /etc/ssh/sshd_config | grep Port
Port 58822
We’re good!
Package up the LXC
Shutdown the container:
(venv) ubuntu@solenoid:~$ sudo shutdown -h now
(venv) ubuntu@solenoid:~$
Broadcast message from ubuntu@solenoid
       	(/dev/lxc/console) at 23:00 ...

The system is going down for halt NOW!
init: tty4 main process (369) killed by TERM signal
init: tty2 main process (372) killed by TERM signal
init: tty3 main process (373) killed by TERM signal
init: cron main process (383) killed by TERM signal
...
You’re back on the devbox.
Become root and package up your tarball:
vagrant@vagrant-ubuntu-trusty-64:~$ sudo -s
root@vagrant-ubuntu-trusty-64:~# cd /var/lib/lxc/solenoid/rootfs/
root@vagrant-ubuntu-trusty-64:~# tar -czvf /vagrant/solenoid.tgz *
See what we did there? We packaged up the container tarball as solenoid.tgz under /vagrant directory. Why is this important?
Well, Vagrant also automatically shares a certain directory with your laptop (for most types of guest operating systems). So the /vagrant is automatically mapped to the directory in which you launched your vagrant instance. To check this, let’s get out of our vagrant instance and issue an ls in your launch directory:
root@vagrant-ubuntu-trusty-64:~# exit
exit
vagrant@vagrant-ubuntu-trusty-64:~$ exit
logout
Connection to 127.0.0.1 closed.
lisroach@LISROACH-M-J0AY ~/W/S/vagrant> pwd
/Users/lisroach/Workspace/Solenoid/vagrant
lisroach@LISROACH-M-J0AY ~/W/S/vagrant> ls -la solenoid.tgz
-rw-r--r--  1 lisroach  staff  252417007 Aug 2 11:27 solenoid.tgz
>
Now you have your solenoid tarball! This will be used to launch the container on your IOS-XRv. If you did not create this tarball, the Vagrantfile is smart enough to grab the container from the internet.
Launch router topology
Launching the router topology is incredibly simple. Just do a vagrant up in the Solenoid/vagrant/ directory.
lisroach@LISROACH-M-J0AY ~/W/S/vagrant> pwd
/Users/lisroach/Workspace/Solenoid/vagrant
lisroach@LISROACH-M-J0AY ~/W/S/vagrant> vagrant up
Bringing machine 'xrv' up with 'virtualbox' provider...
Bringing machine 'devbox' up with 'virtualbox' provider...
==> xrv: Importing base box 'IOS XRv'...
It will take a few minutes, and you will see a number of ugly looking messages like these:
==> xrv: tar: dev/audio2: Cannot mknod: Operation not permitted
==> xrv: tar: dev/sequencer: Cannot mknod: Operation not permitted
==> xrv: tar: dev/midi3: Cannot mknod: Operation not permitted
==> xrv: tar: dev/mixer3: Cannot mknod: Operation not permitted
==> xrv: tar: dev/smpte3: Cannot mknod: Operation not permitted
==> xrv: tar: dev/mpu401data: Cannot mknod: Operation not permitted
But don’t worry, your vagrant boxes are working perfectly. Once you see the following message you will know you are done:
==> xrv: Machine 'xrv' has a post `vagrant up` message. This is a message
==> xrv: from the creator of the Vagrantfile, and not from Vagrant itself:
==> xrv:
==> xrv:
==> xrv:     Welcome to the IOS XRv (64-bit) VirtualBox.
...
You can also check the status of your vagrant boxes:
lisroach@LISROACH-M-J0AY ~/W/S/vagrant> vagrant status
Current machine states:

xrv                       running (virtualbox)
devbox                    running (virtualbox)

This environment represents multiple VMs. The VMs are all listed
above with their current state. For more information about a specific
VM, run `vagrant status NAME`.
Great! Time to start playing with Solenoid.
Test out Solenoid
Solenoid GUI
After completing the initial vagrant up, the application is already up and running. In your browser, navigate to:
localhost:57780
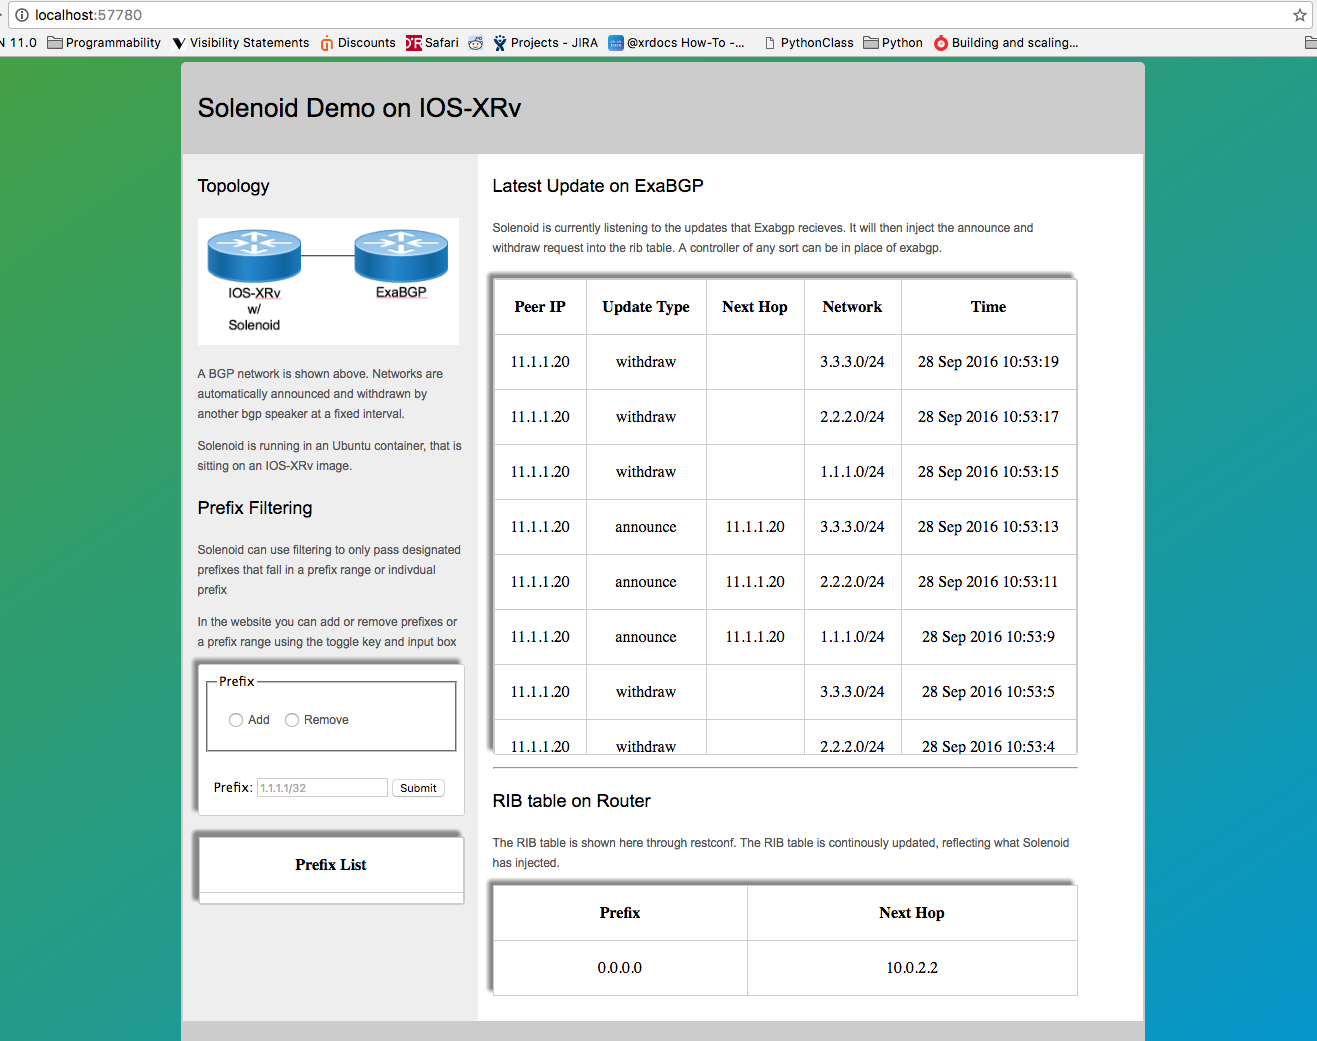
Here you will see the routes being added and withdrawn from the IOS-XRv’s RIB table.
These routes are the routes that are being automatically sent and withdrawn from the exaBGP instance running in your devbox.
Currently there is no filtering enabled, but feel free to add prefixes or prefix ranges to the filtering file. This file acts as a whitelist, so by adding a prefix or prefix range, all other prefixes will be dropped. 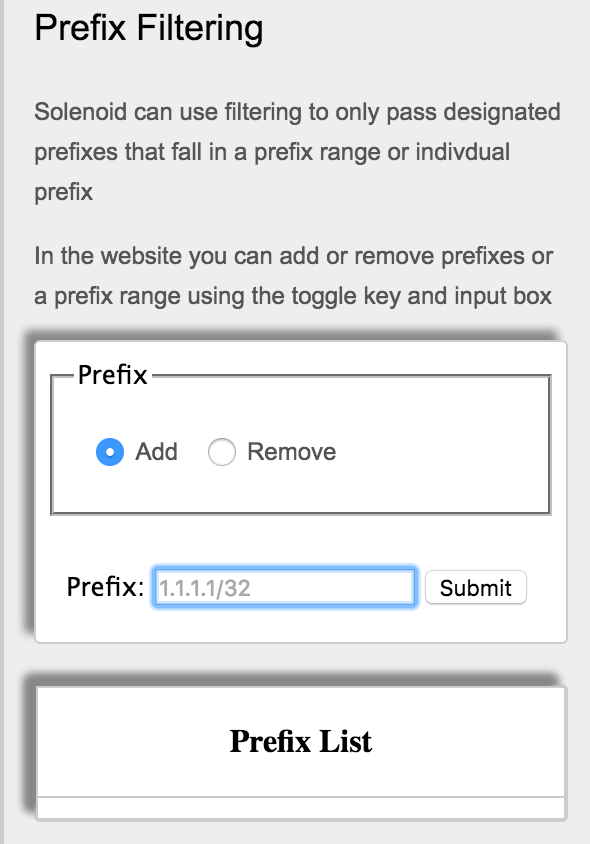
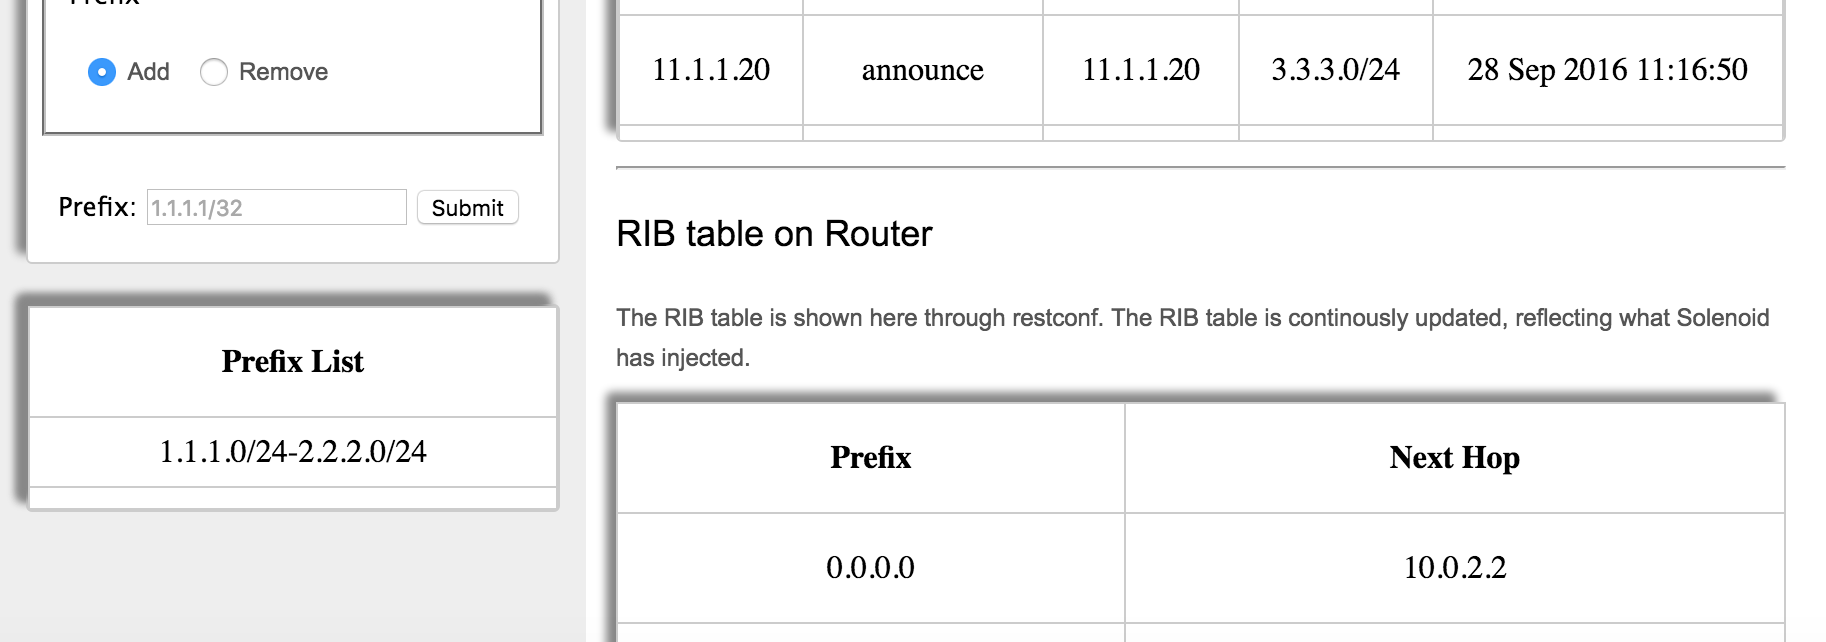
For example, add the prefix range 1.1.1.0/24-2.2.2.0/24 to the filtering. Now watch as the 3.3.3.0/24 network never gets added to the RIB table, because it has been filtered out.
To view the application running on the box, reference the instructions below on how to navigate the vagrant environment.
Solenoid on the Backend
Let’s see what Solenoid looks like on the box. First we’ll check our RIB table on the xrv. In order to do this, we need to SSH into the xrv. First, find out the port that has been forwarded for port 22. Then ssh into that port, and you will find yourself in the CLI. From there, view your RIB table.
Password: vagrant
lisroach@LISROACH-M-J0AY ~/W/S/vagrant> vagrant port xrv
The forwarded ports for the machine are listed below. Please note that
these values may differ from values configured in the Vagrantfile if the
provider supports automatic port collision detection and resolution.

22 (guest) => 2223 (host)
 57722 (guest) => 2222 (host)
 57780 (guest) => 57780 (host)
 58822 (guest) => 58822 (host)
 (venv) lisroach@LISROACH-M-J0AY ~/W/S/vagrant> ssh -p 2223 vagrant@localhost
vagrant@localhost's password:


RP/0/RP0/CPU0:ios#
RP/0/RP0/CPU0:ios#show ip route
Wed Sep 28 18:33:18.266 UTC

Codes: C - connected, S - static, R - RIP, B - BGP, (>) - Diversion path
       D - EIGRP, EX - EIGRP external, O - OSPF, IA - OSPF inter area
       N1 - OSPF NSSA external type 1, N2 - OSPF NSSA external type 2
       E1 - OSPF external type 1, E2 - OSPF external type 2, E - EGP
       i - ISIS, L1 - IS-IS level-1, L2 - IS-IS level-2
       ia - IS-IS inter area, su - IS-IS summary null, * - candidate default
       U - per-user static route, o - ODR, L - local, G  - DAGR, l - LISP
       A - access/subscriber, a - Application route
       M - mobile route, r - RPL, (!) - FRR Backup path

Gateway of last resort is 10.0.2.2 to network 0.0.0.0

S*   0.0.0.0/0 [1/0] via 10.0.2.2, 01:01:34
C    10.0.2.0/24 is directly connected, 01:03:27, MgmtEth0/RP0/CPU0/0
L    10.0.2.15/32 is directly connected, 01:03:27, MgmtEth0/RP0/CPU0/0
L    10.1.1.5/32 is directly connected, 01:01:34, Loopback1
C    11.1.1.0/24 is directly connected, 01:01:34, GigabitEthernet0/0/0/0
L    11.1.1.10/32 is directly connected, 01:01:34, GigabitEthernet0/0/0/0
RP/0/RP0/CPU0:ios#
We can see here there are currently no static routes except for 0.0.0.0/0. You may see some routes other than this, as Solenoid is running and adding routes constantly to the RIB.
Now leave this screen up, open a new tab in your terminal and jump into the Solenoid container. Remember when we changed the ssh port of the container? Now we will use that port to SSH directly from our CLI into the Solenoid container.
Password : ubuntu
lisroach@LISROACH-M-J0AY ~/W/S/vagrant> vagrant port xrv
The forwarded ports for the machine are listed below. Please note that
these values may differ from values configured in the Vagrantfile if the
provider supports automatic port collision detection and resolution.

 22 (guest) => 2223 (host)
 57722 (guest) => 2222 (host)
 57780 (guest) => 57780 (host)
 58822 (guest) => 58822 (host)
lisroach@LISROACH-M-J0AY ~/W/S/vagrant> ssh -p 58822 ubuntu@localhost
The authenticity of host '[localhost]:58822 ([127.0.0.1]:58822)' can't be established.
ECDSA key fingerprint is SHA256:Swie3V2VIYDNCACaRLbSjQa7417yIM6hpbeimNwZr1o.
Are you sure you want to continue connecting (yes/no)? yes
Warning: Permanently added '[localhost]:58822' (ECDSA) to the list of known hosts.
ubuntu@localhost's password:
Welcome to Ubuntu 14.04.5 LTS (GNU/Linux 3.14.23-WR7.0.0.2_standard x86_64)

 * Documentation:  https://help.ubuntu.com/
Last login: Thu Sep 22 21:31:13 2016
We are now on the Solenoid container that is running on the xrv. Solenoid is currently running in a screen named exaBGP. Resume the screen to see Solenoid running.
ubuntu@solenoid:~$
ubuntu@solenoid:~$ screen -ls
There are screens on:
       	1423.website   	(09/28/2016 05:38:22 PM)       	(Detached)
       	1421.exabgp    	(09/28/2016 05:38:22 PM)       	(Detached)
2 Sockets in /var/run/screen/S-ubuntu.

ubuntu@solenoid:~$
ubuntu@solenoid:~$ screen -r exabgp
Wed, 28 Sep 2016 18:35:04 | INFO     | 1436   | solenoid      | WITHDRAW | OK
Wed, 28 Sep 2016 18:35:06 | INFO     | 1436   | solenoid      | WITHDRAW | OK
Wed, 28 Sep 2016 18:35:11 | INFO     | 1436   | solenoid      | ANNOUNCE | OK
Wed, 28 Sep 2016 18:35:13 | INFO     | 1436   | solenoid      | ANNOUNCE | OK
Wed, 28 Sep 2016 18:35:17 | INFO     | 1436   | solenoid      | WITHDRAW | OK
Wed, 28 Sep 2016 18:35:19 | INFO     | 1436   | solenoid      | WITHDRAW | OK
Wed, 28 Sep 2016 18:35:25 | INFO     | 1436   | solenoid      | ANNOUNCE | OK
Wed, 28 Sep 2016 18:35:27 | INFO     | 1436   | solenoid      | ANNOUNCE | OK
Wed, 28 Sep 2016 18:35:37 | INFO     | 1436   | solenoid      | WITHDRAW | OK
Wed, 28 Sep 2016 18:35:37 | INFO     | 1436   | solenoid      | WITHDRAW | OK
Wed, 28 Sep 2016 18:35:38 | INFO     | 1436   | solenoid      | ANNOUNCE | OK
Wed, 28 Sep 2016 18:35:40 | INFO     | 1436   | solenoid      | ANNOUNCE | OK
Wed, 28 Sep 2016 18:35:44 | INFO     | 1436   | solenoid      | WITHDRAW | OK
Wed, 28 Sep 2016 18:35:46 | INFO     | 1436   | solenoid      | WITHDRAW | OK
These messages show the output of Solenoid running. All of the OKs show us that it is running properly. If you hop back to your tab running the CLI and run show ip route a few times, you will see the RIB table changing with the messages that Solenoid is sending.
RP/0/RP0/CPU0:ios#show ip route
Wed Sep 28 18:49:22.165 UTC

Codes: C - connected, S - static, R - RIP, B - BGP, (>) - Diversion path
       D - EIGRP, EX - EIGRP external, O - OSPF, IA - OSPF inter area
       N1 - OSPF NSSA external type 1, N2 - OSPF NSSA external type 2
       E1 - OSPF external type 1, E2 - OSPF external type 2, E - EGP
       i - ISIS, L1 - IS-IS level-1, L2 - IS-IS level-2
       ia - IS-IS inter area, su - IS-IS summary null, * - candidate default
       U - per-user static route, o - ODR, L - local, G  - DAGR, l - LISP
       A - access/subscriber, a - Application route
       M - mobile route, r - RPL, (!) - FRR Backup path

Gateway of last resort is 10.0.2.2 to network 0.0.0.0

S*   0.0.0.0/0 [1/0] via 10.0.2.2, 01:17:38
S    1.1.1.0/24 [1/0] via 11.1.1.20, 00:00:00
C    10.0.2.0/24 is directly connected, 01:19:31, MgmtEth0/RP0/CPU0/0
L    10.0.2.15/32 is directly connected, 01:19:31, MgmtEth0/RP0/CPU0/0
L    10.1.1.5/32 is directly connected, 01:17:38, Loopback1
C    11.1.1.0/24 is directly connected, 01:17:38, GigabitEthernet0/0/0/0
L    11.1.1.10/32 is directly connected, 01:17:38, GigabitEthernet0/0/0/0
RP/0/RP0/CPU0:ios#show ip route
Wed Sep 28 18:49:25.660 UTC

Codes: C - connected, S - static, R - RIP, B - BGP, (>) - Diversion path
       D - EIGRP, EX - EIGRP external, O - OSPF, IA - OSPF inter area
       N1 - OSPF NSSA external type 1, N2 - OSPF NSSA external type 2
       E1 - OSPF external type 1, E2 - OSPF external type 2, E - EGP
       i - ISIS, L1 - IS-IS level-1, L2 - IS-IS level-2
       ia - IS-IS inter area, su - IS-IS summary null, * - candidate default
       U - per-user static route, o - ODR, L - local, G  - DAGR, l - LISP
       A - access/subscriber, a - Application route
       M - mobile route, r - RPL, (!) - FRR Backup path

Gateway of last resort is 10.0.2.2 to network 0.0.0.0

S*   0.0.0.0/0 [1/0] via 10.0.2.2, 01:17:42
S    1.1.1.0/24 [1/0] via 11.1.1.20, 00:00:03
S    2.2.2.0/24 [1/0] via 11.1.1.20, 00:00:01
C    10.0.2.0/24 is directly connected, 01:19:35, MgmtEth0/RP0/CPU0/0
L    10.0.2.15/32 is directly connected, 01:19:35, MgmtEth0/RP0/CPU0/0
L    10.1.1.5/32 is directly connected, 01:17:42, Loopback1
C    11.1.1.0/24 is directly connected, 01:17:42, GigabitEthernet0/0/0/0
L    11.1.1.10/32 is directly connected, 01:17:42, GigabitEthernet0/0/0/0
RP/0/RP0/CPU0:ios#
From this example you can see that we first added 1.1.1.0/24, then in a moment 2.2.2.0/24 was added. 3.3.3.0/24 will never be added, since we added the filtering on the GUI.
Hopfully this tutorial was helpful! If you have issues or questions running Solenoid, please visit Solenoid’s Issues page and submit your question.
Leave a Comment