
Hosting the Routinator 3000 RPKI validator and RTR server on IOS-XR
Blog Summary
This blog assumes the reader is already familiar with the basic concepts of BGP, RPKI, and IOS-XR. Some previous knowledge of Docker is recommended but not 100% necessary. We will briefly cover the origins of RPKI, its components, and the basic operation of how a ROA in a regional registry ends up being a part of the BGP route processing criteria on a router. We will utilize Routinator 3000 from NLNet Labs as our RPKI validator and cache, but the concepts and solution would be similar for other options as well. A list of additional RPKI validators/caches and RPKI-RTR servers is located in the appendix.
Why host an RPKI validator and cache on a router?
Many organizations distribute BGP routing information using distributed route reflectors. Implementing the RPKI Relying Party function on a router follows the same deployment model, with the route reflectors also feeding edge routers with ROA information. Additionally, one does not have to maintain external server resources and network connectivity to perform what is a relatively simple network function. The number of Relying Party routers required depends on the size of the network, but an organization should have at least two in the network.
Environment
Testing was done using a Cisco NCS 55A1-24H router using IOS-XR 6.6.3. Most of the information is relevant to IOS-XR 6.3.1 or newer.
TL;DR
Skip ahead to the section on running the container here or see https://github.com/philbedard/routinator-xr
RPKI Overview
Quick RPKI Terminology
- RIR: Regional Internet Registry
- RPKI: Resource Public Key Infrastructure
- ROA: Route Origin Authorization
- RTR: RPKI to Router Protocol
- RRDP: RPKI Repository Delta Protocol
- Relying Party: Anyone who wants to utilize the RIR ROA data for authorization (You!)
- RPKI Validator: Software for validating ROAs from the RIRs to build a list of prefixes with valid ROAs
- TAL: Trust Anchor Locator
- VRP: Validated ROA Payload
- Validated cache: List of validated prefixes, their max prefix length, and their origin ASN
What security problems does RPKI solve?
First and foremost I’ll touch upon what problems RPKI solves and what problems it doesn’t solve. The initial problem RPKI was created to solve is BGP route hijacking from rogue ASNs. Without RPKI, any ASN connected to the global Internet routing table can originate a prefix and potentially funnel destination traffic to themselves for malicious reasons. There are also ways to create man in the middle attacks by continuing to pass traffic to the original destination while extracting information as it passes through the rogue ASN. Longer prefix hijacking is also possible, since the Internet and routers today route packets based on a longest prefix match criteria. The RPKI infrastructure today can protect against these type of origin hijacks, but does not solve the issue of ASN hijacking or attest to the validity of the end to end chain of BGP advertisements (path validation).
How does RPKI solve route origin hijacking?
In order to verify a BGP prefix advertisement really originated from the organization (ASN) who owns the prefix, we must have a traceable way to attest they are the correct origin ASN for the prefix. This is done using X.509 PKI cryptographic certificates with records for organizations, ASNs and IPv4/IPv6 prefixes. The record responsible for certifying prefix validity for an ASN is the Route Origin Authorization record, or ROA. The ROA defined in RFC6482 uses a standard template simply containing the following elements: Authorized origin ASN, IPv4 or IPv6 prefixes, and the maximum length of the prefixes in the ROA. Each ROA is signed with the private key of an organization/ASN for validation by a Relying Party.
Quoting RFC6483,
A resource certificate describes an action by an issuer that binds a list of IP address blocks and Autonomous System (AS) numbers to the subject of a certificate, identified by the unique association of the subject’s private key with the public key contained in the resource certificate.
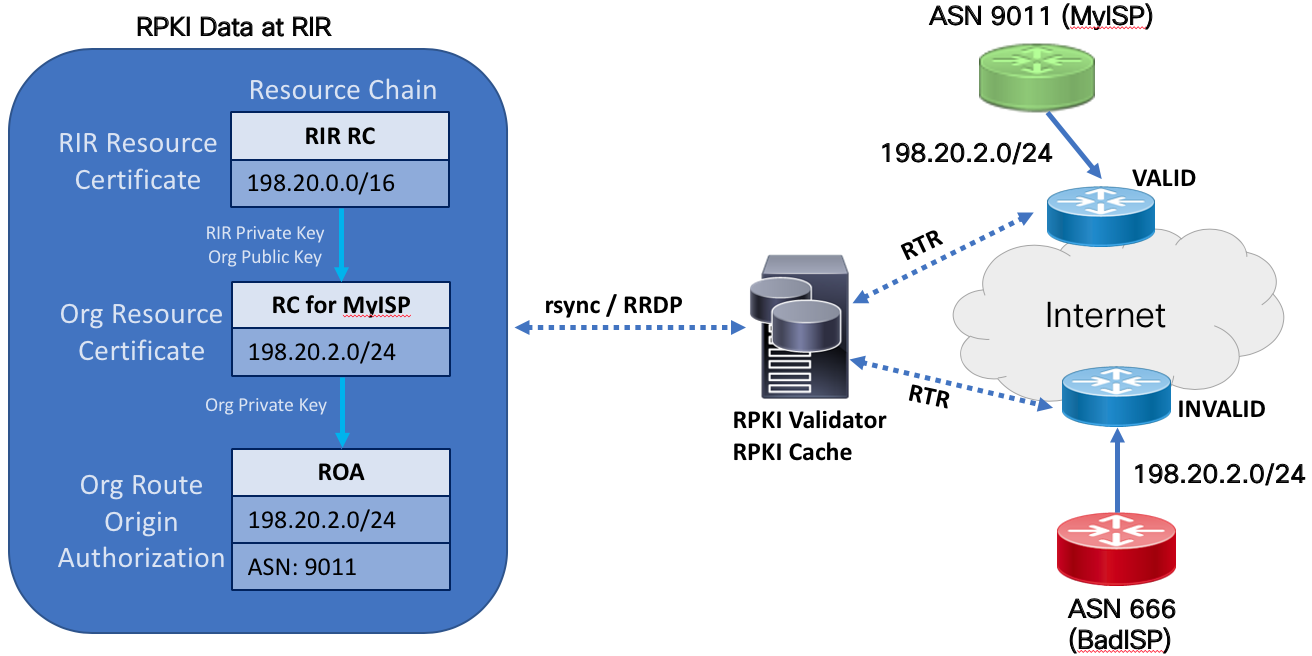
How is RPKI data fetched and validated to create a set of “valid” prefixes?
The steps how ASN and ROA records are used to validate a specific prefix is outlined in RFC6488, section 3. The consumer of the RPKI data, the relying party, must go through these steps in order to validate the signed objects and generate a list of prefixes with a valid cryptographic chain. The validation software will first use a seeded Trust Anchor Location or TAL for each RIR to begin downloading the chain of certificates used to eventually create prefix data for the router to use. RPKI data is stored in RIR, LIR, and delegated repositories so all of those must be traversed to gather data and validate the objects against the signers public key. RPKI data is downloaded using either rsync (legacy, may be deprecated) or RRDP. RRDP offers a more efficient way to download the data and runs over HTTPS.
https://datatracker.ietf.org/doc/draft-ietf-sidrops-rp covers Requirements for RPKI Relying Parties with more detail on these procedures.
Once the validator has validated the signed RPKI objects, it will compile a list of {prefix,maxLength,ASN} entries. The entry is known as a Validated ROA Payload (VRP). The combined list of VRPs form the validated cache of prefixes.
The validator refreshes its data periodically based on a default or user defined interval.
How do I get a set of valid prefixes from a ROA validated cache to my router?
RTR, the RPKI to Router protocol is defined in RFC6810. RTR uses a pull mechanism to download the validated cache data (set of VRPs) from the validator. The cache can signal the router it has new updates, forcing the router to download the new updates, or the router can periodically fetch the entries based on a timer. In IOS-XR the default cache refresh timer is 600 seconds. A serial number is used to keep track of incremental changes in cache data.
![]()
How do I get my router to do something with the data?
References on configuring IOS-XR based devices to use RPKI data can be found at https://xrdocs.io/design/blogs/latest-peering-fabric-hld. We will briefly cover the IOS-XR configuration to the validator cache in the following sections, but not the policy and logic to process routes based on their ROA validation state.
IETF RFCs related to RPKI
This is a non-exhaustive list. Please see the SIDR and SIDROPS IETF working groups for a complete list of completed RFCs and in-progress drafts.
https://tools.ietf.org/html/rfc6480 - An Infrastructure to Support Secure Internet Routing https://tools.ietf.org/html/rfc6482 - A Profile for Route Origin Authorizations (ROAs) https://tools.ietf.org/html/rfc6483 - Validation of Route Origin using PKI and ROAs https://tools.ietf.org/html/rfc6810 - The RPKI to Router Protocol (RTR)
Routinator 3000 Overview
Routinator 3000 is a combined RPKI validator and cache combined into a single application. Routinator is developed by NLnet Labs using the Rust programming language. Routinator utilizes the RTR protocol to provide valid prefix data to the downstream routers for announcement validation. The Routinator 3000 project can be found at https://github.com/NLnetLabs/routinator.
the Routinator 3000 complete documentation can be found at: https://rpki.readthedocs.io/en/latest/index.html
Future enhancements to RPKI
ASPA
ASPA or Autonomous System Provider Authorization extends the capabilities of RPKI to attend to ASN pairs in a BGP prefix AS path. A new ASPA object will be created with these ASN pairs to validate the AS path for a prefix advertisement. ASPA will add the ability to detect rogue ASNs within the path and not only as origins, giving a means to perform path validation. The latest version of the ASPA draft is located at: https://tools.ietf.org/html/draft-azimov-sidrops-aspa-profile
RTRv2
RTRv2 is being defined in the SIDROPS working group via the https://datatracker.ietf.org/doc/draft-ymbk-sidrops-8210bis/ draft. RTRv2 adds additional capabilities to the existing RTR protocol along with support for ASPA records.
Additional information
- Great in-depth information on RPKI: https://rpki.readthedocs.io/en/latest/index.html
- ARIN landing page for RPKI: https://www.arin.net/resources/manage/rpki/
- RIPE landing page for RPKI: https://www.ripe.net/manage-ips-and-asns/resource-management/certification
IOS-XR Third Party Applications
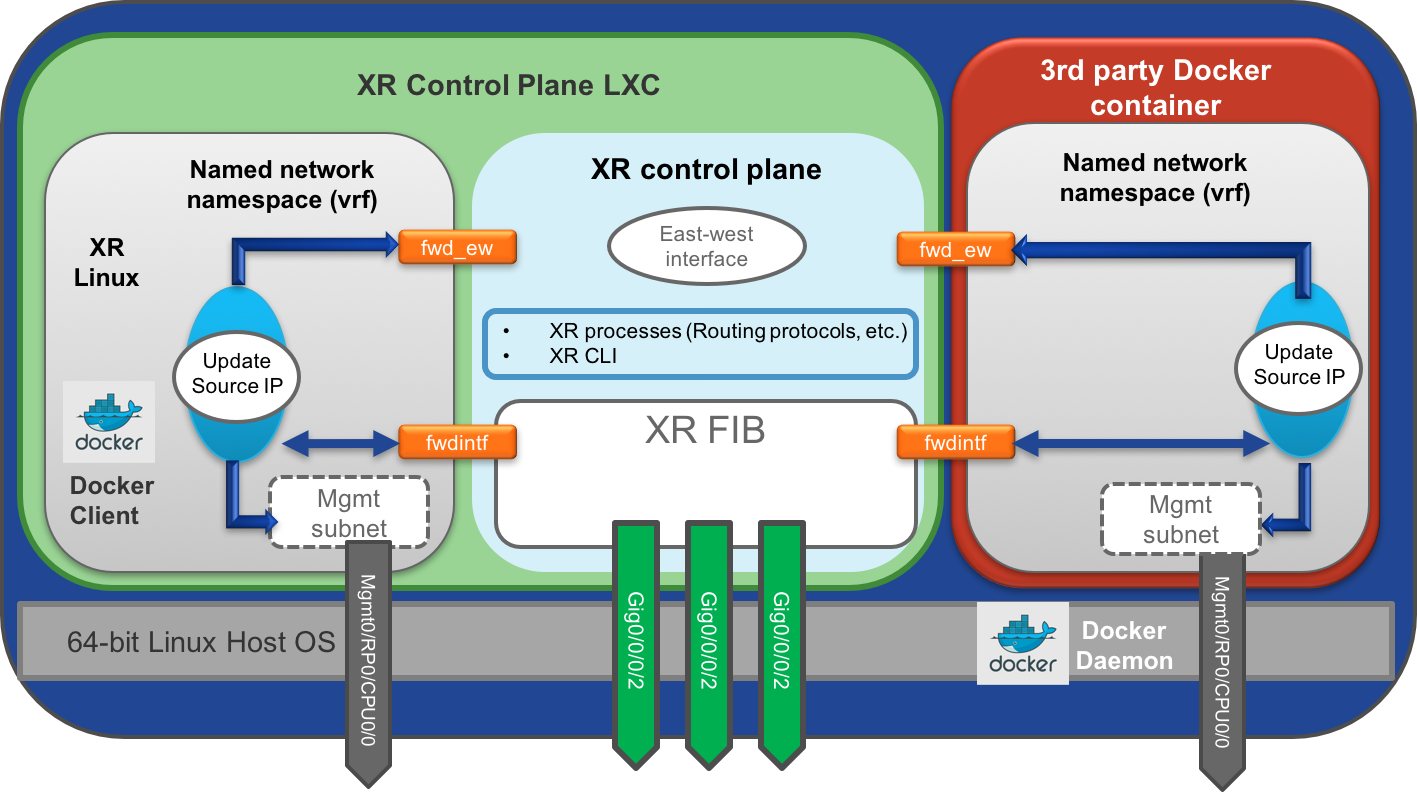
Third party applications or a TPA gives one the ability to run applications not supplied by Cisco on hardware devices and virtual routers like the IOS-XRv9000. Due to the fact IOS-XR 64-bit is based on Linux, it allows a variety of methods for hosting applications on the device. Native Linux applications, Vagrant virtualized environments, and LXC/Docker containers are supported. In this blog we will focus on Docker containers, since Docker is the defacto way of building, distributing, and running Linux applications without having to worry about the base OS and other external dependencies.
Overview of TPA Networking
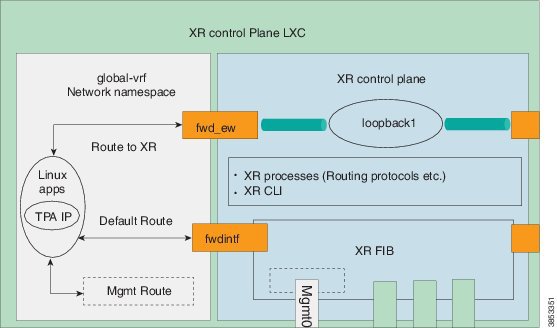
In order to isolate different components between the base Linux OS and IOS-XR control-plane, Linux namespaces and specific routing tables are used. By default, a Docker container has no access to the XR global namespace. In addition to the global namespace, named “global-vrf”, each VRF instance created in XR creates a new Linux nanespace. This isolation can be used creatively to limit communication between IOS-XR and third party applications, or between third party applications themselves.
Third party app forwarding overview
The XR Linux environment uses specific virtual interfaces to forward packets from a container to the local XR control-plane or to send packets outside the router using the XR FIB. In the default configuration the fwdintf interface is used to route packets out the appropriate external or management interface using the XR FIB. The fwd_ew interface is used for East-West communication between third party applications and the XR control plane.
The default configuration uses the Loopback1 interface for East-West communication, but an alternative interface can be configured using the tpa east-west [interface] configuration command.
The default configuration uses the Loopback0 interface for the source address of packets sent from the Docker container either to the XR control plane via the fwd_ew interface or externally using the fwdintf interface. The source-address can be set to any available interface on the router via the tpa address-family ipv4|ipv6 update-source [interface] configuration command. As an example if the “Internet” is reachable via the management interface one would set the source address to the management interface.
The following shows what a default routing table looks like with no additional TPA configuration. The loopback0 interface is 192.168.11.1/32 and the loopback1 interface is 192.168.99.1.
[Compass-PEF-PE1:~]$ ip route show
default dev fwdintf  scope link  src 192.168.11.1
172.20.33.0/24 dev Mg0_RP0_CPU0_0  scope link  src 172.20.33.36
192.168.99.1 dev fwd_ew  scope link src 192.168.11.1
In our example we will configure a Loopback0 and Loopback1 interface and communicate to the third party Docker container via those interfaces. External hosts will utilize the Loopback0 interface.
Forwarding via XR control-plane (RP)
If you have a default 0.0.0.0/0 route in the XR control plane to the management interface, you will need to change the TPA configuration to route all traffic using the fwd_ew interface instead of the fwdintf interface. This is done using the “tpa address-family ipv4 default-route mgmt” command. You may also want to then change the source address to the mgmt interface instead of the default Loopback0 interface. This blog will not cover all network scenarios so please consult the documentation.
Third party app binding (listening) address
In the default configuration the third party application listens to all external interfaces, including Loopback0. Loopback0 is represented in the Linux environment as the “lo” interface shown below. The application itself can bind to a specific address and IOS-XR will adhere to the configuration if the address exists within the namespace.
[Compass-PEF-PE1:~]$ ip addr show lo
1: lo: <LOOPBACK,UP,LOWER_UP> mtu 65536 qdisc noqueue state UNKNOWN group default
    link/loopback 00:00:00:00:00:00 brd 00:00:00:00:00:00
    inet 127.0.0.1/8 scope host lo
       valid_lft forever preferred_lft forever
    inet 192.168.11.1/32 scope global lo:0
       valid_lft forever preferred_lft forever
    inet6 2001:192:168:11::1/128 scope global
       valid_lft forever preferred_lft forever
    inet6 ::1/128 scope host
       valid_lft forever preferred_lft forever
One can restrict traffic to the third party app to specific external interfaces using the following configuration:
tpa
 vrf default
  address-family ipv4
   protection
    allow protocol tcp local-port 3323 interface Loopback0
   !
  !
 !
!
Protecting third party applications
IOS-XR’s TPA configuration allows one to filter incoming packets based on a number of criteria. Since the RTR protocol is internal to the network, it’s recommended to explicitly allow external hosts to access the third party application. One could also create a standard infrastructure ACL to apply to external interfaces as an alternative.
tpa
 vrf default
  address-family ipv4
   protection
    allow protocol tcp local-port 3323 remote-address 1.1.1.1/32
    allow protocol tcp local-port 3323 remote-address 1.1.1.2/32
   !
  !
 !
!
Diagram of networking in a running Docker container
IOS-XR Third Party Application documentation
http://xrdocs.io has an entire section dedicated to app hosting on IOS-XR. You will find in-depth information and real-world examples using native Linux applications, LXC/Docker containers, and Vagrant boxes to host applications.
Official app hosting configuration guide:
Running Routinator in a Docker container in IOS-XR
Overview
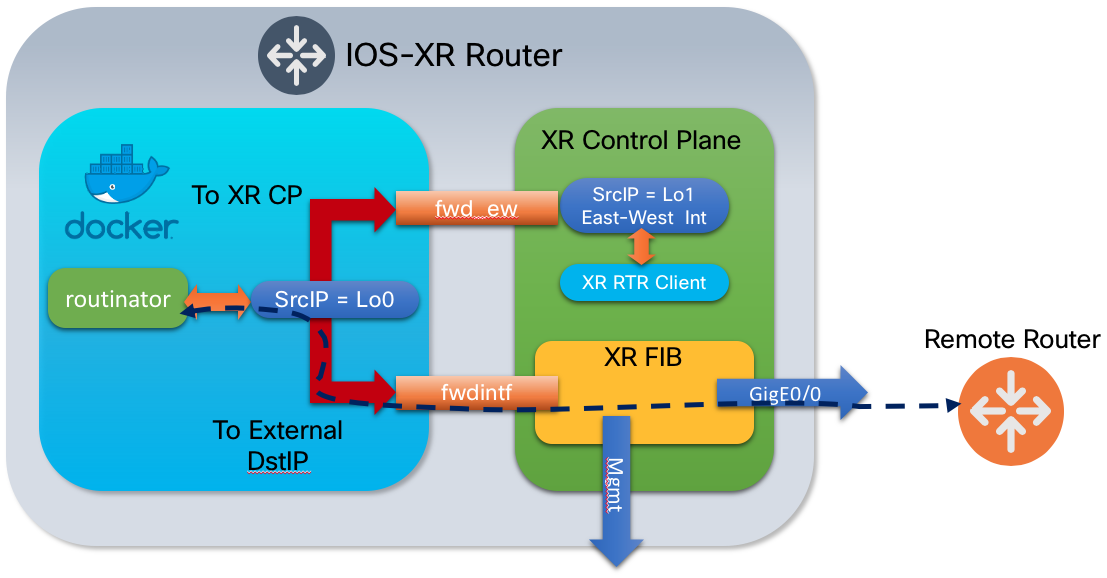
The rest of the blog we will work on building a Routinator 3000 Docker container to run on IOS-XR. Routinator will run as both a RPKI validator/cache and act as a RTR server.
Communication Flows
Routinator uses rsync and/or RRPD to download RPKI data from the various registries hosting the data, thus the router or IOS-XR VM needs access to the global Internet. The default port for rsync is 873/tcp. RRDP uses port 443 as it runs over HTTPS.
Routinator has a web API running over HTTP you can use to retrieve the VRPS in a variety of output formats. For example if my server ip is 172.20.1.1 with the HTTP server running on port 9556 using http://172.20.1.1:9556/csv will return a full list of VRPS in CSV format. You can also check a single prefix for validity by using the following URL: http://172.20.1.1:9556/validity?asn=209&prefix=100.0.0.0/24. See the Routinator documentation for more details.
RTR in our example uses port 3323/tcp but could utilize any TCP port not in use on the router already.
There is also an option in IOS-XR to use RTR over SSH. Routinator does not natively support RTR over SSH, so a proxy is used to bridge traffic between SSH and Routinator. Please see the “RTR over SSH” section here for more details.
Container overview
The Routinator 3000 for XR container is built using an Ubuntu 18.04 base. The resulting image is about 82MB in size. The standard public Routinator docker image uses an Alpine Linux base, which could also be used in this instance, Ubuntu was used more for familiarity than any technical reason, all of the Linux packages used are available for Alpine. The Github repository will contain Dockerfiles for both an Alpine Linux and Ubuntu based Docker image. This Docker image with minor changes could run on any Linux system with Docker installed.
The Routinator program runs under the user “routinator” once started, unless re-defined within the Dockerfile during build.
Prerequisites
If you wish to build the Docker container yourself you will need a Linux host (Ubuntu, Centos, etc) with Docker installed. Instructions for installing Docker on different Linux distributions can be found at https://docs.docker.com/get-docker.
One option for running the Docker image is to copy it to/from the router using the “docker save” and “docker load” commands, requiring the user scp the file to the router or XR VM. If using Linux (including downloading from a host from the router itself) or MacOS the standard scp command will work. Windows will require an scp tool like WinSCP.
Running the Docker container from the router using a public or private Docker registry it is 100% supported as long as the router has IP access to the registry. The up to date built image is located in the Docker hub via philxor/routinator-xr. Information on creating a private registry to load containers from is covered in Akshat Sharma’s excellent XR third party application blog here: https://xrdocs.io/application-hosting/tutorials/2017-02-26-running-docker-containers-on-ios-xr-6-1-2/#public-dockerhub-registry
Building the Docker container
If you wish to skip ahead and download the prebuilt Docker image you can access the routinator-xr.tar.gz image at this URL and skip ahead to the section on loading the Docker image. https://github.com/philbedard/routinator-xr.tar.gz You can also load the image off the public Docker hub by issuing docker pull philxor/routinator-xr
Build Steps
Building the routinator image happens in two steps, defined in a single Dockerfile. First we build the routinator application which requires a much larger Rust compilation environment. The next stage of the Docker build creates the image the router will run. We will use Docker’s ability to copy files from one container to another during the build stage to copy the compiled Routinator binary to the new IOS-XR container image.
We will now go over the different components in the Dockerfile used to build the image which will ultimately validate and serve RPKI prefix data to the local XR instance and the rest of the network.
Dockerfile build script
The following is the annotated build file. Also available at https://github.com/philbedard/routinator-xr
# Build routinator binary for Linux glibc

FROM ubuntu:18.04 as build

# Proxy environment variables if needed for cargo and git
ENV http_proxy=http://myproxy.com:80
ENV https_proxy=http://myproxy.com:80

# Add Tini
ENV TINI_VERSION v0.15.0
ADD https://github.com/krallin/tini/releases/download/${TINI_VERSION}/tini /tini

RUN apt-get update && apt-get upgrade -y && apt-get install -y \
  git \
  cargo \
  libssl-dev \
  && rm -rf /var/lib/apt/lists/*

WORKDIR /tmp/routinator

RUN git clone --depth 1 https://github.com/NLnetLabs/routinator .

RUN cargo build \
    --release \
    --locked

# Create actual routinator container with runtime arguments
FROM ubuntu:18.04
MAINTAINER [email protected]

# Copy routinator binary from build image
COPY --from=build /tmp/routinator/target/release/routinator /usr/local/bin

# Install Tini to capture ^C if running in foreground
COPY --from=build /tini /sbin/tini
RUN chmod +x /sbin/tini

ARG RUN_USER=routinator
ARG RUN_USER_UID=1012
ARG RUN_USER_GID=1012

RUN apt-get update && apt-get install -y \
  rsync \
  iproute2 \
  iputils-ping \
  sudo \
  && rm -rf /var/lib/apt/lists/*

RUN useradd -u $RUN_USER_GID -U $RUN_USER && \
    mkdir -p /home/${RUN_USER}/.rpki-cache/repository /home/${RUN_USER}/.rpki-cache/tals/arin && \
    chown -R ${RUN_USER_UID}:${RUN_USER_GID} /usr/local/bin/routinator /home/${RUN_USER}/.rpki-cache

# Copy TAL files from source to user directory
# Requires acceptance of ARIN TAL at https://www.arin.net/resources/rpki/tal.html
COPY --from=build /tmp/routinator/tals/*.tal /home/${RUN_USER}/.rpki-cache/tals/

# The ARIN TAL is distributed with the image but you will not use it by
# default. If you have accepted the ARIN TAL usage at https://www.arin.net/resources/rpki/tal.html
# you can comment out the following line so all TALs are in the TAL directory at build time
# Otherwise you must interactively accept the ARIN RPA when using the init command
RUN mv /home/${RUN_USER}/.rpki-cache/tals/arin.tal /home/${RUN_USER}/.rpki-cache/tals/arin/

# Copy entrypoint.sh to root of image for execuation
COPY entrypoint.sh /entrypoint.sh
RUN chmod +x /entrypoint.sh

# Default ports to expose. Not 100% necessary in IOS-XR since it will globally listen to ports within the container.

EXPOSE 3323/tcp
EXPOSE 9556/tcp

ENTRYPOINT ["/sbin/tini", "--", "/entrypoint.sh"]
entrypoint.sh script
This Routinator Docker image uses an entrypoint script to setup the environment based on options passed via the “docker run” command and then execute routinator. Here is the entire entrypoint.sh script, annotated with comments for each section. The entrypoint.sh script in this case is included as an external file on the host but could be incorporated into the Docker “Dockerfile” build script.
The entrypoint script creates a a directory in the XR host /app_host/ directory. Due to the disk space required for the RPKI data we must store the data outside the internal Docker container filesystem. It’s also a best practice for data persistance, so the data does not need to be re-downloaded when the Docker container is removed. Any directory can be used as long as its mounted to /data within the container.
#!/bin/bash

if [[ $1 == "init" ]];
then
   echo "Creating RPKI data directory at /misc/app_host/rpki"
   mkdir -p /data/rpki/tals
   mkdir -p /data/rpki/repository
   chown -R routinator:routinator /data/rpki/

   echo "Copying TAL data from container to host directory"
   sudo -u routinator cp /home/routinator/.rpki-cache/tals/* /data/rpki/tals 2>&1

   echo "Please read the ARIN RPA at https://www.arin.net/resources/manage/rpki/rpa.pdf"
   read -p "If you agree with the ARIN RPA type 'yes', any other input will mean non-agreement and the ARIN TAL will NOT be installed: " ARIN_RPA
   if [ "$ARIN_RPA" = "yes" ];
   then
      echo "User agreed to ARIN TAL, copying ARIN TAL file"
      sudo -u routinator cp /home/routinator/.rpki-cache/tals/arin/* /data/rpki/tals
   else
      echo "User declined ARIN TAL, will not be installed in TALS directory. Rerun init to copy, or copy manually after agreeing"
   fi
elif [ ! "$#" -eq 0 ];
then
  echo "Starting command $@"
  exec "$@"
else
   if [[ ! -d "/data/rpki" ]];
      then
      echo "Please run container with 'init' to create directories and copy TAL files"
      exit 1
   fi
   VRF="${VRF:-global-vrf}"
   echo "Using $VRF as namespace, override default of global-vrf with -e VRF=vrf if using a different VRF for TPA"

   RTR_PORT="${RTR_PORT:-3323}"
   echo "Using $RTR_PORT as RTR server port, override default of 3323 with -e RTR_PORT=port"

   HTTP_PORT="${HTTP_PORT:-9556}"
   echo "Using $HTTP_PORT as Routinator HTTP server port, override default of 9556 with -e HTTP_PORT=port"

   if [[ -v RSYNC_PROXY ]];
   then
      echo "Using $RSYNC_PROXY as rsync proxy"
   else
      echo "No rsync proxy set, set using -e RSYNC_PROXY=proxy (not URI) in docker run if required"
   fi
   if [[ -v RRDP_PROXY ]];
   then
      echo "Using $RRDP_PROXY as rrdp proxy"
      RRDP_ARG="--rrdp-proxy=${RRDP_PROXY}"
   else
      echo "No RRDP proxy set, set using -e RRDP_PROXY=proxy (URI form) in docker run if required"
   fi

   NS1="${NS1:-208.67.222.222}"
   echo "Using "$NS1" as primary DNS server, override with -e NS1=nameserver to override default of 208.67.222.222"
   echo "nameserver "$NS1"" > /etc/resolv.conf

   NS2="${NS2:-208.67.220.220}"
   echo "Using "$NS2" as secondary DNS server, override with -e NS2=nameserver to override default of 208.67.220.220"
   echo "nameserver "$NS2"" >> /etc/resolv.conf


   echo "Starting Routinator"
   ip netns exec ${VRF} sudo -E -u routinator routinator \
                                        --base-dir /data/rpki/ \
                                        --verbose \
                                        $RRDP_ARG \
                                        server --rtr 0.0.0.0:$RTR_PORT --http 0.0.0.0:$HTTP_PORT
fi
Copying the built docker container to an IOS-XR VM or device
As noted, we will be using the docker save/load commands as opposed to a registry. On the linux host the docker image was built on execute the following command to save docker image to a .tar file gzip the file to minimize space:
myhost$ docker save --output routinator-xr.tar && gzip routinator-xr.tar
In this case I will be copying from the host to the router by utilizing scp on the router itself.
RP/0/RP0/CPU0:Compass-PEF-PE1# bash
[Compass-PEF-PE1:~]$ scp cisco@myhost:/home/cisco/routinator-xr.tar.gz .
[Compass-PEF-PE1:~]$ gzip -d routinator-xr.tar.gz
Loading the docker image into the local registry
The Docker image is now ready to load. The default user in XR is root so there is no need to sudo to load the docker image. Once loaded we can issue the “docker images” command to view the local images.
[Compass-PEF-PE1:~]$ docker load --input routinator-xr.tar
[Compass-PEF-PE1:~]$ docker images
REPOSITORY          TAG                 IMAGE ID            CREATED             SIZE
routinator-xr       latest              65e4574eb6cb        20 hours ago        79.51 MB
Running the routinator-xr container
The routinator Docker container is started from the IOS-XR bash shell, executed using the “bash” command, or by utilizing ssh to the shell if it’s enabled. The docker image used can either be the image transferred to the IOS-XR host or it can run from the public docker registry via the philxor/routinator-xr tag.
The container must initially be run with the “init” command to initialize the data directories and accept the ARIN RPA. The following will run a single-use container that will setup the directories and present the user with an option to accept the ARIN RPA. The container must be run with the -it switch for interactive input.
docker run --name routinator \
           --it \
           --rm \
           -v /misc/app_host:/data \
           routinator-xr init
The following docker run command shows starting the container with both mandatory and optional parameters after the first “init” run.
docker run --name routinator \
           --restart always \
           --detach \
           --cap-add SYS_ADMIN \
           -v /misc/app_host:/data \
           -v /var/run/netns/global-vrf:/var/run/netns/global-vrf \
           -e VRF=global-vrf \
           -e RSYNC_PROXY=proxy.esl.cisco.com:80 \
           -e RRDP_PROXY=http://proxy.esl.cisco.com:80 \
           -e NS1=171.70.168.183 \
           -e NS2=171.70.168.184 \
           -e RTR_PORT=3323 \
           -e HTTP_PORT=9556 \
           philxor/routinator-xr
Docker Options
| Options | Purpose |
|---|---|
| –name | Sets the name of the running container, default is generated by Docker |
| –restart always | Will automatically restart a container on exit or reload of the host |
| –detach | Run container in the background, running in the foreground is useful for debugging |
| –cap-add | Must be set to SYS_ADMIN to allow access to the network namespace |
| -v | This option mounts host volumes within the container. The namespace utilized by the container must be mounted and the RPKI host data directory must be mounted to /data |
Environment variables
Environment variables specified with -e are how docker passes arguments to containers.
| Environment Variable | Default | Definition |
|---|---|---|
| VRF | global-vrf | Sets the IOS-XR namespace routinator runs in. The default is the global-vrf namespace. See the network section for more information |
| RSYNC_PROXY | none | If your environment requires a proxy to reach RSYNC destinations, use this variable. The rsync proxy is not prefixed by http/https |
| RRDP_PROXY | none | RRDP uses HTTPS, so if you require a HTTP/HTTPS proxy use this variable |
| NS1 | 208.67.222.222 | Primary nameserver |
| NS2 | 208.67.220.220 | Secondary nameserver |
| RTR_PORT | 3323 | RTR server port |
| HTTP_PORT | 9556 | Routinator HTTP API port |
Verifying running state of the container
Once you have started the container you can issue a “docker ps” from the bash prompt and should see something like this:
[Compass-PEF-PE1:~]$ docker ps
CONTAINER ID        IMAGE               COMMAND                  CREATED             STATUS              PORTS               NAMES
bea1760f73b6        routinator-xr       "/sbin/tini -- /entry"   6 minutes ago       Up 6 minutes                            routinator
You can check to make sure the third party application (Docker container in our case), is listening on the correct ports by using the “netstat -lt” or “ss -lt” commands.
[Compass-PEF-PE1:~]$ netstat -ltn
Active Internet connections (only servers)
Proto Recv-Q Send-Q Local Address           Foreign Address         State
tcp        0      0 0.0.0.0:9556            0.0.0.0:*               LISTEN
tcp        0      0 0.0.0.0:3323            0.0.0.0:*               LISTEN
Router configuration
The following diagram shows our basic testing configuration. The router hosting routinator uses it as a RTR server as well as other routers in the network. Ideally the RTR server would be deployed similarly to a route reflector in the network.
Hosting router RPKI RTR configuration
The only special configuration required when using the hosted routinator as a destination on its hosting router is to specify a source interface to use. In our case this interface will be Loopback1, the default east-west forwarding interface. The ability to specify a source interface for RPKI RTR sessions was added in IOS-XR 6.6.25. 192.168.11.1 is the Lo0 IP address.
router bgp 100
 rpki server 192.168.11.1
  bind-source interface Loopback1
  transport tcp port 3323
 !
!
Remote router RPKI RTR configuration
No special configuration is necessary, the configuration will look like any other RTR server.
router bgp 100
 rpki server 192.168.11.1
  transport tcp port 3323
 !
!
Verify successful connectivity
Use the show rpki server <server> command to view details about connectivity to the RPKI server
RPKI Cache-Server 192.168.11.1
  Transport: TCP port 3323
  Bind source: Loopback1
  Connect state: ESTAB
  Conn attempts: 1
  Total byte RX: 3372924
  Total byte TX: 1112
RPKI-RTR protocol information
  Serial number: 8
  Cache nonce: 0xC1ED
  Protocol state: DATA_END
  Refresh  time: 600 seconds
  Response time: 30 seconds
  Purge time: 60 seconds
  Protocol exchange
    ROAs announced: 126492 IPv4   21740 IPv6
    ROAs withdrawn:   5450 IPv4    1139 IPv6
    Error Reports :      0 sent       0 rcvd
Appendix
RTR over SSH
The data transmitted between the validator cache and router in a default configuration is public data. In the case where a provider is using their own delegated RPKI or SLURM to supply local prefixes outside the global RPKI system, it’s up the provider’s discretion. Since the cache is internal to the network and the rest of the network control-plane is not encrypted, running RTR over SSH is not entirely necessary but the following can be used to accomplish it.
On IOS-XR the RTR client can run over cleartext TCP or use SSH. Routinator does not natively support SSH connections, so an intermediate proxy must be used to interconnect the SSH connection to routinator’s RTR port.
The below OpenSSH server configuration can be done in the native IOS-XR shell, but in the spirit of using Docker containers for specific functions, we can use another Docker container running on an external host or the router to proxy SSH to routinator.
RTR over SSH Docker container
The following Docker Dockerfile will build a simple rtr over ssh proxy container. The container is meant to run on a host or under IOS-XR itself. The up to date Dockerfile can be found at https://github.com/philbedard/docker-rtr-ssh-proxy
# This builds a simple SSH over RTR proxy Docker container

FROM ubuntu:18.04

MAINTAINER [email protected]

#Static values if building container once, can be overridden by environment variables
ARG SSHD_PORT=2222
ARG SERVER_IP=127.0.0.1
ARG SERVER_PORT=3323
#Default user is rpki, can be changed to any user
ARG RUN_USER=rpki
ARG RUN_USER_UID=1013
ARG RUN_USER_GID=1013


### !!! Change this !!! ###
ARG RUN_USER_PW=

# If building the container once with defined default values and using namespaces uncomment this line,
# otherwise you can define a namespace as docker run environment variable
#ARG NAMESPACE=global-vrf

RUN apt-get update && apt-get install -y \
  iproute2 \
  netcat \
  openssh-server && \
  apt-get -y purge python3 && \
  rm -rf /var/lib/apt/lists/*

# SSH login fix. Otherwise user is kicked off after login
RUN sed 's@session\s*required\s*pam_loginuid.so@session optional pam_loginuid.so@g' -i /etc/pam.d/sshd

RUN echo  "Port $SSHD_PORT" > /etc/ssh/sshd_config && \
    echo  "PasswordAuthentication yes" >> /etc/ssh/sshd_config && \
    echo  "UsePAM yes" >> /etc/ssh/sshd_config && \
    echo  "Ciphers +3des-cbc" >> /etc/ssh/sshd_config && \
    echo  "KexAlgorithms +diffie-hellman-group1-sha1" >> /etc/ssh/sshd_config && \
#    echo  "Subsystem rpki-rtr /bin/nc $SERVER_IP $SERVER_PORT" >> /etc/ssh/sshd_config && \
    mkdir -p /var/run/sshd

RUN useradd -u $RUN_USER_GID -U $RUN_USER && \
    echo "$RUN_USER:$RUN_USER_PW" | chpasswd

ENV SSHD_PORT=${SSHD_PORT}
ENV SERVER_IP=${SERVER_IP}
ENV SERVER_PORT=${SERVER_PORT}


EXPOSE $SSHD_PORT

# Uncomment this line to use a default namespace without -e docker run option
#ENV NAMESPACE=${NAMESPACE}

SHELL ["/bin/bash", "-c"]

# If a namespace is set run the command under the namespace otherwise run without namespace
CMD   if [[ -v NAMESPACE ]] ; \
      then ip netns exec $NAMESPACE /usr/sbin/sshd -D -p $SSHD_PORT -o "Subsystem rpki-rtr /bin/nc $SERVER_IP $SERVER_PORT"  -f /etc/ssh/sshd_config ; \
      else /usr/sbin/sshd -D -p $SSHD_PORT -o "Subsystem rpki-rtr /bin/nc $SERVER_IP $SERVER_PORT"  -f /etc/ssh/sshd_config ; \
      fi
Due to the fact the user password is defined in cleartext the container must be built by the user, it will not be supplied as a pre-built Docker image.
You can run the RTR over SSH Docker container in IOS-XR with the following docker run command:
docker run --name rtr-proxy \
           --cap-add SYS_ADMIN \
           -v /var/run/netns/global-vrf:/var/run/netns/global-vrf \
           -e NAMESPACE=global-vrf \
           -e SSHD_PORT=2222 \
           -e SERVER_IP=172.20.33.36 \
           -e SERVER_PORT=3323 \
           rtr-ssh-proxy
Environment variables
Environment variables specified with -e are how docker passes arguments to containers.
| Environment Variable | Default | Definition |
|---|---|---|
| NAMESPACE | none | Sets the namespace routinator runs in. Default is no specific namespace |
| SSHD_PORT | 2222 | This is the SSH server port the router will connect to |
| SERVER_IP | 127.0.0.1 | RTR server to proxy connections to, does not have to be local to the Docker host |
| SERVER_PORT | 3323 | RTR server cleartext TCP port |
How RTR over SSH proxy works
This container uses what is known as a OpenSSH subsystem to pipe the output of the SSHD session to another application. “rpki-rtr” is a well-known subsystem. When the router executes the ssh session to the RTR server it uses the “-S” ssh client flag to notify the SSH server the session should be handled by the rpki-rtr subsystem. In our example we use netcat to facilitate the proxy but other tools like socat could also be used.
The /etc/sshd_config config file on the host as following (netcat is used for proxying in the example below):

Subsystem       rpki-rtr        /bin/nc 127.0.0.1 3323
RTR over SSH Router Configuration
This is the basic configuration for defining a RPKI cache utilizing SSH transport. The password configuration will NOT be stored in the visible configuration
router bgp 100 rpki server 172.27.223.244
router bgp 100 rpki server 172.27.223.244 username rpki
router bgp 100 rpki server 172.27.223.244 password password
router bgp 100 rpki server 172.27.223.244 transport ssh port 57322
A recent version of OpenSSH no longer recognizes the version string of “1.99” identifying support for both SSH v1 and SSH v2. If you see a “major protocol version mismatch” error in the SSH server logs and the router cannot connect to the RPKI cache over SSH the following must be enabled to force the router SSH client protocol version to v2.
RP/0/RP0/CPU0:Compass-PEF-PE1#ssh client v2
Additional RPKI open source and information
NLNet Labs Krill project
https://www.nlnetlabs.nl/projects/rpki/krill/ This is an open source RPKI Certificate Authority, allowing a provider to run their own delegated RPKI system. Having your own delegated authority allows one to manage ROAs yourself rather than go through an RIR portal. You can utilize your own in-house processes then to generate and manage ROAs and other RPKI resources.
Cloudflare RPKI toolkit
https://github.com/cloudflare/cfrpki
The Cloudflare RPKI tooklkit consists of OctoRPKI, the Relying Party (validator) component of RPKI, and GoRTR the RPKI to RTR implementation. GoRTR uses a JSON list of prefixes (can be generated by OctoRPKI) as source information to feed routers. GoRTR supports cleartext, TLS, and SSH router to server connections.
RIPE RPKI Validator v3
https://github.com/RIPE-NCC/rpki-validator-3/wiki
This is version 3 of RIPE NCCs RPKI Validator. It supports validation of all RPKI objects, has a full API to interact with the validator, and also contains a full web UI to explore RPKI data and validation status. There is also an included rpki-rtr server.
Leave a Comment