Using Ansible with IOS-XR 6.1.1
Introduction
The goal of this tutorial is to set up an environment that is identical for Windows, Linux or Mac-OSX users.
So instead of setting up Ansible directly on the User’s Desktop/Host, we simply spin up an Ubuntu vagrant instance to host our Ansible playbooks and environment. Let’s call it devbox. We’ll do a separate tutorial on using Ansible directly on Mac-OSX/Windows.
Prerequisites
- Computer with 4-5GB free RAM;
- Vagrant;
- Ansible;
- IOS-XRv Vagrant Box
- Vagrantfile and scripts for provisioning
IOS-XR Vagrant is currently in Private Beta
We explain the steps to in the section below:
Vagrant pre-setup
Clone the repo with Vagrantfile and assisting files:
$ git clone https://github.com/ios-xr/vagrant-xrdocs.git
$ cd vagrant-xrdocs/ansible-tutorials/
$ ls
ubuntu.sh*  Vagrantfile  xr-config
Setup was tested on Windows, but the workflow is the same for other environments. To add an IOS-XR box, you must first download it.
IOS-XR Vagrant is currently in Private Beta
To download the box, you will need an API-KEY and a CCO-ID
To get the API-KEY and a CCO-ID, browse to the following link and follow the steps:
$ BOXURL="http://devhub.cisco.com/artifactory/appdevci-release/XRv64/latest/iosxrv-fullk9-x64.box"

$ curl -u your-cco-id:API-KEY $BOXURL --output ~/iosxrv-fullk9-x64.box

$ vagrant box add --name IOS-XRv ~/iosxrv-fullk9-x64.box
Of course, you should replace your-cco-id with your actual Cisco.com ID and API-KEY with the key you generated and copied using the above link.
Image for devbox will be downloaded from official source:
$ vagrant box add ubuntu/trusty64
We should now have both the boxes available, Use the vagrant box list command to display the current set of boxes on your system as shown below:

The Vagrantfile contains 2 Vagrant boxes and looks like:
Vagrant.configure(2) do |config|

  config.vm.provision "shell", inline: "echo Hello User"

  config.vm.define "devbox" do |devbox|
    devbox.vm.box = "ubuntu/trusty64"
    devbox.vm.network :private_network, virtualbox__intnet: "link1", ip: "10.1.1.10"
    devbox.vm.provision :shell, path: "ubuntu.sh", privileged: false
  end

  config.vm.define "xr" do |xr|
    xr.vm.box = "xrv64"
    xr.vm.network :private_network, virtualbox__intnet: "link1", ip: "10.1.1.20"
  end

end
Now we are ready to boot up the boxes:
mkorshun@MKORSHUN-2JPYH MINGW64 ~/Documents/workCisco/tutorial
$ ls
ubuntu.sh*  Vagrantfile  xr-config

mkorshun@MKORSHUN-2JPYH MINGW64 ~/Documents/workCisco/tutorial
$ vagrant up
devbox box pre-configuration
To access the devbox box just issue the command (no password required):
vagrant ssh devbox
The devbox instance is already configured via file “ubuntu.sh”. This section is only for the user’s information.
Let’s review the content of the script “ubuntu.sh”
The first four lines are responsible for downloading required packages for Ansible and updating the system.sudo apt-get update sudo apt-get install -y python-setuptools python-dev build-essential git libssl-dev libffi-dev sshpass sudo easy_install pip wget https://bootstrap.pypa.io/ez_setup.py -O - | sudo pythonNext, the script clones the Ansible and the IOSXR-Ansible repos:
git clone https://github.com/ios-xr/iosxr-ansible.git
git clone git://github.com/ansible/ansible.git --recursive
It then installs Ansible and applies the variables from “ansible_env” to the system.
cd ansible/ && sudo python setup.py install
echo "source /home/vagrant/iosxr-ansible/remote/ansible_env" >> /home/vagrant/.profile
The last section is responsible for generating a public key for paswordless authorization (for XR linux) and a base 64 version of it (for XR CLI):
ssh-keygen -t rsa -f /home/vagrant/.ssh/id_rsa -q -P ""
cut -d" " -f2 ~/.ssh/id_rsa.pub | base64 -d > ~/.ssh/id_rsa_pub.b64
IOS-XRv box pre-configuration
To access XR Linux Shell:
$ vagrant ssh rtr
To access XR console it takes one additional step to figure out port (credentials for ssh: vagrant/vagrant):
mkorshun@MKORSHUN-2JPYH MINGW64 ~/Documents/workCisco/tutorial
$ vagrant port rtr
The forwarded ports for the machine are listed below. Please note that
these values may differ from values configured in the Vagrantfile if the
provider supports automatic port collision detection and resolution.
 22 (guest) = 2223 (host)
 57722 (guest) = 2200 (host)

mkorshun@MKORSHUN-2JPYH MINGW64 ~/Documents/workCisco/tutorial
$ ssh -p 2223 vagrant@localhost
vagrant@localhost's password:
RP/0/RP0/CPU0:ios#
Now, let’s configure an IP address on the IOS-XRv instance. Issue the following command on XR cli:
conf t
hostname xr
interface GigabitEthernet0/0/0/0
 ipv4 address 10.1.1.20 255.255.255.0
 no shutdown
!
commit
end
Checking connectivity between boxes:
RP/0/RP0/CPU0:ios#ping 10.1.1.10
Mon May  9 08:36:33.071 UTC
Type escape sequence to abort.
Sending 5, 100-byte ICMP Echos to 10.1.1.10, timeout is 2 seconds:
!!!!!
Success rate is 100 percent (5/5), round-trip min/avg/max = 1/5/20 ms
RP/0/RP0/CPU0:ios#
Configure Passwordless Access into XR Linux shell
Let’s copy public part of key from devbox box and allow access without password. First, connect to the devbox instance and copy file to XR via SCP:
vagrant ssh devbox

scp -P 57722 /home/vagrant/.ssh/id_rsa.pub  [email protected]:/home/vagrant/id_rsa_ubuntu.pub
Now add the copied keys to authorized_keys in XR linux
vagrant ssh rtr

cat /home/vagrant/id_rsa_ubuntu.pub >> /home/vagrant/.ssh/authorized_keys
Configure Passwordless Access into XR CLI
If we want passwordless SSH from devbox to XR CLI, issue the following commands in XR CLI:
The first command uses scp to copy the public key (base 64 encoded) to XR.
Once we have the key locally, we import it using XR CLI’s crypto key import command.
Execute in XR CLI
scp [email protected]:/home/vagrant/.ssh/id_rsa_pub.b64 /disk0:/id_rsa_pub.b64

crypto key import authentication rsa disk0:/id_rsa_pub.b64
File “id_rsa_pub.b64” was created by provisioning script “Ubuntu.sh”, during Vagrant provisioning.
Using Ansible Playbooks
Ansible Pre-requisites
On the devbox box let’s configure Ansible prerequisites. We need to configure 2 files:
File “ansible_hosts”: It contains the ip address of the XR instance. We also specify a user to connect to the machine: “ansible_ssh_user=vagrant”
File “ansible_env”: Used to set up the environment for Ansible.
We do not delve into YDK for now, it’s a topic for another tutorial. Note that the files ansible_hosts and ansible_env are preconfigured for our needs.
cd iosxr-ansible/
cd remote/

vagrant@vagrant-ubuntu-trusty-64:~/iosxr-ansible/remote$ cat ansible_hosts
[ss-xr]
10.1.1.20 ansible_ssh_user=vagrant

vagrant@vagrant-ubuntu-trusty-64:~/iosxr-ansible/remote$ cat ansible_env
export BASEDIR=/home/vagrant
export IOSXRDIR=$BASEDIR/iosxr-ansible
export ANSIBLE_HOME=$BASEDIR/ansible
export ANSIBLE_INVENTORY=$IOSXRDIR/remote/ansible_hosts
export ANSIBLE_LIBRARY=$IOSXRDIR/remote/library
export ANSIBLE_CONFIG=$IOSXRDIR/remote/ansible_cfg
export YDK_DIR=$BASEDIR/ydk/ydk-py
export PYTHONPATH=$YDK_DIR
Running Playbooks
cd ~/iosxr-ansible/remote/

ansible-playbook samples/iosxr_get_facts.yml

ansible-playbook iosxr_cli.yml -e 'cmd="show interface brief"'
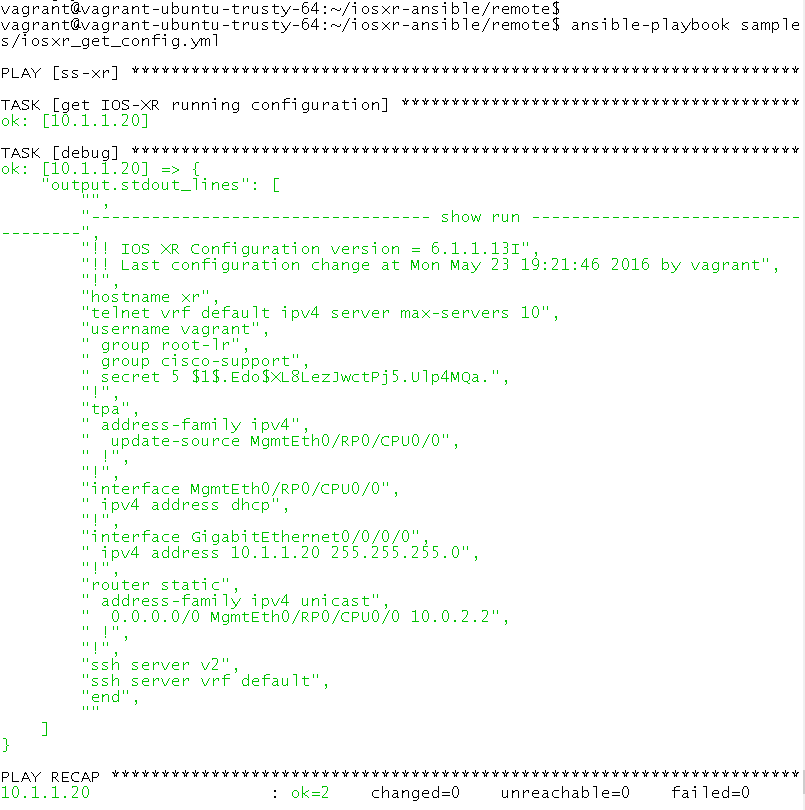
Usual playbook would look like:

Output from our XR instance:

Samples folder contains various playbooks, files started with “show_” using iosxr_cli playbook and passing cmd to XR as parameter. To run playbook as “vagrant” user, playbook should contain string: “become: yes” Feel free to play with any playbook!
Leave a Comment