
Enabling IOS-XR on Third-Party Network Hardware
Background
With the recent announcement that IOS-XR will now be available on a curated set of third party network hardware, let’s dive a little deeper into technical details of the integration. In this ongoing series of technical blogs, we’ve demonstrated how IOS-XR with model driven APIs at every layer of the stack enables us to easily integrate with a wide variety of community tools and protocols.
This time I’d like to explain what it takes to enable a Network Operating System (NOS) on whitebox hardware and showcase how IOS-XR with suitable abstractions at the platform integration layer enabled us to port it to select OCP-compliant hardware for the Service Provider Access market.
In the video below - we show IOS-XR running on OCP compliant hardware, installed and brought up using ONIE and seamlessly integrated with the platform’s capabilities:
Before we discuss details, let’s review the various layers of a generic network stack. In case of IOS-XR, these layers have evolved over time to accommodate different networks with varied software and operational requirements.
“Layers” of the Network Stack
Network disaggregation is generally understood to be a “decoupling” of the network hardware and software. However, we’ve seen a lot of use cases typically associated with network disaggregation being solved by exposing APIs at different layers within the software stack. Over time this has led to a further “disaggregation” within the software stack into multiple layers.
Thus, today when we break down a network device, its constituent parts look something like:
Network Software: Consisting of various layers:
Platform Integration Layer: Typically consists of kernel and/or user-land drivers for devices such as fans, leds, sensors etc. The integration of these device specific drivers with the higher layers of the software stack happens at this layer. It this layer that allows a software stack to extract information (e.g. temperature) from sensors and influence component state (e.g. fan speed).
Hardware Abstraction Layer: This layer interacts with the ASIC SDK (provided by the ASIC vendor) and handles programming of the data plane based on RIB state, or LSD (label switch database) state etc.
Network Infrastructure/Service Adaptation Layer: Typically consists of components such as the RIB, Label Switch database, BFD, network interface handler and APIs for higher layers/agents.
Network Application/Protocol Layer: This layer contains protocols (BGP, ISIS, OSPF etc.) and features such as L2VPN, L3VPN etc.
Manageability Layer: This layer exposes command line interface (CLI) for features and protocols in the network application layer along with model-driven APIs for use with automation tools.
Networking Hardware: Consists of the ASIC that handles forwarding decisions and provides hooks (through the ASIC SDK) to help program route lookup tables in the hardware. The system components such as fans, sensors and optics make up the rest of this layer.
The figure below (click to expand) shows how IOS-XR’s architecture maps to these layers:
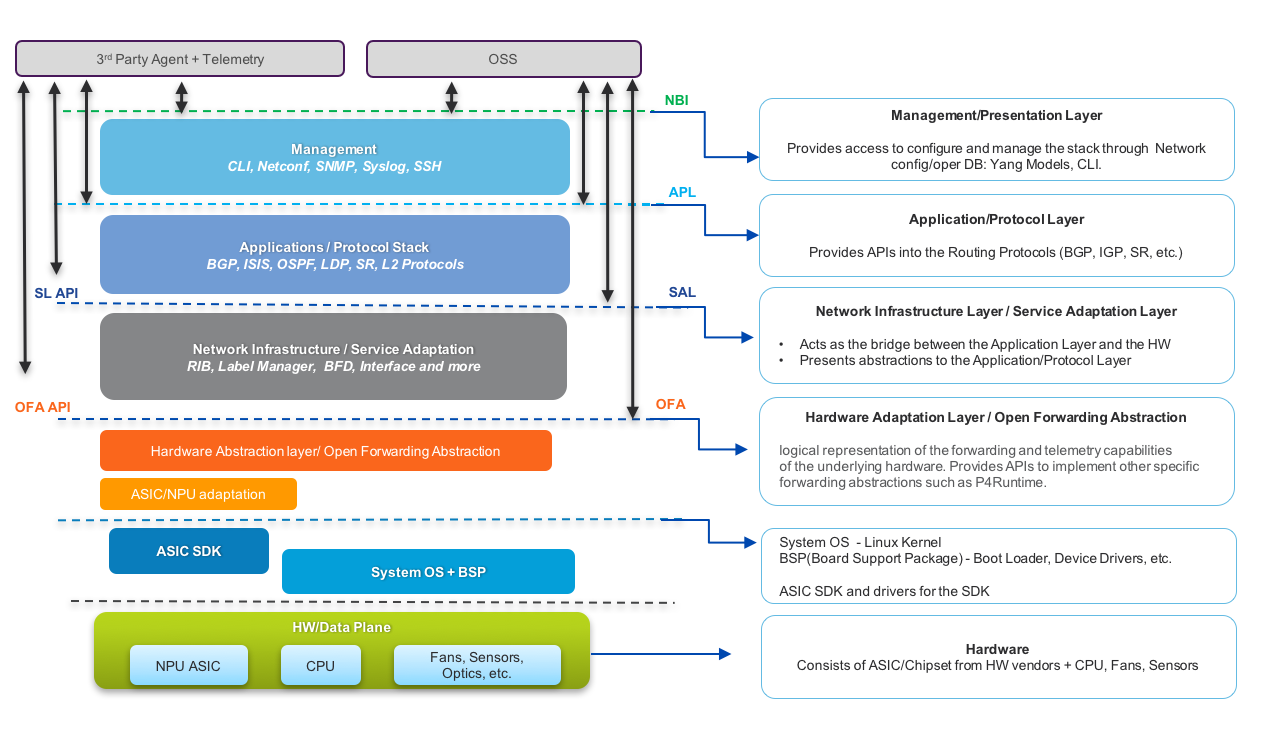
In this blog, we’ll focus primarily on the layers that lie at the interface of the network software and the hardware i.e. the integration of IOS-XR with platform sensors, optics and the use of OCP technologies (such as ONL modules and onlpdump) to enable it.
How we enabled IOS-XR on whitebox hardware
There are four primary steps to enable a NOS on third-party hardware:
The Decision Stages
1. Select the Hardware
This may seem obvious but is an important first step to ensure smooth portability of the vendor software on third party network hardware.
Since we are using OCP-compliant hardware, we get to utilize the ONL driver code/modules on github.
Ultimately when selecting a NOS, integrators look for hardware with a mix of:
- Ports - the required density of (typically) 100G ports
- ASIC capabilities - A lot of the features one can eventually support depend on the capabilities of the underlying ASIC
There are a number of hardware platforms that are already OCP-compliant and several others that are still under review.
In this blog we describe integration with one of the hardware platforms we selected based on our customer requirements: the Edgecore-AS7816-64x, 100GBE platform that provides line-rate L2 and L3 forwarding across 64 x QSFP28 ports.
2. Integrate with the Platform
The term “Platform” here refers to hardware components such as Fans, Power modules, Optics, Sensors etc. The goal is to use available drivers for these hardware components and integrate them with a platform abstraction layer inside the NOS.
This integration stage requires the following steps:
Port ONL modules for selected hardware into the NOS: The ONL modules for the various OCP-compliant and OCP-inspired hardware platforms are available on Github in the opencomputeproject github org.
For example, under the
packagesdirectory browse to theplatforms/accton/x86-64/x86-64-accton-as7816-64x/modules/buildsdirectory: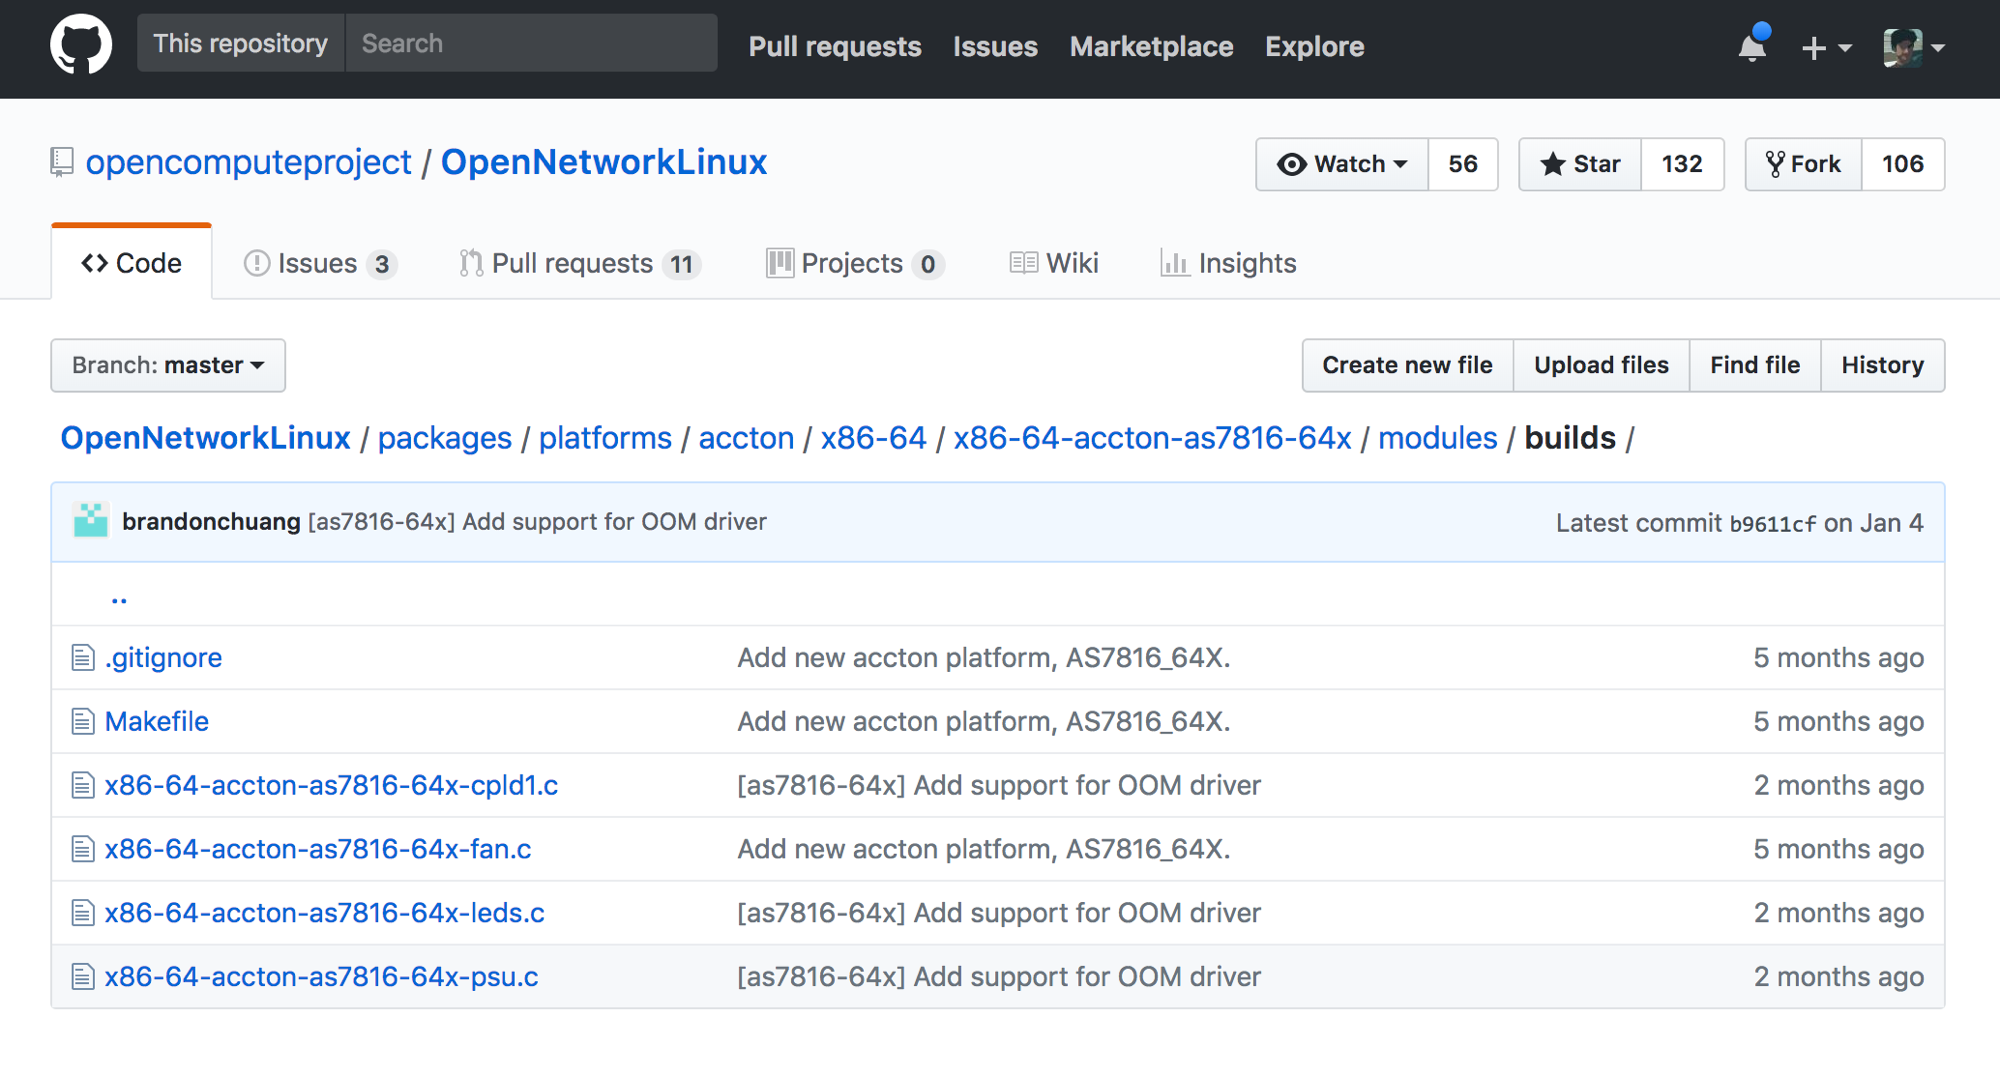
What you see are the kernel modules for the device
x86-64-accton-as7816-64xthat may be ported into a kernel of choice to expose the functionality of the devices’s cpld (complex programmable logic device), fans, leds and power modules.In Jan,2018 the optics support was shifted to the Open optical monitoring(oom) project - common across platforms and available on Github here. If you're still looking for the optics kernel modules however, you will need to check out an older git hash for OpenNetworkLinux:b77d4dde8ea9855843b634a3d41be7b2dedc2dd3- the last one before the OOM change. Here you will find thesfp.csource code still intact:Platform Abstraction inside the NOS: The Platform abstraction layer helps abstract the underlying capabilities of the hardware sensors, fans, optics and power modules and exposes an API north-bound to integrate with higher layer of the NOS.
The technique through which the underlying capabilities of the hardware are exposed to the platform abstraction layer depends on the type of hardware in play - the presence of a BMC (Baseboard management controller) may imply that the NOS leverages something like OpenBMC, whereas an absence of a BMC may imply that ONLP (ONL platform library) would instead serve this purpose.
There are two main ways to expose the underlying hardware’s capabilities to the platform abstraction layer: using platform libraries such as ONLP (Open Network Linux Platform) or using OpenBMC (if available) for hardware with a BMC (Baseboard Management Controller).
The ONL platform library (ONLP) is an abstraction layer used to inventory, manage, and monitor all devices inside the system (fans, power supplies, LEDs, SFP/SFP+/QSFP, temperature sensors, etc.).
Keep in mind that ONLP is not really needed if you’re willing to write your own hooks that manage the capabilities exposed by the kernel modules. But since it’s already available on Github, integrating ONLP and its application layer daemon (onlpdump) could make parts of the integration easier.
To give you a gist of the pieces involved, ONLP consists of two layers:
- The “application to platform” APIs that can be found here:
- The “platform to hardware” APIs found here:
with hardware specific hooks implemented in hardware platform specific directories:
We will show how IOS-XR already contains a platform abstraction layer that allows it to hook up with ONLP and integrate with the underlying platform.
3. Integrate the ASIC SDK
While the OEM vendor provides the APIs/modules that expose functionality of the platform components such as fans, psu modules, leds and sfps, The ASIC SDK comes from the ASIC vendor. For example, Edgecore-AS7816-64x platform uses the Broadcom Tomahawk II (56970) ASIC.
Broadcom provides an Open API on top of their SDK called OpenNSL for integration with a Hardware Abstraction Layer (HAL) in the NOS.
4. Provide a NOS installer for a bootloader such as ONIE
Once you’ve built a NOS capable of running on the selected hardware, you need some way for the device to install and boot the NOS. ONIE may be the available bootloader for the system. It is very well documented and details can be found here:
To build an ONIE-compatible installer, follow the instructions in the developer section:
https://opencomputeproject.github.io/onie/developers/demo_os.html
IOS-XR NOS image is packaged up into an ONIE-compatible NOS installer called iosxrwb-k9.amd64.installer. This installer is then fetched and installed using ONIE on the whitebox hardware.
Putting it all together
Let’s summarize the decision stages described above. The different touch points (Platform Integration and ASIC-SDK integration) in play are showcased below:
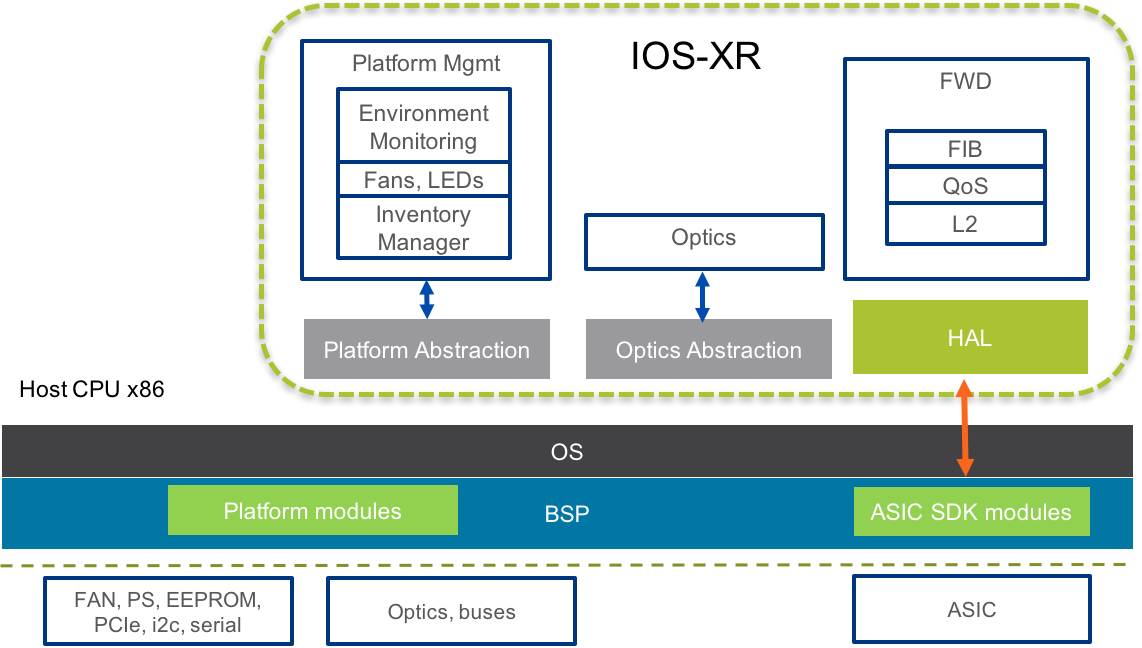
The BSP contains the ONL modules for the platform, compiled into the kernel. Typically, the NOS (IOS-XR) contains the Platform Abstraction Layer to integrate the platform either by using ONLP APIs or directly reading from the sysfs paths exposed by the installed kernel modules. The Optics Abstraction layer integrates with the optics device-driver/kernel-module for the platform and handle Optics in the NOS inventory directly. In the future, we can look at hooking up the OOM (open optical monitoring) layer with the optics abstraction layer for more enhanced functionality. The ASIC SDK API hooks up to a HAL (Hardware Adaptation Layer) that would in turn provide north bound APIs to the NOS layers such as FIB for route or label programming.
Deployment models
The deployment models for a NOS are a function of how an integrator views the software being deployed on whitebox hardware:
As a complete Software Stack: In this scenario, the NOS vendor includes a Linux distribution (rootfs and kernel) within the NOS image along with all the platform modules and any ASIC SDK that may be required.
As an application on Linux: In this scenario, the integrator is expected to run the network stack as an application on top of a Linux distribution (rootfs and kernel) of choice. The platform modules and any ASIC SDK required must be installed by the integrator. The Vendor NOS still contains all the abstraction layers to work with the modules installed by the integrator.
Native:
This deployment model is used when the vendor NOS (IOS-XR) is viewed as “a complete Software Stack” responsible for the Linux distribution(rootfs and the Kernel) as well as the protocol stack capabilities.
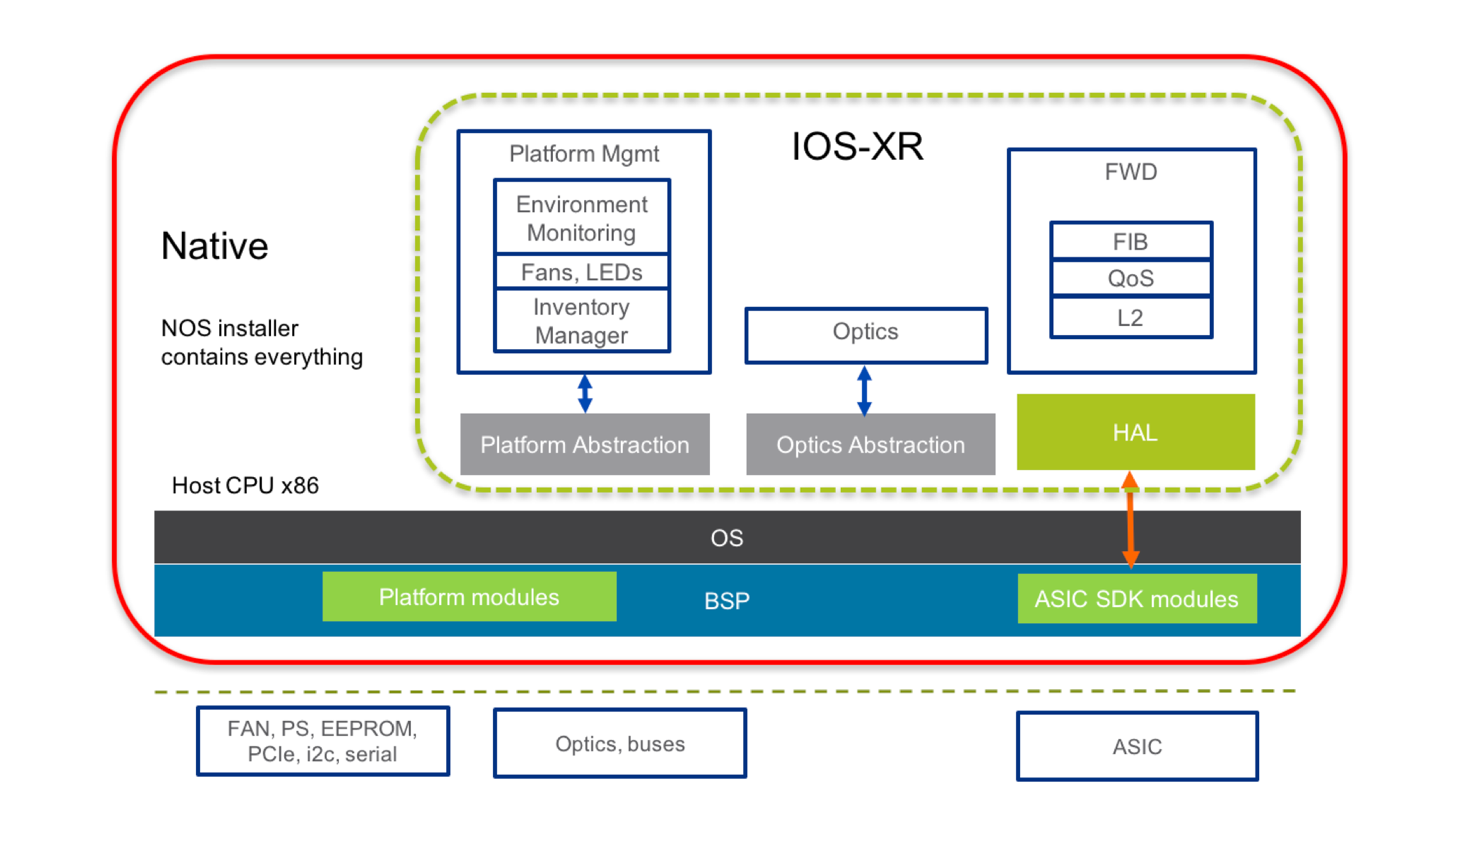
IOS-XR is packaged up into an ONIE-compatible installer and is brought up on the system natively. This installed NOS contains all the kernel modules necessary to work with the platform and the ASIC in question.
Container (Docker, LXC etc.)
This deployment model is used when the vendor NOS (IOS-XR) is viewed as an “application” on top of a custom OS and is responsible only for the abstraction layers and the protocol stack capabilities. The Linux distribution(rootfs and kernel) running natively on the platform is installed and set up by the integrator.
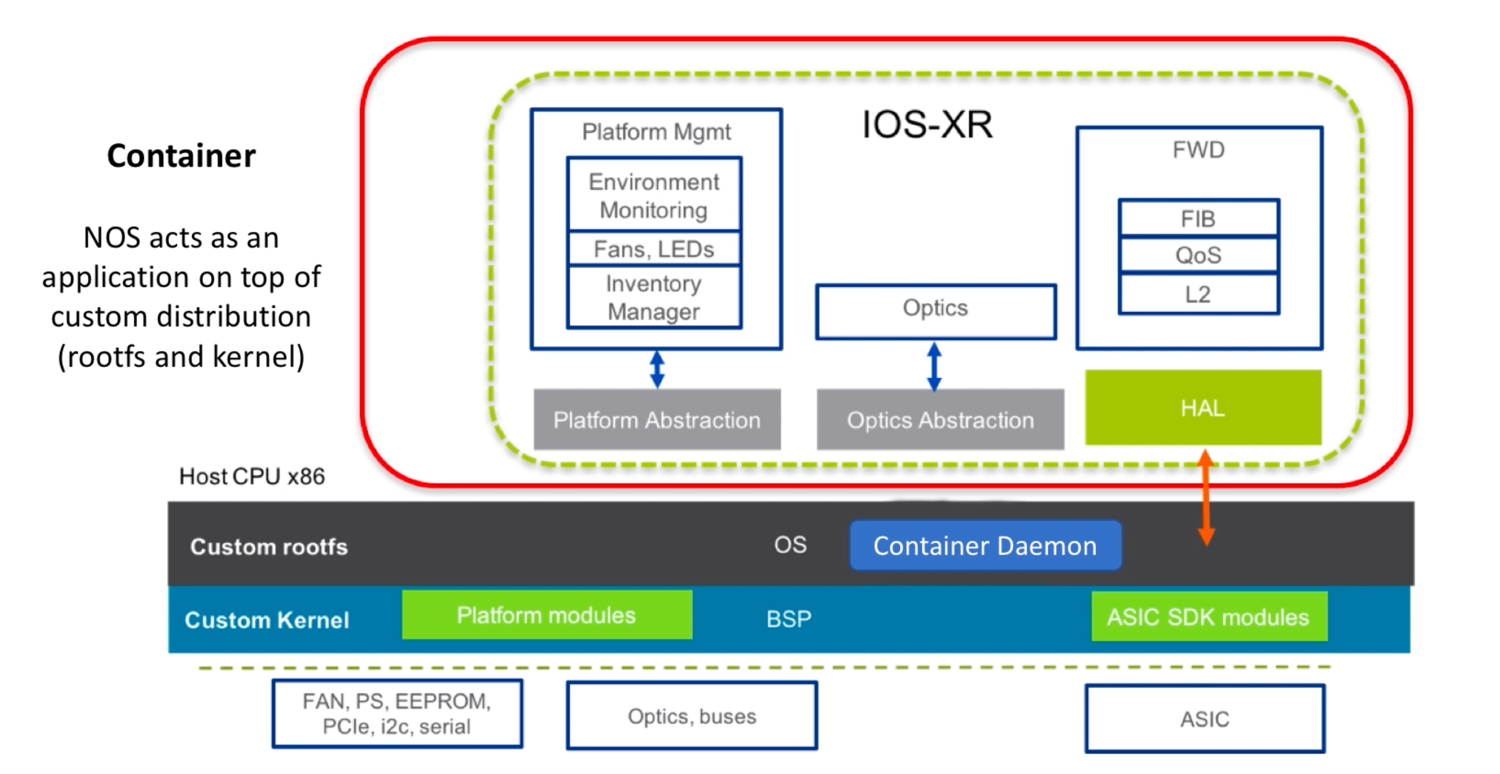
As shown above, IOS-XR is packaged into a container image (Docker, LXC etc.) and published into a either a private or a reachable repository (Docker registry for example).
The network operator can then pull and load the container image directly onto the custom OS using the installed container daemon or through a combination with configuration management tools like Ansible, Puppet, Chef etc.
What does the integration look like?
So, the burning question: What does the integration of IOS-XR on OCP hardware actually look like?.
Since I have an Edgecore-AS7816-64X lying around, let’s begin by setting up a DHCP server to respond with a default-url option and a web server with the ONIE-compatible NOS installer for IOS-XR.
The relevant ISC-DHCP server config snippet is shown below:
host AS7816-64X {
  hardware ethernet a8:2b:b5:87:9f:f4;
  fixed-address 172.30.0.60;
  next-server 172.30.0.22;
  option default-url = "http://172.30.0.22/AS7816-64X/iosxrwb-k9.amd64.installer";
  if exists user-class and option user-class = "exr-config" {
    filename = "http://172.30.0.22/AS7816-64X/scripts/as7816-64x_nso_ztp.py";
  }
}
Notice the yellow highlighted default-url pointing to the ONIE-compatible NOS installer for IOS-XR: iosxrwb-k9.amd64.installer. This is the native deployment model described in the previous section. The installer contains the complete Software Stack replete with the kernel modules that help integrate with the platform and the ASIC. Further it contains a Wind River Linux (WRL) distribution (rootfs and kernel).
Let’s attempt to fetch and install this image by rebooting the network device.
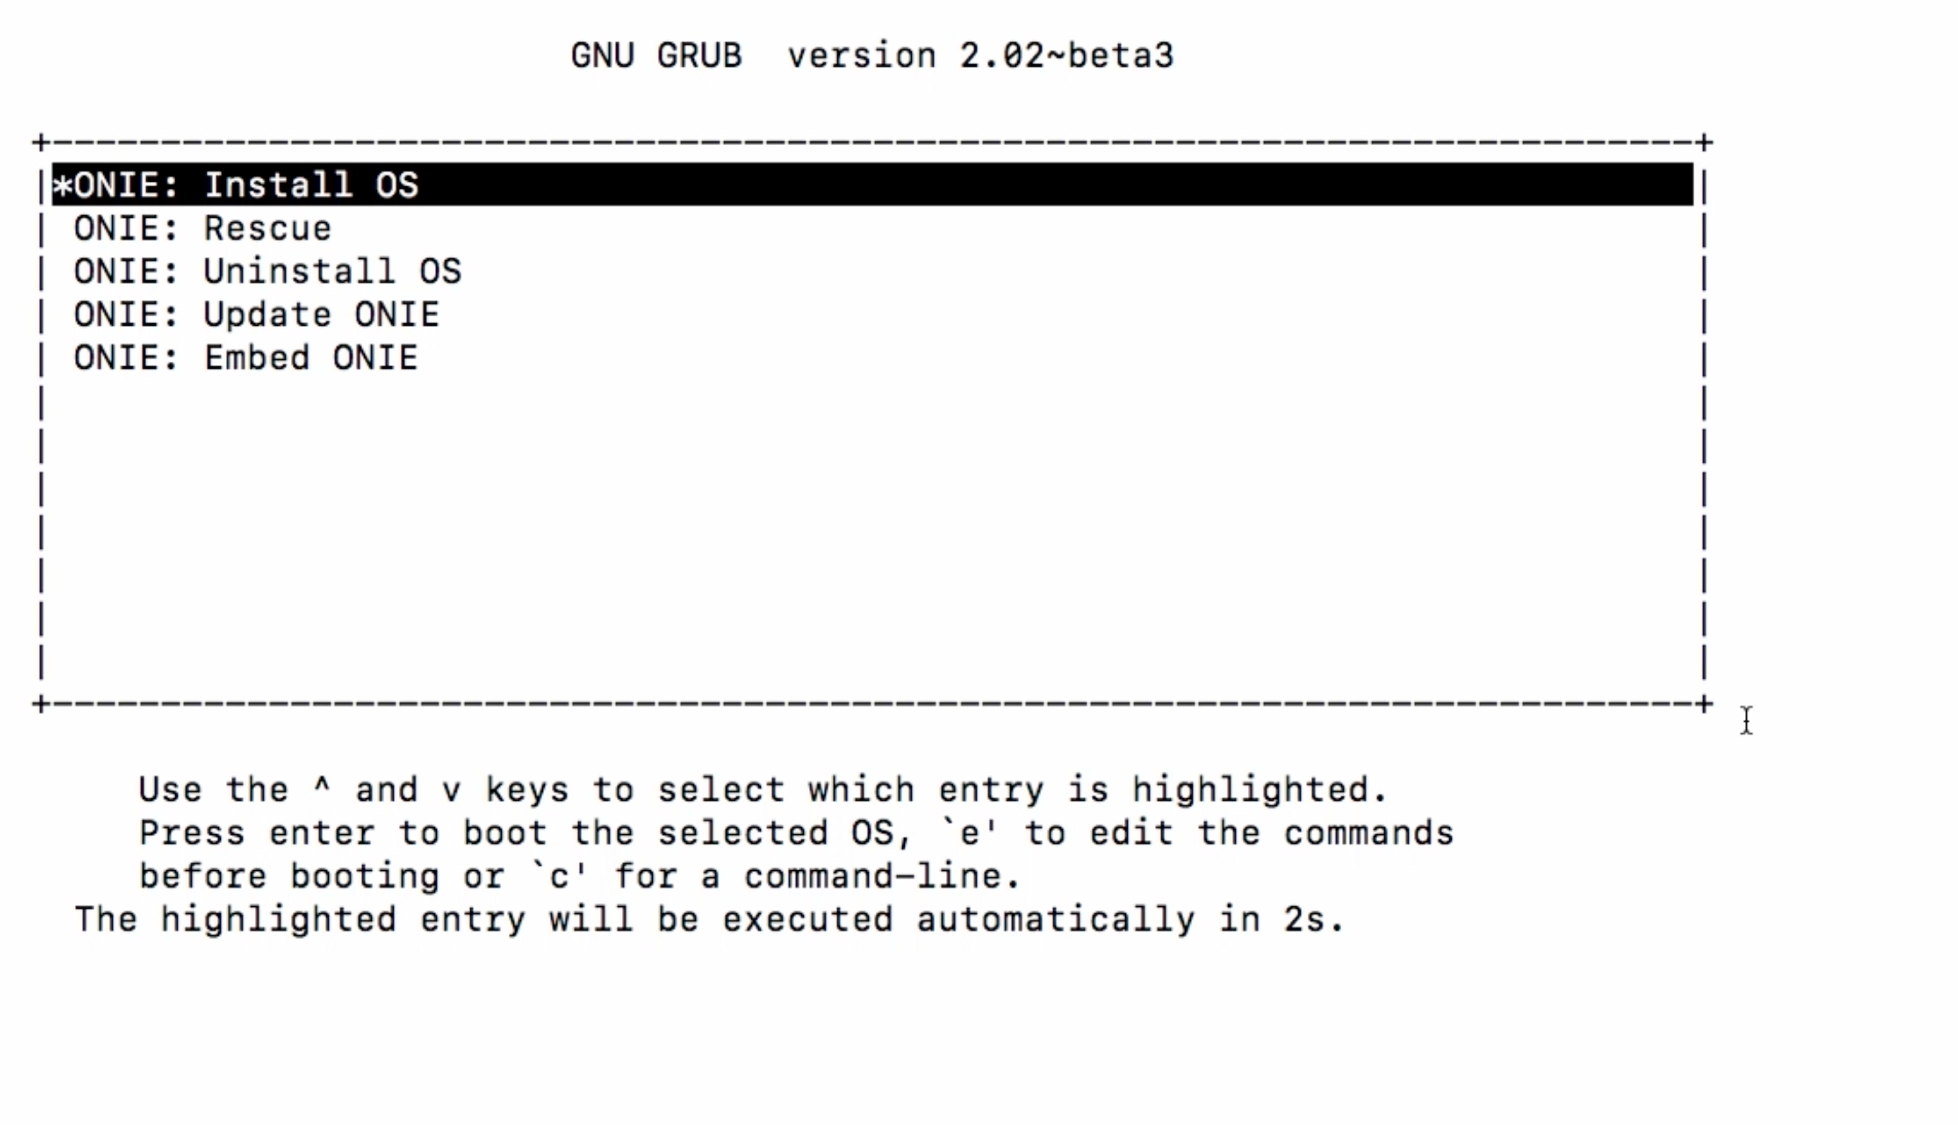
NOTE: If there is a NOS already installed on the device, then the NOS might have options to force the device to boot into ONIE mode directly. If it does not, make sure you select the ONIE loader when the relevant screen pops up upon reboot.
Once selected, the ONIE loader looks something like:

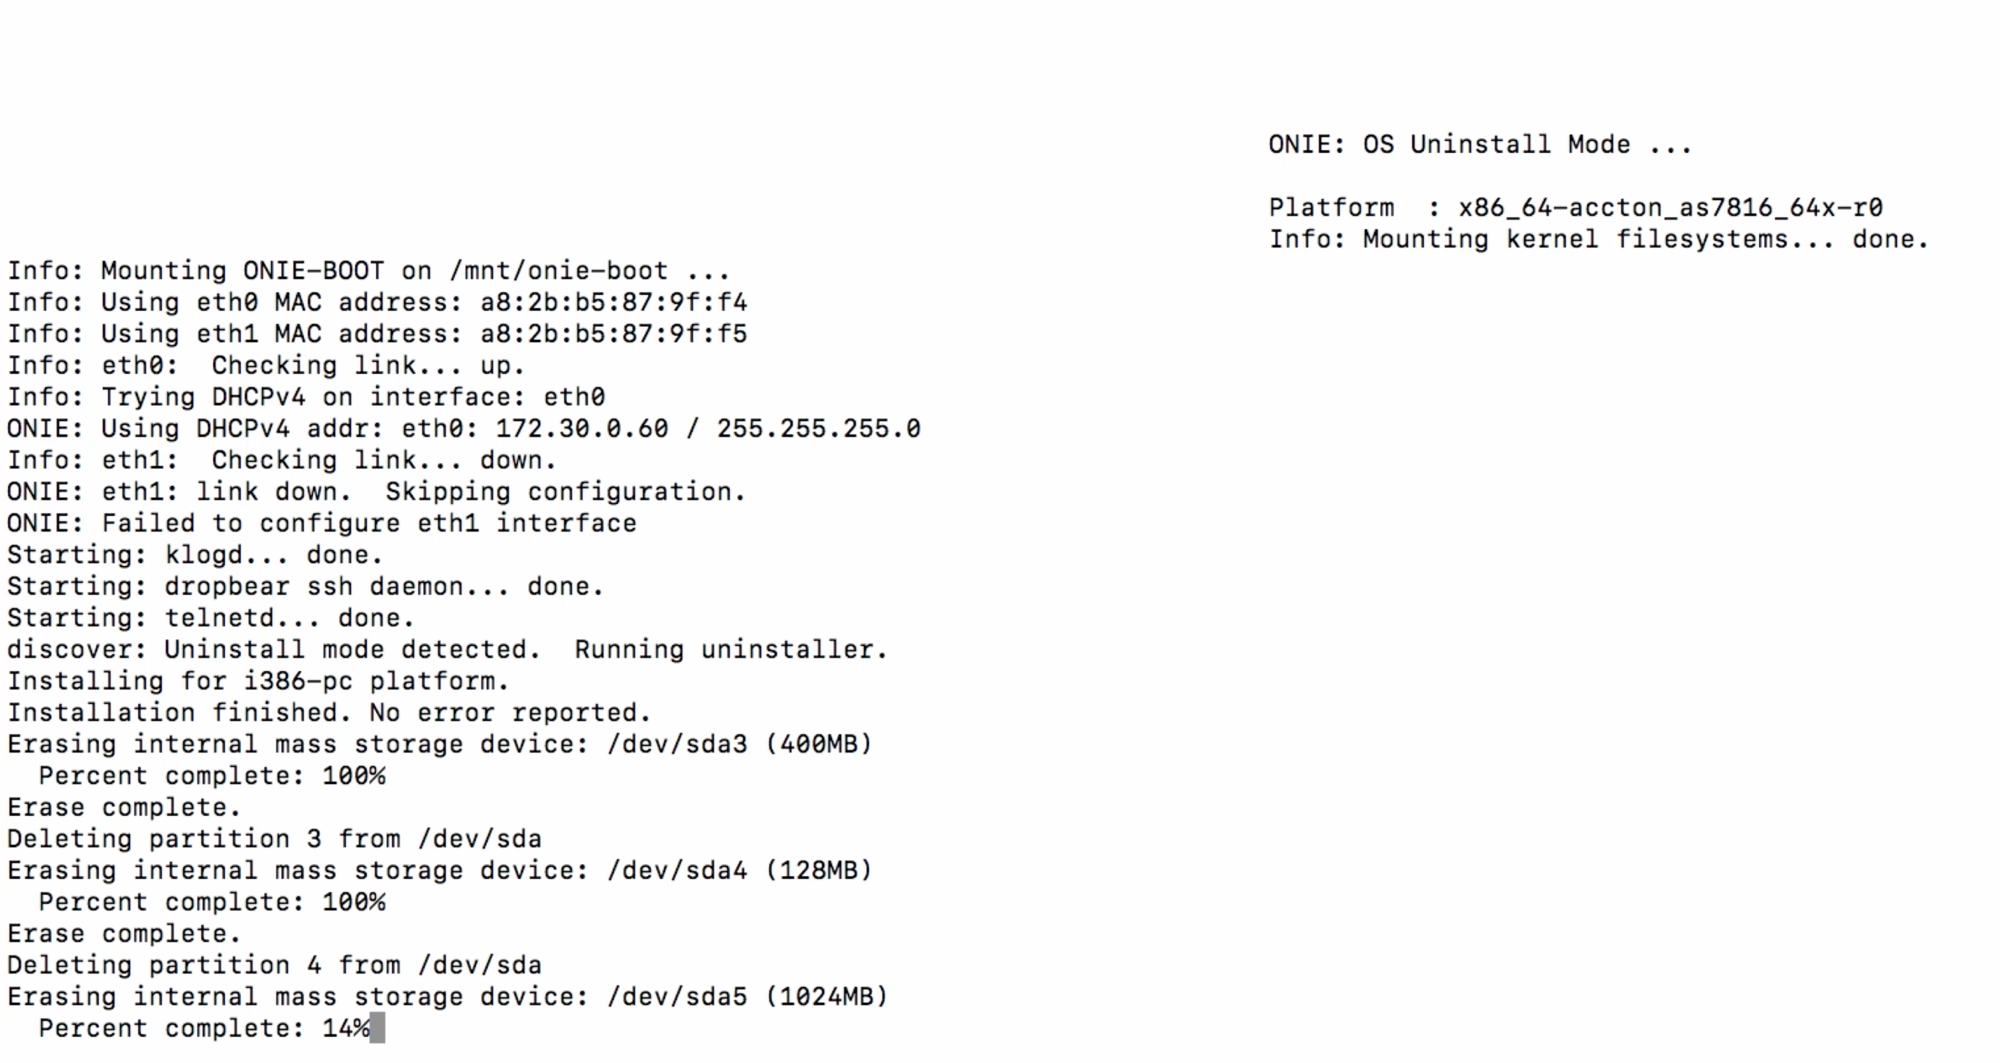
As is evident, I begin by selecting the Uninstall OS option first. This will force the device to erase internal mass storage devices and remove the existing NOS, before rebooting and attempting a fresh install through ONIE.
Upon reboot, the Install OS option should automatically get selected, thereby triggering the download of the ONIE-compatible installer image of IOS-XR based on DHCP interactions with the dhcp server:
Info: Attempting file://dev/sda3/onie-installer-x86_64.bin ...
Info: Attempting file://dev/sda3/onie-installer ...
Info: Attempting file://dev/sda3/onie-installer.bin ...
Info: Attempting http://172.30.0.22/AS7816-64X/iosxrwb-k9.amd64.installer ...
ONIE: Executing installer: http://172.30.0.22/AS7816-64X/iosxrwb-k9.amd64.installer
installer: computing checksum of original archive
installer: checksum is OK
installer: extracting pad
1+0 records in
1+0 records out
512 bytes (512B) copied, 0.000014 seconds, 34.9MB/s
installer: copying file before resetting pad
installer: resetting pad
1+0 records in
1+0 records out
512 bytes (512B) copied, 0.000012 seconds, 40.7MB/s
installer: extracting shar into /tmp/sfx-dFtTra
installer: invoking installer xrinstaller.sh
Found installer tmpfs on /tmp/sfx-dFtTra (/tmp) using opts rw,noatime
Unpacking ONL installer files...
Extracting from /tmp/sfx-dFtTra/onie-installer.zip: iosxrwb-k9.iso ...
Archive:  /tmp/sfx-dFtTra/onie-installer.zip
  inflating: iosxrwb-k9.iso
Extracting initrd to /tmp/sfx-dFtTra/initrd-F3ONm5
Awesome! The default-url option set up on the dhcp server allowed ONIE to pick up the url for the NOS installer and start expanding and booting it.
The next step is ZTP - enabling IOS-XR on the whitebox platform automatically ensures that capabilities such as ZTP become available for use. If you haven’t heard about ZTP yet, hop over to these great tutorials and blogs on xrdocs:
https://xrdocs.github.io/software-management/tutorials/2016-08-26-working-with-ztp/ https://xrdocs.github.io/software-management/blogs/2017-09-21-ios-xr-ztp-learning-through-packet-captures/
Notice the red-marked filename field in the DHCP server config shown earlier. This field is utilized during the ZTP phase to return a custom python script called as7816-64x_nso_ztp.py to execute on IOS-XR once it comes up. The captured reply from the DHCP server is shown below - notice the returned filename, in line with the server configuration.
  TIME: 2018-03-11 06:12:10.692
    IP: 172.30.0.25 (0:50:56:b7:50:d3) > 172.30.0.60 (a8:2b:b5:87:9f:f4)
    OP: 2 (BOOTPREPLY)
 HTYPE: 1 (Ethernet)
  HLEN: 6
  HOPS: 0
   XID: a8e9d54c
  SECS: 0
 FLAGS: 0
CIADDR: 0.0.0.0
YIADDR: 172.30.0.60
SIADDR: 172.30.0.22
GIADDR: 0.0.0.0
CHADDR: a8:2b:b5:87:9f:f4:00:00:00:00:00:00:00:00:00:00
 SNAME: .
 FNAME: http://172.30.0.22/AS7816-64X/scripts/as7816-64x_nso_ztp.py
OPTION:  53 (  1) DHCP message type         5 (DHCPACK)
OPTION:  54 (  4) Server identifier         172.30.0.25
OPTION:  51 (  4) IP address leasetime      86400 (24h)
OPTION:   1 (  4) Subnet mask               255.255.255.0
OPTION:   3 (  4) Routers                   172.30.0.1
OPTION:   6 (  4) DNS server                172.30.0.25
OPTION:  12 ( 10) Host name                 AS7816-64X
OPTION: 114 ( 56) URL                       687474703a2f2f31 http://1
					    37322e33302e302e 72.30.0.
					    32322f4153373831 22/AS781
					    362d3634582f696f 6-64X/io
					    73787277622d6b39 sxrwb-k9
					    2e616d6436342e69 .amd64.i
					    6e7374616c6c6572 nstaller
OPTION:  28 (  4) Broadcast address         172.30.0.255
OPTION:  15 ( 11) Domainname                cisco.local
---------------------------------------------------------------------------
This script is set up to configure an admin user on the system and apply a configuration that enables basic features such as ISIS, LACP etc.
In the end, we are presented with a familiar login prompt if we connect to the box over SSH:
cisco@server:~/$ ssh [email protected]
The authenticity of host '172.30.0.61 (172.30.0.61)' can't be established.
RSA key fingerprint is 45:cb:02:4a:b7:c9:05:ff:6d:74:26:b8:c0:0d:9c:e5.
Are you sure you want to continue connecting (yes/no)? yes
Warning: Permanently added '172.30.0.61' (RSA) to the list of known hosts.
Password:

RP/0/RP0/CPU0:leaf3#
RP/0/RP0/CPU0:leaf3#
RP/0/RP0/CPU0:leaf3#show version
Fri Mar  2 10:15:33.919 UTC

Cisco IOS XR Software, Version 6.5.1.04I
Copyright (c) 2013-2018 by Cisco Systems, Inc.

Build Information:
 Built By     : balsup
 Built On     : Fri Mar  2 02:04:10 PST 2018
 Build Host   : vxr-slurm-124
 Workspace    : /nobackup/balsup/release
 Version      : 6.5.1.04I
 Location     : /opt/cisco/XR/packages/

Accton_as7816_64x () processor
System uptime is 19 minutes

RP/0/RP0/CPU0:leaf3#
RP/0/RP0/CPU0:leaf3#
And there you have it - IOS-XR running on an OCP compliant platform.
Assessing the platform Integration
As mentioned earlier, platform integration involves hooking up the abstraction layers (platform, optics) within IOS-XR to the capabilities exposed by the kernel modules available from the ONL repository while also enabling onlpdump [optional] in the linux user-space.
To begin with, let’s look at the kernel modules installed on the system:
Platform Kernel modules (from ONL repo):
 RP/0/RP0/CPU0:leaf3#
 RP/0/RP0/CPU0:leaf3#bash
 Fri Mar  2 10:35:30.755 UTC
 [leaf3:~]$
 [leaf3:~]$
 [leaf3:~]$ lsmod | grep accton
 x86_64_accton_as7816_64x_sfp    14621  0
 x86_64_accton_as7816_64x_psu     3322  0
 x86_64_accton_as7816_64x_leds     5564  0
 x86_64_accton_as7816_64x_fan     6715  0 accton_i2c_cpld         9016  3 x86_64_accton_as7816_64x_leds,x86_64_accton_as7816_64x_psu,x86_64_accton_as7816_64x_sfp
 i2c_core               29699  12
 igb,at24,lm75,i2c_i801,i2c_mux,ym2651y,i2c_algo_bit,x86_64_accton_as7816_64x_fan,x86_64_accton_as7816_64x_psu,x86_64_accton_as7816_64x_sfp,i2c_mux_pca954x,accton_i2c_cpld
 [leaf3:~]$
Now let’s compare some of the outputs from IOS-XR and onlpdump on the same system to see how they match up:
Fan Speeds:
IOS-XR CLI:
RP/0/RP0/CPU0:leaf3#admin show environment fan
Fri Mar  2 10:44:14.704 UTC
=====================================
			Fan speed (rpm)
Location     FRU Type           FAN_0
-------------------------------------
0/FT0        7816-FN-BK         13800
0/FT1        7816-FN-BK         14100
0/FT2        7816-FN-BK         14000
0/FT3        7816-FN-BK         13800

0/PM0        7816-FN-BK         10800

0/PM1        7816-FN-BK          8096
RP/0/RP0/CPU0:leaf3#
RP/0/RP0/CPU0:leaf3#
Onlpdump Output:
RP/0/RP0/CPU0:leaf3#bash
Fri Mar  2 10:44:23.913 UTC
[leaf3:~]$
[leaf3:~]$ /opt/cisco/hostos/bin/onlpdump | grep -A8 'fan @ [1-4]'
   fan @ 1 = {
       Description: Chassis Fan - 1
       Status: 0x00000009 [ PRESENT,F2B ]
       Caps:   0x00000038 [ SET_PERCENTAGE,GET_RPM,GET_PERCENTAGE ]
       RPM:    13800
       Per:    54
       Model:  NULL
       SN:     NULL
   }
   fan @ 2 = {
       Description: Chassis Fan - 2
       Status: 0x00000009 [ PRESENT,F2B ]
       Caps:   0x00000038 [ SET_PERCENTAGE,GET_RPM,GET_PERCENTAGE ]
       RPM:    14100
       Per:    55
       Model:  NULL
       SN:     NULL
   }
   fan @ 3 = {
       Description: Chassis Fan - 3
       Status: 0x00000009 [ PRESENT,F2B ]
       Caps:   0x00000038 [ SET_PERCENTAGE,GET_RPM,GET_PERCENTAGE ]
       RPM:    14000
       Per:    54
       Model:  NULL
       SN:     NULL
   }
   fan @ 4 = {
       Description: Chassis Fan - 4
       Status: 0x00000009 [ PRESENT,F2B ]
       Caps:   0x00000038 [ SET_PERCENTAGE,GET_RPM,GET_PERCENTAGE ]
       RPM:    13800
       Per:    54
       Model:  NULL
       SN:     NULL
   }
[leaf3:~]$
Temperature Checks:
IOS-XR CLI:
RP/0/RP0/CPU0:leaf3#admin show environment temperatures location 0/RP0
Fri Mar  2 10:49:07.667 UTC
================================================================================
Location  TEMPERATURE                 Value   Crit Major Minor Minor Major  Crit
          Sensor                    (deg C)   (Lo) (Lo)  (Lo)  (Hi)  (Hi)   (Hi)
--------------------------------------------------------------------------------
0/RP0
        ! CPU Core                       67      0     0     0    45    55    60
        ! ChassisThermalSensor 1         48      0     0     0    45    55    60
        ! ChassisThermalSensor 2         54      0     0     0    45    55    60
          ChassisThermalSensor 3         36      0     0     0    45    55    60
          ChassisThermalSensor 4         39      0     0     0    45    55    60
          ChassisThermalSensor 5         44      0     0     0    45    55    60
          ChassisThermalSensor 6         41      0     0     0    45    55    60
          NP1                            64    -10    -5     0   105   110   115
          NP2                            63    -10    -5     0   105   110   115
          NP3                            63    -10    -5     0   105   110   115
          NP4                            64    -10    -5     0   105   110   115
          NP5                            64    -10    -5     0   105   110   115
          NP6                            64    -10    -5     0   105   110   115
          NP7                            63    -10    -5     0   105   110   115
          NP8                            63    -10    -5     0   105   110   115
RP/0/RP0/CPU0:leaf3#
Onlpdump Output:
RP/0/RP0/CPU0:leaf3#
RP/0/RP0/CPU0:leaf3#bash
Fri Mar  2 10:49:15.746 UTC
[leaf3:~]$
[leaf3:~]$
[leaf3:~]$ /opt/cisco/hostos/bin/onlpdump | grep -A10 thermal
   thermal @ 1 = {
       Description: CPU Core
       Status: 0x00000001 [ PRESENT ]
       Caps:   0x0000000f [ GET_TEMPERATURE,GET_WARNING_THRESHOLD,GET_ERROR_THRESHOLD,GET_SHUTDOWN_THRESHOLD ]
       Temperature: 64000
       thresholds = {
           Warning: 45000
           Error: 55000
           Shutdown: 60000
       }
   }
   thermal @ 2 = {
       Description: Chassis Thermal Sensor 1
       Status: 0x00000001 [ PRESENT ]
       Caps:   0x0000000f [ GET_TEMPERATURE,GET_WARNING_THRESHOLD,GET_ERROR_THRESHOLD,GET_SHUTDOWN_THRESHOLD ]
       Temperature: 48500
       thresholds = {
           Warning: 45000
           Error: 55000
           Shutdown: 60000
       }
   }
   thermal @ 3 = {
       Description: Chassis Thermal Sensor 2
       Status: 0x00000001 [ PRESENT ]
       Caps:   0x0000000f [ GET_TEMPERATURE,GET_WARNING_THRESHOLD,GET_ERROR_THRESHOLD,GET_SHUTDOWN_THRESHOLD ]
       Temperature: 54000
       thresholds = {
           Warning: 45000
           Error: 55000
           Shutdown: 60000
       }
   }
   thermal @ 4 = {
       Description: Chassis Thermal Sensor 3
       Status: 0x00000001 [ PRESENT ]
       Caps:   0x0000000f [ GET_TEMPERATURE,GET_WARNING_THRESHOLD,GET_ERROR_THRESHOLD,GET_SHUTDOWN_THRESHOLD ]
       Temperature: 36000
       thresholds = {
           Warning: 45000
           Error: 55000
           Shutdown: 60000
       }
   }
   thermal @ 5 = {
       Description: Chassis Thermal Sensor 4
       Status: 0x00000001 [ PRESENT ]
       Caps:   0x0000000f [ GET_TEMPERATURE,GET_WARNING_THRESHOLD,GET_ERROR_THRESHOLD,GET_SHUTDOWN_THRESHOLD ]
       Temperature: 39500
       thresholds = {
           Warning: 45000
           Error: 55000
           Shutdown: 60000
       }
   }
   thermal @ 6 = {
       Description: Chassis Thermal Sensor 5
       Status: 0x00000001 [ PRESENT ]
       Caps:   0x0000000f [ GET_TEMPERATURE,GET_WARNING_THRESHOLD,GET_ERROR_THRESHOLD,GET_SHUTDOWN_THRESHOLD ]
       Temperature: 44500
       thresholds = {
           Warning: 45000
           Error: 55000
           Shutdown: 60000
       }
   }
   thermal @ 7 = {
       Description: Chassis Thermal Sensor 6
       Status: 0x00000001 [ PRESENT ]
       Caps:   0x0000000f [ GET_TEMPERATURE,GET_WARNING_THRESHOLD,GET_ERROR_THRESHOLD,GET_SHUTDOWN_THRESHOLD ]
       Temperature: 41000
       thresholds = {
           Warning: 45000
           Error: 55000
           Shutdown: 60000
       }
   }
--
       thermal @ 8 = {
           Description: PSU-1 Thermal Sensor 1
           Status: 0x00000001 [ PRESENT ]
           Caps:   0x0000000f [ GET_TEMPERATURE,GET_WARNING_THRESHOLD,GET_ERROR_THRESHOLD,GET_SHUTDOWN_THRESHOLD ]
           Temperature: 40000
           thresholds = {
               Warning: 45000
               Error: 55000
               Shutdown: 60000
           }
       }
--
       thermal @ 9 = {
           Description: PSU-2 Thermal Sensor 1
           Status: 0x00000001 [ PRESENT ]
           Caps:   0x0000000f [ GET_TEMPERATURE,GET_WARNING_THRESHOLD,GET_ERROR_THRESHOLD,GET_SHUTDOWN_THRESHOLD ]
           Temperature: 33000
           thresholds = {
               Warning: 45000
               Error: 55000
               Shutdown: 60000
           }
       }
[leaf3:~]$
Similarly, Optics:
IOS-XR CLI:
RP/0/RP0/CPU0:leaf3#show  inventory
Fri Mar  2 11:06:16.559 UTC
NAME: "0/RP0", DESCR: "Accton-as7816-64x Route processor"
PID: 7816-64X-O-AC-F   , VID: v01, SN: 664X1735002

NAME: "HundredGigE0/0/0/0", DESCR: "Cisco QSFP28 100G AOC Pluggable Optics Module"
PID: QSFP-100G-AOC10M  , VID: V01, SN: FIW211303CS-A

NAME: "HundredGigE0/0/0/1", DESCR: "Cisco QSFP28 100G AOC Pluggable Optics Module"
PID: QSFP-100G-AOC10M  , VID: V01, SN: FIW211303Z9-A

NAME: "HundredGigE0/0/0/62", DESCR: "Cisco QSFP28 100G SR4 Pluggable Optics Module"
PID: QSFP-100G-SR4-S   , VID: V01, SN: AVF1940G0VM

NAME: "HundredGigE0/0/0/63", DESCR: "Cisco QSFP28 100G SR4 Pluggable Optics Module"
PID: QSFP-100G-SR4-S   , VID: V01, SN: AVF1941G0DK
Onlpdump Output:
RP/0/RP0/CPU0:leaf3#bash
Fri Mar  2 11:06:21.072 UTC
[leaf3:~]$
[leaf3:~]$ /opt/cisco/hostos/bin/onlpdump | grep sfp
[leaf3:~]$ /opt/cisco/hostos/bin/onlpdump -S | grep -v NONE
Port  Type            Media   Status  Len    Vendor            Model             S/N
----  --------------  ------  ------  -----  ----------------  ----------------  ----------------
   0  100G-AOC        Fiber           10m    CISCO-FINISAR     FCBN425QE1C10-C1  FIW211303CS-A
   1  100G-AOC        Fiber           10m    CISCO-FINISAR     FCBN425QE1C10-C1  FIW211303Z9-A
  62  100GBASE-SR4    Fiber                  CISCO-AVAGO       AFBR-89CDDZ-CS1   AVF1940G0VM
  63  100GBASE-SR4    Fiber                  CISCO-AVAGO       AFBR-89CDDZ-CS1   AVF1941G0DK

[leaf3:~]$
and so on….
The combination of ONLP and IOS-XR’s platform integration resembles IOS-XR’s integration with Cisco Hardware such as the NCS5500 or NCS5000 series.
Where do we go from here?
In future blogs, we intend to have a deeper discussion on the underlying technology we used in our integration and show how some of IOS-XR’s carrier grade features behave on OCP-compliant hardware (Spoiler Alert!: pretty well 😀).
Leave a Comment