
Application-hosting and Packet-IO on IOS-XR : A Deep Dive
Application-hosting and Packet-IO on IOS-XR 6.X
For readers looking to get hands-on with application-hosting on IOS-XR - bringing up native, lxc or docker applications on IOS-XR plaforms - check out the xr-toolbox series. The goal of this series is to get an unintiated user up and running with simple Linux applications on IOS-XR in a step-by-step manner, enabling them to bring and integrate their own tools and applications.
While the existing tutorials describe the operative aspect of application-hosting, it is often necessary to elucidate the architecture behind these capabilities so that users can better troubleshoot their applications and plan the resources their applications should acquire post deployment.
We delve into these matters and more in this blog, providing an in-depth overview of all the elements of the application-hosting and packet-io architecture that enables Linux applications to run on IOS-XR, route packets to-and-fro and interact with APIs on-box.
Prerequisites
We intend to dive into the specifics of the app-hosting infrastructure on IOS-XR using the on-demand IOS-XR programmability Sandbox on Devnet. This sandbox is easily reservable and allows the reader to walk through the steps in the blog. You can also choose to skip the reservation and simply read through the steps to gain a better understanding of the apphosting and packet-io architecture on IOS-XR.
Reserve the IOS-XR Programmability sandbox
Take some time to reserve and familiarize yourself with the IOS-XR programmability Sandbox on Devnet. Getting started is pretty straightforward - once you hit the above URL, click on the Reserve button on the top right:

As part of the reservation, select the duration for which you’d like to reserve the sandbox (maximum duration = 1 week).
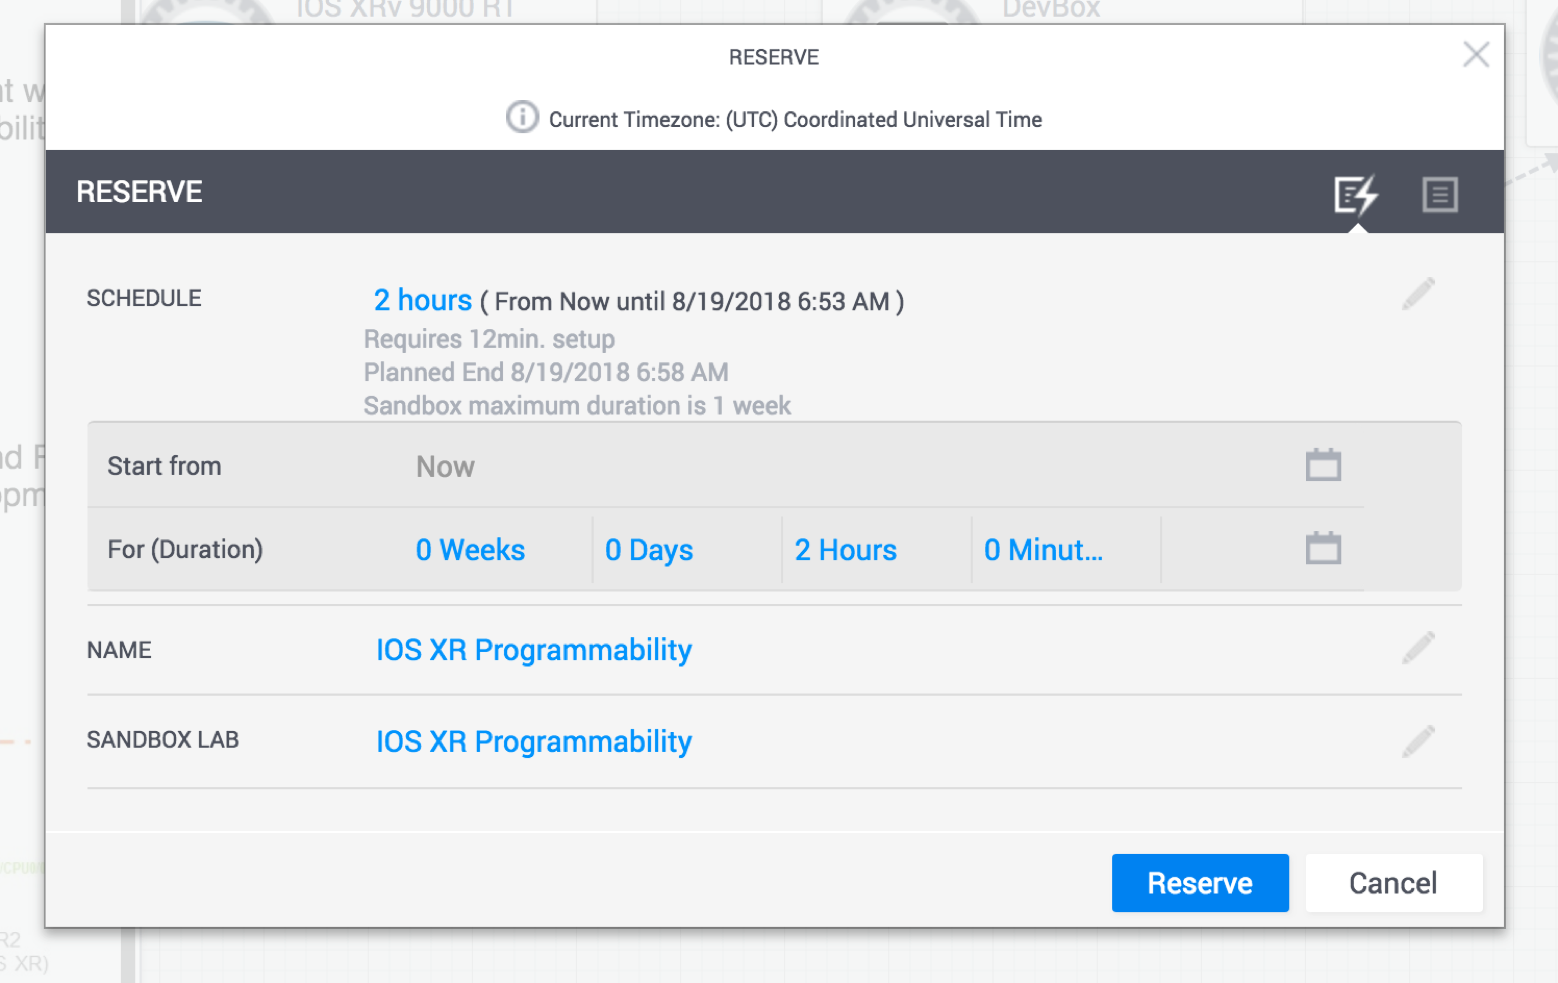
To view the dropdown menu with variable reservation options, hit the edit button (pencil icon) next to schedule. Once your reservation is active, you can keep extending the duration if you start running out of time (with the maximum limit set to a total time of 1 week).
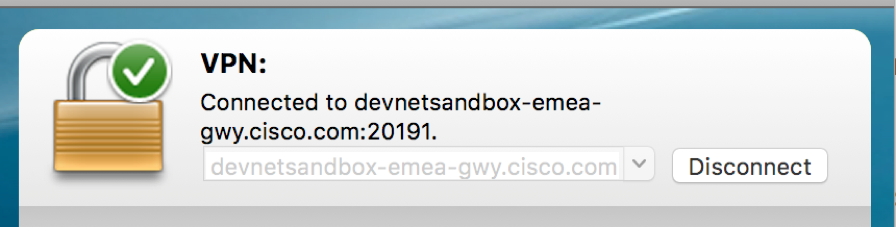
Once reserved, expect an initial email (associated with your login) indicating that your sandbox environment is being set up.
Within about 10 minutes, the entire sandbox environment should be ready and you’ll get another email detailing the Anyconnect server and credential information you need to connect to the same network as the sandbox environment.
These instructions and more are detailed here: Reserving and Connecting to a Devnet Sandbox.
Connect to the Sandbox
Once you’re connected to the Anyconnect server:
You should be able to ping the address: 10.10.20.170 which represents the External NAT address of the virtualization host on which the IOS-XRv9000 instances and the development environment (devbox) are running.
More details can be found at the IOS-XR programmability Sandbox link.
The topology that you will have access to is shown below:
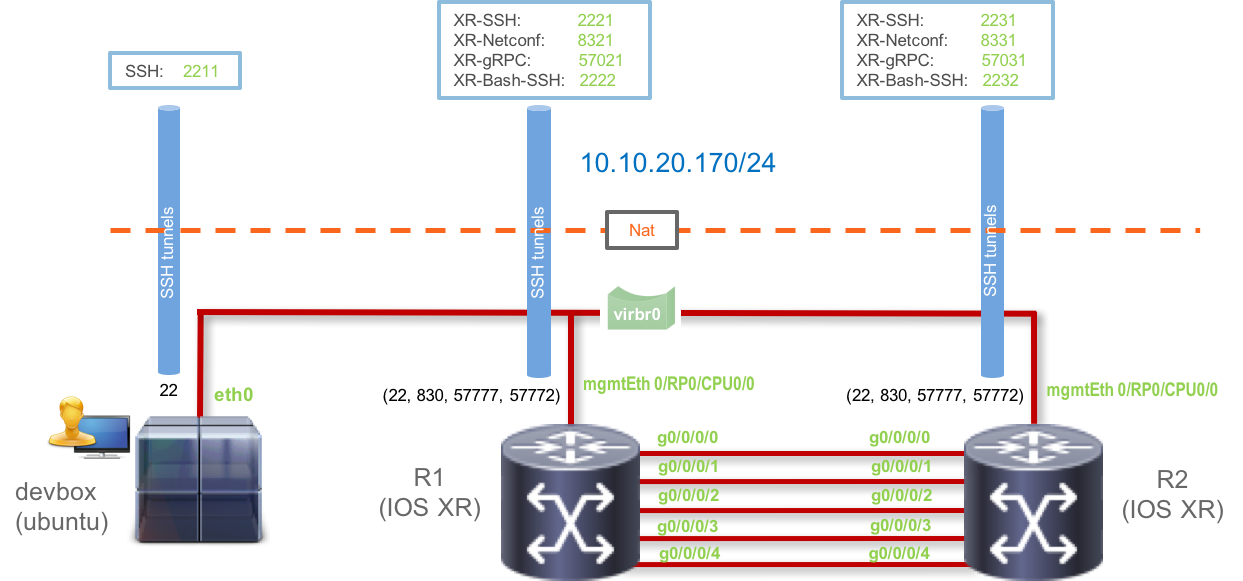
You have SSH access to each of the virtual machines - the two IOS-XRv9000 instances (r1 and r2) and the devbox (an Ubuntu 16.04 instance for access to a development environment).
Further, some special ports (Netconf port: 830, gRPC port: 57777, and XR-Bash-SSH port: 57722) for each of the routers r1 and r2 have been uniquely forwarded to the external NAT IP: 10.10.20.170 as shown in the figure above.
To be clear, the connection details are listed below:
| Developer Box (devbox) | |
|---|---|
| IP | 10.10.20.170 (Post VPN connection) |
| SSH Port | 2211 |
| Username | admin |
| Password | admin |
| IOS-XRv9000 R1 | |
|---|---|
| IP | 10.10.20.170 (Post VPN connection) |
| XR-SSH Port | 2221 |
| NETCONF Port | 8321 |
| gRPC Port | 57021 |
| XR-Bash SSH Port | 2222 |
| Username | admin |
| Password | admin |
| IOS-XRv9000 R2 | |
|---|---|
| IP | 10.10.20.170 (Post VPN connection) |
| XR-SSH Port | 2231 |
| NETCONF Port | 8331 |
| gRPC Port | 57031 |
| XR-Bash SSH Port | 2232 |
| Username | admin |
| Password | admin |
Connect to the nodes in the Topology
To connect to the nodes in the topology, you have 3 options:
Browser Based:
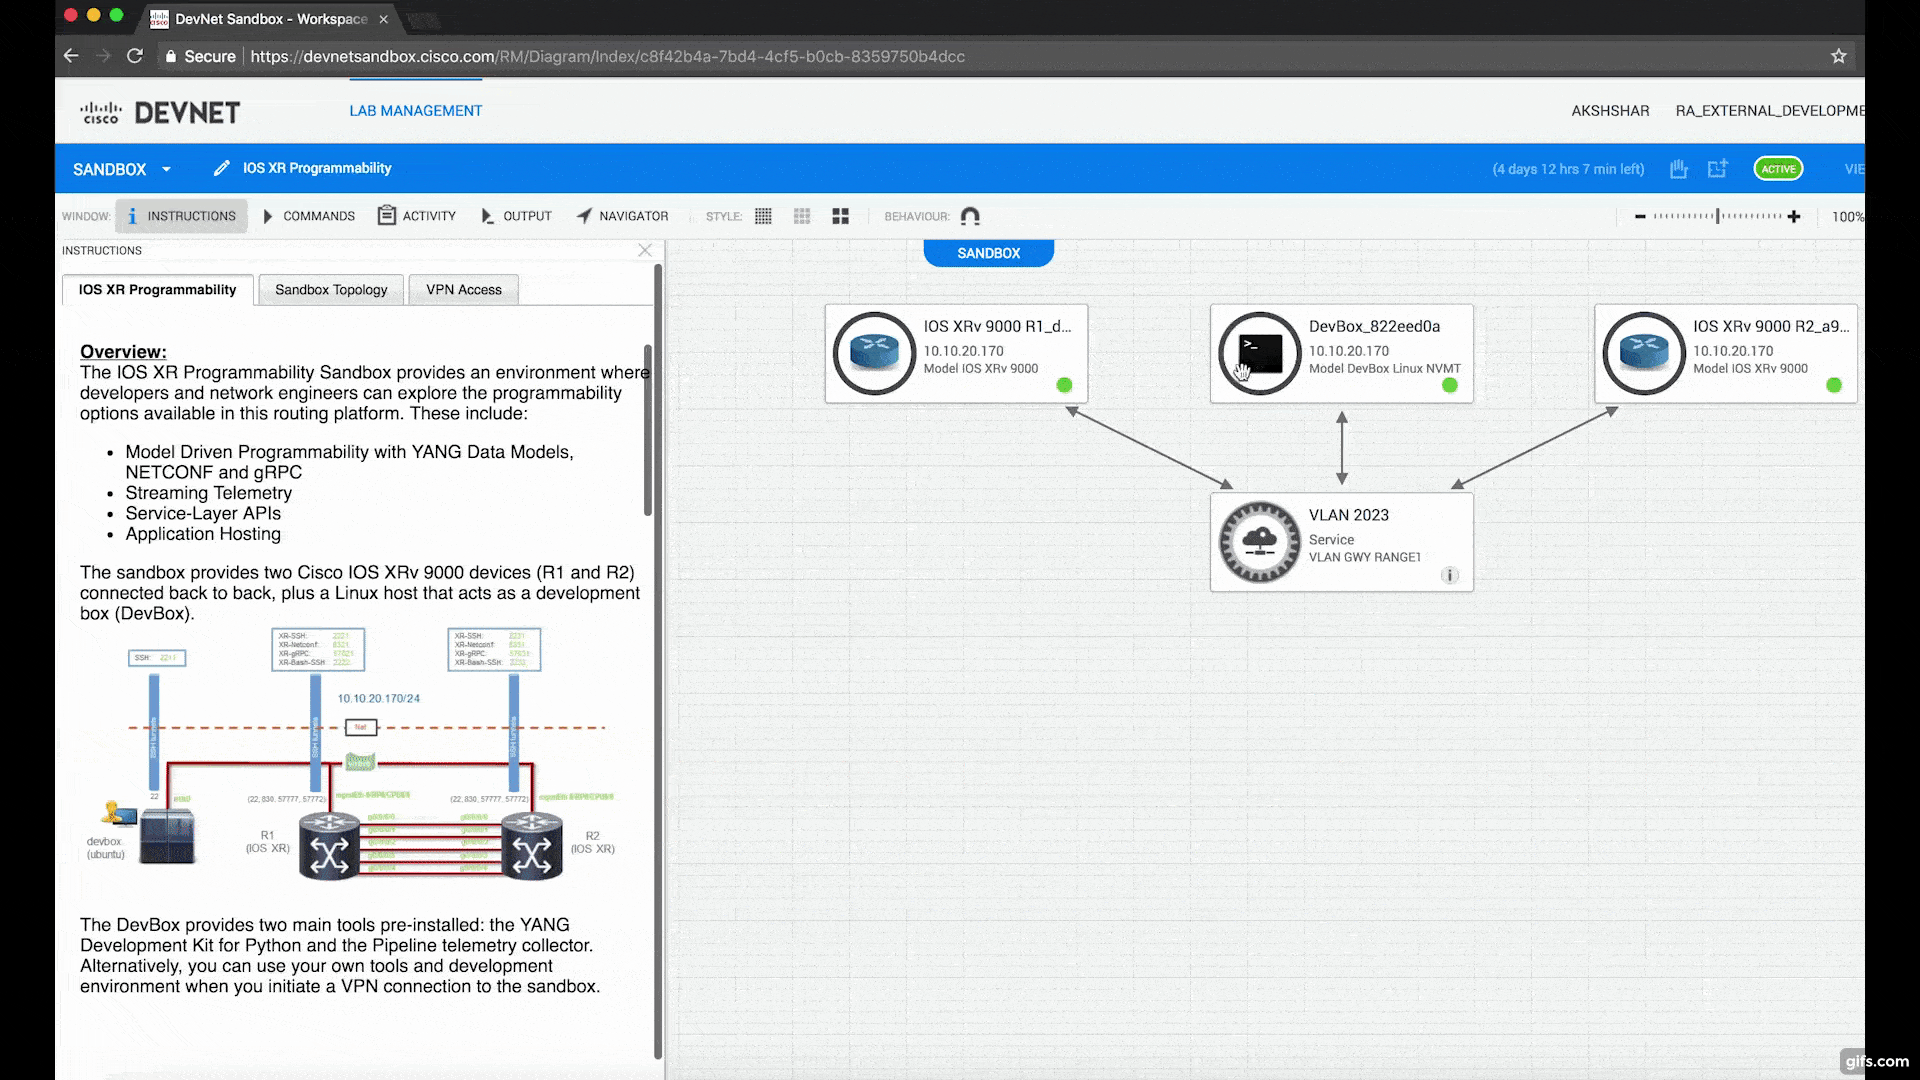
If you don’t have an SSH Client or Terminal available on your Laptop/Machine that you’re using to walk through this lab, then use the UI that Devnet Sandbox provides to connect to the instances within your browser (Chrome or Firefox). Just hover over a node in the topology and hit SSH from the dropdown menu. This is shown below for the devbox:
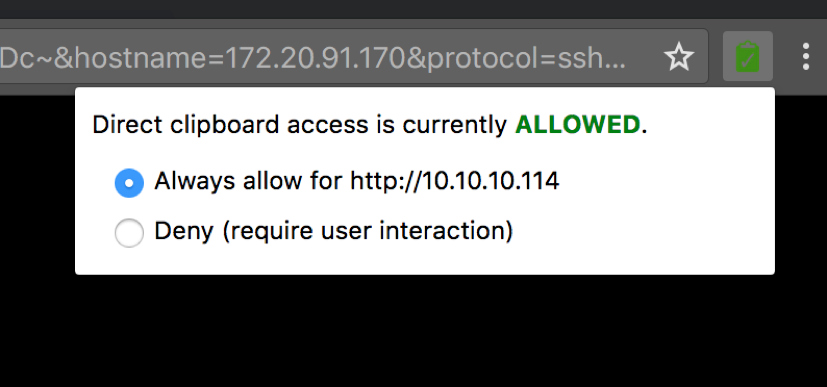
Pro Tip: This browser based session uses Guacamole on the server side to serve up the SSH connection. If you’d like to enable easy copy-paste from your laptop/machine into the session in the browser, then use Chrome as your browser and install the following plugin. Once installed, then within the browser tab that has the SSH session open, enable clipboard copying by clicking the plugin icon on the top right and allowing clipboard permissions for the particular host/IP as shown below:
SSH CLient:
If you have a 3rd party SSH client, use the SSH ports as described in the previous section to connect to the node of your choice. IP address is the same for all the nodes: 10.10.20.170
Terminal:
If you have a Terminal to work with (with an SSH client utility), then to connect to the devbox, run:
Username: admin
Password: admin
SSH port: 2211
Laptop-terminal:$ ssh -p 2211 [email protected]
[email protected]'s password:
Last login: Sat Aug 18 23:12:52 2018 from 192.168.122.1
admin@devbox:~$
admin@devbox:~$
Or to connect to router r1:
Username: admin
Password: admin
SSH port: 2221
Laptop-terminal:$ ssh -p 2221 [email protected]


--------------------------------------------------------------------------
  Router 1 (Cisco IOS XR Sandbox)
--------------------------------------------------------------------------


Password:


RP/0/RP0/CPU0:r1#
RP/0/RP0/CPU0:r1#
RP/0/RP0/CPU0:r1#
RP/0/RP0/CPU0:r1#show version
Sun Aug 19 07:10:06.826 UTC

Cisco IOS XR Software, Version 6.4.1
Copyright (c) 2013-2017 by Cisco Systems, Inc.

Build Information:
 Built By     : nkhai
 Built On     : Wed Mar 28 19:20:20 PDT 2018
 Build Host   : iox-lnx-090
 Workspace    : /auto/srcarchive14/prod/6.4.1/xrv9k/ws
 Version      : 6.4.1
 Location     : /opt/cisco/XR/packages/

cisco IOS-XRv 9000 () processor
System uptime is 1 day, 13 hours, 30 minutes

RP/0/RP0/CPU0:r1#
Perfect! You are now all set to proceed with the rest of this blog.
Understanding App-Hosting on IOS-XR
Post Release 6.0.0, IOS-XR made a jump from a 32-bit QNX operating system to a 64-Bit Linux operating system. This 64-bit Linux environment with a modern Kernel and the ability to run Linux processes and applications from the larger Linux ecosystem enables a whole variety of new use cases.
Breaking down the IOS-XR Software Architecture
The Deployment Architecture of IOS-XR on compatible platforms can be classified into two types:
LXC-Based Deployment
(Contemporary platforms like NCS55xx, NCS5xxx platforms)
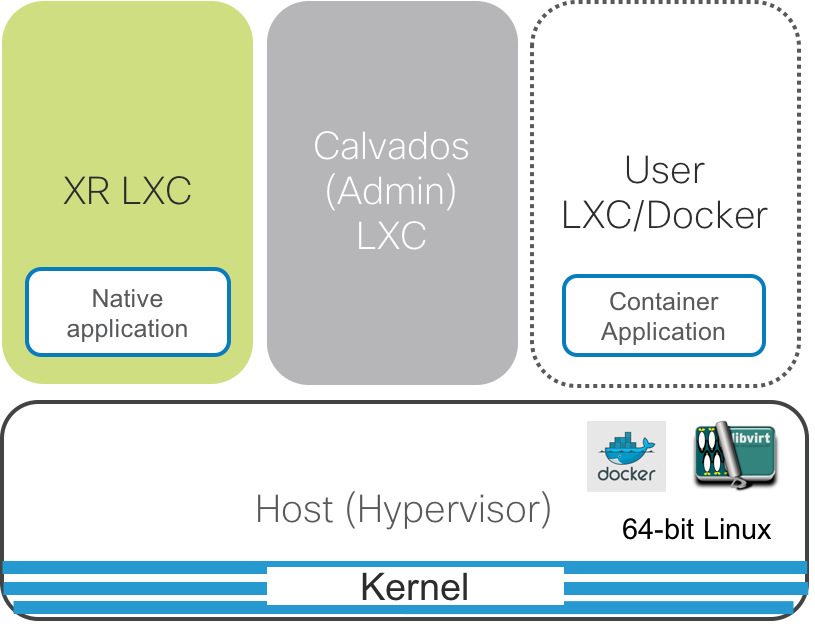
VM-Based Deployment
ASR9xxx platforms
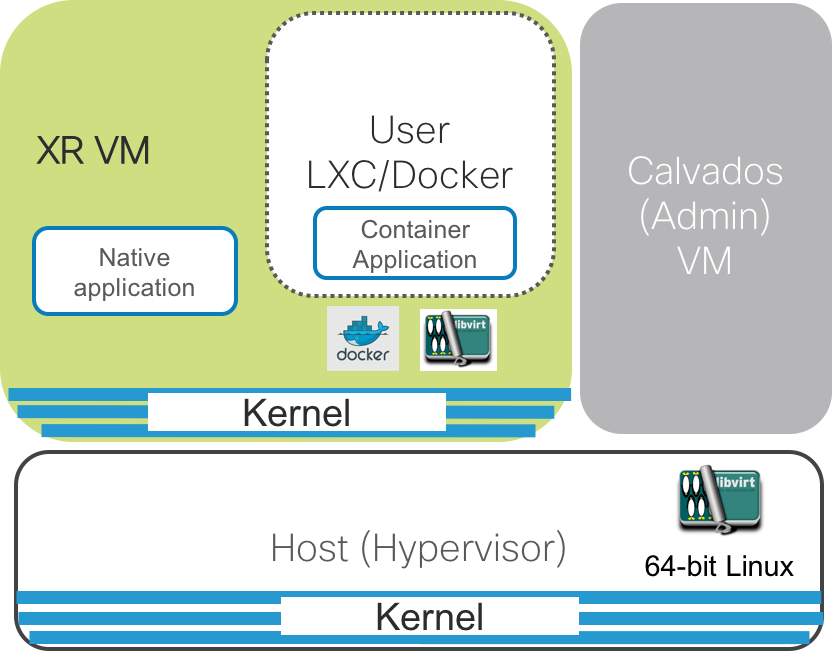
Irrespective of the LXC or VM based architecture, the common components of the architecture are defined below:
Host(Hypervisor): This is the underlying 64-bit Operating system that acts as the hypervisor on top of which the XR LXC/VM and the Admin LXC/VM are spawned. For LXC based platforms, it provides the shared kernel for the system. It also runs the container/VM daemons like libvirt and docker to spawn the XR and Calvados instances or even user spawned LXC/Docker instances (on LXC based platforms).
XR LXC/VM: The IOS-XR control plane processes as shown in green above, run within an isolated LXC (on most contemporary IOS-XR platforms such as the NCS55xx and NCS5xxx platforms) or within an isolated VM (on the ASR9k platform).
This LXC/VM contains all of the IOS-XR control plane processes (Protocol Stacks such as BGP, ISIS, OSPF, Internal Database - SYSDB, APIs etc. ).
For VM-Based platforms, the XR VM brings its own kernel and the runs the libvirt daemon and the docker daemon inside the XR VM. Consequently the User LXC/Docker containers are spawned inside XR VM unlike LXC-Based platforms where the user containers are spawned on the Host kernel.
- Admin LXC/VM: Also called
Calvados, the Admin LXC/VM is the first instance that comes up once the Host layer is up. The Admin LXC/VM then helps handle the lifecycle of the XR LXC/VM. The primary purpose of Calvados was to enable multi-tenancy on the same router by spawning multiple IOS-XR instances that act as logical separate routers (Secure domain routers or SDRs).
For most operations, you will mostly deal with the just the XR LXC/VM on an IOS-XR platform.
Throughout the rest of the lab our focus will be on more contemporary platforms such as NCS55xx and NCS5xxx that are LXC-Based systems.
Types of Linux Applications on IOS-XR
Linux applications supported by IOS-XR can be classified into two types:
Native Applications: An application that runs within the same process space as XR control-plane processes (BGP, OSPF, SYSDB etc.) is considered a native application. In either type of deployment as shown above, the native application runs inside the XR LXC/VM.
There is an obvious red-flag when it comes to native applications that there is no well defined method to constrain the amount of resources (CPU, Memory, Disk) that a native application utilizes on the system.
It is up to the native application itself to police itself in its use of CPU, memory, Disk and other resources on the system.
However, the advantage is the amount of visibility (file system access, XR processes information etc.) that a native application has on the system. This is why most configuration management tool clients (like puppet-client, chef-client, salt-minion are ) end up being native applications. Another example is auditing apps, for example the xr-auditor which actually runs within XR, Admin as well as the Host layer natively:https://xrdocs.io/application-hosting/blogs/2018-05-01-anatomy-of-a-network-app-xr-auditor/
Container applications: Container applications require a container daemon available to launch the container on an available shared kernel on the system. The container daemon could be libvirt (LXCs) or the Docker Daemon(Docker Containers).
As shown in the figures above, the User managed container would be launched on the Host Layer in case of LXC-Based platforms and inside XR VM in case of VM-Based platforms.
The advantage of Container based applications is the resource isolation that is achieved by containerizing the application.
The user is able to pre-allocate the CPU share for the application, maximum memory limits and even launch the container within a pre-allocated mount volume to limit the disk usage of the container.
Further, being able to select a distribution of your choice as the container rootfs significantly eases the requirements on the development of the application - if your application works on Ubuntu:16.04, then simply select Ubuntu:16.04 as the rootfs for the container image/tarball.
The disadvantage of container based applications is the lack of visibility compared to native applications, but owing to the rich RPC based APIs available with IOS-XR there isn’t much that container applications cannot access on the system.
There are several examples of container applications that have built to operate on IOS-XR: a more recent one is when we ran Facebook’s Open/R protocol as a docker application on IOS-XR. You can read more about it here:
Understanding Linux Pkt/IO on IOS-XR
The most important component of the application hosting infrastructure that enables applications to open up TCP/UDP sockets, and send or receive traffic across Management and production data interfaces of IOS-XR is the Pkt/IO infrastructure also commonly known as the KIM-Netstack infrastructure.
The core idea behind the Pkt/IO infrastructure in IOS-XR is to make the linux environment on an IOS-XR system appear identical to a typical Linux box.
Now this would be simpler on a fixed (1RU or 2RU) system without any linecards by leveraging the inherent Linux network stack.
But today, there is no infrastructure available in the Linux ecosystem to manage Distributed systems with multiple linecards.
This is where the IOS-XR network stack excels with its long history of running across fixed systems with no linecards as well as modular systems with multiple linecards.
Knowing this, we implemented the Pkt/IO system such that the Linux kernel network stack on the RP in an IOS-XR platform can piggy-back on the IOS-XR network stack to allow the RP linux environment to have access to all the interfaces and packet paths on the distributed system for free, without any additional investment on the Linux kernel network stack.
The way we accomplish this is shown through the series of images below.
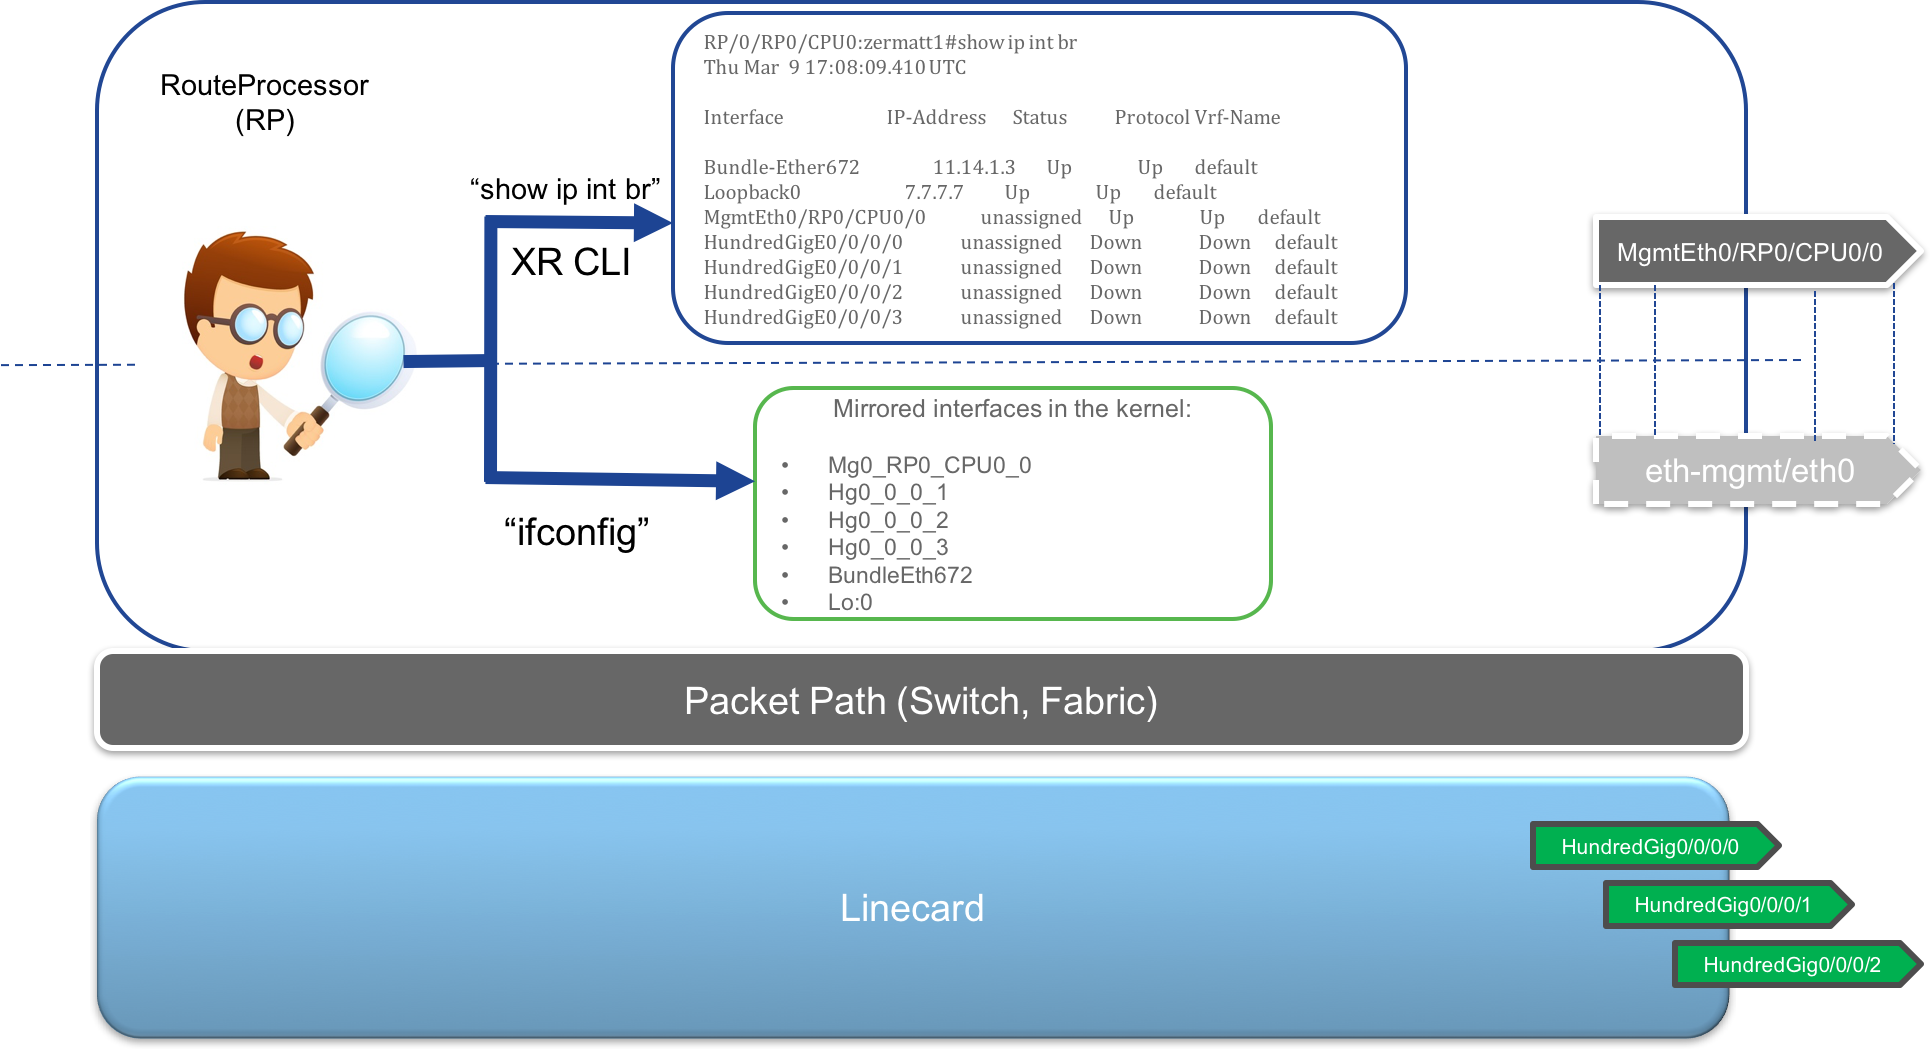
Even though a distributed modular chassis consists of 1 or 2 RPs and multiple Linecards, each of which runs a Linux kernel and a Linux userspace environment on its own, a network operator or any end user typically has access only to the active RP of the system where all the interaction interfaces (CLI, APIs, SSH, Telnet) are available.
So it makes sense to have a system that mimics a fixed (pizza-box) system for the Active RP’s Linux kernel even on a distributed modular chassis. This way a Linux application running on the Active RP’s linux environment will assume that it is on a fixed Linux box with all the (actually distributed) Linecard interfaces connected locally.
Expose Interfaces to the RP kernel:
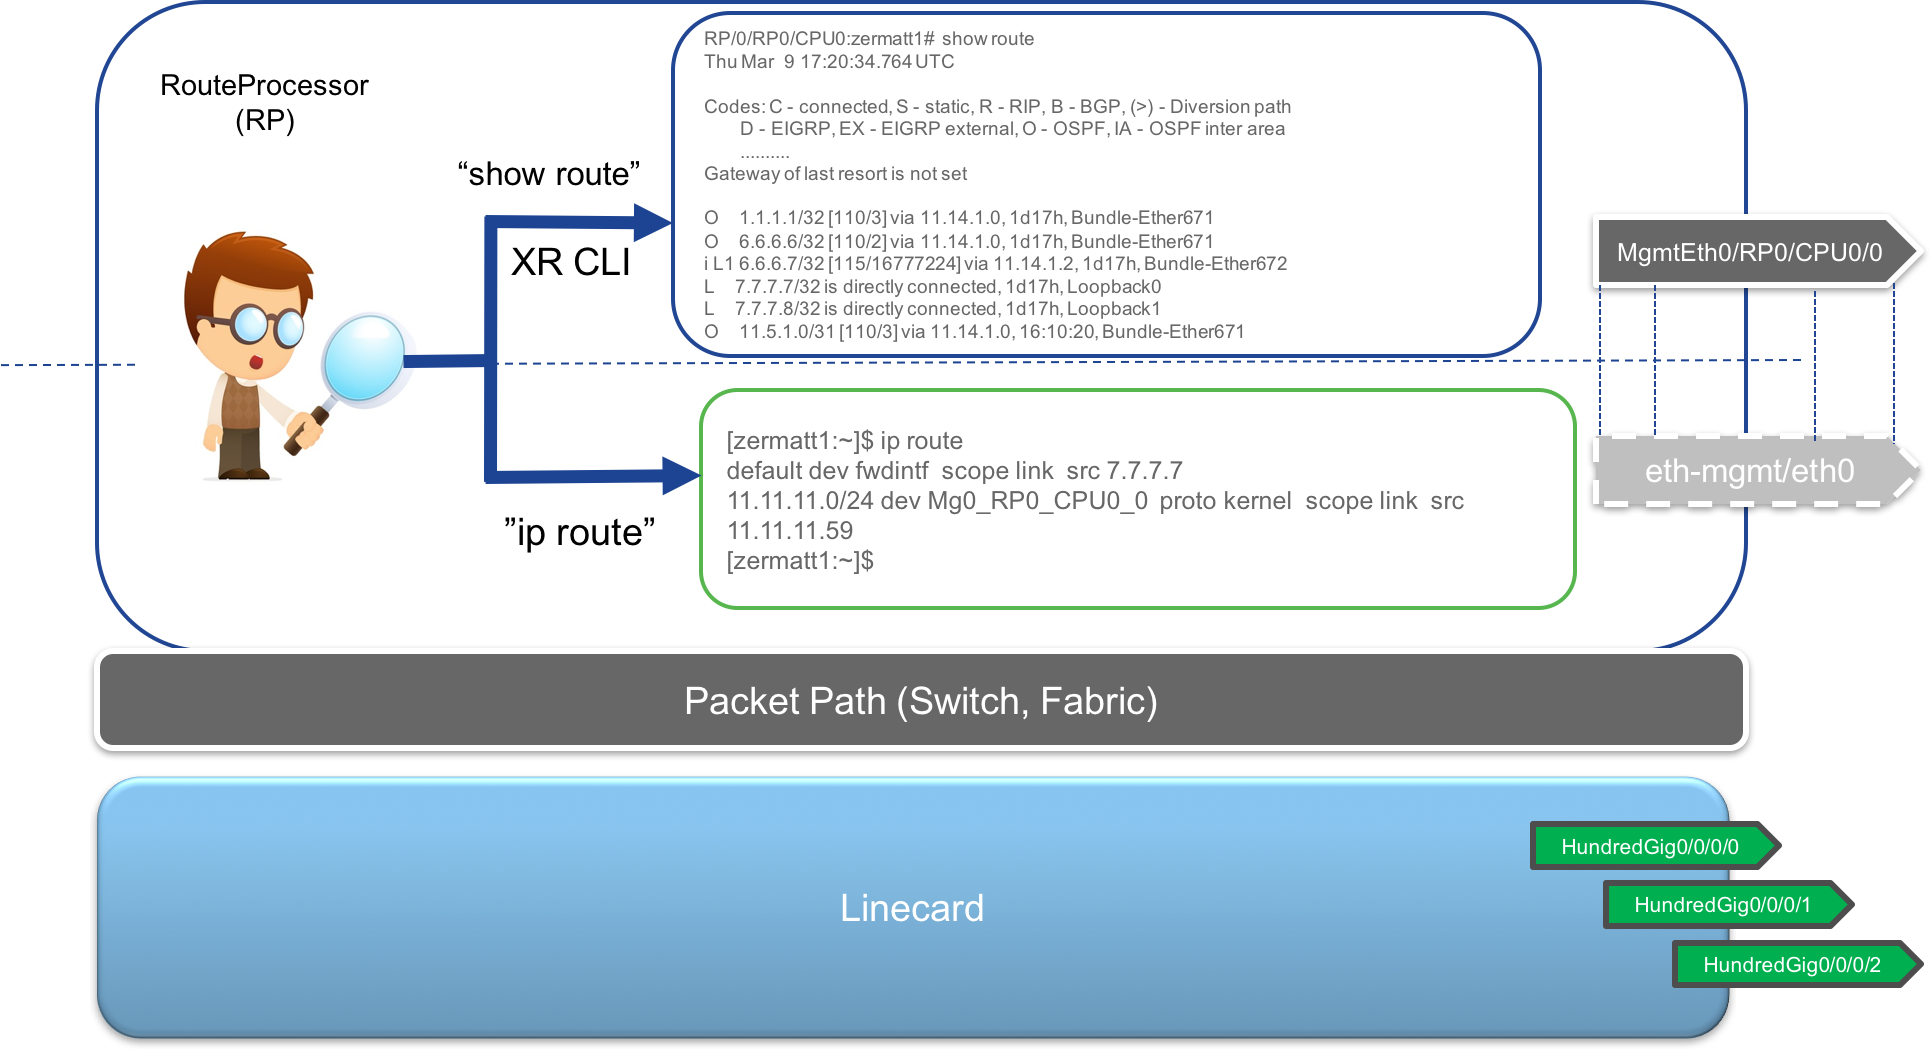
As shown below, all of the interfaces that you typically see in the
show ipv4 interface briefcommand are mirrored into the RP’s Linux kernel. The difference in the Name is that only a shorter form of the name is selected (HundredGigbecomesHg,GigabitEthernetbecomesGi) and the numbering is preserved with/replaced with_. So for exampleHundredGig0/0/0/0becomesHg0_0_0_0in the Active RP’s kernel.All L3 interfaces (Physical interfaces, L3 Subinterfaces, Bundle Interfaces and Loopback interfaces) are supported and synced into the kernel. While physical interfaces are always created in the kernel (can be checked with
ifconfig -a, all other interfaces will only appear in the kernel if they haveupand have an ip address configured on them).Support for routed BVI interfaces (routable virtual interfaces in an integrated Routing and Bridging (IRB) setup) was brought in with IOS-XR Release 6.3.1. This implies one can configure Layer-2 Subinterfaces, place them in a bridge-domain configuration and configure ip addresses on a routable BVI interface in the same bridge domain and the BVI interface will be synced into the kernel. Of course, like other virtual interfaces, an ip address configuration on the BVI interface is necessary for the kernel sync.
Routes in the kernel: This was a decision with multiple implications. One way to solve the problem is to sync all routes from the IOS-XR RIB into the Active RP’s kernel. This is possible but would be highly resource intensive to have two parallel RIBs on the system (one in IOS-XR, and the other in the kernel on the same node - RP), especially if the Router is being utilized to download internet Routing tables over BGP.
So, in order to save resources, we program only 3 potential routes into the kernel:
- Default route: The default route is used to handover the packets from the RP’s kernel to IOS-XR so that the lookup for the packet is done by the IOS-XR stack. There are two potential nexthop interfaces that the
defaultroute might point to:
fwdintf: This is the default forwarding port to send packets from the RP over the fabric to the Linecards with the required platform headers to classify the packets as
tpapackets (short for third party app). This interface has no ip address on it. So the packets exiting this interface cannot have their routing decision (outgoing linecard, interface, nexthop etc.) taken on the RP itself.In this situation, the lookup for the packet’s destination happens on the designated Linecard (every modular chassis has a designated linecard, used for packets for which the routing is not complete.). The designated Linecard then does a FIB lookup for the packet, sends the packet back over the fabric to the correct Linecard where it can finally exit the box.
fwd_ew: This interface is also called the
netiointerface and its job is send the packet to the slow packet path and force IOS-XR software running on the Active RP to do a routing lookup before sending the packet out. This nexthop interface is used when packets need to be sent over the Mgmt port on the RP.Another use case where this interface may be used is when a Linux process running in the RP’s kernel network stack needs to communicate with a process running in the IOS-XR network stack. We call this
east-westcommunication and hence the namefwd_ewfor the interface. This interface too does not have an IP address and the Pkt/IO infrastructure opens up a raw socket on the interface to absorb traffic going out of it.
So, irrespective of the nexthop interface for the default route, there MUST be a route to the required destination in IOS-XR RIB, since the final lookup (whether on RP or LC) will utilize the IOS-XR RIB/FIB routes.
- Local Management Subnet: This is obvious. The Management port is local to the RP, hence the Management port subnet is programmed into the kernel by default. This implies that irrespective of the
defaultroute in the kernel, you will always have reachability from the kernel to destinations on the Management LAN.
- Default route: The default route is used to handover the packets from the RP’s kernel to IOS-XR so that the lookup for the packet is done by the IOS-XR stack. There are two potential nexthop interfaces that the
These routes are shown in the figure below, with the example showcasing a default route through fwdintf.
These routes are controlled through the tpa configuration CLI in IOS-XR:
      !
      tpa
      !
       vrf default
         !
         address-family ipv4
           default-route mgmt
           update-source MgmtEth0/RP0/CPU0/0
         !
         address-family ipv6
           default-route mgmt
           update-source MgmtEth0/RP0/CPU0/0
         !
       !
     !
Where:
vrf <>defines the vrf (and hence the network namespace in the kernel) for which the route configurations are valid.address-family <>determine the address family within the vrf/netns for which the route configurations are valid.default-route mgmt: This is a “Flag” CLI. Its presence forces thedefaultroute in kernel to usefwd_ewas the nexthop interface and thereby cause lookups to happen on RP through the slow packet path for application traffic originating from the Kernel. Its absence will change the default route to point tofwdintfinterface instead.update-source <>: This CLI is used to set thesrc-hintfield in the linux route. Remember that Linux requires the outgoing interface to have an IP address to determine the source IP to be used for the packet destined to a particular destination in case the application does not set the source IP itself and depends on the kernel to do so. Since bothfwd_ewandfwdintfare interfaces without any IP address, a src-hint must be set to ensure correct source-IP being set on the outgoing packet.
If we apply the above configuration on an IOS-XR router (Release 6.3.1+), the routes in the kernel end up being:
  [r1:~]$ ip route
  default dev fwd_ew  scope link  src 192.168.122.21
  192.168.122.0/24 dev Mg0_RP0_CPU0_0  scope link  src 192.168.122.21
  [r1:~]$
where 192.168.122.21 was the IP address of the MgmtEth0/RP0/CPU0/0 interface that got configured as src-hint because of the update-source CLI under tpa.
Network Namespace: If a vrf (complete BGP vrf or just vrf-lite) is configured in IOS-XR CLI and the same vrf (same name) is configured under the
tpaconfiguration, then a corresponding network namespace is allocated in the kernel with the same name as the VRF.
This is very useful when trying to isolate your applications into separate VRFs and running across specific interfaces.If a vrf is mapped to a network namespace of the same name using the tpa CLI then Interfaces configured under the vrf in XR CLI will automatically be isolated into the corresponding namespace in the RP’s kernel.
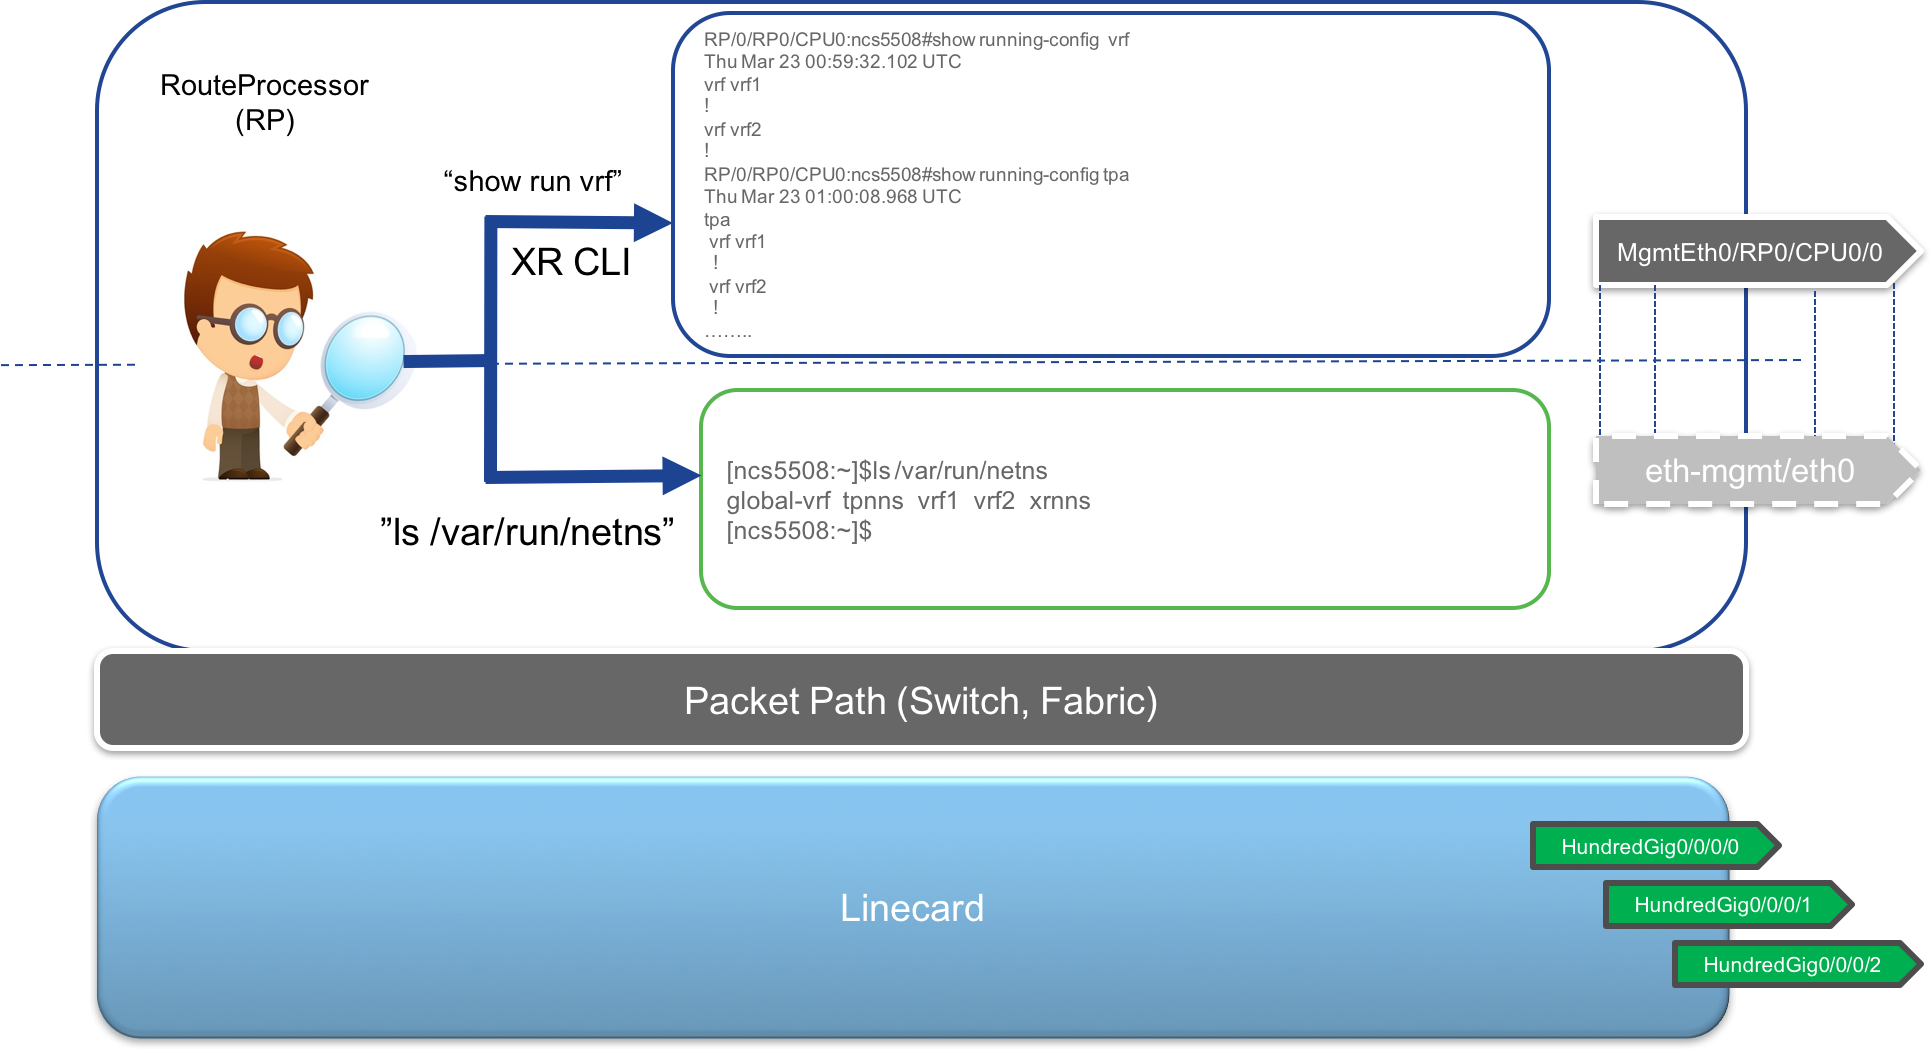
Let’s try this out on route
r2in the sandbox:Username: admin
Password: admin
SSH port: 2231Laptop-terminal:$ ssh -p 2231 [email protected] -------------------------------------------------------------------------- Router 2 (Cisco IOS XR Sandbox) -------------------------------------------------------------------------- Password: RP/0/RP0/CPU0:r2# RP/0/RP0/CPU0:r2#Initially, the interface
GigabitEthernet0/0/0/2on routerr2is shutdown and is by default in theglobal-vrfnetwork namespace which corrsponds to vrfdefaultin IOS-XR.RP/0/RP0/CPU0:r2#show running-config int gigabitEthernet 0/0/0/2 Mon Sep 10 05:13:15.645 UTC interface GigabitEthernet0/0/0/2 shutdown !Check that this interface is visible in the
global-vrfnetns. We useifconfig -ainstead of justifconfigsince the interface is currently shutdown. We use thenetns_identifyutility in XR bash with the$$argument (represents the process ID of the current XR bash shell) to determine the netns we are dropped into when we issue thebashCLI in XR:RP/0/RP0/CPU0:r2# RP/0/RP0/CPU0:r2#conf t Mon Sep 10 05:13:23.081 UTC RP/0/RP0/CPU0:r2(config)# RP/0/RP0/CPU0:r2# RP/0/RP0/CPU0:r2# RP/0/RP0/CPU0:r2#bash Mon Sep 10 05:13:30.038 UTC [r2:~]$ [r2:~]$ netns_identify $$ tpnns global-vrf [r2:~]$ [r2:~]$ ifconfig -a Gi0_0_0_2 Gi0_0_0_2 Link encap:Ethernet HWaddr 52:54:00:93:8a:b2 [NO FLAGS] MTU:1514 Metric:1 RX packets:0 errors:0 dropped:0 overruns:0 frame:0 TX packets:0 errors:0 dropped:0 overruns:0 carrier:0 collisions:0 txqueuelen:1000 RX bytes:0 (0.0 B) TX bytes:0 (0.0 B) [r2:~]$Next, configure
vrf blueat the global configuration level as well as undertpato ensure that the netns calledbluegets created in the kernel:
  RP/0/RP0/CPU0:r2#conf t
  Mon Sep 10 05:14:16.867 UTC
  RP/0/RP0/CPU0:r2(config)#vrf blue
  RP/0/RP0/CPU0:r2(config-vrf)#tpa
  RP/0/RP0/CPU0:r2(config-tpa)#vrf blue
  RP/0/RP0/CPU0:r2(config-tpa-vrf)#exit
  RP/0/RP0/CPU0:r2(config-tpa)#
  RP/0/RP0/CPU0:r2(config-tpa)#
  RP/0/RP0/CPU0:r2(config-tpa)#commit
  RP/0/RP0/CPU0:r2(config)#
  RP/0/RP0/CPU0:r2#
  RP/0/RP0/CPU0:r2#bash
  Mon Sep 10 05:14:39.438 UTC
  [r2:~]$ ls /var/run/netns
  blue  global-vrf  tpnns  xrnns
  [r2:~]$
Perfect! Now configure interface GigabitEthernet0/0/0/2 under vrf blue to trigger its migration in the kernel netns as well:
  RP/0/RP0/CPU0:r2#
  RP/0/RP0/CPU0:r2#
  RP/0/RP0/CPU0:r2#conf t
  Mon Sep 10 05:14:54.079 UTC
  RP/0/RP0/CPU0:r2(config)#interface gigabitEthernet 0/0/0/2
  RP/0/RP0/CPU0:r2(config-if)#no shutdown
  RP/0/RP0/CPU0:r2(config-if)#ip addr 101.1.1.20/24
  RP/0/RP0/CPU0:r2(config-if)#vrf blue
  RP/0/RP0/CPU0:r2(config-if)#commit
  Mon Sep 10 05:15:15.502 UTC
  RP/0/RP0/CPU0:r2(config-if)#
  RP/0/RP0/CPU0:r2#
Drop into bash and check if Gi0_0_0_2 is still present in global-vrf netns:
  RP/0/RP0/CPU0:r2#bash
  Mon Sep 10 05:15:19.643 UTC
  [r2:~]$
  [r2:~]$
  [r2:~]$ ifconfig -a Gi0_0_0_2
  Gi0_0_0_2: error fetching interface information: Device not found
  [r2:~]$
Nope! now let’s drop into netns blue and check the same:
  [r2:~]$ ip netns exec blue bash
  [r2:~]$
  [r2:~]$ source /etc/init.d/operns-functions
  [r2:~]$ netns_identify $$
  blue
  [r2:~]$
  [r2:~]$ ifconfig -a Gi0_0_0_2
  Gi0_0_0_2 Link encap:Ethernet  HWaddr 52:54:00:93:8a:b2
            inet addr:101.1.1.20  Mask:255.255.255.0
            inet6 addr: fe80::5054:ff:fe93:8ab2/64 Scope:Link
            UP RUNNING NOARP MULTICAST  MTU:1500  Metric:1
            RX packets:0 errors:0 dropped:0 overruns:0 frame:0
            TX packets:0 errors:0 dropped:0 overruns:0 carrier:0
            collisions:0 txqueuelen:1000
            RX bytes:0 (0.0 B)  TX bytes:0 (0.0 B)

  [r2:~]$
Exactly what we expected. The interface Gi0_0_0_2 has now migrated to netns blue.
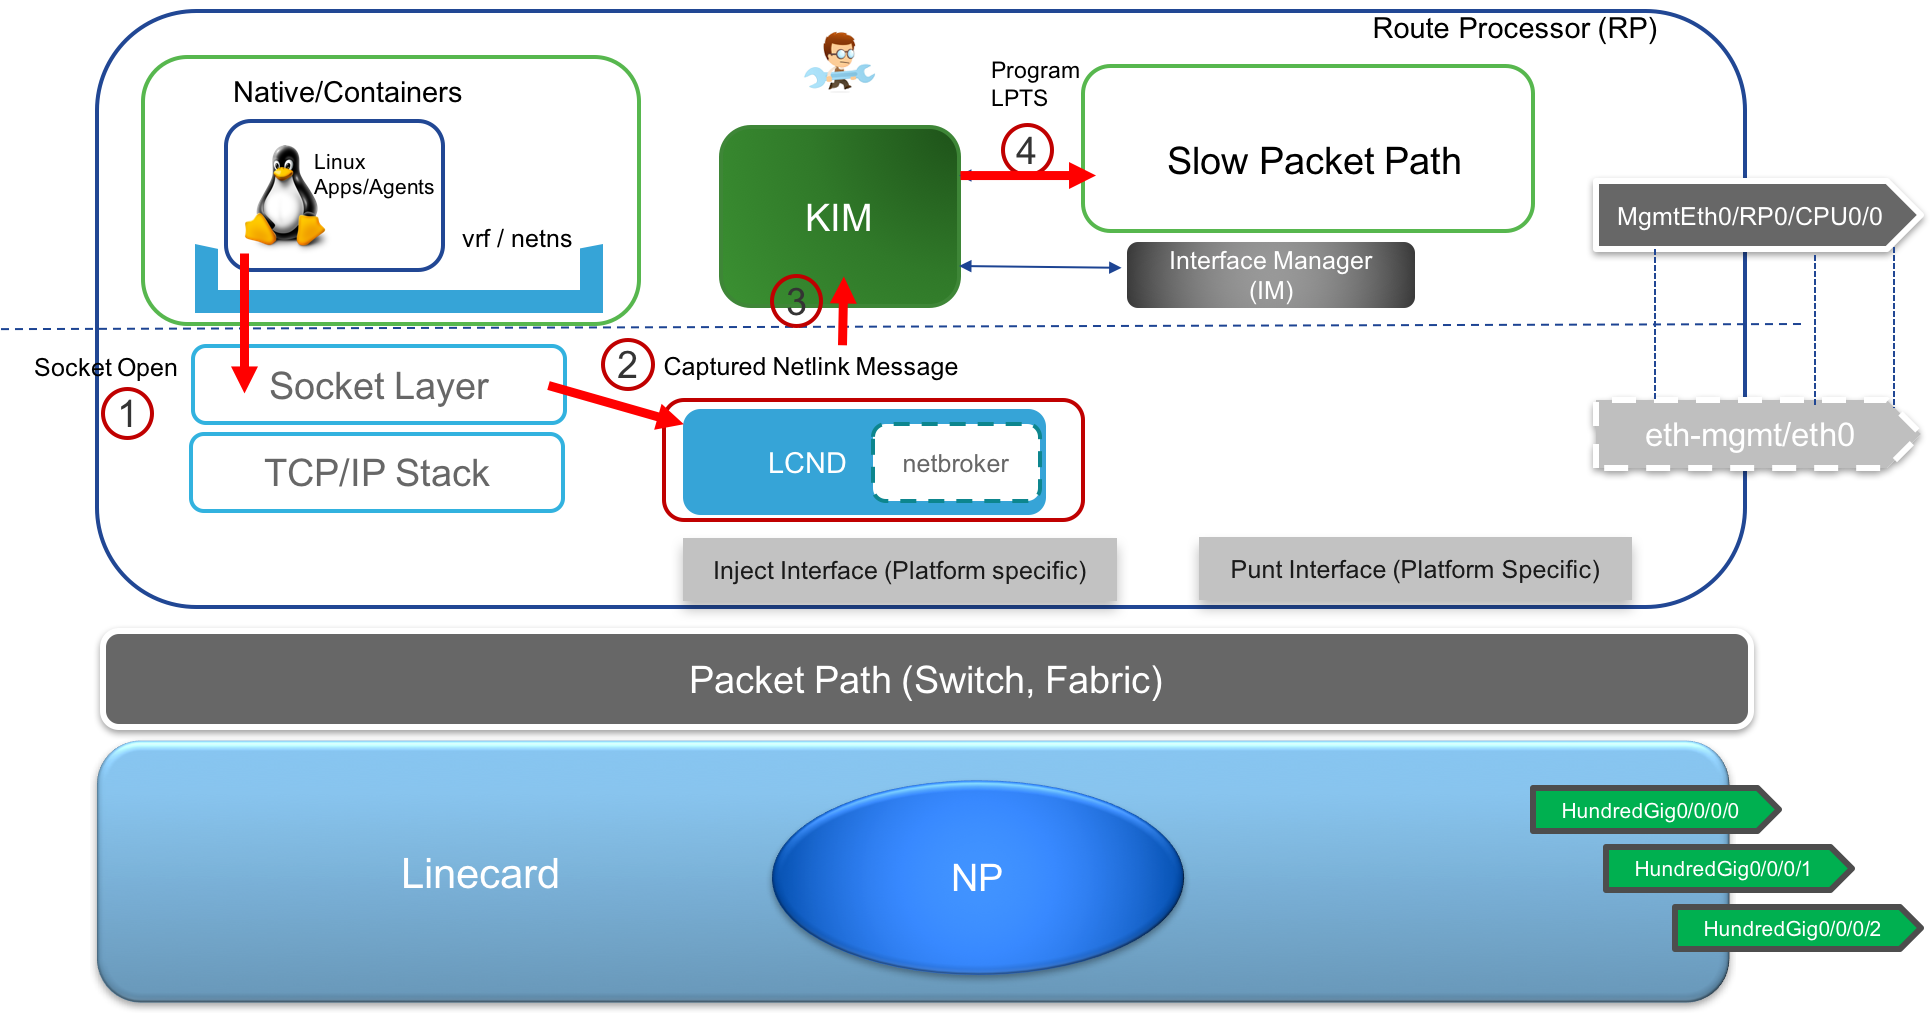
KIM (kernel Interface Module) The KIM module is an important part of the current IOS-XR architecture. It is an XR process that serves as an interface to Kernel (hence the name) and is used to trigger route creation, interface creation, vrf creation in the kernel in response to variable set of inputs: User configured CLI (under
tpa), Interface events from the interface manager and even RIB events for static routes through the Management port that are automatically synced into the kernel. KIM also handles the programming of LPTS (local packet transport services) in XR in response to netlink events that apps use to open sockets (TCP/UDP) in the kernel.Interface Sync: As shown below, KIM utilizes interface manager events (shut/no-shut) to trigger a kernel module called LCND to create/delete/migrate mirrored interfaces corresponding to all the RP and LC interfaces in the kernel.

Route Sync: Similarly, as shown below, KIM will accept the
tpaCLI as described earlier to determine the default routes, src-hints, next-hop interface etc. and program the kernel to reflect the requirement. It also works with RIB events to configure static routes with the Mgmt port as the next hop into the kernel (since the Mgmt port is local to the RP).
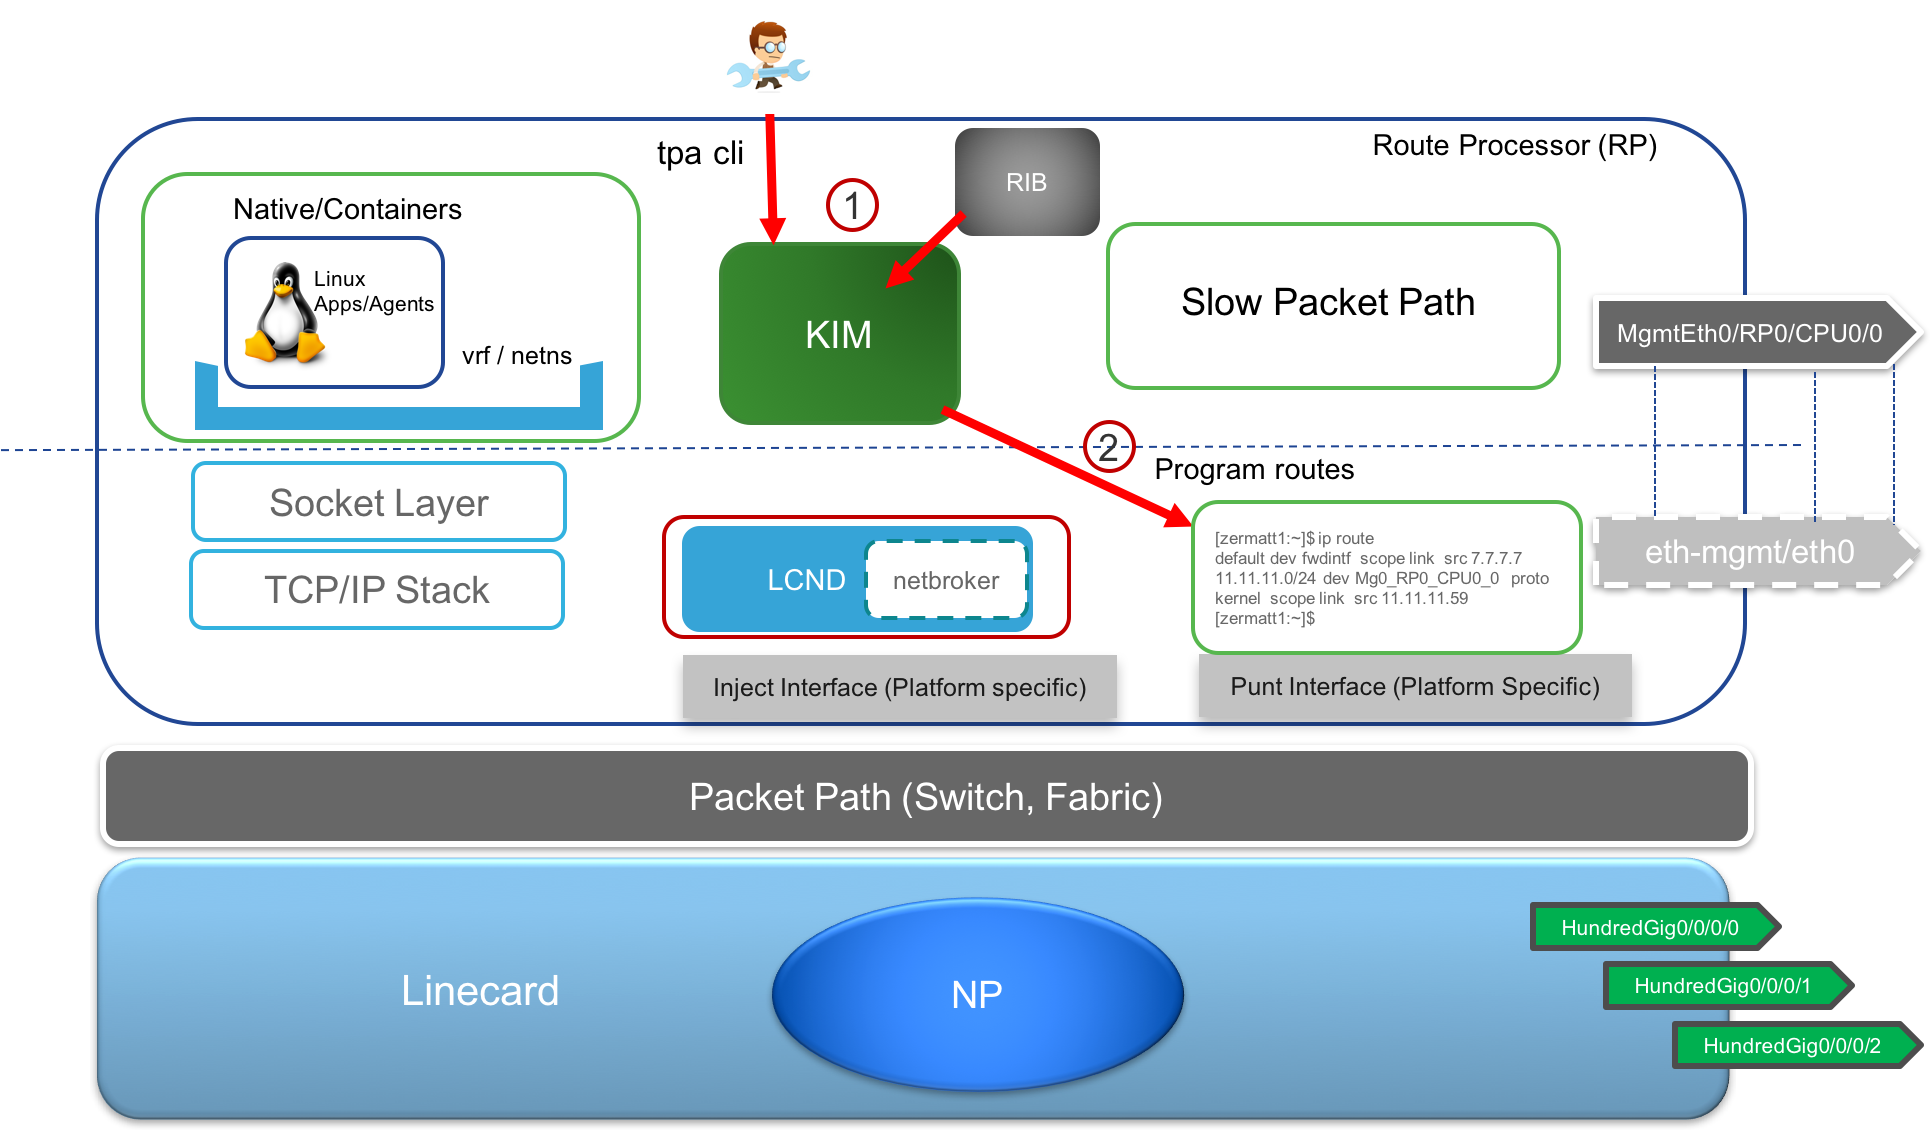
- TCP/UDP socket sync: When applications running (either natively or inside containers) attempt to open up TCP/UDP sockets, then it is essential for the IOS-XR LPTS framework (which is a distributed database of ports open on the system and exists across the RP and LCs) to be programmed to reflect these open ports so that any received packets can be subject to an LPTS lookup by an LC or RP and correctly forward the incoming traffic to the application opening up the socket.
For this purpose, the netlink messages generated by the application when it tries to open sockets (TCP/UDP) in the kernel are captured by a kernel module and the events are forwarded to KIM, which in turn programs LPTS to reflect the newly opened sockets. A similar process also happens when the application closes the socket causing KIM to remove the entry from LPTS.
Traffic flow for Linux/Application Traffic: Let’s take a quick look at how the traffic flow and lookups happen for application traffic with the Pkt/IO infrastructure in place for some unique scenarios:
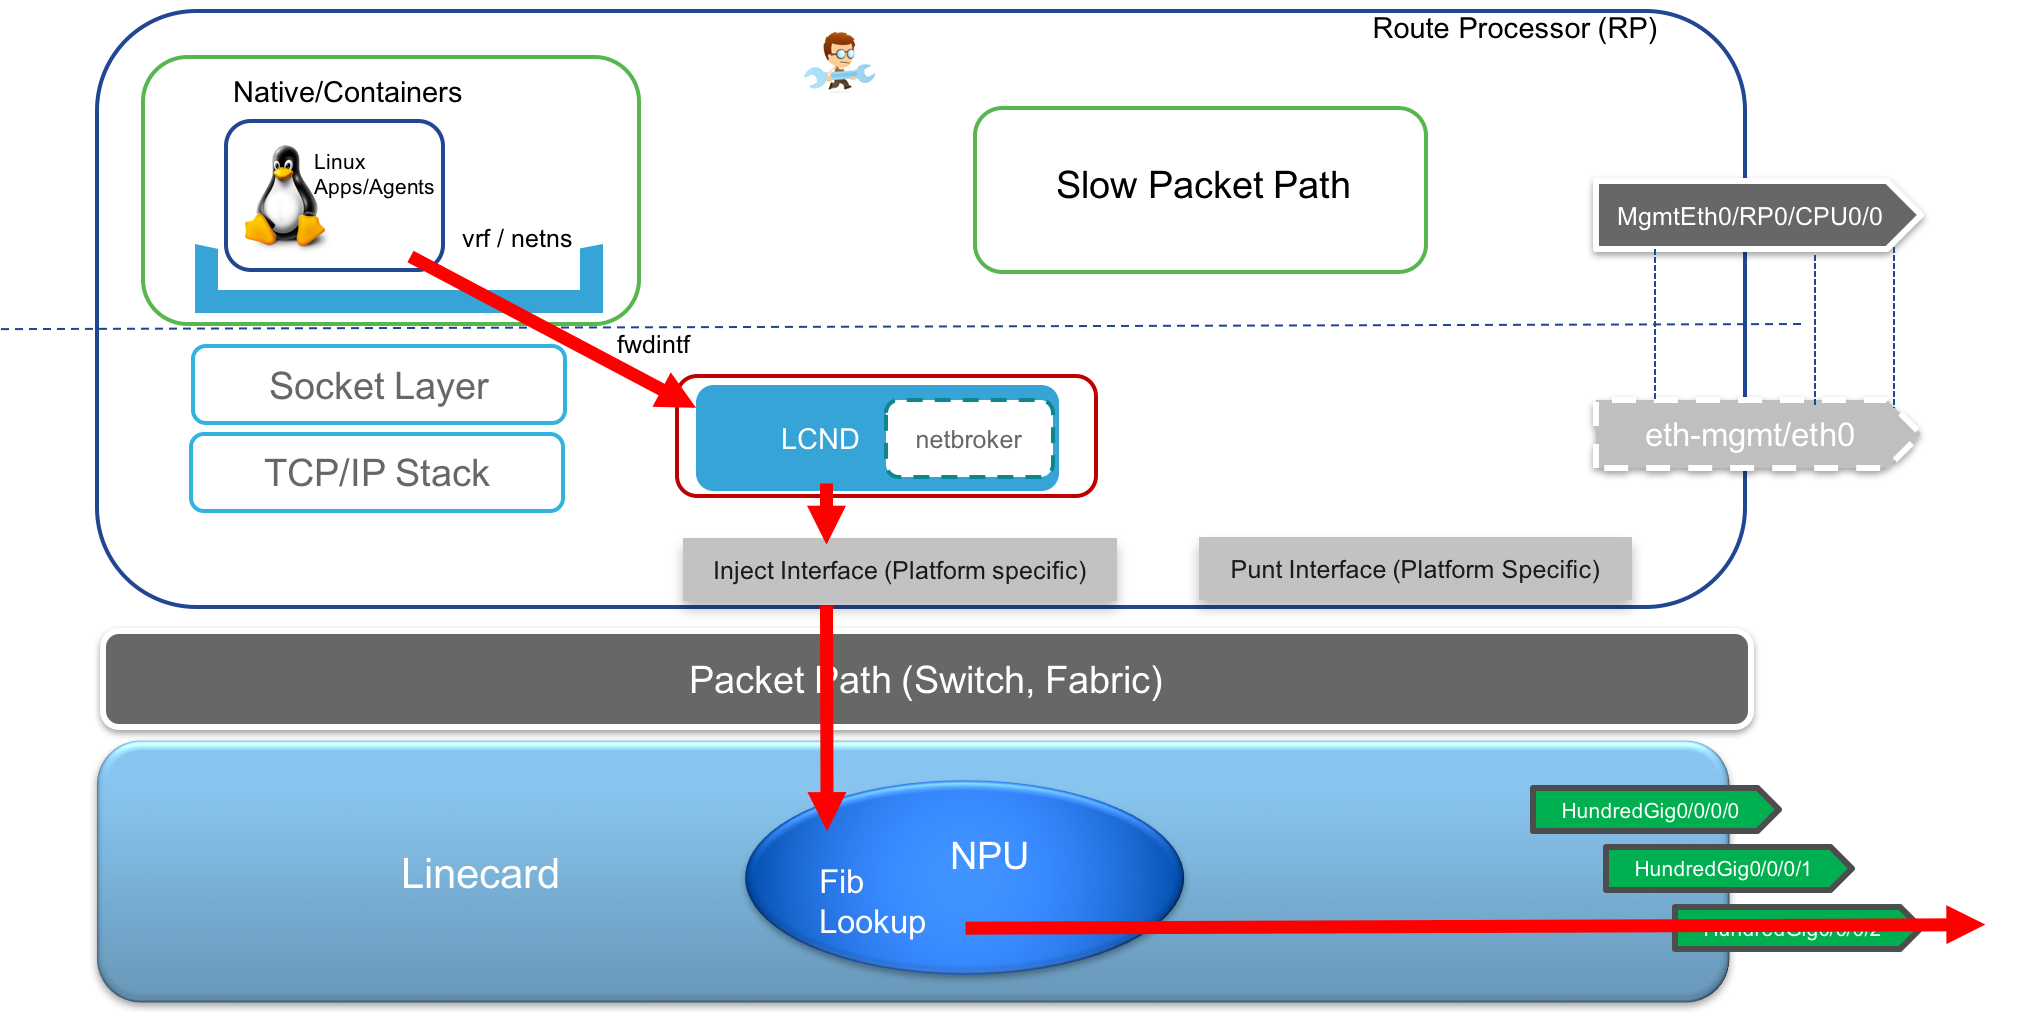
- Transmit TCP/UDP traffic over Data ports: In this scenario, typically, the
defaultroute is set up to point tofwdintfas the next hop interface. The packet generated from the userspace process/application, exitsfwdintf, is captured by a kernel module listening on a raw socket onfwdintfand the packet is then injected into the fabric towards the designated Linecard.
The Designated linecard then does a FIB lookup, determines if it can directly send it out of the interface on the same linecard, else it sends it back over the fabric to the correct linecard based on the FIB lookup result.
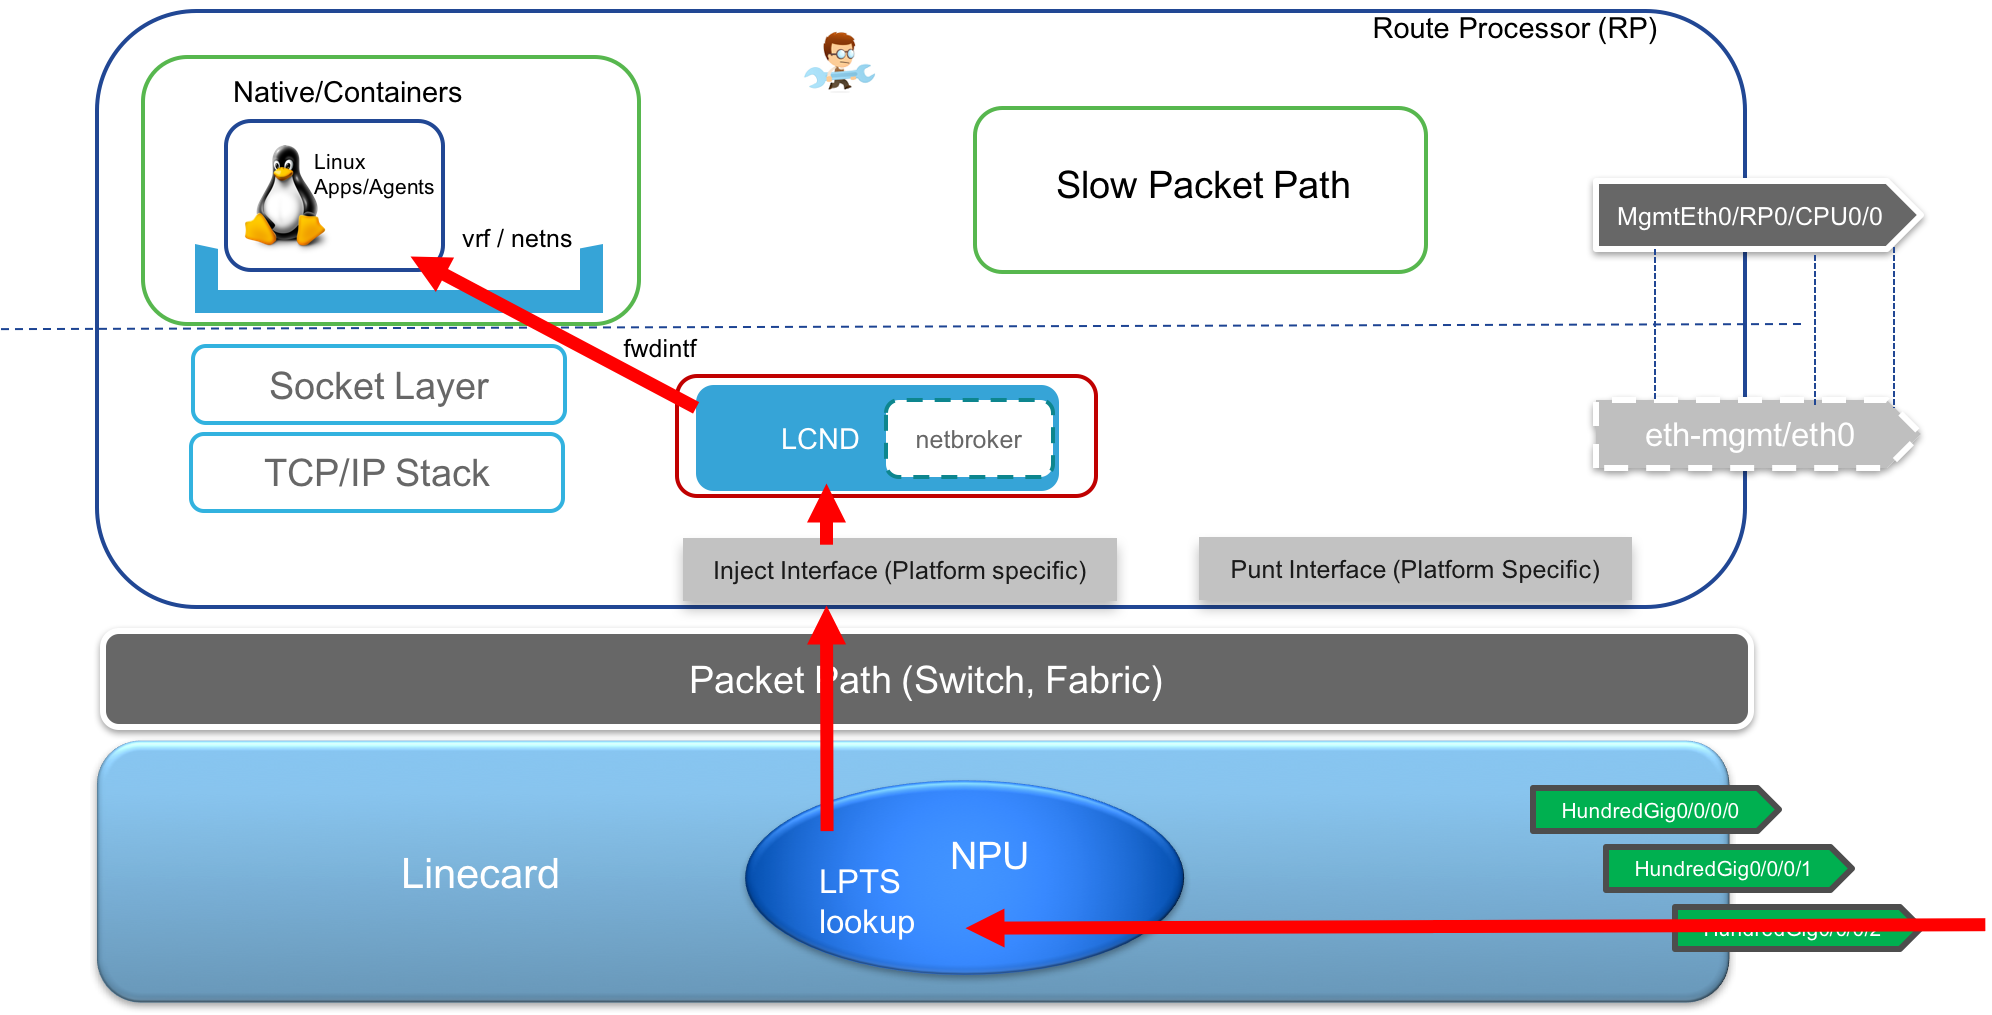
- Receive TCP/UDP traffic over Data port: Here the packets arrive over the data port into the Linecard where an LPTS lookup takes place. Thanks to KIM which populates the LPTS entries based on TCP/UDP sockets opened by applications on the RP, the packets are then forwarded over the fabric towards the RP kernel and given to the application that opened up the matching socket.
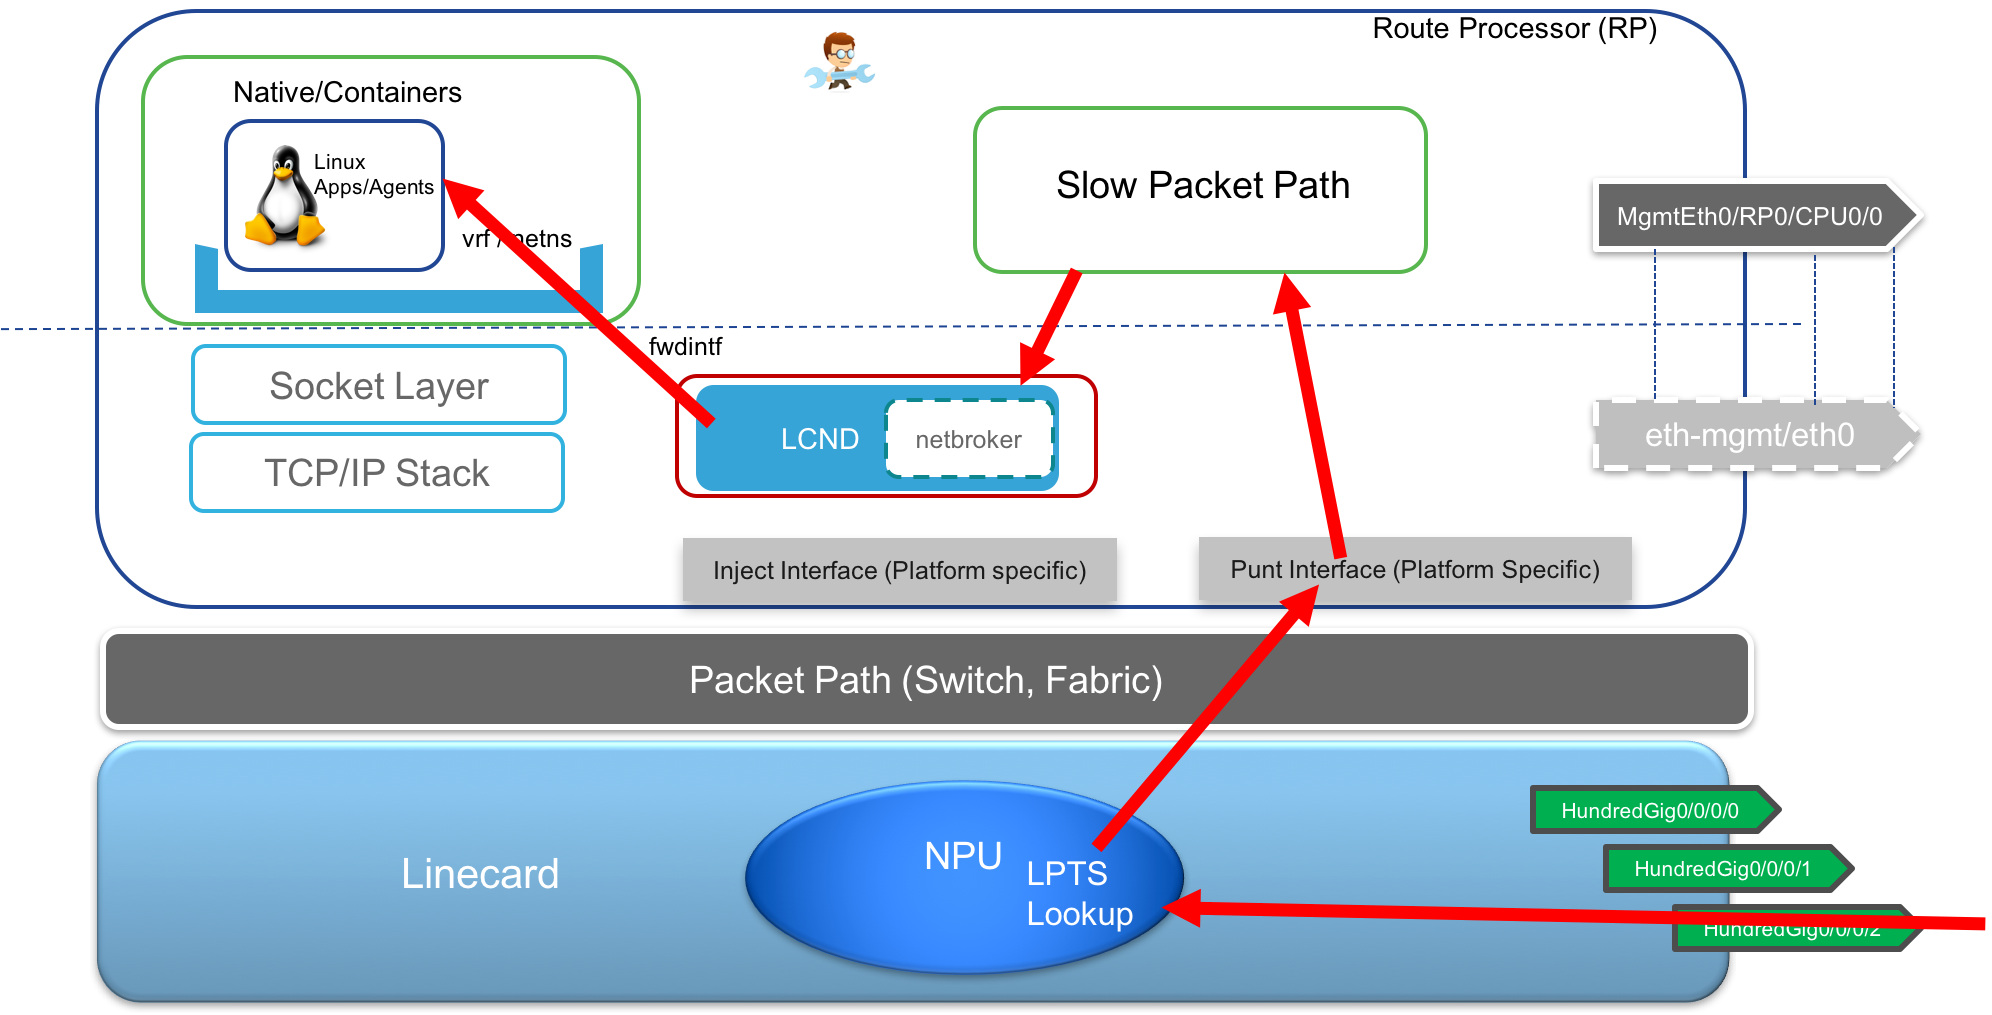
- Receive Exception Traffic(ping) Any traffic received that does not contain a layer 4 header specifying a TCP/UDP port is treated as exception traffic since it will not match any entry during LPTS lookup (which only handles TCP/UDP sockets). For such a packet, there will be a punt towards the RP’s slow packet path where a software lookup will happen and the packet will be forwarded to the kernel as well as XR (replication). This is how a ping initiated in the Linux kernel of the RP will be able to receive a reply back.
- Management traffic Transmit/Receive: This is fairly straightforward. All the traffic transmitted and received via the Local Management port on the RP is handled by the slow packet path as shown below.
Transmit Traffic through Mgmt Port:

Receive Traffic via Mgmt Port: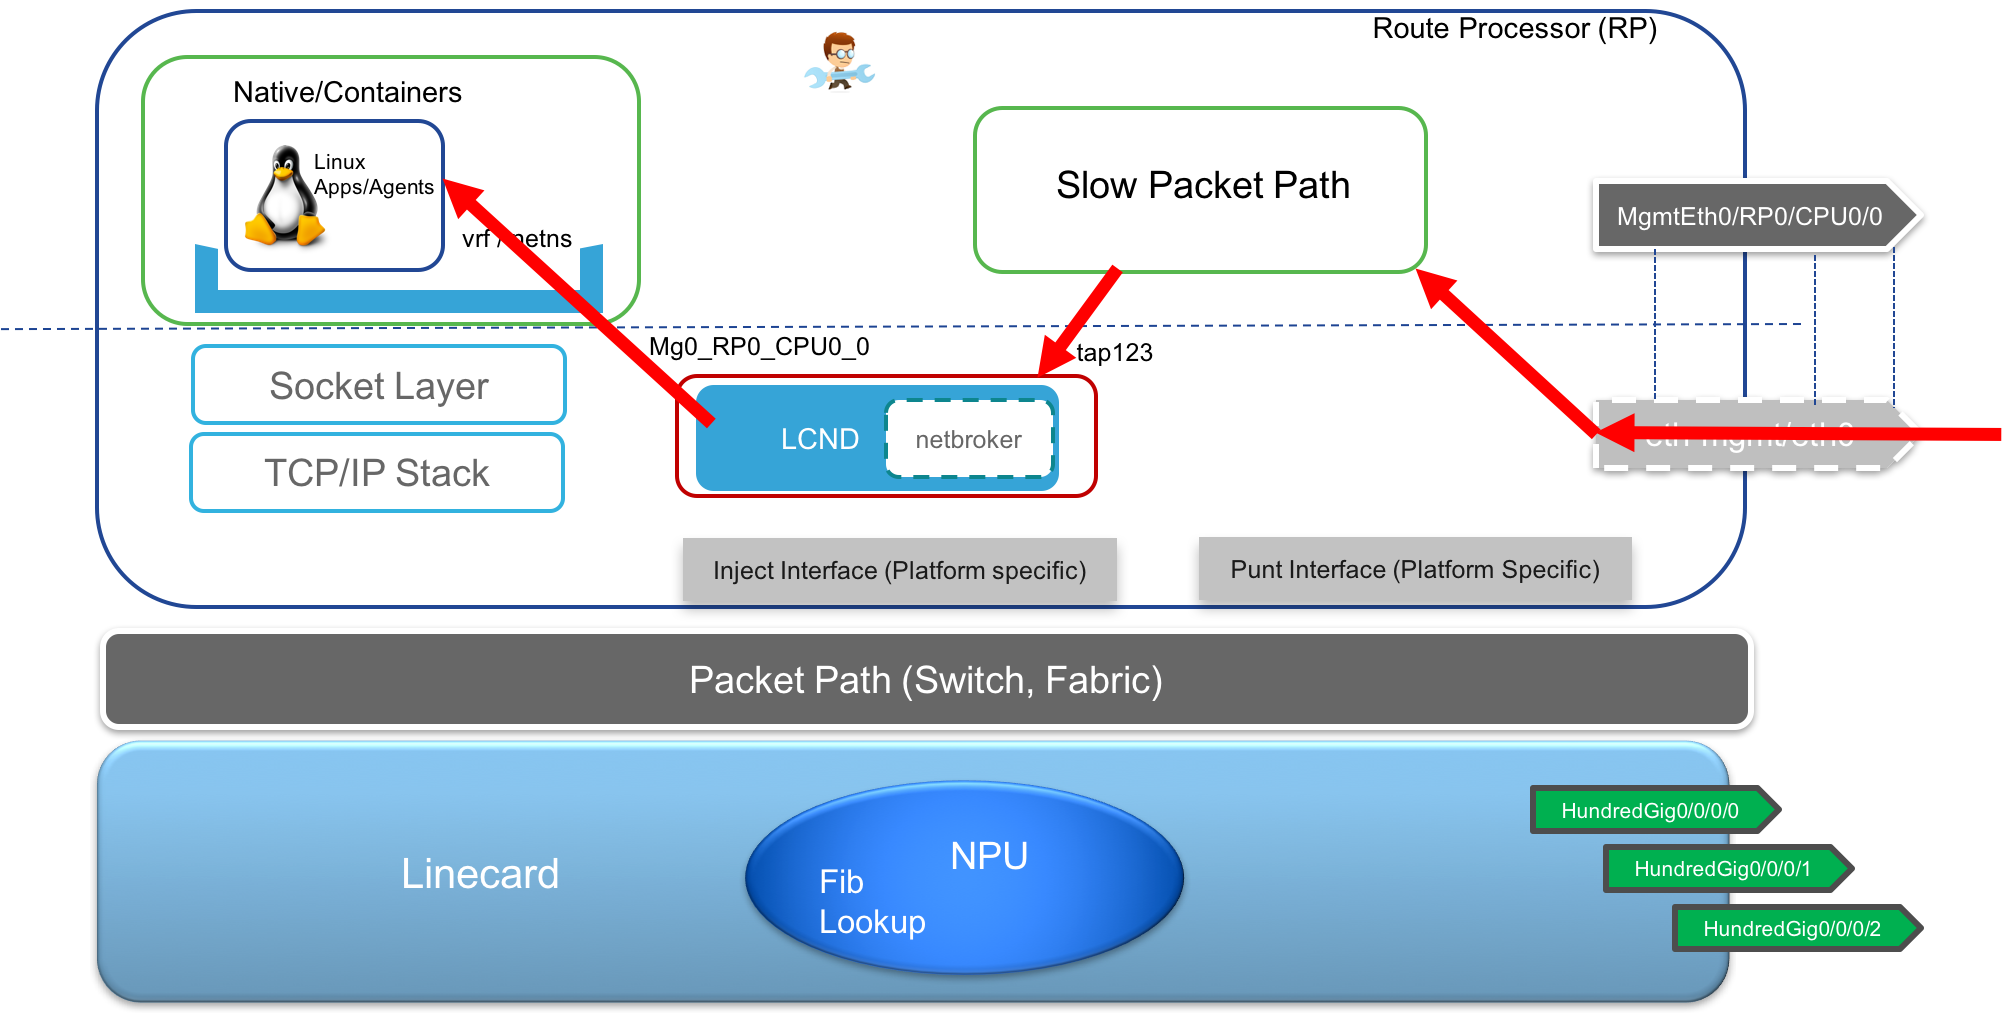
- Transmit TCP/UDP traffic over Data ports: In this scenario, typically, the
Native Applications on IOS-XR
If you’ve gone through some of the CLI automation labs already, then it must be fairly clear that being able to run bash and python scripts natively in the XR shell is fairly common. Extend that to cron jobs and you get all the typical scripting capabilities that you expect on a Linux environment.
Further, IOS-XR uses the Windriver Linux 7 (WRL7) distribution which is RPM based and also support yum natively for WRL7 applications.
You can certainly build your own WRL7 RPMs and install them on the system. This scenario is covered in great detail on xrdocs, here:
Further, the IOS-XR team also hosts some pre-built libraries for common Linux applications on the Yum repository here:
To show how a native application RPM could be installed from this yum repo, let’s connect to router r1 in the sandbox:
Username: admin
Password: admin
SSH port: 2221
Laptop-terminal:$ ssh -p 2221 [email protected]


--------------------------------------------------------------------------
  Router 1 (Cisco IOS XR Sandbox)
--------------------------------------------------------------------------


Password:


RP/0/RP0/CPU0:r1#
RP/0/RP0/CPU0:r1#
Drop into the bash shell and run ip route:
RP/0/RP0/CPU0:r1#bash
Mon Sep 10 01:56:15.560 UTC

[r1:~]$
[r1:~]$ ip route
default dev fwdintf  scope link
192.168.122.0/24 dev Mg0_RP0_CPU0_0  scope link  src 192.168.122.21
[r1:~]$
It can be seen that the current default route for the global-vrf network namespace in the shell is set to go over the fabric and expects the default route in IOS-XR RIB to contain a route to the internet over the data ports.
But the way the sandbox VMs are connected, internet access is available over the Management port sitting behind the gateway 192.168.122.1 and natted to the external world. Therefore to establish connectivity to the yum repo, we need to configure both the default route and the update-source config (setting the source IP of outgoing packets) to point to the Management port.
Configuring thus:
RP/0/RP0/CPU0:r1(config)#tpa
RP/0/RP0/CPU0:r1(config-tpa)#vrf default
RP/0/RP0/CPU0:r1(config-tpa-vrf)#address-family ipv4
RP/0/RP0/CPU0:r1(config-tpa-vrf-afi)#update-source MgmtEth 0/RP0/CPU0/0
RP/0/RP0/CPU0:r1(config-tpa-vrf-afi)#default-route mgmt
RP/0/RP0/CPU0:r1(config-tpa-vrf-afi)#address-family ipv6
RP/0/RP0/CPU0:r1(config-tpa-vrf-afi)#update-source MgmtEth 0/RP0/CPU0/0
RP/0/RP0/CPU0:r1(config-tpa-vrf-afi)#default-route mgmt
RP/0/RP0/CPU0:r1(config-tpa-vrf-afi)#commit
Mon Sep 10 01:57:49.243 UTC
RP/0/RP0/CPU0:r1(config-tpa-vrf-afi)#
RP/0/RP0/CPU0:r1(config-tpa-vrf-afi)#
RP/0/RP0/CPU0:r1#show configuration commit changes last 1
Mon Sep 10 02:08:56.266 UTC
Building configuration...
!! IOS XR Configuration version = 6.4.1
tpa
 vrf default
  address-family ipv4
   default-route mgmt
   update-source dataports MgmtEth0/RP0/CPU0/0
  !
  address-family ipv6
   default-route mgmt
   update-source dataports MgmtEth0/RP0/CPU0/0
  !
 !
!
end

RP/0/RP0/CPU0:r1#
We can now check the output of ip route again:
RP/0/RP0/CPU0:r1#bash
Mon Sep 10 02:09:25.572 UTC
[r1:~]$
[r1:~]$ ip route
default dev fwd_ew  scope link  src 192.168.122.21
192.168.122.0/24 dev Mg0_RP0_CPU0_0  scope link  src 192.168.122.21
[r1:~]$
Great, notice how the default route changed to point to the fwd_ew interface so that the packet will be sent to the slow packet path where IOS-XR can also forward packets out to the Management port.
Finally, set up the dns resolution by adding a nameserver to /etc/resolv.conf through the bash cli:
RP/0/RP0/CPU0:r1#bash
Mon Sep 10 01:56:15.560 UTC

[r1:~]$
[r1:~]$ ping google.com
ping: unknown host google.com
[r1:~]$
[r1:~]$ echo "nameserver 8.8.8.8" > /etc/resolv.conf
[r1:~]$
[r1:~]$ ping google.com
PING google.com (216.58.217.78) 56(84) bytes of data.
64 bytes from iad23s41-in-f78.1e100.net (216.58.217.78): icmp_seq=1 ttl=49 time=113 ms
64 bytes from iad23s41-in-f78.1e100.net (216.58.217.78): icmp_seq=2 ttl=49 time=113 ms
^C
--- google.com ping statistics ---
2 packets transmitted, 2 received, 0% packet loss, time 1001ms
rtt min/avg/max/mdev = 113.174/113.573/113.973/0.522 ms
[r1:~]$
[r1:~]$
Perfect, we now have DNS resolving towards the internet, so let’s set up access to the yum repo, Again in the bash shell :
RP/0/RP0/CPU0:r1#bash
Mon Sep 10 01:56:15.560 UTC

[r1:~]$
[r1:~]$ yum-config-manager --add-repo https://devhub.cisco.com/artifactory/xr600/3rdparty/x86_64/
adding repo from: https://devhub.cisco.com/artifactory/xr600/3rdparty/x86_64/

[devhub.cisco.com_artifactory_xr600_3rdparty_x86_64_]
name=added from: https://devhub.cisco.com/artifactory/xr600/3rdparty/x86_64/
baseurl=https://devhub.cisco.com/artifactory/xr600/3rdparty/x86_64/
enabled=1


[r1:~]$
Let’s install the available iperf RPM from the yum repo:
[r1:~]$
[r1:~]$ yum install iperf
Loaded plugins: downloadonly, protect-packages, rpm-persistence
devhub.cisco.com_artifactory_xr600_3rdparty_x86_64_                                                                                                                                                         | 1.3 kB     00:00
devhub.cisco.com_artifactory_xr600_3rdparty_x86_64_/primary                                                                                                                                                 | 1.1 MB     00:00
devhub.cisco.com_artifactory_xr600_3rdparty_x86_64_                                                                                                                                                                      5912/5912
Setting up Install Process
Resolving Dependencies
--> Running transaction check
---> Package iperf.core2_64 0:2.0.5-r0.0 will be installed
--> Finished Dependency Resolution

Dependencies Resolved

===================================================================================================================================================================================================================================
 Package                                  Arch                                        Version                                         Repository                                                                              Size
===================================================================================================================================================================================================================================
Installing:
 iperf                                    core2_64                                    2.0.5-r0.0                                      devhub.cisco.com_artifactory_xr600_3rdparty_x86_64_                                     34 k

Transaction Summary
===================================================================================================================================================================================================================================
Install       1 Package

Total download size: 34 k
Installed size: 67 k
Is this ok [y/N]: y
Downloading Packages:
iperf-2.0.5-r0.0.core2_64.rpm                                                                                                                                                                               |  34 kB     00:00
Running Transaction Check
Running Transaction Test
Transaction Test Succeeded
Running Transaction
  Installing : iperf-2.0.5-r0.0.core2_64                                                                                                                                                                                       1/1

Installed:
  iperf.core2_64 0:2.0.5-r0.0
Complete!
[r1:~]$
[r1:~]$
[r1:~]$
[r1:~]$ iperf -v
iperf version 2.0.5 (08 Jul 2010) pthreads
[r1:~]$
There you go, iperf version 2.0.5 has been installed and is ready to run as a native application.
Container applications on IOS-XR
Some common setup details for both LXC containers and Docker containers on the IOS-XR system are:
Disk Volume: By default the mount volume
/misc/app_hoston the underlying host layer is mounted into the XR LXC by default. The amount of space allocated is about 3.9G on an xrv9k and about 3.7G on an NCS5500. It varies based on the resource availability of the platform, but is within this range.This can be checked by runningdf -hin the bash shell:[r1:~]$ df -h Filesystem Size Used Avail Use% Mounted on /dev/loop5 2.9G 1.4G 1.4G 49% / run 7.3G 476K 7.3G 1% /bindmnt_netns devfs 1.0M 16K 1008K 2% /dev tmpfs 64K 0 64K 0% /dev/cgroup /dev/mapper/panini_vol_grp-host_lv0 969M 412M 492M 46% /dev/sde none 7.3G 787M 6.5G 11% /dev/shm none 7.3G 787M 6.5G 11% /dev/shm /dev/mapper/app_vol_grp-app_lv0 3.9G 106M 3.6G 3% /misc/app_host tmpfs 7.3G 4.0K 7.3G 1% /var/volatile tmpfs 7.3G 68K 7.3G 1% /run tmpfs 7.3G 0 7.3G 0% /media/ram tmpfs 64M 208K 64M 1% /tmp tmpfs 64M 208K 64M 1% /tmp /dev/mapper/panini_vol_grp-ssd_disk1_xr_1 1.5G 233M 1.1G 18% /misc/disk1 /dev/mapper/xr-vm_encrypted_log 475M 16M 430M 4% /var/log /dev/mapper/xr-vm_encrypted_config 475M 3.3M 443M 1% /misc/config /dev/mapper/xr-vm_encrypted_scratch 989M 21M 902M 3% /misc/scratch none 512K 0 512K 0% /mnt [r1:~]$CPU shares: Both LXC containers and Docker containers on IOS-XR have their resources (CPU/Memory) governed by cgroups settings. To figure out the limits on these container applications by default, we need to drop into the Host shell and check the cgroups settings:
To drop into the host shell, follow the exact sequence of commands shown below, starting from the XR CLI:
  RP/0/RP0/CPU0:r1#
  RP/0/RP0/CPU0:r1#admin
  Mon Sep 10 02:33:43.456 UTC

  admin connected from 127.0.0.1 using console on r1
  sysadmin-vm:0_RP0#run
  Mon Sep  10 02:33:45.243 UTC

  [sysadmin-vm:0_RP0:~]$
  [sysadmin-vm:0_RP0:~]$ssh 10.0.2.16
  [host:~]$
Let’s break down the cpu-shares allocated to different parts of the system:
  [host]$
  [host]$ cd /dev/cgroup/
  [host:/dev/cgroup]$ virsh -c lxc:/// list
   Id    Name                           State
  ----------------------------------------------------
   6396  sysadmin                       running
   14448 default-sdr--1                 running
   22946 default-sdr--2                 running

  [host:/dev/cgroup]$
  [host:/dev/cgroup]$ cat cpu/cpu.shares
  >>>>  Host CPU shares
  1024
  [host:/dev/cgroup]$ cat  cpu/machine/cpu.shares
  >>>> machine subgroup CPU shares
  1024
  [host:/dev/cgroup]$
  [host:/dev/cgroup]$ cat cpu/machine/default-sdr--1.libvirt-lxc/cpu.shares
  >>>>> XR Control Plane
  1024
  [host:/dev/cgroup]$ cat cpu/machine/default-sdr--2.libvirt-lxc/cpu.shares
  >>>>  Data Plane LC container
  1024
  [host:/dev/cgroup]$ cat cpu/machine/sysadmin.libvirt-lxc/cpu.shares
  >>> Sysadmin Container
  1024
  [host:/dev/cgroup]$
  [host:/dev/cgroup]$ cat cpu/machine/tp_app.partition/cpu.shares
  >>>>> Allocation for the    tp_app.partition subgroup
  1024
  [host:/dev/cgroup]$
  [host:/dev/cgroup]$ cat cpu/machine/tp_app.partition/docker/cpu.shares
  >>>> Allocation for third party docker container subgroup under the tp_app.partition subgroup
  1024
  [host:/dev/cgroup]$
  [host:/dev/cgroup]$ cat cpu/machine/tp_app.partition/lxc.partition/cpu.shares
  >>>>  Allocation for third party LXC container subgroup under the tp_app.partition subgroup
  1024
  [host:/dev/cgroup]$
What do these cpu share allocations mean?
CPU shares help determine the relative allocation of CPU resources when processes are running in all groups and subgroups.
Now at the highest level (Host), there is no competing group defined. So Host gets 1024 CPU shares. This is the root cgroup. All processes at this level get to utilize 1024 shares
One level down, the “machine” sub group is defined and is given 1024 CPU shares. Again, no competing subgroup at this level, so all cpu resources get passed down.
Next level, machine is divided into 4 groups: default-sdr—1 , default-sdr—2, sysadmin and tp_app.partition with cpu shares at 1024, 1024, 1024 and 1024 respectively. On the NCS55xx devices, tp_app.partition is allocated 256 cpu shares.
CPU shares do NOT easily map to percentages of the CPU that will get used up because the percentage of CPU utilized is a function of the distribution of CURRENTLY running processes across different cgroups (root, machine, tp_app.partition etc.). The cpu shares are not hard limits, but rather guide how the CPU gets utilized across different process groups. I found a nice explanation of this breakdown in the RedHat documentation here: https://access.redhat.com/documentation/en-us/red_hat_enterprise_linux/6/html/resource_management_guide/process_behavior.
So, in our case, assuming the same number of processes are running in the Host (root) and in each of the “machine” subgroups: default-sdr–1, default-sdr–2, syasdmin, tp_app.partition (This is not the case, but we use this to simplify the calculation):
When no 3rd party application (docker or LXC, I’m not talking about native) is running on the system, then the allocation of CPU for the 3 system subgroups are (Remember 1024 cpu shares are reserved for the Host(root) layer):
machine subgroup share = 1024/(1024+1024) = 50%
Host (root) share = 1024/(1024+1024) = 50%
default-sdr—1 share = (1024/(1024+1024+1024)) * 50%  = 16.67%
default-sdr—2 share = (1024/(1024+1024+1024)) * 50%  = 16.67%
sysadmin share = (1024/(1024+1024+1024)) * 50%  = 16.67%
When an application is running on the system as part of the tp_app.partition subgroup (either docker or LXC or both), then the remaining 3 subgroups are already active. Now, the allocations for the system subgroups are reduced to:
machine subgroup share = 1024/(1024+1024) = 50%
Host share = 1024/(1024+1024) = 50%
tp_app.partition process = 1024/(1024+1024+1024+1024) * 50% = 12.5%
default-sdr—1 share = 1024/(1024+1024+1024+1024) * 50% = 12.5%
default-sdr—2 share = 1024/(1024+1024+1024+1024) * 50% = 12.5%
sysadmin share = 1024/(1024+1024+1024+1024) * 50% = 12.5%
On the NCS55xx platforms the tp_app.partition is actually allocated 256 CPU shares. So, for these platforms, the calculations would change to:
For NCS55xx platforms:
machine subgroup share = 1024/(1024+1024) = 50%
Host share = 1024/(1024+1024) = 50%
tp_app.partition process = 256/(256+1024+1024+1024) * 50% = 3.84%
default-sdr—1 share = 1024/(256+1024+1024+1024) * 50% = 15.38%
default-sdr—2 share = 1024/(256+1024+1024+1024) * 50% = 15.38%
sysadmin share = 1024/(256+1024+1024+1024) * 50% = 15.38%
Further, under the tp_app.partition subgroup, Docker and LXC get 1024 and 1024 shares respectively. So, in case you’re running an LXC app and a Docker app at the same time, they will get 12.5/2 = 6.25% of the CPU each. Again, this is for the IOS-XRv9000 platform in this devnet sandbox. For NCS55XX platforms, running both an LXC and Docker app would reduce the CPU share to 3.84%/2 = 1.92% based on our calculations above.
If you run any one of them (typically the case), then they get to use all of 12.5% (3.84% in case of NCS55xx platforms).
Not all platforms have the default-sdr–2 container running on the RP. This is true for IOS-XRv9000 and the fixed boxes like the NCS540 or NCS5501/5502.
But, for modular chassis like NCS5508/5516 etc., there is NO default–sdr-2 container.
In such a case, the tp_app.partition subgroup gets to utilize 5.56% (256 shares) of the cpu with remaining 94.46% used by default-sdr–1 (22.22%), sysadmin container (22.22%) and the host layer (50%).Memory Limits: Similarly, cgroups settings on the host shell can also be used to determine the maximum limit on the amount of memory that a container app can utilize on the system:
  [host:~]$ cat /dev/cgroup/memory/machine/tp_app.partition/lxc.partition/memory.limit_in_bytes
  536870912
  [host:~]$
  [host:~]$ cat /dev/cgroup/memory/machine/tp_app.partition/docker/memory.limit_in_bytes
  536870912
  [host:~]$
The above values are in bytes but it translates to 512 MB memory limit on container apps.
For the NCS55XX platforms, the same limits are increased to 1G:
  [host:0_RP0:~]$ cat /dev/cgroup/memory/machine/tp_app.partition/lxc.partition/memory.limit_in_bytes
  1073741824
  [host:0_RP0:~]$
  [host:0_RP0:~]$ cat /dev/cgroup/memory/machine/tp_app.partition/docker/memory.limit_in_bytes
  1073741824
  [host:0_RP0:~]$
Bear in mind that the above values are for an IOS-XRv9000 platform. Each platform would handle these limits based on the resources available. But you can use the same techniques described above across all IOS-XR platforms to determine the limits imposed by the one selected.
LXC Containers
The libvirt daemon runs on the host layer of the system. However the interaction client for libvirt, i.e. virsh has been made available for use within the XR LXC for end users.
These implies that a user in the XR bash shell can run the virsh command to display the running containers or even launch new custom containers:
Trying this out on router r1:
RP/0/RP0/CPU0:r1#
RP/0/RP0/CPU0:r1#bash
Mon Sep 10 02:20:21.486 UTC

[r1:~]$
[r1:~]$ virsh list
 Id    Name                           State
----------------------------------------------------
 7554  sysadmin                       running
 17021 default-sdr--1                 running
 27481 default-sdr--2                 running

[r1:~]$
Here sysadmin corresponds to the admin LXC and default-sdr--1 corresponds to the XR LXC. Further, since r1 is a virtual XRv9000 platform, it doesn’t contain physical linecards. Hence the XR LXC that would typically run on a linecard runs as a separate LXC on the RP host itself to mimic the behaviour of a linecard on an XRv9000.
Bringing up your own LXC container on IOS-XR is fairly simple, and this has been covered in great detail on xrdocs, here:
We will skip bringing up an LXC container and will leave it as a exercise for the reader based on the blog above.
Docker Containers
The Docker daemon runs on the host layer as well, much like the libvirt daemon. Again, to simplify operations, the docker client has been made available in the XR bash shell.
Drop into the bash shell of router r1, so we can play around with the docker client:
RP/0/RP0/CPU0:r1#bash
Mon Sep 10 02:20:21.486 UTC

[r1:~]$
[r1:~]$
[r1:~]$ docker ps
CONTAINER ID        IMAGE               COMMAND             CREATED             STATUS              PORTS               NAMES
[r1:~]$
[r1:~]$
[r1:~]$ docker images
REPOSITORY          TAG                 IMAGE ID            CREATED             SIZE
[r1:~]$
There are multiple different techniques that can be used to bring up a docker container on IOS-XR and all of them are discussed in great detail on xrdocs, here:
Since docker supports pulling docker images directly from dockerhub over the internet, we can try a quick demonstration. If you already ran through the steps to set up the yum repository and install iperf in the native application example above, then your bash in the XR LXC must have the following routes:
RP/0/RP0/CPU0:r1#bash
Mon Sep 10 03:02:56.144 UTC

[r1:~]$
[r1:~]$ ip route
default dev fwd_ew  scope link  src 192.168.122.21
192.168.122.0/24 dev Mg0_RP0_CPU0_0  scope link  src 192.168.122.21
[r1:~]$
To demonstrate how the IOS-XR Pkt/IO environment can be inherited by the docker container, we pull in a pre-built ubuntu container with iproute2 pre-installed from dockerhub.
The advantage of iproute2 being available is that we can execute the ip netns exec commands inside the container to change into the the required mounted netns where the container will have full access to the exposed IOS-XR interfaces and routes in the kernel.
Pull the ubuntu_iproute2 docker image
[r1:~]$
[r1:~]$
[r1:~]$ docker pull akshshar/ubuntu_iproute2_docker
Using default tag: latest
latest: Pulling from akshshar/ubuntu_iproute2_docker
124c757242f8: Pull complete
9d866f8bde2a: Pull complete
fa3f2f277e67: Pull complete
398d32b153e8: Pull complete
afde35469481: Pull complete
acff1696516b: Pull complete
Digest: sha256:e701a744a300effd821b1237d0a37cb942f67d102c9b9752e869caa6cb91e5fa
Status: Downloaded newer image for akshshar/ubuntu_iproute2_docker:latest
[r1:~]$
You should see the pulled docker image using the docker images command:
[r1:~]$
[r1:~]$ docker images
REPOSITORY                        TAG                 IMAGE ID            CREATED              SIZE
akshshar/ubuntu_iproute2_docker   latest              e0dd0f444715        About a minute ago   128.5 MB
[r1:~]$
Next, launch the docker image with the following essential parameters:
--cap-add SYS_ADMIN: This is capability added to the container to give it enough privileges to run theip netns exec <>command.-v /var/run/netns:/var/run/netns: The-vflag is a mount flag that will mount the/var/run/netnsvolume from the host into the docker container. This ensures that all the network namespaces created in the kernel by IOS-XR are available for use within the container’s filesystem.
 [r1:~]$
 [r1:~]$ docker run -itd --name ubuntu_iproute2 --cap-add SYS_ADMIN -v  /var/run/netns:/var/run/netns akshshar/ubuntu_iproute2_docker bash
 871fe3fd745e903b3652ad89e013e83b64fa476ca79731037f9542c1fbca8b7f
 [r1:~]$
Check that the container is now running:
[r1:~]$
[r1:~]$ docker ps
CONTAINER ID        IMAGE                             COMMAND             CREATED             STATUS              PORTS               NAMES
871fe3fd745e        akshshar/ubuntu_iproute2_docker   "bash"              25 minutes ago      Up 25 minutes                           ubuntu_iproute2
[r1:~]$
Exec into the container:
[r1:~]$
[r1:~]$ docker exec -it ubuntu_iproute2 bash
root@871fe3fd745e:/#
Exec into the global-vrf network namespace to gain access to all the interfaces and routes:
root@871fe3fd745e:/# ip netns exec global-vrf bash
root@871fe3fd745e:/#
root@871fe3fd745e:/# ip link show
1: lo: <LOOPBACK,UP,LOWER_UP> mtu 65536 qdisc noqueue state UNKNOWN mode DEFAULT group default
    link/loopback 00:00:00:00:00:00 brd 00:00:00:00:00:00
6: fwdintf: <MULTICAST,NOARP,UP,LOWER_UP> mtu 1500 qdisc pfifo_fast state UNKNOWN mode DEFAULT group default qlen 1000
    link/ether 00:00:00:00:00:0a brd ff:ff:ff:ff:ff:ff
7: fwd_ew: <MULTICAST,NOARP,UP,LOWER_UP> mtu 1500 qdisc pfifo_fast state UNKNOWN mode DEFAULT group default qlen 1000
    link/ether 00:00:00:00:00:0b brd ff:ff:ff:ff:ff:ff
8: Mg0_RP0_CPU0_0: <MULTICAST,NOARP,UP,LOWER_UP> mtu 1500 qdisc pfifo_fast state UNKNOWN mode DEFAULT group default qlen 1000
    link/ether 52:54:00:28:c2:94 brd ff:ff:ff:ff:ff:ff
9: Gi0_0_0_0: <> mtu 1514 qdisc pfifo_fast state DOWN mode DEFAULT group default qlen 1000
    link/ether 52:54:00:1c:5e:e0 brd ff:ff:ff:ff:ff:ff
10: Gi0_0_0_1: <> mtu 1514 qdisc pfifo_fast state DOWN mode DEFAULT group default qlen 1000
    link/ether 52:54:00:1c:5e:e1 brd ff:ff:ff:ff:ff:ff
11: Gi0_0_0_2: <> mtu 1514 qdisc pfifo_fast state DOWN mode DEFAULT group default qlen 1000
    link/ether 52:54:00:1c:5e:e2 brd ff:ff:ff:ff:ff:ff
12: Gi0_0_0_3: <> mtu 1514 qdisc pfifo_fast state DOWN mode DEFAULT group default qlen 1000
    link/ether 52:54:00:1c:5e:e3 brd ff:ff:ff:ff:ff:ff
13: Gi0_0_0_4: <> mtu 1514 qdisc noop state DOWN mode DEFAULT group default qlen 1000
    link/ether 52:54:00:1c:5e:e4 brd ff:ff:ff:ff:ff:ff
root@871fe3fd745e:/#
root@871fe3fd745e:/# ip route
default dev fwd_ew scope link src 192.168.122.21
192.168.122.0/24 dev Mg0_RP0_CPU0_0 scope link src 192.168.122.21
root@871fe3fd745e:/#
root@871fe3fd745e:/# exit
root@871fe3fd745e:/# exit
[r1:~]$
[r1:~]$
Great, now let’s clean up.
Stop the Docker container:
[r1:~]$
[r1:~]$ docker stop ubuntu_iproute2
ubuntu_iproute2
[r1:~]$
[r1:~]$ docker ps
CONTAINER ID        IMAGE               COMMAND             CREATED             STATUS              PORTS               NAMES
[r1:~]$
Remove the Docker container:
Stopping the docker container is equivalent to “pausing” it. It does not free up the disk space used by the container. To free up the disk space, remove the container:
[r1:~]$
[r1:~]$ docker rm ubuntu_iproute2
ubuntu_iproute2
[r1:~]$
Finally, remove the docker image
[r1:~]$
[r1:~]$ docker rmi akshshar/ubuntu_iproute2_docker
Untagged: akshshar/ubuntu_iproute2_docker:latest
Untagged: akshshar/ubuntu_iproute2_docker@sha256:e701a744a300effd821b1237d0a37cb942f67d102c9b9752e869caa6cb91e5fa
Deleted: sha256:e0dd0f44471590a8327802dc447606a9dc36dc8ce0f3df2aee6c75b6e9190eb0
Deleted: sha256:a12f84e26b7ab31a36f53feb6cca22222f4ce211a4a7cdc449e0e5a179b0ec23
Deleted: sha256:2416e906f135eea2d08b4a8a8ae539328482eacb6cf39100f7c8f99e98a78d84
Deleted: sha256:7f8291c73f3ecc4dc9317076ad01a567dd44510e789242368cd061c709e0e36d
Deleted: sha256:4b3d88bd6e729deea28b2390d1ddfdbfa3db603160a1129f06f85f26e7bcf4a2
Deleted: sha256:f51700a4e396a235cee37249ffc260cdbeb33268225eb8f7345970f5ae309312
Deleted: sha256:a30b835850bfd4c7e9495edf7085cedfad918219227c7157ff71e8afe2661f63
[r1:~]$
And that completes the crash-course on the application hosting infrastructure on IOS-XR! Use this blog along with the other blogs in the xr-toolbox series to build and host your own applications and tools on routers running IOS-XR.
Leave a Comment