
XR toolbox, Part 4: Bring your own Container (LXC) App
Check out Part 3 of the XR toolbox series: App Development Topology.
Introduction
If you haven’t checked out the earlier parts to the XR toolbox Series, then you can do so here:
The purpose of this series is simple. Get users started with an IOS-XR setup on their laptop and incrementally enable them to try out the application-hosting infrastructure on IOS-XR.
In this part, we explore how a user can build and deploy their own container (LXC) based applications on IOS-XR.
Pre-requisites
Before we begin, let’s make sure you’ve set up your development environment. If you haven’t checked it out, go through the “App-Development Topology” tutorial here:
Follow the instructions to get your topology up and running as shown below:
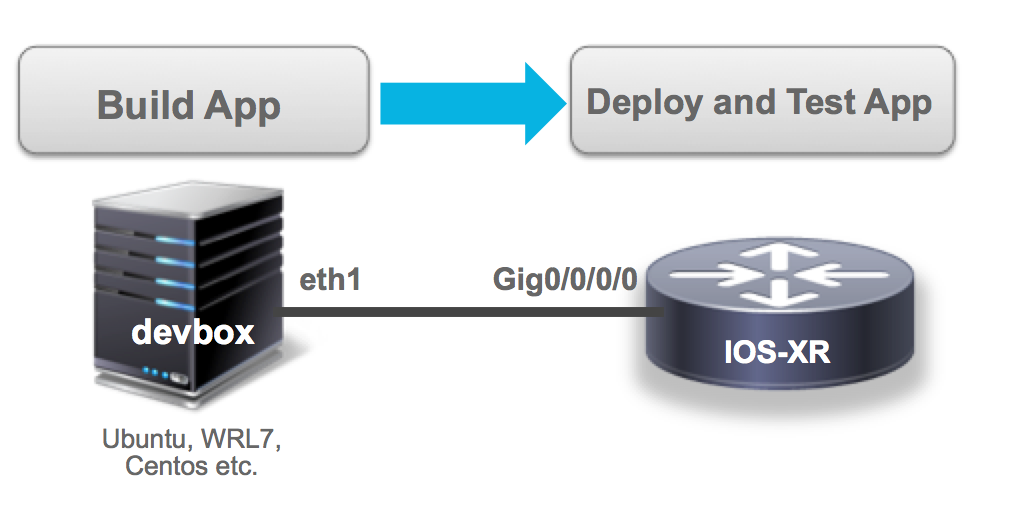
If you’ve reached the end of the above tutorial, you should be able to issue a vagrant status in the vagrant-xrdocs/lxc-app-topo-bootstrap directory to see a rtr (IOS-XR) and a devbox (Ubuntu/trusty) instance running.
AKSHSHAR-M-K0DS:lxc-app-topo-bootstrap akshshar$ pwd
/Users/akshshar/vagrant-xrdocs/lxc-app-topo-bootstrap
AKSHSHAR-M-K0DS:lxc-app-topo-bootstrap akshshar$
AKSHSHAR-M-K0DS:lxc-app-topo-bootstrap akshshar$ vagrant status
Current machine states:

rtr                       running (virtualbox)
devbox                    running (virtualbox)

This environment represents multiple VMs. The VMs are all listed
above with their current state. For more information about a specific
VM, run `vagrant status NAME`.
AKSHSHAR-M-K0DS:lxc-app-topo-bootstrap akshshar$
All good? Perfect. Let’s start building our container application tar ball.
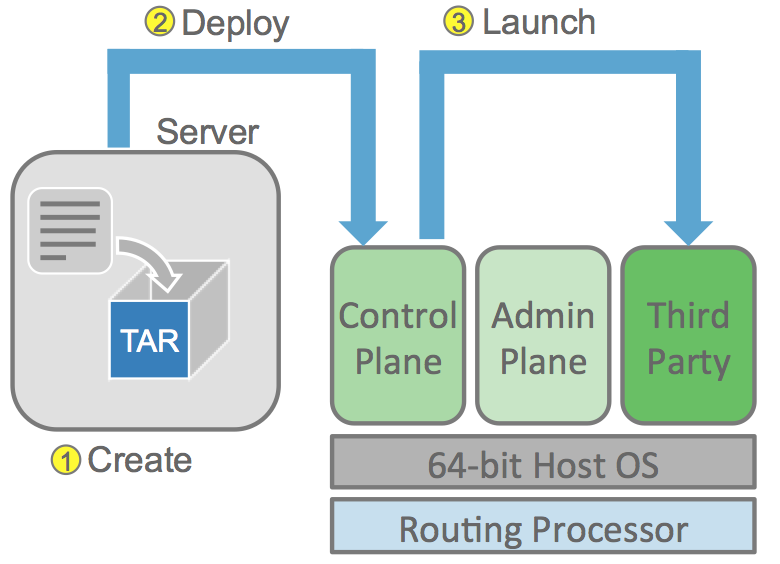
The figure on the right illustrates the basic steps to undertake to launch an lxc container on IOS-XR 6.0+:
- We will build the container rootfs tar ball on our devbox (see topology above)
- The rootfs tar ball will then be transferred to IOS-XR
- The rootfs will be launched on the underlying hypervisor using the virsh command in XR shell.
Create a container rootfs
Using a custom rootfs tar ball
The technique presented here focuses on the creation of a container from scratch (using a base ubuntu template) followed by the installation of an application for first-time users. A user can easily use their own pre-built rootfs tar ball and ignore this section altogether.
The only point to remember is that if you expect to use SSH access into the container after deployment to XR, then change the default SSH port in /etc/ssh/sshd_config in your rootfs to something other than 22/57722 (or any other port you expect XR to use based on your config).
This is showcased in the following section below:
To launch an LXC container we need two things:
- A container rootfs tar ball
- An XML file to launch the container using
virsh/libvirt
To create them, we’ll hop onto our devbox (Ubuntu/trusty) VM in the topology and install lxc-tools. lxc-tools will be used to create a container rootfs tar ball.
Install lxc tools on devbox
SSH into the devbox:
AKSHSHAR-M-K0DS:lxc-app-topo-bootstrap akshshar$ vagrant ssh devbox
Welcome to Ubuntu 14.04.4 LTS (GNU/Linux 3.13.0-87-generic x86_64)

 * Documentation:  https://help.ubuntu.com/

  System information as of Thu Jun 16 14:27:47 UTC 2016

  System load:  0.0               Processes:           74
  Usage of /:   3.5% of 39.34GB   Users logged in:     0
  Memory usage: 25%               IP address for eth0: 10.0.2.15
  Swap usage:   0%                IP address for eth1: 11.1.1.20

  Graph this data and manage this system at:
    https://landscape.canonical.com/

  Get cloud support with Ubuntu Advantage Cloud Guest:
    http://www.ubuntu.com/business/services/cloud

0 packages can be updated.
0 updates are security updates.


Last login: Thu Jun 16 14:27:47 2016 from 10.0.2.2
vagrant@vagrant-ubuntu-trusty-64:~$
Install lxc tools inside the devbox
sudo apt-get update
sudo apt-get -y install lxc
Check that lxc was properly installed:
vagrant@vagrant-ubuntu-trusty-64:~$ sudo lxc-start --version
1.0.8
vagrant@vagrant-ubuntu-trusty-64:~$
Launch an LXC container on the devbox
Using the standard ubuntu template available with lxc, let’s create and start the ubuntu container inside devbox:
vagrant@vagrant-ubuntu-trusty-64:~$ sudo lxc-create -t ubuntu --name xr-lxc-app
Checking cache download in /var/cache/lxc/trusty/rootfs-amd64 ...
Installing packages in template: ssh,vim,language-pack-en
Downloading ubuntu trusty minimal ...
I: Retrieving Release
I: Retrieving Release.gpg
I: Checking Release signature
I: Valid Release signature (key id 790BC7277767219C42C86F933B4FE6ACC0B21F32)
I: Retrieving Packages

------------------------------ snip output ------------------------------------
This process will take some time as the ubuntu rootfs template is downloaded for you by the lxc tools.
Once the container template is installed successfully, it should show up in the lxc-ls output:
vagrant@vagrant-ubuntu-trusty-64:~$ sudo lxc-ls --fancy
NAME        STATE    IPV4  IPV6  AUTOSTART
------------------------------------------
xr-lxc-app  STOPPED  -     -     NO
vagrant@vagrant-ubuntu-trusty-64:~$
Now let’s start the container:
vagrant@vagrant-ubuntu-trusty-64:~$ sudo lxc-start --name xr-lxc-app
<4>init: plymouth-upstart-bridge main process (5) terminated with status 1
<4>init: plymouth-upstart-bridge main process ended, respawning
<4>>init: hwclock main process (7) terminated with status 77
<4>>init: plymouth-upstart-bridge main process (15) terminated with status 1
<4>>init: plymouth-upstart-bridge main process ended, respawning

------------------------------ snip output ------------------------------------
You will be taken to the login prompt.
The Default credentials are:
Username: ubuntu
Password: ubuntu
Ubuntu 14.04.4 LTS xr-lxc-app console

xr-lxc-app login: <4>init: setvtrgb main process (428) terminated with status 1
<4>init: plymouth-upstart-bridge main process (23) killed by TERM signal


Ubuntu 14.04.4 LTS xr-lxc-app console

xr-lxc-app login: ubuntu
Password:
Welcome to Ubuntu 14.04.4 LTS (GNU/Linux 3.13.0-87-generic x86_64)

 * Documentation:  https://help.ubuntu.com/

The programs included with the Ubuntu system are free software;
the exact distribution terms for each program are described in the
individual files in /usr/share/doc/*/copyright.

Ubuntu comes with ABSOLUTELY NO WARRANTY, to the extent permitted by
applicable law.

ubuntu@xr-lxc-app:~$
Perfect! You’ve launched an ubuntu container on your devbox.
Create/Install your app
In this example we’ll install iperf as a sample application.You may choose to skip this step if you have another app in mind.
sudo password: ubuntu
ubuntu@xr-lxc-app:~$ sudo apt-get -y install iperf
[sudo] password for ubuntu:
Reading package lists... Done
Building dependency tree
Reading state information... Done
The following NEW packages will be installed:
  iperf
0 upgraded, 1 newly installed, 0 to remove and 0 not upgraded.
Need to get 56.3 kB of archives.
After this operation, 174 kB of additional disk space will be used.
Get:1 http://archive.ubuntu.com/ubuntu/ trusty/universe iperf amd64 2.0.5-3 [56.3 kB]
Fetched 56.3 kB in 2s (23.5 kB/s)
Selecting previously unselected package iperf.
(Reading database ... 14629 files and directories currently installed.)
Preparing to unpack .../iperf_2.0.5-3_amd64.deb ...
Unpacking iperf (2.0.5-3) ...
Setting up iperf (2.0.5-3) ...
ubuntu@xr-lxc-app:~$
ubuntu@xr-lxc-app:~$
ubuntu@xr-lxc-app:~$
ubuntu@xr-lxc-app:~$ iperf -v
iperf version 2.0.5 (08 Jul 2010) pthreads
ubuntu@xr-lxc-app:~$
Change SSH port inside your container
When we deploy the container to IOS-XR, we will share XR’s network namespace. Since IOS-XR already uses up port 22 and port 57722 for its own purposes, we need to pick some other port for our container.
Our recommendation? - Pick some port in the 58xxx range.
Let’s change the SSH port to 58822:
ubuntu@xr-lxc-app:~$ sudo sed -i s/Port\ 22/Port\ 58822/ /etc/ssh/sshd_config
ubuntu@xr-lxc-app:~$
Check that your port was updated successfully:
ubuntu@xr-lxc-app:~$ cat /etc/ssh/sshd_config | grep Port
Port 58822
ubuntu@xr-lxc-app:~$
We’re good!
Shutdown and package your container
Issue a shutdown to escape
ubuntu@xr-lxc-app:~$ sudo shutdown -h now
ubuntu@xr-lxc-app:~$
Broadcast message from ubuntu@xr-lxc-app
	(/dev/lxc/console) at 19:37 ...

The system is going down for halt NOW!

------------------------------ snip output ------------------------------------

mount: cannot mount block device /dev/sda1 read-only
 * Will now halt
vagrant@vagrant-ubuntu-trusty-64:~$
vagrant@vagrant-ubuntu-trusty-64:~$
We’re back on our devbox. Now hop over to the directory /var/lib/lxc/xr-lxc-app and package the rootfs into a tar ball. In the end we transfer the tar ball to the home directory (~/ or /home/vagrant)
You will need to be root for this operation
vagrant@vagrant-ubuntu-trusty-64:~$ sudo -s
root@vagrant-ubuntu-trusty-64:~#
root@vagrant-ubuntu-trusty-64:~# whoami
root
root@vagrant-ubuntu-trusty-64:~# cd /var/lib/lxc/xr-lxc-app/
root@vagrant-ubuntu-trusty-64:/var/lib/lxc/xr-lxc-app# ls
config  fstab  rootfs
root@vagrant-ubuntu-trusty-64:/var/lib/lxc/xr-lxc-app# cd rootfs
root@vagrant-ubuntu-trusty-64:/var/lib/lxc/xr-lxc-app/rootfs#
root@vagrant-ubuntu-trusty-64:/var/lib/lxc/xr-lxc-app/rootfs# tar -czf xr-lxc-app-rootfs.tar.gz *
tar: dev/log: socket ignored
root@vagrant-ubuntu-trusty-64:/var/lib/lxc/xr-lxc-app/rootfs#
root@vagrant-ubuntu-trusty-64:/var/lib/lxc/xr-lxc-app/rootfs#mv *.tar.gz /home/vagrant
root@vagrant-ubuntu-trusty-64:/var/lib/lxc/xr-lxc-app/rootfs#ls -l /home/vagrant
total 119984
-rw-r--r-- 1 root root 122863332 Jun 16 19:41 xr-lxc-app-rootfs.tar.gz
Create LXC SPEC XML File
We need to create an XML file that will define different parameters (cpu, mem, rootfs location etc.) for the container launch on IOS-XR (which uses libvirt). On the devbox, use your favorite editor (vi, nano, pico etc.) to create a new file called
xr-lxc-app.xml under /home/vagrant of the devbox with the following content:
<domain type='lxc' xmlns:lxc='http://libvirt.org/schemas/domain/lxc/1.0' >
<name>xr-lxc-app</name>
<memory>327680</memory>
<os>
<type>exe</type>
<init>/sbin/init</init>
</os>
<lxc:namespace>
<sharenet type='netns' value='global-vrf'/>
</lxc:namespace>
<vcpu>1</vcpu>
<clock offset='utc'/>
<on_poweroff>destroy</on_poweroff>
<on_reboot>restart</on_reboot>
<on_crash>destroy</on_crash>
<devices>
<emulator>/usr/lib64/libvirt/libvirt_lxc</emulator>
<filesystem type='mount'>
<source dir='/misc/app_host/xr-lxc-app/'/>
<target dir='/'/>
</filesystem>
<console type='pty'/>
</devices>
</domain>
A couple of configuration knobs seem interesting in the above XML file:
The netns (network namespace) setting:
`<sharenet type='netns' value='global-vrf'/>`;In IOS-XR the ‘global-vrf’ network namespace houses all the XR Gig/Mgmt interfaces that are in the global/default VRF. The sharenet setting above makes sure that the container on launch will also have access to all of XR’s interfaces natively
The rootfs mount volume:
`<source dir='/misc/app_host/xr-lxc-app/'/>`;/misc/app_host/ in IOS-XR is a special mount volume that is designed to provide nearly 3.9G of Disk space on IOS-XRv and varying amounts on other platforms (NCS5508, ASR9k) etc. This mount volume may be used to host custom container rootfs and other large files without using up XR’s disk space. In this case we expect the rootfs to be untarred in the /misc/app_host/xr-lxc-app/ directory
Your LXC app is now ready to be deployed! You should have the following two components in the home directory of the devbox:
root@vagrant-ubuntu-trusty-64:~# pwd
/home/vagrant
root@vagrant-ubuntu-trusty-64:~# ls -l
total 119988
-rw-r--r-- 1 root root 122863332 Jun 16 19:41 xr-lxc-app-rootfs.tar.gz
-rw-r--r-- 1 root root       590 Jun 16 23:29 xr-lxc-app.xml
root@vagrant-ubuntu-trusty-64:~#
Transfer rootfs and XML file to XR
We can either use the XR Gig or Mgmt interface to transfer the files. IOS-XR runs openssh in the linux environment on port 57722.
We need to transfer the files to the /misc/app_host volume on IOS-XR. However, /misc/app_host is owned by root and root access over SSH is not allowed, for obvious security reasons.
Hence, to enable the transfer of custom files to IOS-XR, we provide a
/misc/app_host/scratchdirectory which is owned by the app_host group. Any user transferring files over SSH to this directory must be part of the app_host group to have access.The uservagrantis already part of the app_host group.
Transfer using the Gig interface:
The password for the vagrant user is vagrant
scp -P 57722 /home/vagrant/xr-lxc-app-rootfs.tar.gz [email protected]:/misc/app_host/scratch/
scp -P 57722 /home/vagrant/xr-lxc-app.xml [email protected]:/misc/app_host/scratch/
Where 11.1.1.10 is the directly connected Gig0/0/0/0 interface of IOS-XR instance (this config was explained in the XR Toolbox, Part 3: App Development Topology tutorial).
But this process might be slow since Gig interfaces in the Vagrant IOS-XR image are rate-limited.
Transfer using the Mgmt interface
Vagrant forwards the port 57722 to some host port for IOS-XR over the management port. In Virtualbox, the IP address of the host (your laptop) is always 10.0.2.2 for the NAT’ed port.
So determine the forwarded port for port 57722 for XR on your laptop shell (in a separate window):
AKSHSHAR-M-K0DS:lxc-app-topo-bootstrap akshshar$ vagrant port rtr
The forwarded ports for the machine are listed below. Please note that
these values may differ from values configured in the Vagrantfile if the
provider supports automatic port collision detection and resolution.

    22 (guest) => 2223 (host)
 57722 (guest) => 2222 (host)
AKSHSHAR-M-K0DS:lxc-app-topo-bootstrap akshshar$
Now use port 2222 to transfer the files over the management port using the host IP = 10.0.2.2 from your devbox
vagrant@vagrant-ubuntu-trusty-64:~$ scp -P 2222 /home/vagrant/*.* [email protected]:/misc/app_host/scratch
The authenticity of host '[10.0.2.2]:2222 ([10.0.2.2]:2222)' can't be established.
ECDSA key fingerprint is db:25:e2:27:49:2a:7b:27:e1:76:a6:7a:e4:70:f5:f7.
Are you sure you want to continue connecting (yes/no)? yes
Warning: Permanently added '[10.0.2.2]:2222' (ECDSA) to the list of known hosts.
[email protected]'s password:
xr-lxc-app-rootfs.tar.gz                                   100%  117MB  16.7MB/s   00:07
xr-lxc-app.xml                                             100%  590     0.6KB/s   00:00
vagrant@vagrant-ubuntu-trusty-64:~$
Untar rootfs under /misc/app_host/
Let’s hop onto the IOS-XR instance.
AKSHSHAR-M-K0DS:lxc-app-topo-bootstrap akshshar$ vagrant ssh rtr
Last login: Thu Jun 16 19:45:33 2016 from 10.0.2.2
xr-vm_node0_RP0_CPU0:~$
xr-vm_node0_RP0_CPU0:~$
Create a directory xr-lxc-app/(remember the source dir in the XML file?) under /misc/app_host:
You need to be sudo to perform the next set of tasks.
sudo mkdir /misc/app_host/xr-lxc-app/
Now untar the rootfs tar-ball that we transferred to the /misc/app_host/scratch directory into the newly created /misc/app_host/xr-lxc-app/ directory.
xr-vm_node0_RP0_CPU0:~$cd /misc/app_host/xr-lxc-app/
xr-vm_node0_RP0_CPU0:/misc/app_host/xr-lxc-app$
xr-vm_node0_RP0_CPU0:/misc/app_host/xr-lxc-app$sudo tar -zxf ../scratch/xr-lxc-app-rootfs.tar.gz
tar: dev/mpu401data: Cannot mknod: Operation not permitted
tar: dev/rmidi3: Cannot mknod: Operation not permitted
tar: dev/rmidi2: Cannot mknod: Operation not permitted
tar: dev/smpte1: Cannot mknod: Operation not permitted
tar: dev/audio1: Cannot mknod: Operation not permitted
tar: dev/smpte0: Cannot mknod: Operation not permitted
tar: dev/midi0: Cannot mknod: Operation not permitted
tar: dev/mixer1: Cannot mknod: Operation not permitted
tar: dev/smpte3: Cannot mknod: Operation not permitted

--------------------------- snip output --------------------------
Ignore the “Operation not permitted” messages when you untar. These are harmless.
Use virsh to launch container
Now we use the XML file that we transferred to /misc/app_host/scratch to launch our container.
libvirtd is the daemon running on IOS-XR to help launch LXC containers. The client for libvirtd (virsh) is made available in the XR linux shell to interact with the libvirtd daemon.
To perform the virsh client commands, you will need to be root. In order to properly source the right environment variables for the virsh commands to connect to the libvirtd daemon, use the “-i” flag with “sudo” when becoming root.
Become root:
xr-vm_node0_RP0_CPU0:~$ sudo -i
xr-vm_node0_RP0_CPU0:~$
The “vagrant” user is already a part of the sudoers group, so you won’t be asked for the sudo password. But when you create your own users, expect the password prompt to show up.
To list the current running containers:
xr-vm_node0_RP0_CPU0:~$ virsh list
 Id    Name                           State
----------------------------------------------------
 4922  sysadmin                       running
 12010 default-sdr--1                 running

xr-vm_node0_RP0_CPU0:~$
Now launch the container using virsh create and the XML file we transferred earlier:
xr-vm_node0_RP0_CPU0:~$ virsh create /misc/app_host/scratch/xr-lxc-app.xml
Domain xr-lxc-app created from /misc/app_host/scratch/xr-lxc-app.xml

xr-vm_node0_RP0_CPU0:~$
xr-vm_node0_RP0_CPU0:~$
xr-vm_node0_RP0_CPU0:~$ virsh list
 Id    Name                           State
----------------------------------------------------
 4922  sysadmin                       running
 7315  xr-lxc-app                     running
 12010 default-sdr--1                 running

xr-vm_node0_RP0_CPU0:~$
To get into the container, you have two options:
Our credentials for the container were:
Username: ubuntu Password: ubuntu
Use
virsh console:xr-vm_node0_RP0_CPU0:~$ virsh console xr-lxc-app Connected to domain xr-lxc-app Escape character is ^] init: Unable to create device: /dev/kmsg * Stopping Send an event to indicate plymouth is up [ OK ] * Starting Mount filesystems on boot [ OK ] * Starting Signal sysvinit that the rootfs is mounted [ OK ] * Starting Fix-up sensitive /proc filesystem entries [ OK ] -------------------------------- snip output --------------------------------- Ubuntu 14.04.4 LTS xr-lxc-app tty1 xr-lxc-app login: ubuntu Password: Last login: Thu Jun 16 19:23:10 UTC 2016 on lxc/console Welcome to Ubuntu 14.04.4 LTS (GNU/Linux 3.14.23-WR7.0.0.2_standard x86_64) * Documentation: https://help.ubuntu.com/ ubuntu@xr-lxc-app:~$ ubuntu@xr-lxc-app:~$ ubuntu@xr-lxc-app:~$To get out of the container console, issue Ctrl+]
Use SSH to get into the container:
We set the SSH port to 58822 earlier, we can use any of XR’s interface addresses to log in:
xr-vm_node0_RP0_CPU0:~$ ssh -p 58822 [email protected]
Warning: Permanently added '[11.1.1.10]:58822' (ECDSA) to the list of known hosts.
[email protected]'s password:
Welcome to Ubuntu 14.04.4 LTS (GNU/Linux 3.14.23-WR7.0.0.2_standard x86_64)

* Documentation:  https://help.ubuntu.com/
Last login: Fri Jun 17 16:42:13 2016
ubuntu@xr-lxc-app:~$
If you’d like to be able to access the container directly from your laptop, then make sure you
forward the intended port (in this case 58822) to your laptop (any port of your choice), in the Vagrantfile:node.vm.network "forwarded_port", guest: 58822, host: 58822With the above setting in the Vagrantfile, you can ssh to the container directly from your
laptop using:ssh -p 58822 vagrant@localhost
Perfect! Our container is up and running!
Test your app!
Now that we have our container up and running, let’s see how we run our app (iperf in our case).
Think of the LXC container as your own linux server on the router. Because we share the network namespace between the LXC and XR, all of XR's interfaces (Gig, Mgmt etc.) are available to bind to and run your applications.
We can see this by issuing an ifconfig inside the running container:
xr-vm_node0_RP0_CPU0:~$ssh -p 58822 [email protected]
Warning: Permanently added '[11.1.1.10]:58822' (ECDSA) to the list of known hosts.
[email protected]'s password:
Welcome to Ubuntu 14.04.4 LTS (GNU/Linux 3.14.23-WR7.0.0.2_standard x86_64)

 * Documentation:  https://help.ubuntu.com/
Last login: Fri Jun 17 16:42:13 2016
ubuntu@xr-lxc-app:~$
ubuntu@xr-lxc-app:~$
ubuntu@xr-lxc-app:~$
ubuntu@xr-lxc-app:~$ ifconfig
Gi0_0_0_0 Link encap:Ethernet  HWaddr 08:00:27:17:f9:a8
          inet addr:11.1.1.10  Mask:255.255.255.0
          inet6 addr: fe80::a00:27ff:fe17:f9a8/64 Scope:Link
          UP RUNNING NOARP MULTICAST  MTU:1514  Metric:1
          RX packets:0 errors:0 dropped:0 overruns:0 frame:0
          TX packets:1 errors:0 dropped:3 overruns:0 carrier:1
          collisions:0 txqueuelen:1000
          RX bytes:0 (0.0 B)  TX bytes:42 (42.0 B)

Mg0_RP0_CPU0_0 Link encap:Ethernet  HWaddr 08:00:27:13:ad:eb
          inet addr:10.0.2.15  Mask:255.255.255.0
          inet6 addr: fe80::a00:27ff:fe13:adeb/64 Scope:Link
          UP RUNNING NOARP MULTICAST  MTU:1514  Metric:1
          RX packets:89658 errors:0 dropped:0 overruns:0 frame:0
          TX packets:34130 errors:0 dropped:0 overruns:0 carrier:1
          collisions:0 txqueuelen:1000
          RX bytes:127933763 (127.9 MB)  TX bytes:2135907 (2.1 MB)

------------------------------- snip output -----------------------------------
Set the src-hint for Application traffic
By default, your XR Vagrant box is set up to talk to the internet using a default route through your management port.
If you want the router to use XR’s routing table and talk to other nodes in the topology, then you need to set the “tpa address” in XR’s configuration. This becomes the “src-hint” for all linux application traffic. The reason we use something like “loopback 0” is to make sure that the IP for any originating traffic for applications on the router is a reachable IP address across your topology.
AKSHSHAR-M-K0DS:lxc-app-topo-bootstrap akshshar$ vagrant port rtr | grep 22
    22 (guest) => 2223 (host)
 57722 (guest) => 2222 (host)
AKSHSHAR-M-K0DS:lxc-app-topo-bootstrap akshshar$
AKSHSHAR-M-K0DS:lxc-app-topo-bootstrap akshshar$
AKSHSHAR-M-K0DS:lxc-app-topo-bootstrap akshshar$ ssh -p 2223 vagrant@localhost
vagrant@localhost's password:


RP/0/RP0/CPU0:ios#
RP/0/RP0/CPU0:ios#conf t
Fri Jun 17 17:34:45.707 UTC
RP/0/RP0/CPU0:ios(config)#int loopback 0
RP/0/RP0/CPU0:ios(config-if)#ip address 1.1.1.1/32
RP/0/RP0/CPU0:ios(config-if)#exit
RP/0/RP0/CPU0:ios(config)#tpa address-family ipv4 update-source loopback 0
RP/0/RP0/CPU0:ios(config)#commit
Fri Jun 17 17:35:19.815 UTC
RP/0/RP0/CPU0:ios(config)#
RP/0/RP0/CPU0:ios(config)#exit
RP/0/RP0/CPU0:ios#
Let’s say we’ve set up the TPA address as shown above, you should see the following route in XR’s linux shell:
RP/0/RP0/CPU0:ios#bash
Fri Jun 17 17:39:37.771 UTC

[xr-vm_node0_RP0_CPU0:~]$
[xr-vm_node0_RP0_CPU0:~]$ip route
default dev fwdintf  scope link  src 1.1.1.1
10.0.2.0/24 dev Mg0_RP0_CPU0_0  proto kernel  scope link  src 10.0.2.15
[xr-vm_node0_RP0_CPU0:~]$
So all you’ve really done using the tpa address-family... config is to set src address for all application traffic to XR’s loopback0 address.
The advantage of this approach is that when you use larger topologies that may include routing protocols like OSPF,BGP or even static routes, all you have to do is make loopback0 reachable and the application will be able to communicate across the entire topology. Also, this significantly reduces the routing table size in the linux environment as you can see in the output above.
See if things work!
We’re going to use an iperf-server inside our container on XR and an iperf-client running on devbox. You could reverse the client-server setup if you want.
Start the iperf server inside the Container on XR:
xr-vm_node0_RP0_CPU0:~$ ssh -p 58822 [email protected]
[email protected]'s password:
Welcome to Ubuntu 14.04.4 LTS (GNU/Linux 3.14.23-WR7.0.0.2_standard x86_64)

 * Documentation:  https://help.ubuntu.com/
Last login: Fri Jun 17 18:09:50 2016 from 11.1.1.10
ubuntu@xr-lxc-app:~$
ubuntu@xr-lxc-app:~$ iperf -s -u
------------------------------------------------------------
Server listening on UDP port 5001
Receiving 1470 byte datagrams
UDP buffer size: 64.0 MByte (default)
------------------------------------------------------------
Keep the iperf server (started above) running, as you proceed to initiate the iperf client on the devbox.
Let’s make sure XR’s loopback0 is reachable from the devbox (since we’re not running routing protocols in this topology, this isn’t automatic):
AKSHSHAR-M-K0DS:lxc-app-topo-bootstrap akshshar$ vagrant ssh devbox
Welcome to Ubuntu 14.04.4 LTS (GNU/Linux 3.13.0-87-generic x86_64)

 * Documentation:  https://help.ubuntu.com/

---------------------------- snip output -------------------------------
vagrant@vagrant-ubuntu-trusty-64:~$
vagrant@vagrant-ubuntu-trusty-64:~$ sudo ip route add 1.1.1.1/32 via 11.1.1.10
vagrant@vagrant-ubuntu-trusty-64:~$
vagrant@vagrant-ubuntu-trusty-64:~$ ping 1.1.1.1
PING 1.1.1.1 (1.1.1.1) 56(84) bytes of data.
64 bytes from 1.1.1.1: icmp_seq=1 ttl=255 time=6.53 ms
64 bytes from 1.1.1.1: icmp_seq=2 ttl=255 time=1.77 ms
Install iperf on devbox and start the iperf client there (to point to XR loopback=1.1.1.1):
vagrant@vagrant-ubuntu-trusty-64:~$ sudo apt-get install iperf
Reading package lists... Done
Building dependency tree
Reading state information... Done
The following NEW packages will be installed:
  iperf
---------------------------- snip output -------------------------------
vagrant@vagrant-ubuntu-trusty-64:~$ iperf -u -c 1.1.1.1
------------------------------------------------------------
Client connecting to 1.1.1.1, UDP port 5001
Sending 1470 byte datagrams
UDP buffer size:  208 KByte (default)
------------------------------------------------------------
[  3] local 11.1.1.20 port 54284 connected with 1.1.1.1 port 5001
[ ID] Interval       Transfer     Bandwidth
[  3]  0.0-10.0 sec  1.25 MBytes  1.05 Mbits/sec
[  3] Sent 893 datagrams
[  3] Server Report:
[  3]  0.0-10.0 sec  1.25 MBytes  1.05 Mbits/sec   0.275 ms    0/  893 (0%)
vagrant@vagrant-ubuntu-trusty-64:~$
There you have it! iperf running inside an Ubuntu Container on IOS-XR. Too many steps to look up? In our next tutorial, we look at automating all of the steps needed to bring up a container using an Ansible Playbook: IOS-XR: Ansible based LXC deployment
Leave a Comment