
App Hosting with XR AppMgr and Docker (7.3.1+)
Introduction
Previous tutorials have discussed running docker containers within the Linux environment on IOS-XR. However, with the recent debut of the XR AppMgr in release 7.3.1, there are now expanded capabilities to activate and manage the lifecycle of third-party docker containers directly within the XR Control Plane. My goal by the end of the article is to familiarize you with the ins and outs of AppMgr so you can begin developing and deploying custom solutions that meet your unique network demands.
Before You Dive In
I highly recommend you look at some other resources on the IOS-XR application hosting architecture before you start, as I will be expanding upon some of these concepts throughout the article. Or if you are eager to get started, you can skip them and come back if you get confused.
Vagrant Setup: If you intend to follow along with this tutorial and do not have a physical router to test it on, look into using an IOS-XR Vagrant box
IOS-XR App Hosting Architecture:
XR AppMgr: As this is a very new technology, there are limited resources available that explain it in depth. If you have access to the Cisco Live! recordings, you can watch this presentation on demand (31:00-36:30), otherwise you will have to make do with just the slide deck (Slides 36-41). You can read the official documentation here.
XR Collector Health Monitor: Throughout the tutorial, I will be referencing this application as the sample for packaging, installation, and activation.
- GitHub
- Docker Hub
- xrdoc with more details
What Can I Do with Docker on IOS-XR?
In short, almost anything.
Thanks to the rich set of Model-Driven RPC-based APIs, docker containers hosted on IOS-XR have direct access to nearly all layers of IOS-XR. From high-level configuration management to direct programming of the RIB to a multitude of other applications, IOS-XR’s APIs supply third-party applications with the visibility and flexibility to innovate direct solutions to specific problems. One of the more famous examples of application hosting on IOS-XR is Open/R developed by Facebook. A fantastic blog detailing Open/R’s integration with IOS-XR can be found here. Of course, application hosting on IOS-XR is not limited to these use cases, and you should take every opportunity to explore xrdocs or tinker with custom containers yourself to determine how you might best leverage application hosting to meet your needs.
How Do I Get Started?
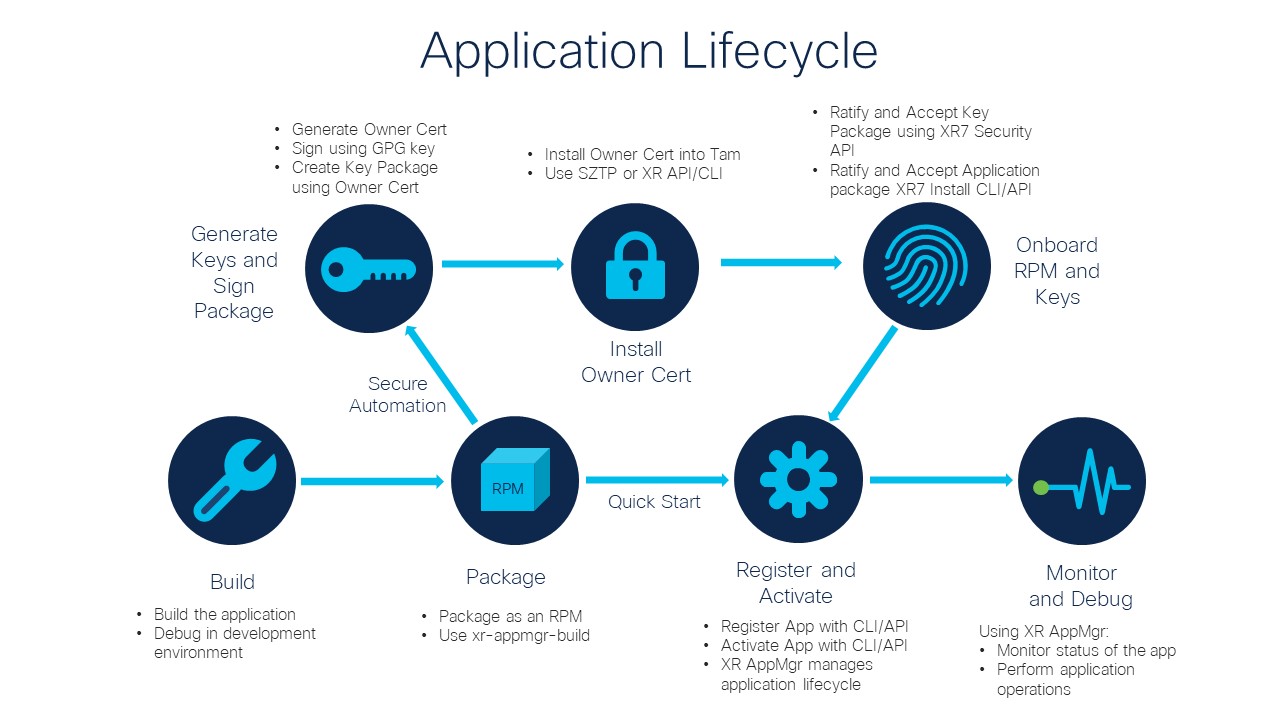
In my experience, the best way to learn a new technology is to follow an example. In this tutorial, I will walk through the process of packaging, installing, configuring, and activating the XR Collector Health Monitor, which is an app I developed to automate the configuration management of a telemetry stream. The details behind the design and function of the application are largely irrelevant for the purposes of this demonstration, but more details for the curious reader can be found here. We will be following the Quick Start workflow:
Docker Development Tips and Tricks
Designing your Docker Image for IOS-XR is specific to your solution, so I will not go into too much detail. However, there are a few things to know that can simplify development. It is important to have a strong grasp of the IOS-XR application hosting architecture. Your application must communicate with the box, so you need to understand the channels that make that communication possible. Check out the links on XR AppMgr and the IOS-XR App-Hosting Architecture. As you will see later, it can also be helpful to setup a CI/CD pipeline before you begin developing your application to quickly test the latest changes without having to go through the lengthy packaging and building process. For a sample workflow using GitHub Actions, you can check out the source code in the XR Collector Health Monitor repository here.
Packaging Your Docker Image as an RPM
Once you have built your Docker Image and want to test it directly on the router, it is time to package it as an RPM. If you have already set up CI/CD as mentioned in the previous section, this process is taken care of automatically for you. However, for the sake of demonstration and for your overall understanding, I will walk through the manual packaging process. We will be using another script to set up an environment similar to IOS-XR and build the RPM within that environment. You can start by cloning it from the xr-appmgr-build repository. After that step is complete, we will follow this workflow to assemble the package:
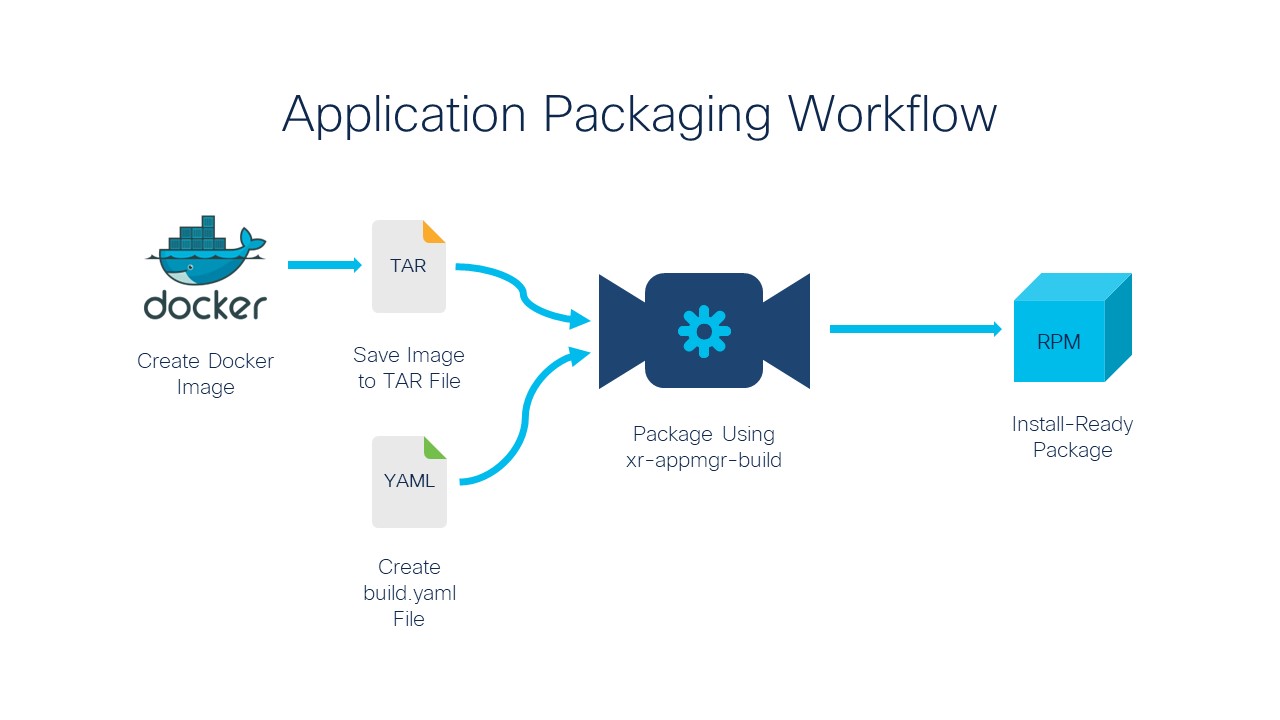
Create Docker Image
For the tutorial, I will be pulling my image for the XR Collector Health Monitor v1.3.2 from the Docker Hub. If you are working on your own application, you would most likely build it from scratch with a docker build command.
cisco@cocoa:~/adam/appmgr/xr-appmgr-build$ docker pull adhorton/xr-collector-health-monitor:1.3.2
1.3.2: Pulling from adhorton/xr-collector-health-monitor
ac2fb615420c: Pull complete
64d0f1d7987a: Pull complete
54c425cbf621: Pull complete
01eaa7c10346: Pull complete
a3e61f8fbfcd: Pull complete
113604aa28a4: Pull complete
c737badf4067: Pull complete
bfff7d1f3e6b: Pull complete
Digest: sha256:5dd4662087a07aba61585d74922f1ac0e632064c229f3d58c8d075d7cc72ee8d
Status: Downloaded newer image for adhorton/xr-collector-health-monitor:1.3.2
docker.io/adhorton/xr-collector-health-monitor:1.3.2
Save Image to TAR file
This can simply be done with a docker save command. I make a subdirectory within the cloned xr-appmgr-build before saving the image to a TAR.
cisco@cocoa:~/adam/appmgr/xr-appmgr-build$ mkdir monitor
cisco@cocoa:~/adam/appmgr/xr-appmgr-build$ cd monitor
cisco@cocoa:~/adam/appmgr/xr-appmgr-build/monitor$ docker save adhorton/xr-collector-health-monitor:1.3.2 > monitor-132.tar
Create build.yaml file
The build.yaml file specifies the name, version, release platform, and location of your application as well as some other important configuration settings. A better explanation of what belongs in the build.yaml file can be found in the xr-appmgr-build README. My sample build.yaml file looks like this:
packages:
- name: "xr-collector-health-monitor"
  release: "eXR_7.3.1"
  version: "1.3.2"
  sources:
    - name: xr-collector-health-monitor
      file: monitor/monitor-132.tar
Package with xr-appmgr-build
To package the application, simply run the appmgr_build script and provide the path to your build.yaml file with the -b option.
cisco@cocoa:~/adam/appmgr/xr-appmgr-build$ ./appmgr_build -b monitor/build.yaml
Starting to build package: xr-collector-health-monitor
Building docker image arhashem/xr-wrl7...
docker build docker -f docker/WRL7.Dockerfile -t arhashem/xr-wrl7
Sending build context to Docker daemon  6.656kB
Step 1/2 : FROM akshshar/xr-wrl7
 ---> a25bec9d92f6
Step 2/2 : COPY build_rpm.sh /usr/sbin/
 ---> Using cache
 ---> 5c71ebd92141
Successfully built 5c71ebd92141
Successfully tagged arhashem/xr-wrl7:latest
Adding sources...
 ---> xr-collector-health-monitor
Adding configs...
Adding data...
Creating source archive...
Generating spec file: xr-collector-health-monitor-1.3.2-eXR_7.3.1.spec
Building RPM...
/usr/sbin/build_rpm.sh --spec-file /usr/src/rpm/SPECS/xr-collector-health-monitor-1.3.2-eXR_7.3.1.spec --source-dir /usr/src/rpm/SOURCES --rpm-dir /usr/src/rpm/RPMS --output-dir /root/RPMS --verbose
+ [[ '' == '' ]]
+ log_file=/tmp/rpmbuild.log
+ [[ /usr/src/rpm/SPECS/xr-collector-health-monitor-1.3.2-eXR_7.3.1.spec == '' ]]
+ [[ /usr/src/rpm/SOURCES == '' ]]
+ [[ /usr/src/rpm/RPMS == '' ]]
+ [[ /root/RPMS == '' ]]
+ mkdir -p /root/RPMS
+ chown -Rf root:root /root/RPMS
+ chown -Rf root:root /usr/src/rpm/SOURCES/xr-collector-health-monitor-1.3.2-eXR_7.3.1.tar.gz
++ dirname /usr/src/rpm/SPECS/xr-collector-health-monitor-1.3.2-eXR_7.3.1.spec
+ chown -Rf root:root /usr/src/rpm/SPECS/xr-collector-health-monitor-1.3.2-eXR_7.3.1.spec
+ [[ '' != '' ]]
+ /usr/bin/rpmbuild --verbose -bb /usr/src/rpm/SPECS/xr-collector-health-monitor-1.3.2-eXR_7.3.1.spec
+ rpm_build_ec=0
+ [[ 0 -eq 0 ]]
+ echo 'RPM built successfully, copying over the RPMs directory to /root/RPMS'
+ [[ '' != '' ]]
RPM built successfully, copying over the RPMs directory to /root/RPMS
+ cp -r /usr/src/rpm/RPMS/noarch /usr/src/rpm/RPMS/x86_64 /root/RPMS
+ sync
+ ls -R /root/RPMS
/root/RPMS:
noarch
x86_64

/root/RPMS/noarch:

/root/RPMS/x86_64:
xr-collector-health-monitor-1.3.2-eXR_7.3.1.x86_64.rpm

Done building package xr-collector-health-monitor
NOTE: You must install have pyyaml installed to run the script. If the script fails with an import error, use pip install pyyaml.
Find Your RPM
Great! Your application has been packaged as an RPM and can be found in the RPMS/x86_64 directory.
cisco@cocoa:~/adam/appmgr/xr-appmgr-build$ cd RPMS/x86_64
cisco@cocoa:~/adam/appmgr/xr-appmgr-build/RPMS/x86_64$ ls
xr-collector-health-monitor-1.3.2-eXR_7.3.1.x86_64.rpm
Registering and Activating Your Application
In the previous step, we packaged a Docker Image as an RPM to be hosted on IOS-XR with XR AppMgr. For applications that will be setup securely or for automated deployment across multiple routers, investigate secure onboarding with CLI/API, SZTP, or using a GISO. This demonstration is exclusively about getting your application up and running as quickly as possible, so I will shortcut some of the best practices for security and automation in an effort to speed up the visibility of results.
Transfer RPM to the Router
Enter the Linux environment from IOS-XR on your router and use scp to transfer the RPM from your machine to the router. The /misc/app_host directory is the preferred location to store RPMs.
RP/0/RP0/CPU0:R1-MAcrocarpa#bash
Thu Jul 14 20:43:19.887 UTC
[R1-MAcrocarpa:~]$ cd /misc/app_host
[R1-MAcrocarpa:/misc/app_host]$ scp cisco@cocoa:/home/cisco/adam/appmgr/xr-appmgr-build/RPMS/x86_64/xr-collector-
health-monitor-1.3.2-eXR_7.3.1.x86_64.rpm /misc/app_host
cisco@cocoa’s password:
xr-collector-health-monitor-1.3.2-eXR_7.3.1.x86_64.rpm                                 100%   74MB  36.9MB/s   00:02
Install Package with XR AppMgr
Return to the IOS-XR CLI and install the package with AppMgr.
[R1-MAcrocarpa:/misc/app_host]$ exit
logout

RP/0/RP0/CPU0:R1-MAcrocarpa#appmgr package install rpm /misc/app_host/xr-collector-health-monitor-1.3.2-eXR_7.3.1.x86_64.rpm
Thu Jul 14 20:52:11.237 UTC
RP/0/RP0/CPU0:R1-MAcrocarpa#show appmgr packages installed
Thu Jul 14 20:54:03.996 UTC
Package
------------------------------------------------------------
xr-collector-health-monitor-1.3.2-eXR_7.3.1.x86_64
Additional Step for XR Collector Health Monitor
If you have been following this tutorial exactly, there are two more setup steps before you can run the XR Collector Health Monitor. If you are following this tutorial with your own application, feel free to skip this step. For those of you who are still reading, the XR Collector Health Monitor application requires gRPC to be enabled on the router and a config file to be mounted into the docker container be run properly. Let’s start by copying the sample config file from the GitHub repository into a new directory in the Linux environment.
RP/0/RP0/CPU0:R1-MAcrocarpa#bash
Thu Jul 14 21:05:31.597 UTC
[R1-MAcrocarpa:~]$ cd /misc/app_host
[[R1-MAcrocarpa:/misc/app_host]$ mkdir config
[R1-MAcrocarpa:/misc/app_host]$ cd config
[R1-MAcrocarpa:/misc/app_host/config]$ vim config.yaml

Copy, Paste, Edit Credentials, and Save contents of config.yaml

[R1-MAcrocarpa:/misc/app_host/config]$ cat config.yaml
# This is a sample config file for the automated telemetry configuration changing script
# It must be named config.yaml for the script to function
# It must conform to the schema defined in src/schema.json
# It will be mounted into the docker container at runtime
# It defines the characteristics of the router, the telemetry collector and its backups
---

### ROUTER CHARACTERISTICS ###
router:
  ip: "127.0.0.1"         # IP address of the router (Use 127.0.0.1 if running on local machine)
  port: 57777             # Port enabled for grpc communication
  username: "YOUR USERNAME"       # Username of router
  password: "YOUR PASSWORD"    # Password of router
  tls: false               # Encrypt configuration messages from xr-collector-health-monitor
                          # Must have grpc configured with tls and /misc/config/grpc/ems.pem copied into mounted config directory

### SENSOR GROUPS FOR TELEMETRY ###
sensor-groups:
  - sensor-group-id: "Sample-Sensor-Group-Name"                                                     # Name of a sensor group
    sensor-paths:
      - "Cisco-IOS-XR-pfi-im-cmd-oper:interfaces/interface-xr/interface"                            # List of sensor paths in sensor group
      - "Cisco-IOS-XR-infra-statsd-oper:infra-statistics/interfaces/interface/latest/data-rate"
  - sensor-group-id: "Sample-Sensor-Group-Name-2"                                                   # Name of a second sensor group
    sensor-paths:
      - Cisco-IOS-XR-nto-misc-oper:memory-summary/nodes/node/summary                                # Another list of sensor paths in the second sensor group

### SERIES OF COLLECTORS ###

# The script will automatically configure the router to send telemetry data to the
# the highest-priority active collector. The order of collectors in the list is
# the order of their priority

collectors:
  - destination-group:
      ip: "4.5.6.7"                       # IP address of the primary collector
      port: 57777                         # Port the primary collector is listening on
      destination-id: "First-Collector"   # Name of the primary collector
      encoding: "self-describing-gpb"     # Encoding for the primary collector
      protocol: "grpc"                    # Protocol for the primary collector
      tls: false                          # Do not encrypt telemetry data with tls
    subscription:
      subscription-id: "Subscription-1"   # Name of the subscription
      interval: 30000                     # Time interval to send the telemetry data

  - destination-group:
      ip: "7.6.5.4"                          # IP address of the secondary collector
      port: 57777                            # Port the secondary collector is listening on
      destination-id: "Second-Collector"     # Name of the secondary collector
      encoding: "self-describing-gpb"        # Encoding for the primary collector
      protocol: "grpc"                       # Protocol for the primary collector
      tls: true                              # Encrypt telemetry data with tls. CA Certificate must be copied into /misc/config/grpc/dialout/dialout.pem in advance
      tls-hostname: "hostname.com"           # Optional parameter to define the tls-hostname when tls is true
    subscription:
      subscription-id: "Subscription-2"      # Name of the subscription
      interval: 30000                        # Time interval to send the telemetry data

# Further backup collectors can be added if necessary
Enable gRPC on the port specified in the config.yaml file:
RP/0/RP0/CPU0:R1-MAcrocarpa#config
Thu Jul 14 21:15:51.207 UTC
RP/0/RP0/CPU0:R1-MAcrocarpa(config)#grpc
RP/0/RP0/CPU0:R1-MAcrocarpa(config-grpc)#port 57777
RP/0/RP0/CPU0:R1-MAcrocarpa(config-grpc)#no-tls
RP/0/RP0/CPU0:R1-MAcrocarpa(config-grpc)#commit
Thu Jul 14 21:19:26.335 UTC
RP/0/RP0/CPU0:R1-MAcrocarpa(config-grpc)#end
RP/0/RP0/CPU0:R1-MAcrocarpa#
Activate Your Application
Finally, it is time to activate your application and watch it run! Enter the config menu in the IOS-XR CLI and copy the activation command with your own information.
Activation Command:
RP/0/RP0/CPU0:R1-MAcrocarpa(config)#appmgr application <CONTAINER NAME> activate type docker source <NAME FROM BUILD.YAML> docker-run-opts “<YOUR DOCKER RUN OPTS>
Activating XR Collector Health Monitor:
RP/0/RP0/CPU0:R1-MAcrocarpa#config
Thu Jul 14 21:20:43.901 UTC
RP/0/RP0/CPU0:R1-MAcrocarpa(config)#appmgr application monitor activate type docker source xr-collector-health-monitor docker-run-opts “-v /misc/app_host/config:/config:ro --network host”
RP/0/RP0/CPU0:R1-MAcrocarpa(config)#commit
Thu Jul 14 21:21:42.322 UTC
RP/0/RP0/CPU0:R1-MAcrocarpa(config)#end
Verify Your Application is Running
If everything went to plan, your application is now running on the router! Let’s verify that it is running successfully, and I will share some other tips for using XR AppMgr.
RP/0/RP0/CPU0:R1-MAcrocarpa#show appmgr application-table
Thu Jul 14 21:58:11.251 UTC
Name   Type   Config State Status
------ ------ ------------ ----------------------------------------------------
monitor  Docker  Activated  Up 10 seconds
NOTE: If you tried running XR Collector Health Monitor and the container has EXITED, more than likely, it is an error with the config.yaml file or the gRPC configuration of your router, not with you packaging the RPM and configuring the application. You can check the container logs for more details.
Clean Up
Before we wrap up the tutorial, let’s stop the application, remove it, and uninstall the package. You can also enter the linux environment and remove the RPM from the /misc/app_host directory for extra cleanliness.
RP/0/RP0/CPU0:R1-MAcrocarpa#appmgr application stop name monitor
Fri Jul 15 14:44:34.778 UTC
RP/0/RP0/CPU0:R1-MAcrocarpa#config
Fri Jul 15 14:44:45.339 UTC
RP/0/RP0/CPU0:R1-MAcrocarpa(config)#appmgr
RP/0/RP0/CPU0:R1-MAcrocarpa(config-appmgr)#no application monitor
RP/0/RP0/CPU0:R1-MAcrocarpa(config-appmgr)#commit
Fri Jul 15 14:45:07.226 UTC
RP/0/RP0/CPU0:R1-MAcrocarpa(config-appmgr)#end
RP/0/RP0/CPU0:R1-MAcrocarpa#appmgr package uninstall package xr-collector-health-monitor-1.3.2-eXR_7.3.1.x86_64
Fri Jul 15 14:46:53.133 UTC
Additional Tips with XR AppMgr
The official documentation of XR AppMgr provides an easy-to-understand table detailing the available CLI commands with XR AppMgr.
Looking to use model-driven APIs with XR AppMgr? The associated YANG models are:
- Cisco-IOS-XR-appmgr-oper (For operational data)
- Cisco-IOS-XR-appmgr-cfg (For configuration settings)
- Cisco-IOS-XR-appmgr-act (To perform operations on applications)
Conclusion
Today we covered third-party application hosting on IOS-XR using Docker with the newly released XR AppMgr. We went over the packaging, installing, and activation of a Docker Image, as well as some features of XR AppMgr and common pitfalls. As you begin building your own Docker applications to run on IOS-XR, start with a small scope and increase complexity as you become more comfortable with the technologies. Good luck developing!
Leave a Comment