
@xrdocs Formatting Useful Tips
This Tutorial gives a quick walkthrough of some of the functionalities available with @xrdocs. While some of these tips may be hidden/less-known Markdown techniques, most of them showcase custom css classes that have been provided with @xrdocs to give you a true editor experience while still using Markdown.
Link to other posts
Include and use the “base_path” variable so that you only have to use relative URLs for other posts (tutorials/blogs/tech-docs) on the same website. Referencing the link is then similar to any Markdown link of the form:
[link title/context](complete link)
For example:
Link back to the xrdocs Tutorial: @xrdocs How-To
{% include base_path %}
Link back to the xrdocs Tutorial: [@xrdocs How-To]({{ base_path }}/helpdocs/xrdocs-how-to)
How to hide your posts from indexing temporarily
Quite often you’d like to be able to publish your blog/tutorial to the website but not have it be indexed or tweeted automatically till you’re ready.
This is pretty simple to enable.
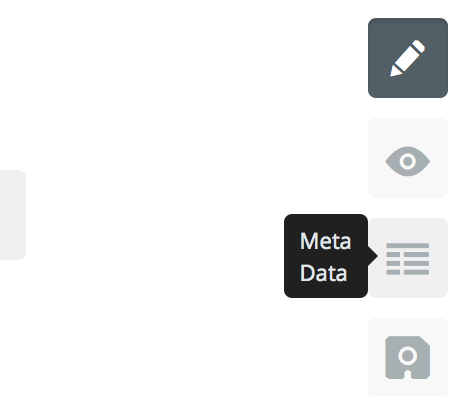
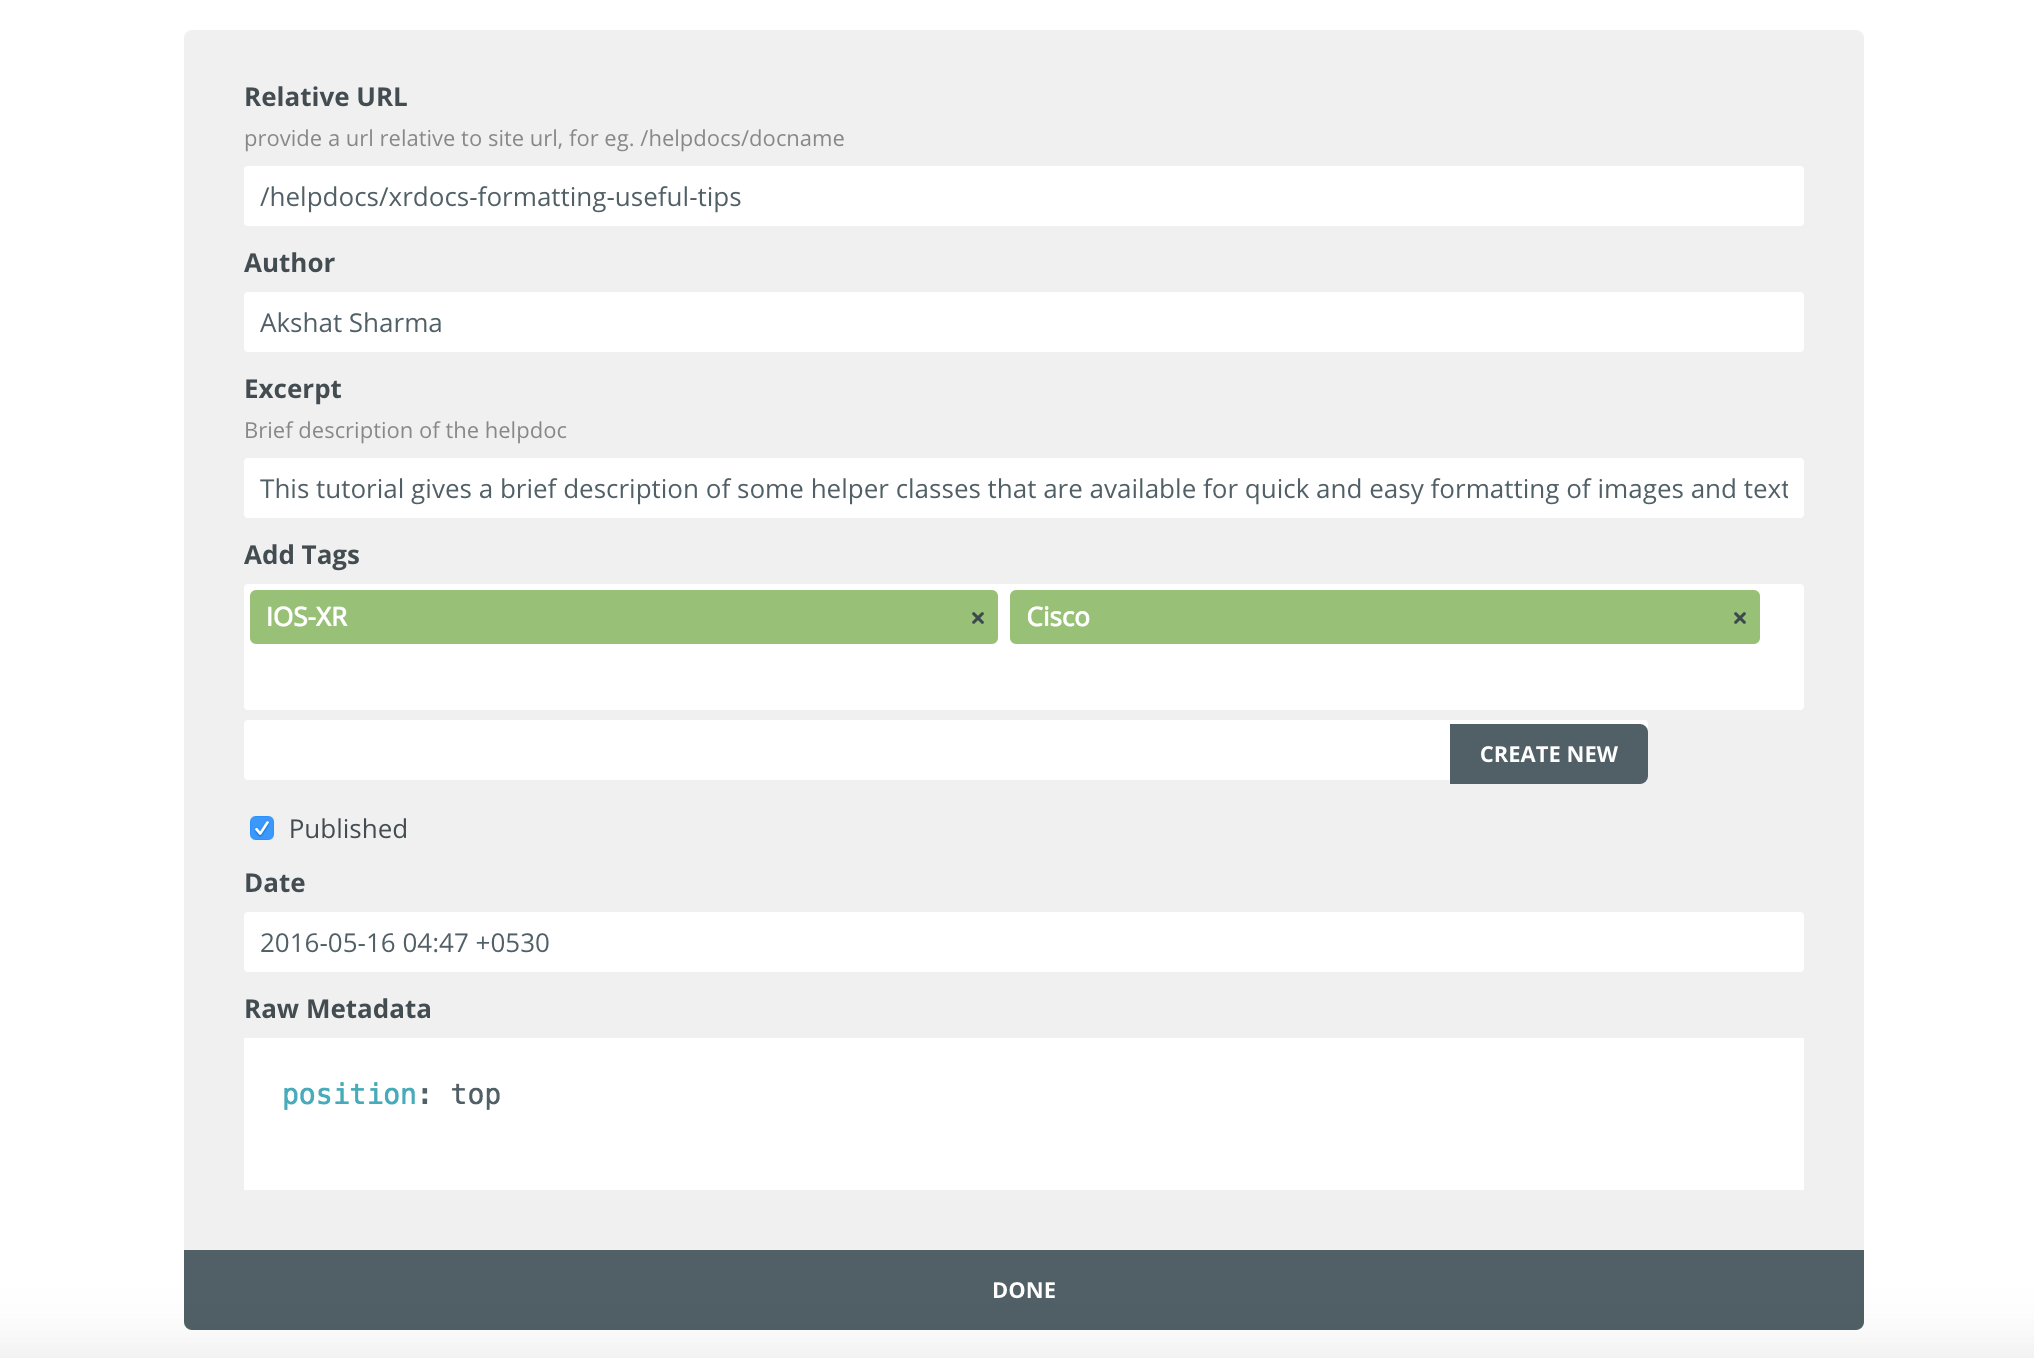
Hit the metadata button on the right hand side as shown below:
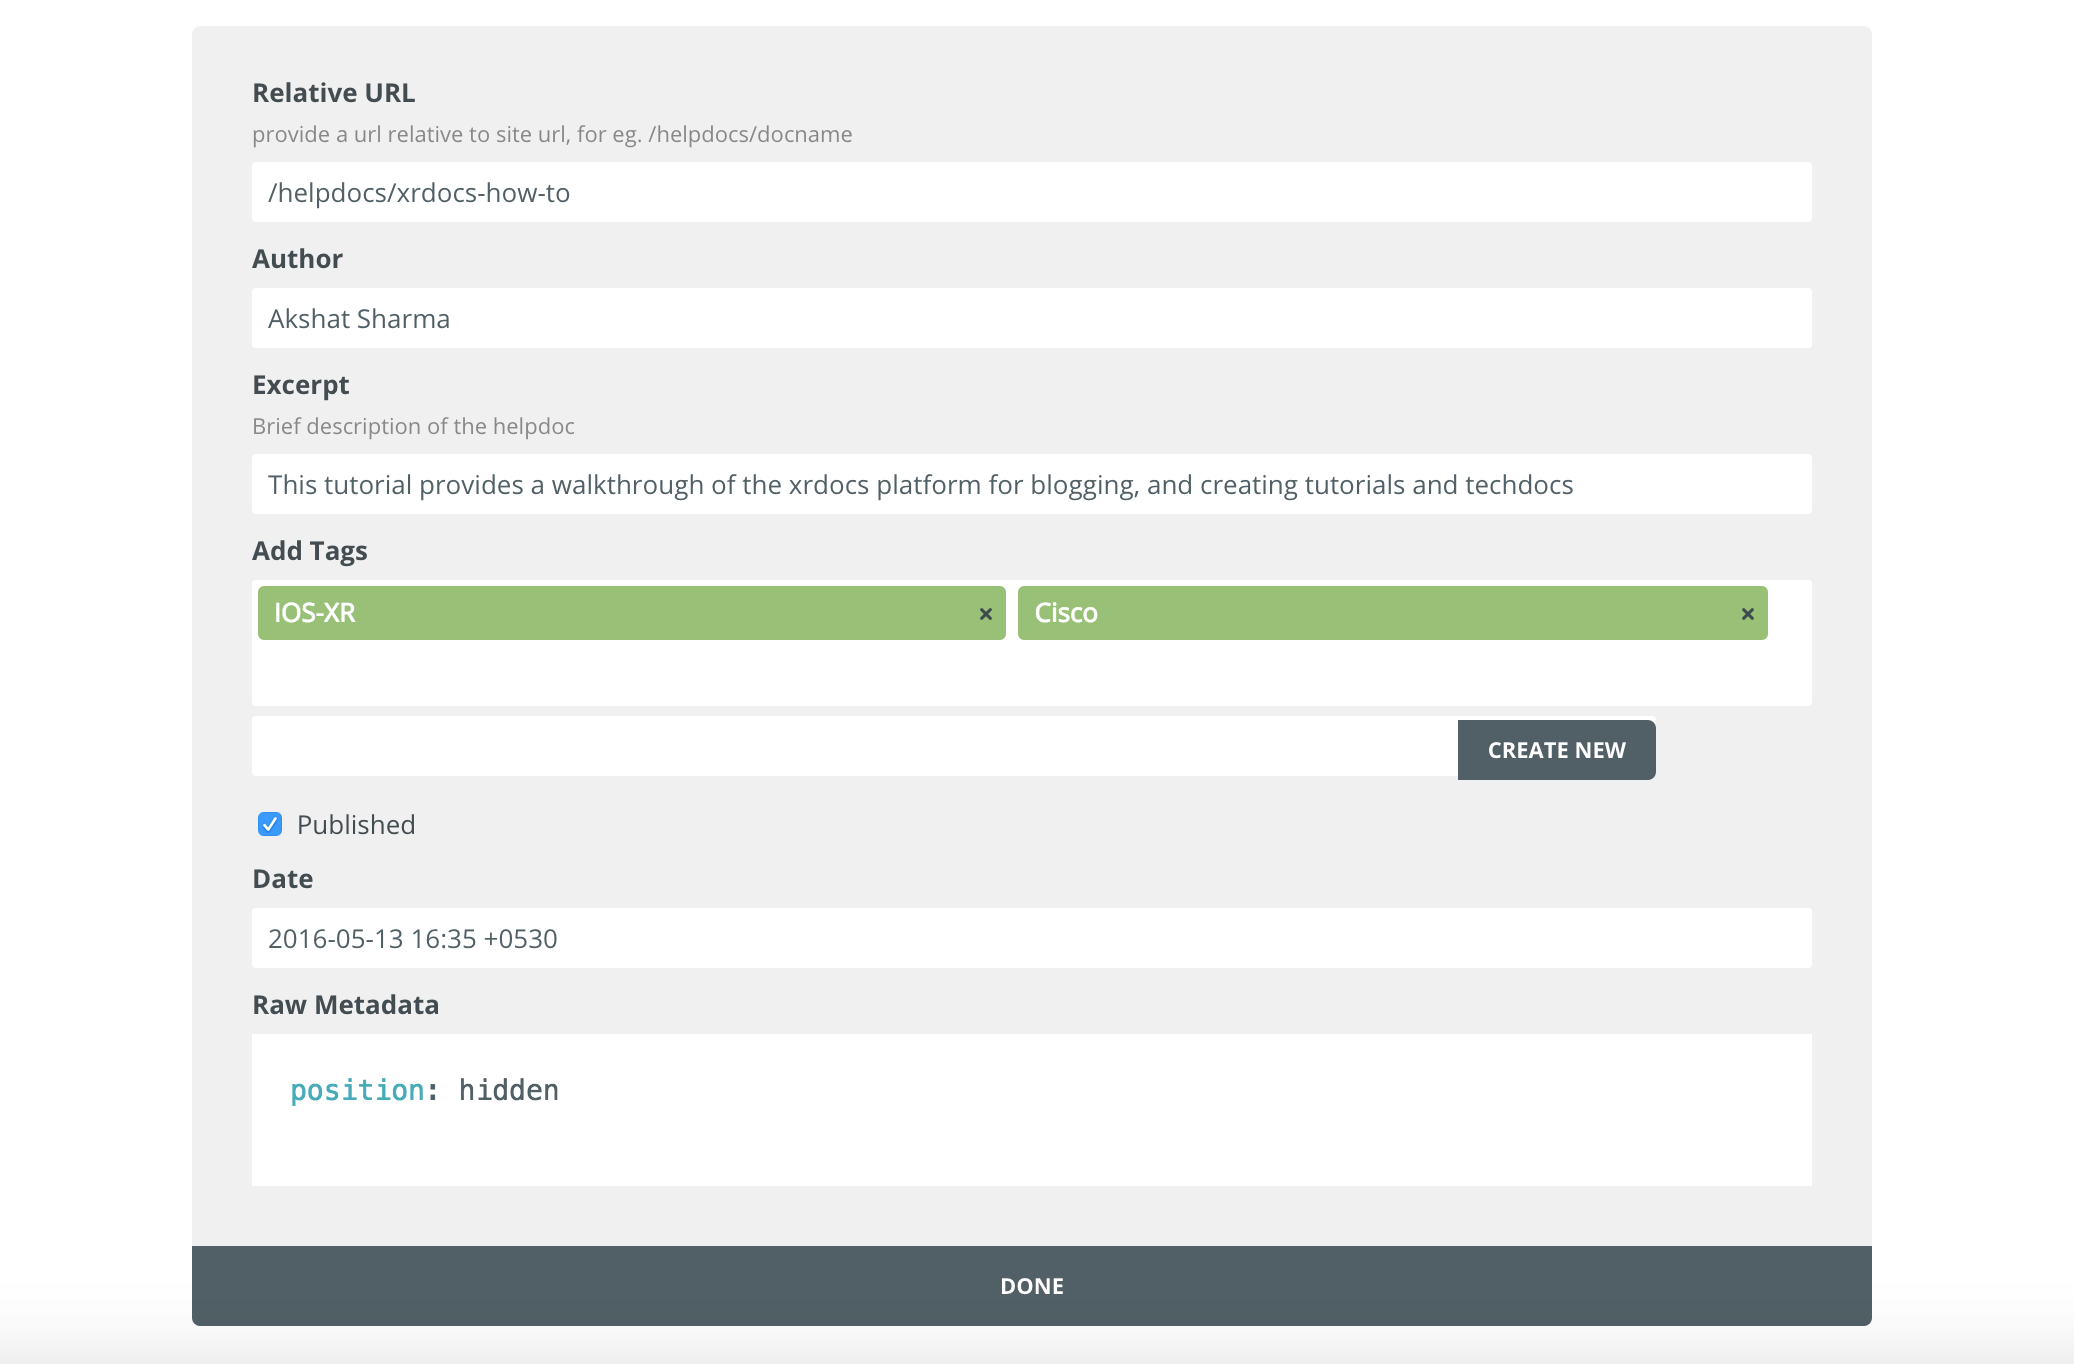
When the metadata fields open up, enter position: hidden into the raw metadata field as shown below:
Now save/commit the blog. It will only be visible if you have the link to it. How do you get the link?
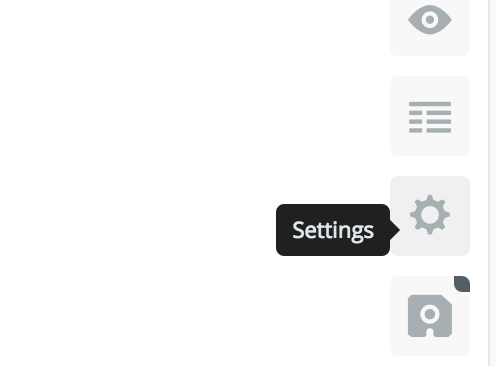
Hit the settings button on the right hand side as shown:
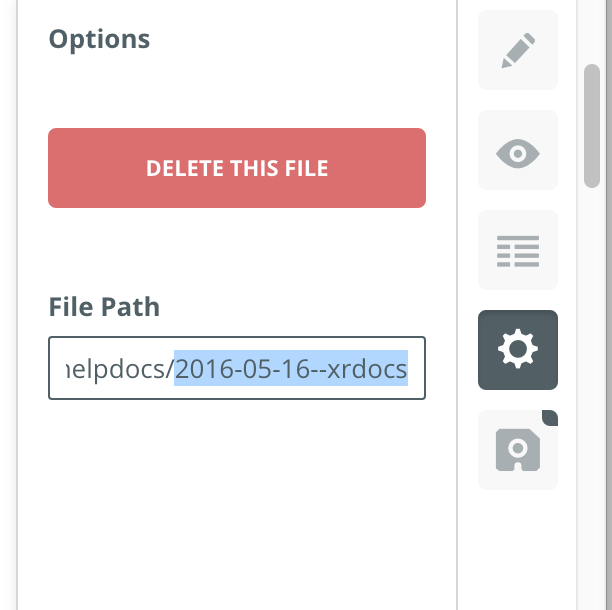
Copy the filename that shows up under the directory you’re posting under (remove the .md at the end) and append to the link where you expect the blog/tutorial to show up.
So, if the blog needs to appear under https://xrdocs.github.io/telemetry/blogs/ and filename as determined above is 2016-07-23-my-new-blog.md then the link to the blog will be:
https://xrdocs.github.io/telemetry/blogs/2016-07-23-my-new-blog/
How do you go live after hiding it?
Going live is simple. Hit the metadata button again and replace position: hidden with position: top as shown below:
Save and Commit. You’re live! and will tweeted out on https://twitter.com/xrdocs in upto an hour.
Add new lines (carriage return)
This is sort of a known secret with markdown. Markdown just outputs text directly on the next line as you hit enter. If you want to add more carriage returns to your text, then add 2+ spaces at the end of a line and hit enter.
Like this.
This is sort of a known secret with markdown. Markdown just outputs text directly on the next
line as you hit enter. If you want to add more carriage returns to your text, then add 2+ spaces
at the end of a line and hit enter.
<2 spaces here >
Like this.
Formatting inside a code block!
Sometimes you might want to highlight text inside a code block or to show it in a bold font. By default, markdown doesn’t support it. But, here is a technique that can be used and it delivers great results:
Instead of using:
```
Your code here
```
Use this exact set up:
<div class="highlighter-rouge">
<pre class="highlight">
<code>

Your code here

</code>
</pre>
</div>
The advantage?
I could now easily use the <b> (bold) tag or <mark> (highlight) tag or the <span> (custom color highlight) tag from html to make my code content stand out.
For example, if I use:
<div class="highlighter-rouge">
<pre class="highlight">
<code>
function filesize
{
    local file=$1
    <mark>size=`stat -c %s $file 2>/dev/null` # linux</mark>
    if [[ $? -eq 0 ]]; then
        echo $size
        return 0
    fi

    <b>eval $(stat -s $file) # macos </b>
    if [[ $? -eq 0 ]]; then
        echo $st_size
        return 0
    fi

    <span style="background-color: #FDD7E4">echo 0</span>
    return -1
}
</code>
</pre>
</div>
Then the result is:
function filesize
{
    local file=$1
    size=`stat -c %s $file 2>/dev/null` # linux
    if [[ $? -eq 0 ]]; then
        echo $size
        return 0
    fi

    eval $(stat -s $file) # macos
    if [[ $? -eq 0 ]]; then
        echo $st_size
        return 0
    fi

    echo 0
    return -1
}
P.S. You can get the color code for your favorite highlight color from here: Color Codes
Text Alignment
Align text blocks with the following classes.
Left aligned text .text-left
Left aligned text
{: .text-left}
Center aligned text. .text-center
Center aligned text.
{: .text-center}
Right aligned text. .text-right
Right aligned text.
{: .text-right}
Justified text. .text-justify Lorem ipsum dolor sit amet, consectetur adipiscing elit. Pellentesque vel eleifend odio, eu elementum purus. In hac habitasse platea dictumst. Fusce sed sapien eleifend, sollicitudin neque non, faucibus est. Proin tempus nisi eu arcu facilisis, eget venenatis eros consequat.”
Justified text..text-justify Lorem ipsum dolor sit amet, consectetur adipiscing elit. Pellentesque vel eleifend odio, eu elementum purus. In hac habitasse platea dictumst. Fusce sed sapien eleifend, sollicitudin neque non, faucibus est. Proin tempus nisi eu arcu facilisis, eget venenatis eros consequat.”
{: .text-justify}
No wrap text. Lorem ipsum dolor sit amet, consectetur adipiscing elit. Pellentesque vel eleifend odio, eu elementum purus. In hac habitasse platea dictumst. Fusce sed sapien eleifend, sollicitudin neque non, faucibus est. Proin tempus nisi eu arcu facilisis, eget venenatis eros consequat.”.text-nowrap
No wrap text. Lorem ipsum dolor sit amet, consectetur adipiscing elit. Pellentesque vel eleifend odio, eu elementum purus. In hac habitasse platea dictumst. Fusce sed sapien eleifend, sollicitudin neque non, faucibus est. Proin tempus nisi eu arcu facilisis, eget venenatis eros consequat.
{: .text-nowrap}
Image Alignment
Position images with the following classes.

The image above happens to be centered.
{: .align-center}
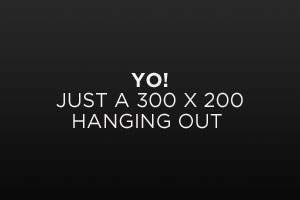
 The rest of this paragraph is filler for the sake of seeing the text wrap around the 150×150 image, which is left aligned. There should be plenty of room above, below, and to the right of the image. Just look at him there — Hey guy! Way to rock that left side. I don’t care what the right aligned image says, you look great. Don’t let anyone else tell you differently.
{: .align-left}
And now we’re going to shift things to the right align. Again, there should be plenty of room above, below, and to the left of the image. Just look at him there — Hey guy! Way to rock that right side. I don’t care what the left aligned image says, you look great. Don’t let anyone else tell you differently.
{: .align-right}

The image above should extend outside of the parent container on right.

{: .full}
Resizing an image
For best experience, it’s preferrable to have fixed image size and resize it offline. You can use Preview on MAC, or Paint on Windows. You can check target image size opening it with your local web browser.
It’s also possible to use Markdown to resize an image. You need to add {:height="60%" width="60%"} after the image reference.
For example:
{: .align-center}{:height="60%" width="60%"}
Adding the Table
Adding new table in Markdown is not straightforward. Simple way to create a new one by using external service, such as tablesgenerator.com.
Buttons
Make any link standout more when applying the .btn class.
This is a success button: Text
This is a success button: [Text](#link){: .btn .btn--success}
| Button Type | Example | Class | Kramdown |
|---|---|---|---|
| Default | Text | .btn | [Text](#link){: .btn} |
| Success | Text | .btn .btn--success | [Text](#link){: .btn .btn--success} |
| Warning | Text | .btn .btn--warning | [Text](#link){: .btn .btn--warning} |
| Danger | Text | .btn .btn--danger | [Text](#link){: .btn .btn--danger} |
| Info | Text | .btn .btn--info | [Text](#link){: .btn .btn--info} |
| Inverse | Text | .btn .btn--inverse | [Text](#link){: .btn .btn--inverse} |
| Light Outline | Text | .btn .btn--light-outline | [Text](#link){: .btn .btn--light-outline} |
| Button Size | Example | Class | Kramdown |
|---|---|---|---|
| X-Large | X-Large Button | .btn .btn--x-large | [Text](#link){: .btn .btn--x-large} |
| Large | Large Button | .btn .btn--large | [Text](#link){: .btn .btn--large} |
| Default | Default Button | .btn | [Text](#link){: .btn} |
| Small | Small Button | .btn .btn--small | [Text](#link){: .btn .btn--small} |
Notices
Call attention to a block of text.
| Notice Type | Class |
|---|---|
| Default | .notice |
| Primary | .notice--primary |
| Info | .notice--info |
| Warning | .notice--warning |
| Success | .notice--success |
| Danger | .notice--danger |
Watch out! This paragraph of text has been emphasized with the {: .notice} class.
**Watch out!** This paragraph of text has been emphasized with the `{: .notice}` class.
{: .notice}
Watch out! This paragraph of text has been emphasized with the {: .notice--primary} class.
**Watch out!** This paragraph of text has been emphasized with the `{: .notice--primary}` class.
{: .notice--primary}
Watch out! This paragraph of text has been emphasized with the {: .notice--info} class.
**Watch out!** This paragraph of text has been emphasized with the `{: .notice--info}` class.
{: .notice--info}
Watch out! This paragraph of text has been emphasized with the {: .notice--warning} class.
**Watch out!** This paragraph of text has been emphasized with the `{: .notice--warning}` class.
{: .notice--warning}
Watch out! This paragraph of text has been emphasized with the {: .notice--success} class.
**Watch out!** This paragraph of text has been emphasized with the `{: .notice--success}` class.
{: .notice--success}
Watch out! This paragraph of text has been emphasized with the {: .notice--danger} class.
**Watch out!** This paragraph of text has been emphasized with the `{: .notice--danger}` class.
{: .notice--danger}
Use block quotes “>” to add lists to your “notices”
You can also add the
.noticeclass to a<div>element,but we won’t get into that.
- Bullet point 1
- Bullet point 2
>
Use block quotes ">" to add lists to your "notices"
>
You can also add the `.notice` class to a `<div>` element, but we won't get into that.
>
* Bullet point 1
* Bullet point 2
{: .notice}
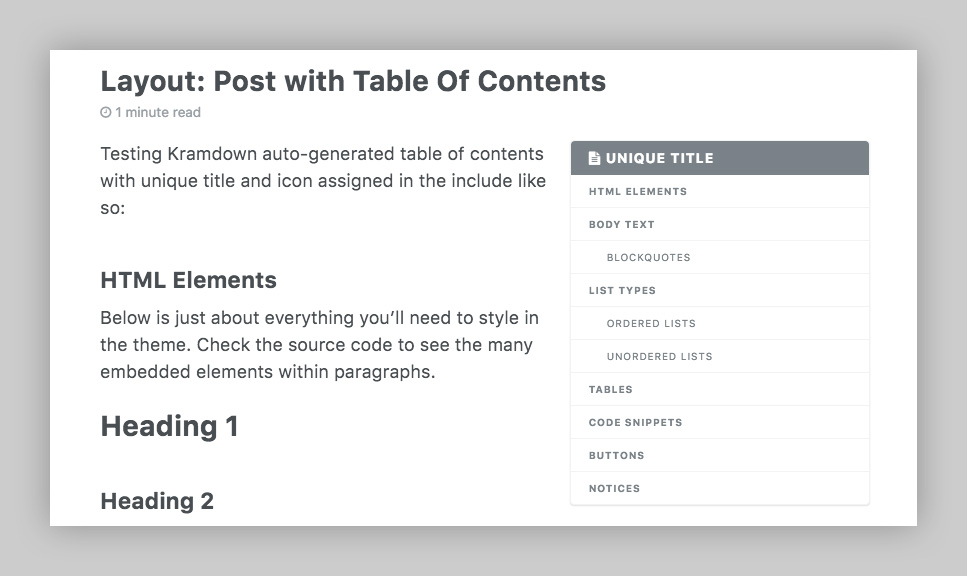
Adding a Table of Contents to a page
To include an auto-generated table of contents for posts and pages, add the following helper before any actual content in your post or page.
{% include toc %}
| Parameter | Required | Description | Default |
|---|---|---|---|
| title | Optional | Table of contents title. | toc_label in UI Text data file. |
| icon | Optional | Table of contents icon (shows before the title). | Font Awesome file-text icon. Any other FA icon can be used instead. |
TOC example with custom title and icon
{% include toc icon="table" title="My Table of Contents" %}
Leave a Comment